Looking for WordPress on Docker setup that offers multi-level caching and multiple websites (including non-WordPress) with automatic LetsEncrypt certificates? This step-by-step Docker WordPress tutorial will show you how to achieve this on a Ubuntu VPS.
I have been a big proponent of Docker for Home server apps. My Docker Traefik guide for and GitHub repo have received hundreds of thousands of visits over the last two years.
Even though I have been using docker for over two years, I have hesitated to move this WordPress site to Docker. There are multiple reasons for it, the primary reason being security.
Over the last several months, I have worked very hard to improve the security of my Docker stack. Review my docker security best practices guide for details on what I have implemented so far.
With the security part addressed, I felt confident moving to WordPress on Docker. Since August 22nd, 2020 this site has been running successfully on Docker. This step-by-step Docker WordPress tutorial details how to accomplish this.
Table of Contents
- Why Run WordPress on Docker?
- WordPress with Docker - Setup Description
- WordPress on Docker
- Docker WordPress Security
- Caching for WordPress Docker
- WordPress with Docker - Final Remarks
Why Run WordPress on Docker?
I started this website in 2010 with a LAMP stack on Ubuntu Server. In 2014, I transitioned to a LEMP stack for the speed that Nginx offered.
This LEMP stack on Digitial Ocean VPS, worked successfully for me for nearly 6 years. [Read: Digital Ocean vs Synthesis – 10 reasons why I chose Digital Ocean VPS]
Then, why did I choose to move to WordPress on Docker?
- Simplicity: Since the beginning of my Docker journey in 2018, I became fascinated by the simplicity of Docker and Docker Compose. I was amazed at how in seconds I could create and destroy apps at will with little to no impact on the host system.
- Conveniance and Portability: The ease of adding any needed app and the portability increased significantly with Docker compose. Once I had my Docker Compose finalized I could literally create a brand new VPS droplet, install Docker, copy over my files, start the docker-compose stack, and boom. I was in business in less than 30 minutes.
- Speed: My admin dashboard was noticeably faster on WordPress Docker stack than on LEMP stack. For the visitors, I am not sure if this made a big difference as I have always had Ezoic Site Speed+ (which is Amazing by way) on top.
- Caching: Adding apps for caching such as Redis is so much easier with Docker.
- Security: With Docker I could protect key WordPress pages/locations with multifactor authentication (Google OAuth or Authelia), easily.
- Leaner WordPress: Too many plugins slow down WordPress. With my move to Docker, I cut the number of plugins by 20%. Here are some of the plugins I used to use before but don't anymore: WP-Cerber, AntiSpam by CleanTalk, Async Javascript, Autoptimize, and Nginx Helper. My current security and caching mechanism are described in detail below.
- Scalability and Load Balancing: As your site grows, it is easy to scale up or even take the route of Docker Swarm to leverage load balancing.
This step-by-step docker WordPress guide will show you how to achieve all of the above and more. So read on.
WordPress with Docker - Setup Description
Next, let me briefly describe the Docker WordPress setup we are going to achieve using this guide.
1. WordPress Setup
There is an official WordPress image for Docker. This image has a built-in webserver (Apache) and PHP. There is also a WordPress Docker-Compose example that you can use. All that is needed is a database server (MariaDB).
I will NOT be using the official WordPress Docker image. Here are the key reasons for it:
- I prefer Nginx for speed over Apache. Plus, I already have Nginx configuration files from my previous LEMP setup I can re-use. Don't worry, I will share them in this guide for you to use.
- Nginx offers FastCGI page-level cache, which is amazingly fast and removes the need for WordPress caching plugins such as WP-Super Cache.
- I wanted to run multiple websites, including non-WordPress sites. This may be possible with the official WordPress image (I do not know) but I am familiar and prefer the Nginx way.
2. Webserver Setup
The consequence of not using the official WordPress Docker image is that I had to set up the webserver (Nginx + PHP) from scratch. But that is a breeze with Docker. So I went the Docker WordPress Nginx route.
We are going to use:
- Nginx - Version 1.18 (at the time of writing this guide) as web server
- PHP-FPM - A leaner custom-built PHP-FPM image based on version 7.4. I will explain how to do this using a Dockerfile.
3. WordPress Caching
Caching strategy is a key decision for any WordPress site for speed and performance. There are typically 4 levels of caching recommended for WordPress. Here is a description of how we will set up caching for WordPress with Docker:
- Browser Caching: This is what tells the visitors browser to cache the files locally to speed up future site/page visits. We will set this up using Nginx. On Apache, this is accomplished using .htaccess files.
- Server Caching: This caches static versions of pages (Page cache). We are going to accomplish this using Nginx FastCGI cache.
- Frontend Caching: This means caching WordPress PHP files so they don't have to be re-compiled for every visit. We are going to set this up using PHP OpCache.
- Database Caching: This optimizes database queries by storing them in the RAM for faster delivery. We are going to use Redis for this.
As mentioned before, I have Cloudflare and Ezoic Site Speed+ that serve cached and optimized content to visitors. But even without those, the above caching strategy should deliver excellent speeds.
If you do not have Ezoic Site Speed+, I would recommend two WordPress plugins: Autoptimize and Async Javascript.
4. Traefik Reverse Proxy
We are going to have all the websites and apps behind Traefik Reverse proxy. Traefik will automatically fetch LetsEncrypt SSL certificates for all web interfaces.
Be the 1 in 200,000. Help us sustain what we do.You will gain benefits such as Deployarr access, discord roles, exclusive content, ad-free browsing, and more.🔥 Holiday Sale! 25% Off Platinum Membership$399.99$299.99 (ends December 31).Join the Geek Army (starting from just $1.67/month)
WordPress on Docker
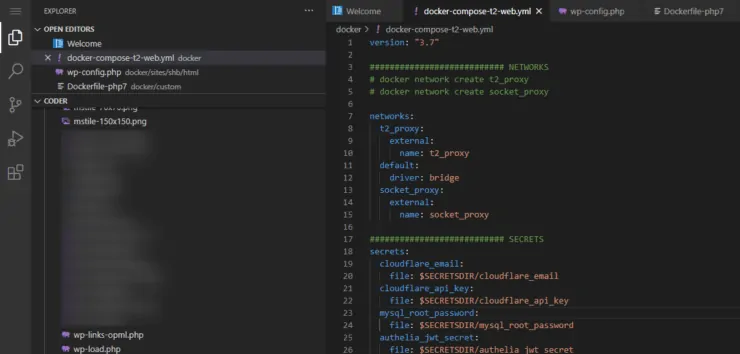
Ok, with all the basic information explained let us move on to setting up WordPress using Docker. We will use Docker Compose for simplicity. You can always check my GitHub Repo for my current setup (docker-compose-t2-web.yml).
One recommendation I have for production environments or busy sites is to use specific version tags for Docker images instead of "latest": eg. nginx:1.18 instead of nginx:latest. This ensures reliability and avoids unexpected failures due to breaking changes.
Folder Structure
If you have followed my previous docker guides, then you should be familiar with my folder structure.
I use a Docker root folder, which houses the docker-compose file and all relevant folders for services.
So for this Docker WordPress setup, I have the following under the Docker root folder ($DOCKERDIR):
- docker-compose.yml - Or, docker-compose-t2-web.yml if you are following my GitHub repo.
- .env - Environmental variables file.
- traefik2 - Traefik config folder.
- custom - Folder for custom Dockerfiles (explained later).
- mariadb - MariaDB config and databases.
- nginx - Nginx web server config files.
- php - I have php7 as a separate folder inside the folder php to allow for any future version of PHP to be in the same folder for better organization.
- redis - For Redis cache.
- secrets - for Docker secrets.
- authelia - for Authelia configuration files.
- sites - to store files for websites in their respective sub-folders.
In addition, I have folders for other apps (eg. Portainer). But these are not required for the purposes of this guide.
Traefik Setup
Setting Traefik is exactly the same as what is described in my Docker Traefik guide. I am not going to cover that here to keep things lean.
But briefly, her is what you should do:
- Read up Traefik Basic Information
- Complete prep work for Traefik
- Complete Traefik Docker Compose file
- Test Traefik and Traefik Dashboard
- Check LetsEncrypt SSL Certificates
We will cover the security part later in this guide. Once you have Traefik and Traefik Dashboard with proper SSL certificates return back to this Docker WordPress tutorial and continue.
Visual Studio Code Server Setup
This is optional and you can always use commandline text editors for editing your files. But as we go through the guide, it will be easier to have a visual text editor handy.
For this purpose, I use and recommend Visual Studio code. Add the following docker-compose snippet to your compose file:
  # VSCode - VSCode Editing
  vscode:
    image: codercom/code-server:latest
    container_name: vscode
    restart: unless-stopped
    networks:
      - t2_proxy
    volumes:
      - $DOCKERDIR:/home/coder/docker
      - $DOCKERDIR/vscode:/home/coder
    environment:
      PASSWORD: $VSCODE_PASSWORD
      # Run as root first time (user: 0), then stop container, then change permissions to user:docker and 775. Disable run as root below.
      user: $PUID:$PGID
      # user: "0"
    labels:
      - "traefik.enable=true"
      ## HTTP Routers
      - "traefik.http.routers.vscode-rtr.entrypoints=https"
      - "traefik.http.routers.vscode-rtr.rule=Host(`code.$DOMAINNAME_SHB`)"
      ## Middlewares
      - "traefik.http.routers.vscode-rtr.middlewares=chain-oauth@file"
      ## HTTP Services
      - "traefik.http.routers.vscode-rtr.service=vscode-svc"
      - "traefik.http.services.vscode-svc.loadbalancer.server.port=8080"
Here are some notes on the docker-compose snippet:
- I am using the latest version of VS Code by codercom. Other images may require a different setup process.
- I am mounting the docker root folder on /home/coder/docker. So all my docker files and app files will be available for editing through that folder.
- As noted in the comment, first time start the container with user: "0" enabled and user: $PUID:$PGID disabled. After first start, stop the VS Code container and change ownership and permissions of $DOCKERDIR/vscode folder to user:docker and 775, respectively.
- $DOCKERDIR, $PUID, and $PGID must be defined using Docker environmental variables.
Save the compose file and start the container. Check the logs for any error.
If successful, you should have a very nice visual text editor available at code.domain.com.
MariaDB Setup
Next, let us get the database server up and running. Below is the docker-compose snippet for MariaDB:
  # MariaDB - MySQL Database
  mariadb:
    container_name: mariadb
    image: linuxserver/mariadb:110.4.14mariabionic-ls77
    restart: always
    networks:
      t2_proxy:
        ipv4_address: 192.168.90.250
    security_opt:
      - no-new-privileges:true
    volumes:
      - $DOCKERDIR/mariadb/data:/config
      - /etc/timezone:/etc/timezone:ro
      - /etc/localtime:/etc/localtime:ro
    environment:
      - PUID=$PUID
      - PGID=$PGID
      - MYSQL_ROOT_PASSWORD_FILE=/run/secrets/mysql_root_password # Not taking this pw during initialization
    secrets:
      - mysql_root_password
Here are some notes on the MariaDB docker-compose snippet:
- I am using the tag mariadb:110.4.14mariabionic-ls77 for my MariaDB docker image from LinuxServer. You can use the currently available tag. Alternatively, check my GitHub repo for the latest tag that I have tested and implemented.
- I am giving a static IP of 192.168.90.250 to MariaDB container. This will depend on how you defined your network during the Traefik Prep Work.
- All databases and MariaDB configs will be stored in $DOCKERDIR/mariadb/data.
- Root password (mysql_root_password) must be set using Docker secret .
- You may create a custom.cnf file inside mariadb/data folder in Docker root to customize MariaDB settings as needed.
1. Confirm MariaDB Root Login
After starting the container for the first time, you will have to access it through the commandline and login once as root user. To do this, first access the container using:
sudo docker exec -ti mariadb /bin/bash
Alternatively, you can use dexec mariadb /bin/bash if have setup bash aliases like I have.
Then run the following command:
mysqladmin -u root password MYSQL_ROOT_PASSWORD
Replace MYSQL_ROOT_PASSWORD with the root password you set in your docker-compose snippet.
After first login, you can use quit and exit to return back to your host commandline.
2. Create/Restore WordPress MariaDB Database
At this point, we do not have a GUI database management app such as phpMyAdmin or Adminer. So we will have to create/restore the database using MySQL commands.
After confirming root login, log in to MariaDB server using the following two commands:
sudo docker exec -ti mariadb /bin/bash
mysql -u root -p
Enter the MariaDB root password to reach the MariaDB prompt.
3. Create a New Database for WordPress
To create a database for WordPress, use the following commands:
create database wordpress_db;
create user 'wordpress_db_user' identified by 'wordpress_db_password';
grant all on `wordpress_db%`.* to 'wordpress_db_user';
Remember to customize all occurrences of wordpress_db (a name for WordPress database), wordpress_db_user (a WordPress database username), and wordpress_db_password (a strong password for WordPress database user) in the above three lines.
If you are moving an existing site to WordPress on Docker, then you may reuse the existing database name, username, and password.
If successful, the output should look something like what is shown below:
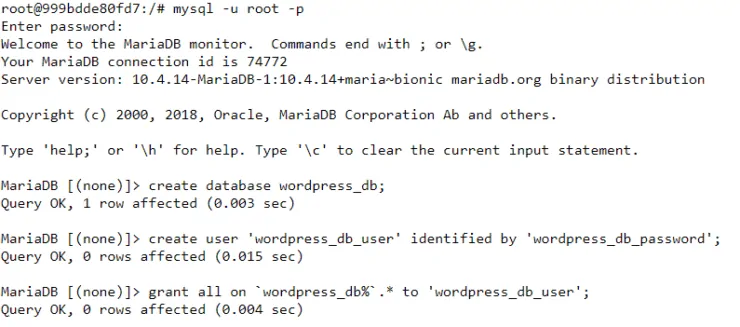
If you are not restoring an existing MariaDB database, skip the next step and exit as described below.
4. Restore an Existing Database for WordPress
Export your current WordPress database as .sql file and copy it over to the $DOCKERDIR/mariadb/data folder.
Next, from the MariaDB prompt use the following command to restore your current database:
mysql -u wordpress_db_user -p wordpress_db < /config/database_backup.sql;
Replace database_backup.sql with the filename of your backup.
5. Exit MariaDB Prompt
After completing the above steps, reload MariaDB privileges and exit using the following commands:
flush privileges;
quit;
That is it, your database for WordPress with Docker should be ready to go.
PHP-FPM Setup
Next, we are going to build our custom PHP-FPM image using Dockerfile and set up a container based on the custom image.
The reason for using a custom image is to use a clean and lean base PHP image and add only the modules we want.
1. PHP-FPM Dockerfile
I have not described or used a Dockerfile in any of my previous guides. In fact, this was my first time using it as well.
Basically what a Dockerfile does is, it specifies a set of rules/procedures using which Docker builds a custom image of something.
We are going to use php:7.4-fpm base image and add modules to it for WordPress container to work properly. Unfortunately, adding modules can be a tricky process as it is easy to miss dependencies.
This is where, docker-php-extension-installer comes to the rescue. This script makes installing PHP modules a breeze.
First, create a folder called custom inside Docker root.
Inside the custom folder, create a file called Dockerfile-php7 and add the following contents to it:
FROM php:7.4-fpm

ADD https://raw.githubusercontent.com/mlocati/docker-php-extension-installer/master/install-php-extensions /usr/local/bin/

RUN chmod uga+x /usr/local/bin/install-php-extensions && sync && \
    install-php-extensions gd mysqli pdo_mysql opcache imagick exif zip mcrypt pspell redis sockets ssh2
What this Dockerfile does is, when docker-compose file is run, it 1) pulls the php:7.4-fpm base image, 2) pulls the latest version of the docker-php-extension-installer script, 3) makes the script executable, and 4) install the extensions (gd, mysqli, pdo_mysql, opcache, imagick, exif, zip, mcrypt, pspell, redis, sockets, and ssh2) that WordPress and other PHP-based websites may require.
2. Basic PHP-FPM Configuration
Before starting PHP, let us also create some basic configuration files. Create a folder called php in docker root.
Then create all of the configuration files linked below (ignore/remove the .example in the linked files on GitHub):
- php
- php7
You may use the example configuration files as is or customize them as needed. The extensions.ini file enables PHP extensions we added to the base image and php.ini contains settings for PHP. The opcache.ini file contains configurations for OpCache, which is discussed later in this guide.
3. PHP-FPM Docker Compose
With the Dockerfile specified for PHP-FPM and basic configuration files created, let us now add the docker-compose snippet:
  # PHP - Hypertext Preprocessor
  php7:
    container_name: php7
    image: php:7.4-fpm-custom
    build:
      context: $DOCKERDIR/custom/
      dockerfile: Dockerfile-php7
    restart: unless-stopped
    user: $PUID:$PGID # allows upgrading WP and plugins
    networks:
      - t2_proxy
    volumes:
      - $DOCKERDIR/sites/wordpress/html:/var/www/html/wordpress
      - $DOCKERDIR/php/php7:/usr/local/etc/php
      - $DOCKERDIR/sites/khub/html:/var/www/html/khub
      - $DOCKERDIR/sites/dash/html:/var/www/html/dash
Here are some notes about the PHP-FPM docker-compose snippet:
- As explained previously, I am building a custom image named php:7.4-fpm-custom. For building this image, Docker will pickup the Dockerfile-php7 file from $DOCKERDIR/custom folder.
- PHP-FPM will run as the user $PUID and group $PGID, which are defined in the docker environmental variables.
- In addition to mounting the php7 folder for PHP configuration files, I am mounting three other volumes (shb, khub, and dash) which house files relevant to three websites. Only one of them (shb - for Smart Home Beginner) is a WordPress site.
Start the PHP container and check for any errors before proceeding.
Setup WordPress with Docker
Next, we are going to set up WordPress files.
If you are starting out fresh, then download the WordPress files from here and extract them into the desired location. If you are following this guide strictly, that would be sites/wordpress/html.
On Linux, you can use the following commands:
wget https://wordpress.org/latest.zip
unzip latest.zip
If like me, moving your existing WordPress site to Docker, then copy all the WordPress related files to the desired location (sites/wordpress/html in my case).
In both cases, be sure to edit the wp-config.php to customize the database details, folder paths, etc. if required.
Configure/Update wp-config.php
To update database details in wp-config.php, open the file (in VS Code or commandline) and edit the following lines:
// ** MySQL settings ** //
/** The name of the database for WordPress */
define( 'DB_NAME', 'wordpress_db' );

/** MySQL database username */
define( 'DB_USER', 'wordpress_db_user' );

/** MySQL database password */
define( 'DB_PASSWORD', 'wordpress_db_password' );

/** MySQL hostname */
define( 'DB_HOST', 'mariadb' );
Customize wordpress_db, wordpress_db_user, and wordpress_db_password. Leave MySQL hostname as mariadb, which is the name of the MariaDB service we setup earlier.
In addition to the database details, you may need to customize any paths (this is not common).
Nginx Setup
And finally the big one, Nginx web server. There is a lot to talk about here and I am going to try to cover them all briefly.
Explaining how to configure Nginx is beyond the scope of this WordPress Docker tutorial. But fear not, I have included example configuration files in my GitHub Repo and linked below.
These work great for this website on a 2CPU and 4GB RAM Ubuntu Server VPS on Digital Ocean and should work for most droplet sizes.
1. Prepare Nginx Configuration Files
Let us first create the require Nginx configuration files. Create a folder called nginx inside Docker root folder.
Then create all of the configuration files linked below (ignore/remove the .example in the linked files on GitHub):
- nginx
You will most likely have to edit only the files in the sites folder to specify your domain and paths. The rest can be left 'as-is' for a good starting point.
2. Docker WordPress Nginx Setup
With the Nginx configuration files created let us now add Nginx to our stack.
First add the following Docker-Compose snippet to your compose file:
  # Nginx - Web Server
  nginx:
    container_name: nginx
    image: nginx:1.18
    restart: unless-stopped
    depends_on:
      - php7
    networks:
      - t2_proxy
    volumes:
      - /etc/localtime:/etc/localtime:ro
      - /etc/timezone:/etc/timezone:ro
      - /var/log/nginx:/var/log/nginx
      - $DOCKERDIR/nginx:/etc/nginx
      #- $DOCKERDIR/shared/.htpassd:/shared/.htpasswd
      - $DOCKERDIR/sites/shb/html:/var/www/html/shb
      - $DOCKERDIR/sites/khub/html:/var/www/html/khub
      - $DOCKERDIR/sites/dash/html:/var/www/html/dash
Here are some notes on the Nginx docker-compose snippet:
- We are using Nginx version 1.18, which is the stable version at the time of writing this guide. You can look for current tags here or check my GitHub Repo periodically for updates.
- nginx service is dependent on php7 service. So when nginx container is started/restarted, php7 will also be restarted.
- If you have any basic authentication credentials you would like to use with Nginx, uncomment the appropriate line and store the .htpasswd file in a folder called shared in docker root.
- The three folders (shb, khub, and dash) containing the files for three websites are mapped as volumes on the nginx container.
The above snippet is not complete. It is missing the labels for traefik to use. It is a big one that needs some explanation and hence why I have separated it out below.
    labels:
      - "traefik.enable=true"
      ## HTTP Routers SHB (WordPress) Auth
      - "traefik.http.routers.nginx-shb-auth-rtr.entrypoints=https"
      - "traefik.http.routers.nginx-shb-auth-rtr.rule=Host(`www.$DOMAINNAME_SHB`) && Path(`/wp-login.php`)"
      - "traefik.http.routers.nginx-shb-auth-rtr.priority=100"
      ## HTTP Routers SHB (WordPress) Bypass
      - "traefik.http.routers.nginx-shb-rtr.entrypoints=https"
      - "traefik.http.routers.nginx-shb-rtr.rule=Host(`$DOMAINNAME_SHB`) || Host(`www.$DOMAINNAME_SHB`)"
      - "traefik.http.routers.nginx-shb-rtr.priority=99"
      ## HTTP Routers DASH (non-WordPress)
      - "traefik.http.routers.nginx-dash-rtr.entrypoints=https"
      - "traefik.http.routers.nginx-dash-rtr.rule=Host(`dash.$DOMAINNAME_SHB`)"
      ## HTTP Routers KHUB (non-WordPress)
      - "traefik.http.routers.nginx-khub-rtr.entrypoints=https"
      - "traefik.http.routers.nginx-khub-rtr.rule=Host(`$DOMAINNAME_KHUB`) || Host(`www.$DOMAINNAME_KHUB`)"
      # Redirect shb non-www to www middleware
      - "traefik.http.middlewares.shb-redirect.redirectregex.regex=^https?://$DOMAINNAME_SHB/(.*)"
      - "traefik.http.middlewares.shb-redirect.redirectregex.replacement=https://www.$DOMAINNAME_SHB/$${1}"
      - "traefik.http.middlewares.shb-redirect.redirectregex.permanent=true"
      # Redirect khub non-www to www middleware
      - "traefik.http.middlewares.khub-redirect.redirectregex.regex=^https?://$DOMAINNAME_KHUB/(.*)"
      - "traefik.http.middlewares.khub-redirect.redirectregex.replacement=https://www.$DOMAINNAME_KHUB/$${1}"
      - "traefik.http.middlewares.khub-redirect.redirectregex.permanent=true"
      ## Middlewares
      - "traefik.http.routers.nginx-khub-rtr.middlewares=khub-redirect,chain-no-auth@file"
      - "traefik.http.routers.nginx-shb-rtr.middlewares=shb-redirect,chain-no-auth-wp@file"
      - "traefik.http.routers.nginx-shb-auth-rtr.middlewares=shb-redirect,chain-oauth-wp@file"
      - "traefik.http.routers.nginx-dash-rtr.middlewares=chain-oauth@file"
      ## HTTP Services
      - "traefik.http.routers.nginx-shb-rtr.service=nginx-svc"
      - "traefik.http.routers.nginx-shb-auth-rtr.service=nginx-svc"
      - "traefik.http.routers.nginx-khub-rtr.service=nginx-svc"
      - "traefik.http.routers.nginx-dash-rtr.service=nginx-svc"
      - "traefik.http.services.nginx-svc.loadbalancer.server.port=80"
Here is the explanation for Nginx docker-compose labels:
Routers
- I have 3 websites (shb, dash, and khub) but only 2 domains ($DOMAINNAME_SHB and $DOMAINNAME_KHUB defined in .env file). Dash is a private website fully behind authentication.
- We are defining four routers:
- A higher priority router for the WordPress site when wp-login.php is accessed.
- A lower priority router for the WordPress site when rest of the pages are accessed.
- One router for non-WordPress site (Dash) that is fully private and behind Auth wall.
- One router for non-WordPress site (KHUB) that is fully public.
Middlewares
- There are two redirect middleware (shb-redirect and khub-redirect, which redirect non-www connections to www connections on both $DOMAINNAME_SHB (SHB) and $DOMAINNAME_KHUB (KHUB).
- We are defining middleware chains to the go with the four routers listed above:
- Non-WordPress site KHUB which includes the redirect to www and a middleware chain without authentication.
- WordPress (SHB) site's wp-login.php file which includes the redirect to www and middleware chain with Google Oauth authentication.
- WordPress (SHB) site's rest of the pages which includes the redirect to www and middleware chain without authentication.
- Private Non-WordPress site Dash, which includes a middleware chain with Google Oauth authentication.
Services
Finally we are pointing all the 4 routers to the nginx service (nginx-svc), which is listening on port 80.
Save the docker-compose file and start Nginx. Check the logs to ensure there are no errors.
This completes the Docker WordPress setup part. Your sites should now be up and running. It appears to be a lengthy process but I promise once you get going, you will be very happy with the outcome.
Be the 1 in 200,000. Help us sustain what we do.You will gain benefits such as Deployarr access, discord roles, exclusive content, ad-free browsing, and more.🔥 Holiday Sale! 25% Off Platinum Membership$399.99$299.99 (ends December 31).Join the Geek Army (starting from just $1.67/month)
Docker WordPress Security
As I mentioned at the beginning of this guide, security was the biggest reason delaying the move of this WordPress site to Docker. I have implemented several Docker security measures for WordPress that gives me a little bit of peace.
1. Docker Security Best Practices
I recently published a detailed guide on Docker security best practices that I have learned and implemented over the last several months.
I strongly recommend that you follow the linked guide and implement as many of the security measures as possible: especially Docker secrets and Docker Socket Proxy.
2. Multi-Factor Authentication for WordPress with OAuth or Authelia
In the security guide linked above, I also talk about multifactor authentication.
You can either use Google OAuth or Authelia (both support multiple users):
- Google OAuth Tutorial for Docker and Traefik – Authentication for Services
- Authelia Tutorial – Protect your Docker Traefik stack with Private MFA
In this guide and in my GitHub Repo, I use Google OAuth. We are protecting the WordPress login page - wp-login.php.
Following the Authelia guide linked above, you can implement Authelia just as easily. Once Authelia is setup, you can easily switch between OAuth and Authelia by simply specifying the corresponding middleware chain: chain-oauth@file or chain-authelia@file in Docker labels.
3. Cloudflare Security
If you use Cloudflare, then you can add more layers of security to protect your site. I detailed this in my Cloudflare security settings for Docker guide.
You can define a firewall rule for increased security on wp-login.php.
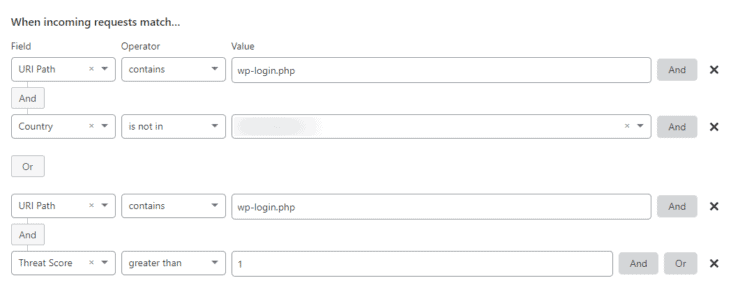
As shown in the example, when wp-login.php is being accessed from outside of a certain country or when the visitor's threat score is higher than 1, I block the log in attempt. Typically, in a 24 hour period, this rule blocks about 75 login attempts on my site.
4. Security via Nginx
Cloudflare rules, combined with docker/traefik security practices discussed above (eg. rate limit, socket proxy, etc.) and multi-factor authentication already provide a strong security layer for WordPress sites.
If you look through my Nginx configuration files linked above, there are a few more security measures implemented. First, in wp-locations-php7.conf:
location ~ /\. {
  deny all;
  access_log off;
  log_not_found off;
}

# Deny backup extensions & log files
location ~* ^.+\.(bak|log|old|orig|original|php#|php~|php_bak|save|swo|swp|sql)$ {
  deny all;
  access_log off;
  log_not_found off;
}

# Return 403 forbidden for readme.(txt|html) or license.(txt|html) or example.(txt|html)
# Added build.xml based on 404 data on redirection plugin - 9/21/2020
if ($uri ~* "^.+(readme|license|example|build)\.(txt|html|xml)$") {
  return 403;
}
The above bits of codes, block access to any hidden files (those that begin with a period in front), backups and logs, and unimportant files (eg. readme, license, example, build, etc.).
In addition, in the wp-common-php7.conf, I am denying access to wp-config.txt and WordPress XMLRPC. I am also disabling PHP execution in the uploads folder, which is typically for images.
# Disable wp-config.txt
location = /wp-config.txt {
  deny all;
  access_log off;
  log_not_found off;
}

# Disable xmlrpc
location = /xmlrpc.php {
  deny all;
  access_log off;
  log_not_found off;
}

# Disallow php in upload folder
location /wp-content/uploads/ {
  location ~ \.php$ {
    #Prevent Direct Access Of PHP Files From Web Browsers
    deny all;
  }
}
Finally, in addition to the rate limits set using Traefik, I have also implemented a rate limit on Nginx (nginx.conf):
  # Limit Request
  limit_req_status 403;
  limit_req_zone $binary_remote_addr zone=one:10m rate=1r/s;
There are few more minor security implementations, but I won't go over those in this guide. You may dig deeper into my Nginx configurations if interested.
Obviously, some of the above are redundant and overkill. But one can never have enough security.
Caching for WordPress Docker
The last bit of information is on the caching mechanism. Caching significantly reduces the server load and increases the speed at which pages are served.
At the beginning of this guide, I mentioned 4 caching strategies. Let us now see how exactly those are implemented in this guide.
1. Browser Cache
In my case, Ezoic/Cloudflare takes care of this. But the following Nginx configuration also encourages the browser to cache static files:
# Cache static files
location ~* \.(ogg|ogv|svg|svgz|eot|otf|woff|mp4|ttf|css|rss|atom|js|jpg|jpeg|gif|png|ico|zip|tgz|gz|rar|bz2|doc|xls|exe|ppt|tar|mid|midi|wav|bmp|rtf|swf)$ {
  add_header "Access-Control-Allow-Origin" "*";
  access_log off;
  log_not_found off;
  expires max;
}
To verify if browser caching is working, check the HTTP headers for one of your images using a service like RedBot.
2. Page Cache
We are achieving page level caching using Nginx FastCGI cache, which can be managed using in the wp-nfc-php7.conf file.
Enable or disable FastCGI caching by changing the following line (0 to enable FastCGI cache or don't skip cache; 1 to disable FastCGI cache):
# Enable Nginx FastCGI Cache
set $skip_cache 0;
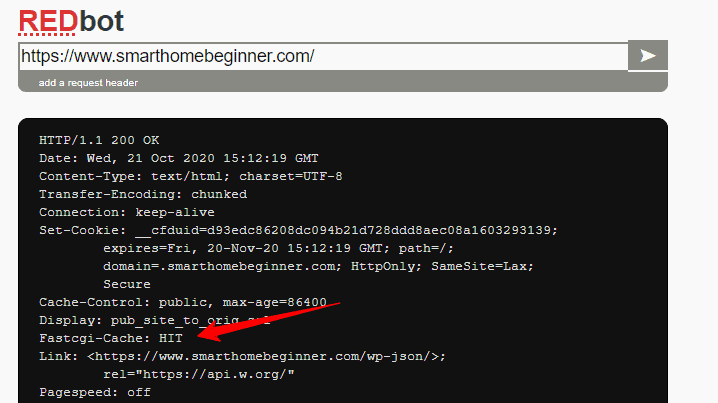
How do we know if page caching is working or not? Well, our Nginx configuration file (nginx.conf) sets a HTTP header to notify FastCGI cache's status:
  # Headers
  add_header Fastcgi-Cache $upstream_cache_status;
Now when we check the HTTP header information for any page, you should see HIT if FastCGI cache is working:
3. Frontend Cache - PHP
We compiled a custom PHP-FPM docker image with OpCache enabled. OpCache reduces the need to re-compile PHP codes and serves the cached code when requested.
You will have to first, enable the extension by adding the following line to extensions.ini (linked previously):
zend_extension=opcache
Then, you can enable or disable OpCache by editing the following lines in opcache.ini file:
opcache.enable=1

; 0 means it will check on every request
;Development = 0. Production = 1 or comment out (default 1)
opcache.revalidate_freq=1

; 0 is irrelevant if opcache.validate_timestamps=0 which is desirable in production
;Development = 1. Production = 0 or comment out (default 0)
opcache.validate_timestamps=0

;Development = 1. Production0 or comment out (default 0)
opcache.consistency_checks=0
If you are making changes to your PHP code, be sure to enable Development mode, which forces re-compilation on every request.
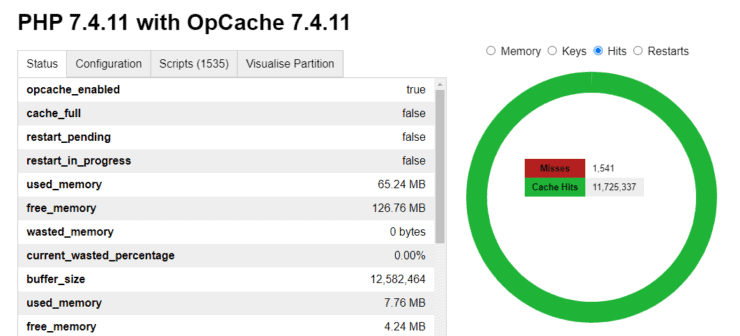
There are several simple PHP tools available to monitor OpCache. I have been using this OpCache Status for a while. Even though it has not been updated in a while, it still works great.
As you can see I have an almost 100% hit rate on OpCache and it is using about 50% of the allocated memory.
4. Database Cache - Redis
The final cache is to reduce database querying operations (Object Caching), which can be time-consuming and slow down WordPress sites. In the past, I have used Memcached. While moving my WordPress to Docker, I switch to Redis.
1. Redis Setup
First, let us add Redis to our Docker stack using the following Docker-Compose snippet:
  # Redis - Key-value Store
  redis:
    container_name: redis
    image: redis:6.0.6
    restart: unless-stopped
    entrypoint: redis-server --appendonly yes --requirepass $REDIS_PASSWORD --maxmemory 512mb --maxmemory-policy allkeys-lru
    networks:
      - t2_proxy
    security_opt:
      - no-new-privileges:true
    volumes:
      - $DOCKERDIR/redis/data:/data
      - /etc/timezone:/etc/timezone:ro
      - /etc/localtime:/etc/localtime:ro
Here are some notes to customize the above snippet:
- As with many other key services, I am using a specific version of redis. I frequently test and upgrade the version.
- We are setting a password for Redis access using the environmental variable $REDIS_PASSWORD set in our .env file.
Save the compose file and start the Redis service to ensure that the container is running without any errors.
2. Redis Object Cache for WordPress
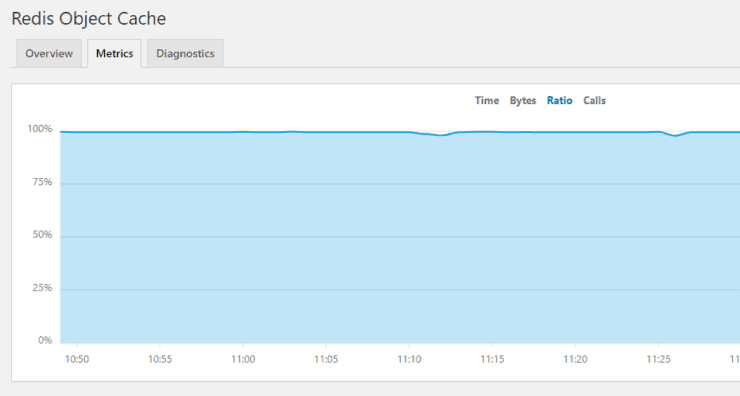
To take advantage of Redis on WordPress, I use the Redis Object Cache Plugin. Again, I see almost 100% hit rate.
I used to use Redis Commander to manage Redis data. But I did not find much use for it. If interested, you can find the docker-compose for it in my GitHub Repo.
WordPress with Docker - Final Remarks
There you go, an almost exhaustive guide on how to not only install WordPress using Docker but also how to make your setup compatible with non-WordPress sites. I also shared some additional features for convenience (eg. VS Code), Security (Rate Limit, Firewalls, Multi-factor Authentication for WordPress), and Performance (Redis, Nginx FastCGI, and other coaching mechanisms).
One app I do not talk about here is Portainer to manage Docker containers visually. If interested, you can follow my Docker Traefik guide to implement it.
I was wary about moving to WordPress on Docker. I was afraid this setup would be unreliable. But I have been pleasantly surprised so far. I am loving my new setup and as I mentioned before, for whatever reason my dashboard is noticeably faster.
In addition, I got rid of several of my plugins.
If you are interested in setting up Docker with WordPress, I say go for it. My hope is that this Docker WordPress tutorial helps you accomplish what I did and saves you time and frustration.

