In this post, I will show you how to easily add an animated weather radar on Home Assistant. Home Assistant can track and control and automate all your devices at home. With the by adding a weather map on home assistant, you will have one more piece of information about your home location that is easily available to you.
Home Assistant already has support for numerous weather services. But getting a radar weather map of your area is not so easy. If you are like me, you hate the ad-ridden pages of weather sites. A Home Assistant weather map puts that information at your finger tips, if needed and configured with other weather information. So let us take a look at how to add a Weather Radar on Home Assistant web interface.
Table of Contents
What is Home Assistant?
Home Assistant is a free and open-source home automation platform built using Python. It allows you to control all your devices from a single, mobile-friendly, interface. Furthermore, you can track and control all your data without having to store them on the cloud like some of the other commercially available smart home hubs.
You can monitor the state of your devices and setup advanced home automation rules to control your devices. It supports over 1000 (not a typo) platforms. None of the other commercially available smart home controllers such as Samsung SmartThings or Wink support these many. Home Assistant can be installed on several platforms, including raspberry, Linux, etc. With Home Assistant on Docker, pretty much all platforms are covered.
It is one of the most exciting apps that I started using in 2017 and is included in my ultimate docker home media server.
Enough about the greatness of Home Assistant. Let's see how to add an animated weather map on Home Assistant.
Add Weather Radar on Home Assistant
You can add a static weather map with current conditions or an animated home assistant weather radar. I am going to show both ways in this post. Both processes are essentially the same, the only difference is whether or not you enable the "Animate" button while grabbing the URL of the weather gif image.
Step 1. Grab URL for Weather Map
Head over to Weather Radar from Weather Underground.
Static Home Assistant Weather Map
To grab URL for a static weather map, first, choose your country and location as shown in the screenshot below. If you want to zoom in further into your location you can pick one of the radar stations but I will cover this later in this guide.
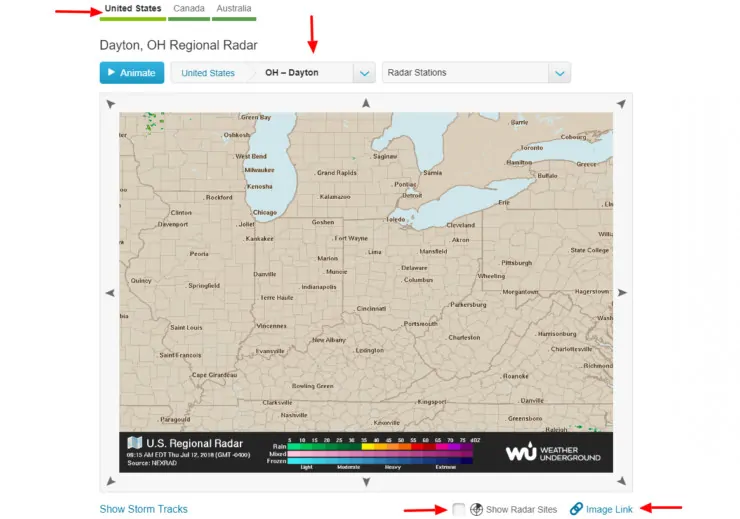
Then, uncheck Show Radar Sites and finally right-click on Image-Link and Copy Link Address (on Chrome; may be different in other browsers). The static weather map URL to current conditions should be copied to your clipboard.
| Build an Ultimate Raspberry Pi Smart Home Hub ~$105 | Price |
|---|---|
| Raspberry Pi 3 B+ Starter Kit with case, power adapter, and heat sinks | ~$55.00 |
| Sandisk Ultra 16GB Micro SDHC UHS-I Card 98 MB/s | ~$7.50 |
| Aeotec Z-Stick Gen5, Z-Wave Plus USB to create gateway | ~$45.00 |
Animated Home Assistant Weather Radar
For an animated weather map, I am going to zoom into a specific weather station. If you prefer a more broader look then do not select a weather station.
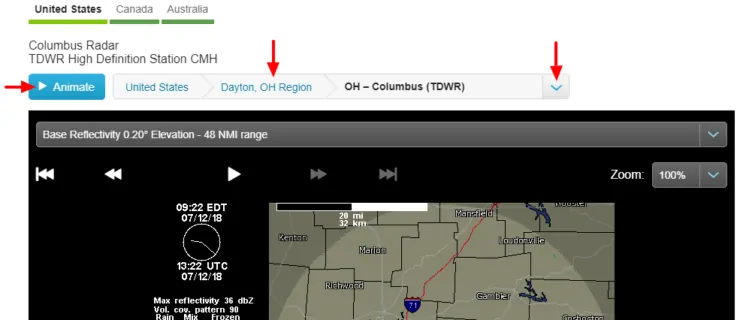
Click the Animate button, then choose your location, and a specific radar station, as shown in the screenshot below.
Next, you may customize the animation on the weather radar using the options shown below. I typically leave "Severe", "Rain/Snow", and "Labels" on. You may also customize the animation speed but I will leave the default for this HASS weather map tutorial.
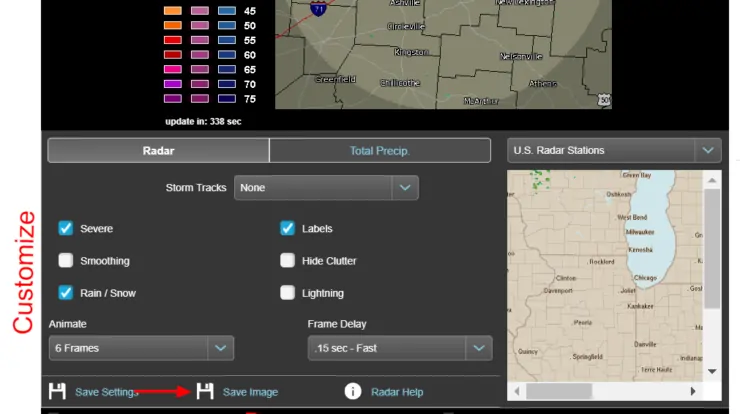
When done, right-click on the Save Image button and Copy Link Address (on Chrome; may be different in other browsers). Your animated weather radar URL should be copied to your clipboard.
Step 2. Add Weather Radar to Home Assistant UI
Now that you have URL to your weather map, let us add it to your HASS UI. For this, we are going to use the camera component of Home Assistant. Open your configuration.yaml file and add the following code block:
camera:
  - platform: generic
    still_image_url: 'https://icons.wxug.com/data/weather-maps/radar/united-states/dayton-ohio-region-current-radar.gif'
    name: Radar WU Ohio Current
  - platform: generic
    still_image_url: 'https://radblast.wunderground.com/cgi-bin/radar/WUNIDS_map?station=DAY&brand=wui&num=6&delay=15&type=TR0&frame=0&scale=1.000&noclutter=0&showstorms=0&mapx=400&mapy=240¢erx=400¢ery=240&transx=0&transy=0&showlabels=1&severe=0&rainsnow=1&lightning=0&smooth=0&rand=25523390&lat=0&lon=0&label=you'
    name: Radar WU Ohio
Note that in the above code block, I am adding both static current weather map and the animated weather radar. Hence, two camera components - one with static URL (first one) and the other with URL to animated radar (second long one). Replace the still_image_url parameter with your URLs copied from the first step. You can also customize the name parameter.
Save your configuration.yaml and restart Home Assistant.
Step 3. Check Weather Maps on Home Assistant UI
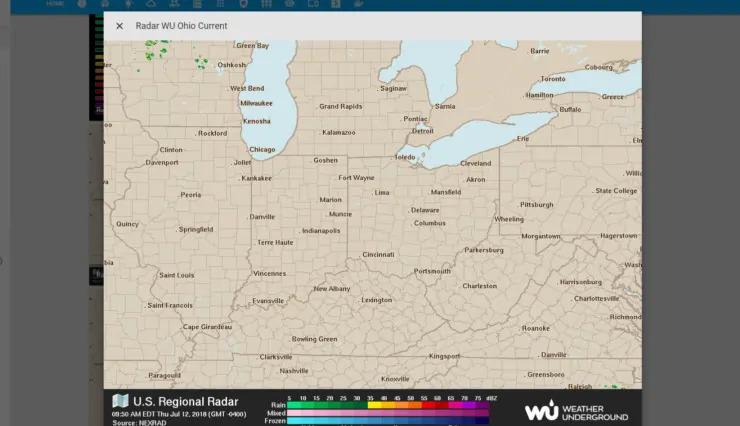
If everything worked, you should now see two instances of Weather map on Home Assistant. The first one should be a static map showing the current conditions as shown below:
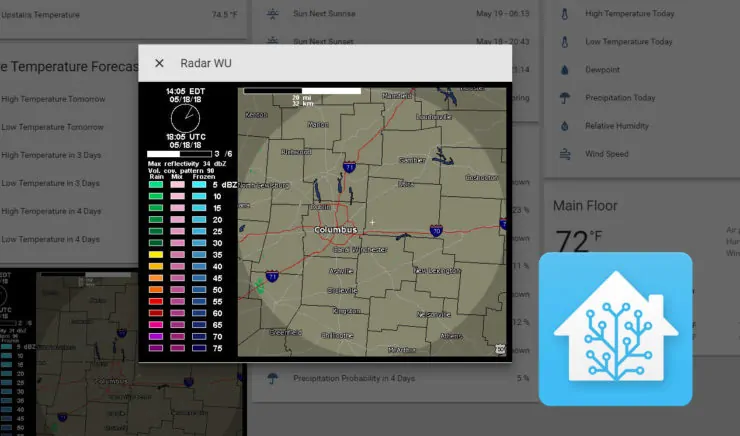
The second one should be animated Weather radar on Home Assistant UI, as shown below:
Once again, sorry, the sky was clear in my area when I took video. So there is no action to see in the video except the movement in the clock.
Make Telegram Text You Weather Radar
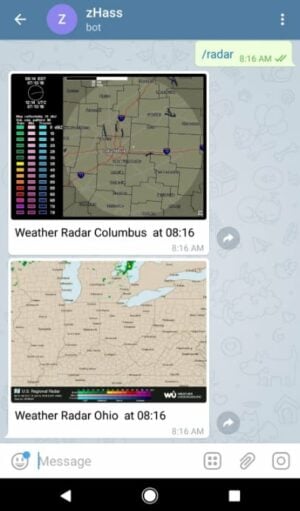
Configuring Telegram for home assistant is outside the scope of this guide, but you refer to the official documentation. I have my home assistant setup integrated with Telegram. So when I send a /radar command my home assistant instance on Telegram, I get a response with all the weather radar images, as shown below. I do not even have to open Home Assitant UI.
If you are interested in accomplishing something like this, here is the automation to add int your automations.yaml of wherever your automation are listed.
- id: telegram_weather_radar
  alias: Telegram Weather Radar
  trigger:
  - event_data:
      command: /radar
    event_type: telegram_command
    platform: event
  condition: []
  action:
  - data:
      title: Weather Radar Columbus at {{ now().strftime("%H:%M") }}
      message: Weather Radar Columbus  at {{ now().strftime("%H:%M") }}
      data:
        photo:
        - url: https://radblast.wunderground.com/cgi-bin/radar/WUNIDS_map?station=CMH&brand=wui&num=1&delay=15&type=TR0&frame=0&scale=1.000&noclutter=0&showstorms=0&mapx=400&mapy=240¢erx=400¢ery=240&transx=0&transy=0&showlabels=1&severe=0&rainsnow=1&lightning=0&smooth=0&rand=25445968&lat=0&lon=0&label=you
          caption: Weather Radar Columbus  at {{ now().strftime("%H:%M") }}
    service: notify.telegram
  - data:
      title: Weather Radar Ohio at {{ now().strftime("%H:%M") }}
      message: Weather Radar Ohio  at {{ now().strftime("%H:%M") }}
      data:
        photo:
        - url: https://icons.wxug.com/data/weather-maps/radar/united-states/dayton-ohio-region-current-radar.gif
          caption: Weather Radar Ohio  at {{ now().strftime("%H:%M") }}
    service: notify.telegram
Of course, change the url in above code block to your own.
Conclusions
I hated going to ad-ridden and slow weather websites trying to find a radar map for my area. Now I don't have to. On my HASS, I have static and animated weather radars for both my city for current conditions and advanced weather radar of the state to see what's coming. In addition, I have Telegram configured to send me the radar with a quick text.
Sounds exciting? Go ahead and add weather radar on Home Assistant and make it even better.

![8 Amazing Raspberry Pi Ideas [2022]: Beginners and Enthusiasts Raspberry Pi ideas](https://www.smarthomebeginner.com/images/2021/09/raspberry-pi-4-dev-board.jpg)

