Password managers are a critical component when trying to increase your security in our online world. Vaultwarden is my top pick for a self-hosted password manager, and (at the time of writing) leading our poll for the Top 12 Self-Hosted Password Managers.
This Vaultwarden Docker Compose article is the natural next step to help you take your home server to the next level.
Vaultwarden is an uncomplicated application that you will have up and running in a few clicks and a handful of minutes. Without further delay, let's get Vaultwarden into your Docker compose stack!
Table of Contents
What is Vaultwarden? A Brief Recap
For a more in-depth overview of Vaultwarden, please refer to the section in my Top 12 Self-Hosted Password Managers article.
To briefly recap a bit about Vaultwarden, it is a standalone application that you can self-host for free on your home server. As a password manager, it can hold a variety of information you'd like to be kept secret and secure - passwords, credit card details, API keys, notes, files, etc. Each individual vault is secured with a "master password", allowing you to access all others. This helps to reduce the myriad of passwords (or password re-use!) we have come to normalize.
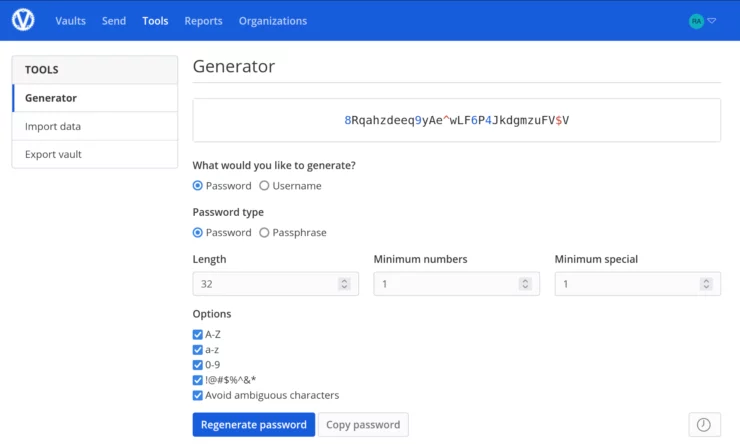
The beauty of the vault is that it only requires one password, but we can use long, complex, passwords for each individual website we login to, without having to remember them directly. This is a HUGE security and privacy win. All the while, our vault is in sync across our devices, making them too easy NOT to use.
It is a single-container application, utilizing an internal SQLite database and integrated, lightweight web server. This dramatically reduces the application's resource overhead and setup complexity! This means that we will only need a single entry in our Vaultwarden Docker compose file.
Sorry, there are no polls available at the moment.
How do you use Vaultwarden?
Vaultwarden relies on the server-client model. We will install Vaultwarden with Docker Compose on our server. We will then use clients to connect to the server to provide the synchronized data from the vault.
Vaultwarden integrates nicely into your browser and on your smartphone. This allows us to easily fill in sign-up and login forms with minimal clicks, in a secure manner. There is also a web vault to view and manage your Vaultwarden vault in addition to using the clients.
The project is inspired by another open-source project named Bitwarden.
Bitwarden vs Vaultwarden
Bitwarden and Vaultwarden vary slightly, but have lots in common; although, the maintainers of the Vaultwarden project have no direct association with Bitwarden. I believe that Vaultwarden was born out of the difficulty of self-hosting Bitwarden.
Vaultwarden relies heavily on Bitwarden's browser extensions and mobile applications and only truly provides a "lite" version of the Bitwarden backend.
Prerequisites
Many tutorials out there these days will simply give you a nice curated command to run, and BAM! Off to the races. And with the rise of services like ChatGPT, you could simply ask it to create one for you. But, in my humble opinion, both of these options are rife with hazard.
Don't go in blind!
Spend the time to learn the very basics of your own server administration. This will pay off ten-fold when it comes to customizing or troubleshooting your setup.
Guides can never cover 100% of everyone's specific setups. That is why they are merely guides, giving you a path to follow, but allowing for your own unique setup.
I stress this here because we are about to install a password manager. Yes, it is a GREAT way to improve your security on the internet. But, you should also understand that keeping all of this knowledge in one place means that, if not secured properly, you could leak your passwords to devastating effect.
Your server must be behind a firewall. This is the bare minimum. You should have (among other things):
- Protection against physical theft (don't leave the server in your dorm hallway...)
- Disabled root password authentication over SSH, and only using (also secured!) SSH keys
- A banning system like fail2ban or Crowdsec
- Firewall enabled with only the necessary ports open to the internet (if any at all!)
- Strong backup system already in place following the 3-2-1 principal
DISCLAIMER:
I, the author (nor anyone from SmartHomeBeginner) will not be held responsible for a poorly configured server leading to a leakage of your passwords. You have been warned.
If you are new to self-hosting services, I highly recommend protecting your self-hosted password manager behind a VPN. There are many options out there. I have previously written about using Wireguard, but other services exist like Tailscale and ZeroTier.
Other Posts in the Wireguard Series:
- Wireguard VPN Intro in 15 min: Amazing new VPN Protocol
- Complete Wireguard Setup in 20 min – Better Linux VPN Server
- Wireguard Windows Setup: Powerful VPN for Windows
- Wireguard Mac OS Client Setup – The sleek new VPN
- Wireguard Android Client Setup – Simple and Secure VPN
- Ultimate WireGuard Docker Compose: with CF and Traefik Support
Finally, since we all rely on passwords so heavily, consider the consequences if your server goes down and you are unable to reach your password manager for an extended period. Most browser extensions and mobile apps will keep a cache of your vault for a limited time. You should ask yourself if you are willing to accept this risk, or have a mitigation plan in place!

Phew! OK, that's serious business out of the way.
Docker and Docker Compose
While you may know that I'm a huge proponent of Podman, I recognize that nearly everyone reading this is using Docker and Docker compose. Thus, they need to be installed and working before continuing forward.
Anand has previously written extensively on this topic, and offers a great "Ultimate Docker Traefik Guide" which this article will attempt to fit nicely into.
Requirements
As always, I assume that all the environments (docker, compose, folder structure, ...) have already been set following Anand's guides, especially for file and folder structures and permissions.
- Install Docker on Ubuntu
- Install Docker on Ubuntu Server
- Install Docker Compose on Ubuntu
- Set Docker Environment (MOST IMPORTANT)
If not, do not worry, I am going to make it generic enough for anyone to follow.
Note: You will need a valid TLS certificate to use Vaultwarden. This means you will need to have a domain name to associate with your vault. This is often done as a subdomain, and can be anything you like; for example: vault.example.com.
While I recommend using a real domain name you have purchased, and Let's Encrypt (free) for the TLS certificate, you can also use "self-signed" certificates; but that is for a different article!
Vaultwarden Docker Installation
Vaultwarden's wiki is honestly a fantastic resource with lots of information about all the nuances possible for running the app.
We will focus on the Vaultwarden Docker Compose example, and adapt it to work with our Traefik Docker Compose file.
If you have been following the Anand's Ultimate Docker Server series, then you would create a file called vaultwarden.yml in your compose folder, add the above docker-compose for Vaultwarden, and activate it by calling the file under include block in the master Docker compose file.
Otherwise, you may just add it straight to the Docker compose file in your situation.
Basic Docker Compose File
The basic Vaultwarden Docker compose file looks something like this:
services:
  vaultwarden:
    image: vaultwarden/server:latest
    container_name: vaultwarden
    restart: always
    environment:
      DOMAIN: "https://vault.example.com"  # Your domain here!
    volumes:
      - ./vw-data:/data
This is a good starting point, but let's customize it a bit before moving forward. Recall from earlier, that we will need to put this behind a reverse proxy like Traefik or NPM to be able to access the web vault!
We will cover both Traefik and Nginx Proxy Manager.
Option 1: Using Traefik Reverse Proxy
Add the following to your existing Docker Compose file or to compose/vaultwarden.yml inside the Docker Root folder (if your setup is based on our guides).
services:
  # Vaultwarden Password Manager
  vaultwarden:
    image: vaultwarden/server:latest
    container_name: vaultwarden
    security_opt:
      - no-new-privileges:true
    restart: unless-stopped
    # profiles: ["core", "all"]
    networks:
      - t2_proxy
    environment:
        # This is required to allow vaultwarden to verify the TLS certificate!
      - DOMAIN=https://vault.$DOMAINNAME_HS
    volumes:
      - $DOCKERDIR/appdata/vaultwarden/data:/data
    labels:
    - "traefik.enable=true"
    ## HTTP Routers
    - "traefik.http.routers.vaultwarden-rtr.entrypoints=websecure"
    - "traefik.http.routers.vaultwarden-rtr.rule=Host(`vault.$DOMAINNAME_HS`)"
    - "traefik.http.routers.vaultwarden-rtr.tls=true"
    ## Middlewares
    - "traefik.http.routers.vaultwarden-rtr.middlewares=chain-no-auth@file"
    ## HTTP Services
    - "traefik.http.routers.vaultwarden-rtr.service=vaultwarden-svc"
    - "traefik.http.services.vaultwarden-svc.loadbalancer.server.port=80"
Besides the obvious comments, here are a few point points on the Docker compose for Vaultwarden:
- Docker profiles is commented out as explained previously (see my Docker guide for how I use profiles).
- networks: We added Vaultwarden to t2_proxy (change it if your Traefik network is named differently) network so we can put it behind Traefik.
- The environmental variable $DOCKERDIR is already defined in our .env file. All Vaultwarden data is being stored in its own folder within appdata.
- Set the environment variable DOMAIN to vault.your-domain.com. Note that if you'd like to use a different subdomain than "vault", you'll need to change it here AND in the labels below.
- With the labels, we are specifying that Vaultwarden will use the websecure entrypoint and chain-no-auth file provider we created previously.
- Vaultwardent listens on port 80. So, we point vaultwarden-rtr.service to a service name vaultwarden-svc and in the next line, we define where that service is listening at (vaultwarden-svc.loadbalancer.server.port=80.
Once added to your compose file, move onto the next section!
Option 2: Using NPM Reverse Proxy
If you are using Nginx Proxy Manager (NPM), you do not need any Docker labels. You can leave those out.
services:
  # Vaultwarden Password Manager
  vaultwarden:
    image: vaultwarden/server:latest
    container_name: vaultwarden
    security_opt:
      - no-new-privileges:true
    restart: unless-stopped
    # profiles: ["core", "all"]
    networks:
      - npm_proxy
    environment:
        # This is required to allow vaultwarden to verify the TLS certificate!
      - DOMAIN=https://vault.$DOMAINNAME_HS
    volumes:
      - $DOCKERDIR/appdata/vaultwarden/data:/data
Almost all of the Vaultwarden Docker Compose explanations provided for the Traefik example above apply here as well. One minor change here is that we are putting Vaultwarden behind NPM network instead of Traefik network.
Add Vaultwarden to the Docker Stack
If you added the Docker Compose for Vaultwarden directly to your master Docker Compose file, then you are good to go.
Otherwise, if you have followed Anand's Ultimate Docker Server series or used Auto-Traefik, then you will have to call vaultwarden.yml into your master Docker Compose file under include block.
To do so, add the path to the vaultwarden.yml (compose/udms/vaultwarden.yml - if you followed our Ultimate Docker Server series) file under the include block, as shown below:
...
...

include:
...
  - compose/$HOSTNAME/vaultwarden.yml
...
$HOSTNAME here will be replaced with udms automatically (as defined in the .env file).
Save the Master Docker Compose file.
Start Vaultwarden Docker Compose
Save your Docker compose file, and then start the container and follow the logs using the following commands (replace with the correct path to your master compose file):
sudo docker compose -f /home/user/docker/docker-compose-udms.yml up -d
sudo docker compose -f /home/user/docker/docker-compose-udms.yml logs -tf --tail="50" vaultwarden
Anand has written a great Docker guide detailing how you can check the container's logs and ensure the Vaultwarden container has started correctly. Another option is to follow the logs in real-time using the Dozzle app.
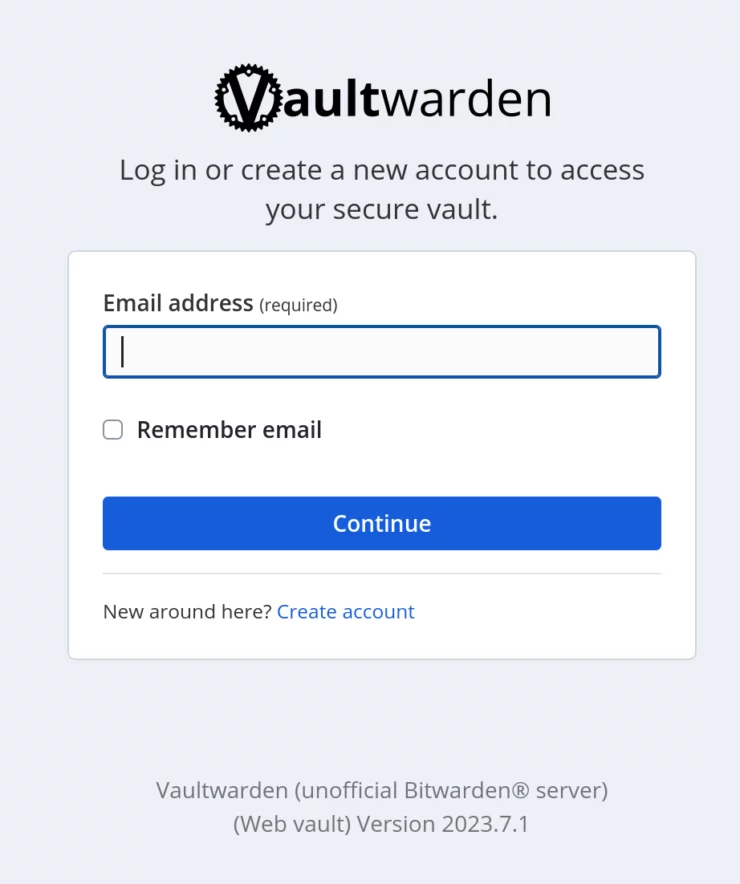
The Docker container image is quite small and should be pulled quickly. Normally, the startup is quick and you should be able to access Vaultwarden's welcoming page by visiting the URL you created in the Vaultwarden Docker compose file.
Vaultwarden Setup
The setup is relatively straightforward from here, but I wanted to point out a few nice features and some common mistakes people can make.
Create a new account
Below the login, click the Create account link to make a new account. Fill in your info here.
You don't need to use a real email address here. However, if you'd like to receive email notifications, reset your password, etc, it will need to be a real address.
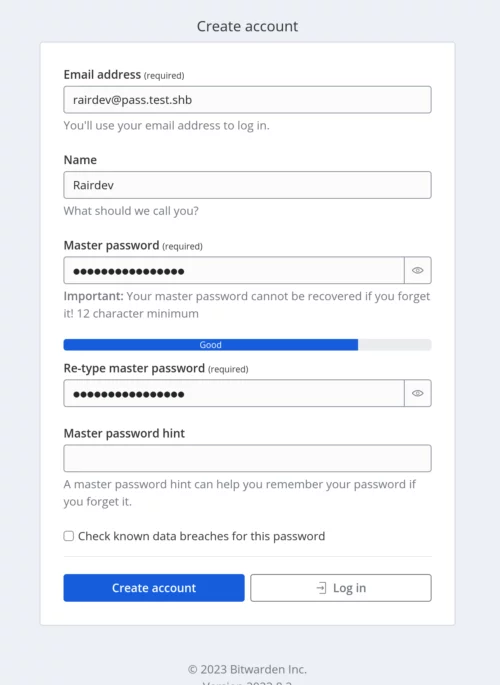
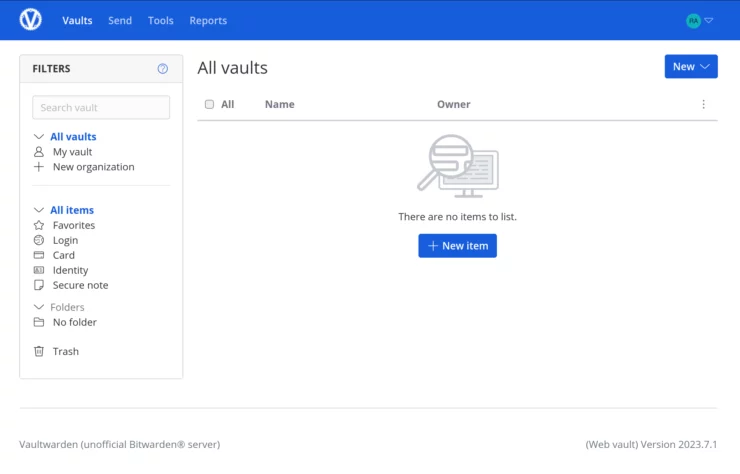
Once created, login with the new account, and you will be redirected to the Vaultwarden homepage.
And voila! From the homepage, there are many options available to you, but here are a few of my top tips for getting the most out of your Vaultwarden instance.
Importing Passwords
If you already have your passwords stored somewhere (like in Chrome, Firefox, or even another password manager), they can easily be imported into Vaultwarden.
Begin by exporting the password database from its current location. This will depend on which software you are currently using but usually can be found with a quick web search.
Once you have the file, head to your Vaultwarden dashboard, and click on Tools at the top. Next, on the left side, we will see the Import data section.
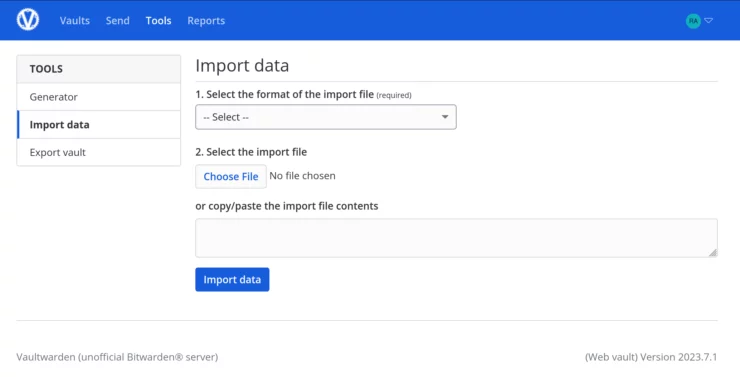
Next, select your import file type from the drop-down menu, select the file, and click Import data to add the passwords to your Vaultwarden vault.
Install Browser Extensions and Mobile Apps
As noted, before, Vaultwarden is simply a "fork" of Bitwarden. It is written in a different programming language but is nearly 100% compatible with existing Bitwarden clients.
Head to the Bitwarden Clients download page, and download the client(s) for all of your devices. Once installed, there's one small step you'll need to follow to get them to work with our self-hosted Vaultwarden.
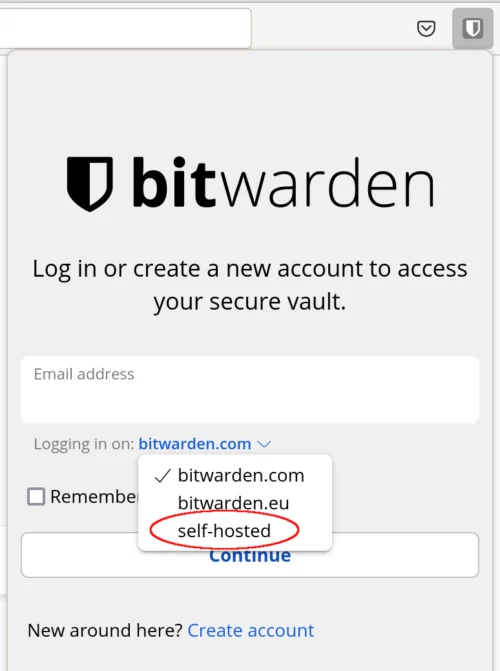
In this example, I'm using Firefox, but the same will apply to all clients. When you click on the extension (or open the mobile app), you'll be asked to login. Notice just underneath the email address, that you can click the small drop down. Select self-hosted.
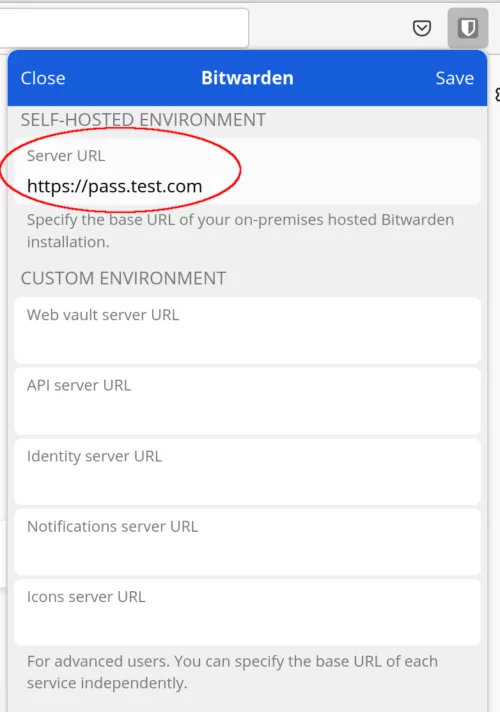
The new screen that appears is where you'll want to enter the URL of your Vaultwarden instance. Click Save and you'll be taken back to the first screen where you can now login with your username and password created earlier!
Improve your Auto-fill settings
There are several options in the Settings tab of the extensions and apps, but there's one important setting I'd like to draw your attention to. If you, like me, host most of your services behind subdomains, the default auto-fill settings will mean that when you visit one of your sites to login, you will see the login details of ALL of your sites.
This could be helpful, but I find that I prefer to only see the login details for the app I'm looking at. To change this behavior, head to the Settings tab, then click on Auto-fill under the Manage section.
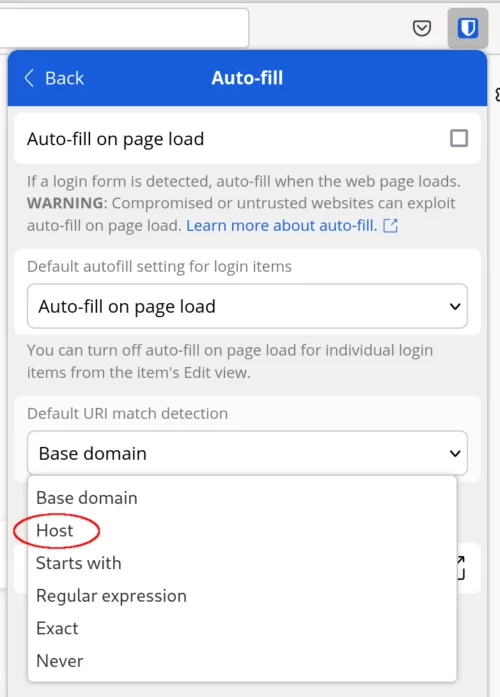
Near the bottom is the Default URI match detection setting. Click the drop down and select Host. This will match the host (music.example.com) instead of the base URL (*.example.com). For more, check out how Bitwarden clients do URI matching.
There are also a few other interesting settings available under the Settings tab if you scroll to the bottom and click the Other section.
For those of you with families, significant others, etc. who'd like to share specific information/logins with others, Vaultwarden has you covered.
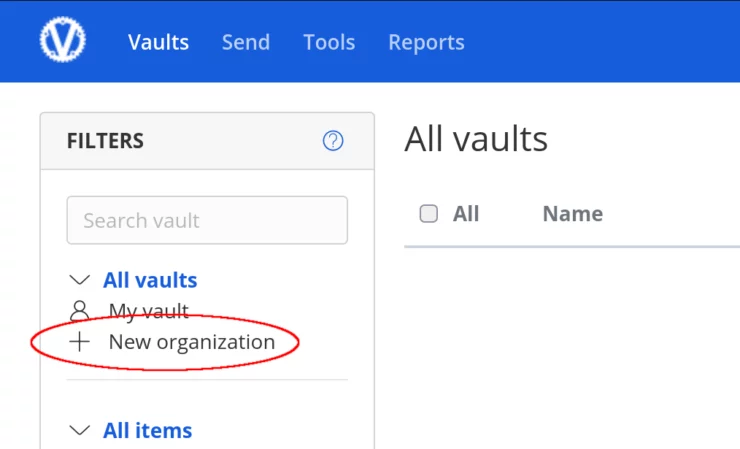
From the home page, on the left side, click on + New Organization. You'll have to give it a name and an email address.
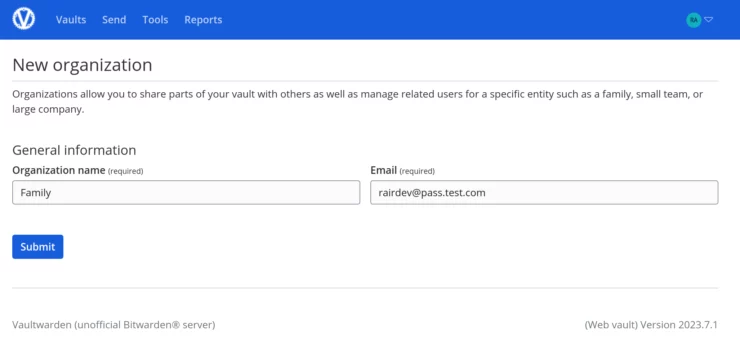
After creation, you'll notice there's a new tab at the top of your homepage where you can directly access any shared vaults.
Inviting members is easily accomplished using the Members tab.
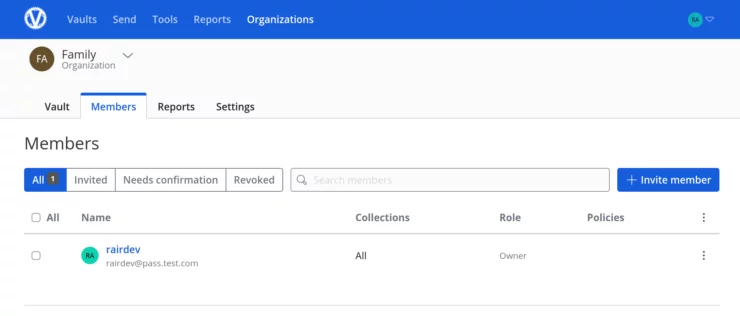
But what's most interesting to me is actually the organization's policies. There are numerous available, like setting requirements on the password generator or master password, and requiring 2FA.
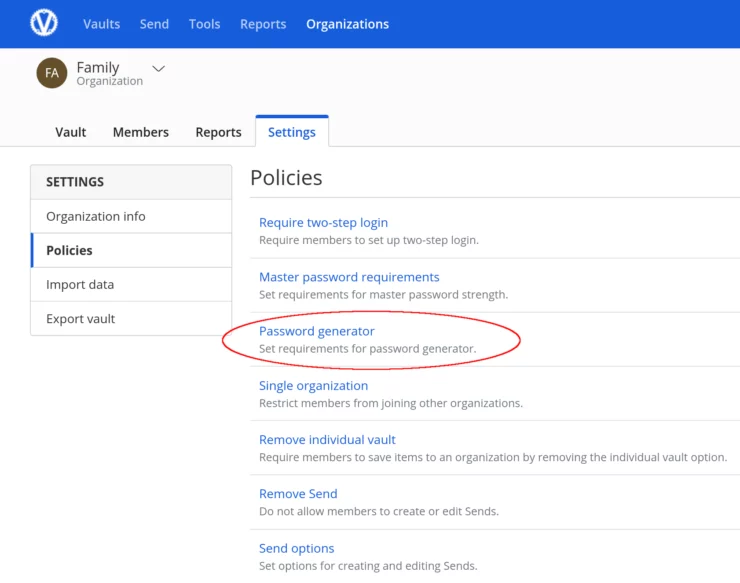
This was a huge requirement of mine and a simple feature I'm happy exists in Vaultwarden.
Enable and Access Vaultwarden Admin Page
Vaultwarden's Admin page gives you full access to the Vaultwarden Docker Compose app in a nice GUI. It should be noted that everything that can be set on the Admin page can also be done with ENV variables. However, any changes you make via the Admin page would override any you set in the ENV variables.
Generate the Access Code
To enable the admin page, you'll have to create an "authentication token". Older versions of Vaultwarden just let you create a long string of letters and numbers to use. The new version allows you to create a much more secure version which is stored as a "hash" (not the actual access code).
We can use a tool in the Vaultwarden Docker Compose container to help us create this "hash". The command is:
sudo docker exec -it vaultwarden /vaultwarden hash
Enter your desired password (twice) which will spit out a long string starting with ADMIN_TOKEN='$argon2...
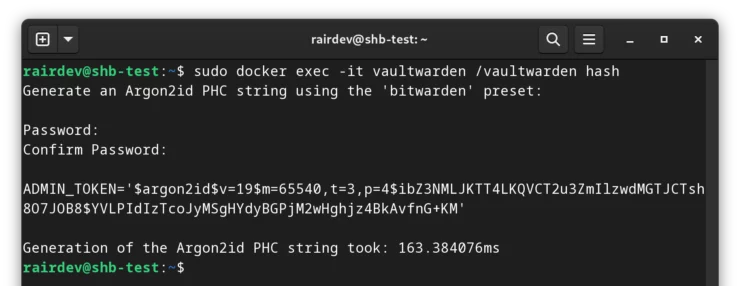
Copy this long string, it's going to go into our Vaultwarden Docker Compose file.
If you don't want to bother with putting this (or other secrets) in your compose files, they can also be mounted into the container as secrets:
echo '$argon2id$v=19...' | podman secret create vw-admin-token -
And when running the container:
podman run ... --secret vw-admin-token,type=env,target=ADMIN_TOKEN ...
Note that this only (currently) works with podman run commands, and not with podman-compose!
Insert ADMIN_TOKEN into Docker Compose file
Insert this string into your Vaultwarden Docker compose file under the environment section like the following:
...
    environment:
        # This is required to allow vaultwarden to verify the TLS certificate!
      - DOMAIN=https://vault.$DOMAINNAME_HS
        # Admin page token (required to access admin page, otherwise can be disabled)
      - ADMIN_TOKEN=$$argon2id$$v=19$$m=65540,t=3,p=4$$ibZ3NMLJKTT4LKQzO7JOB8$$YVLPIdIyBGPjM2wHghjz4BkAvfnG+KM
...
The one CRITICAL point you need to see here is that I've doubled all of the $ signs to avoid what's known as variable interpolation. Note that there are 5 instances that need to be doubled.
This line uses the command line program sed to search for the line containing "ADMIN_TOKEN" and replacing all $ with $$. Keep in mind that if you already changed one $ to a double $$, you'll now have $$$$ which will not work!! The above command will only work if you haven't touched the ADMIN_TOKEN line.
Recreate your container
Finally, we will just need to recreate the container. That can be done with a simple:
sudo docker compose -f /home/user/docker/docker-compose-udms.yml down vaultwarden
Followed by:
sudo docker compose -f /home/user/docker/docker-compose-udms.yml up -d vaultwarden
Access the Admin Page
You should now have access to your admin page at your vault URL with /admin: https://vault.example.com/admin.
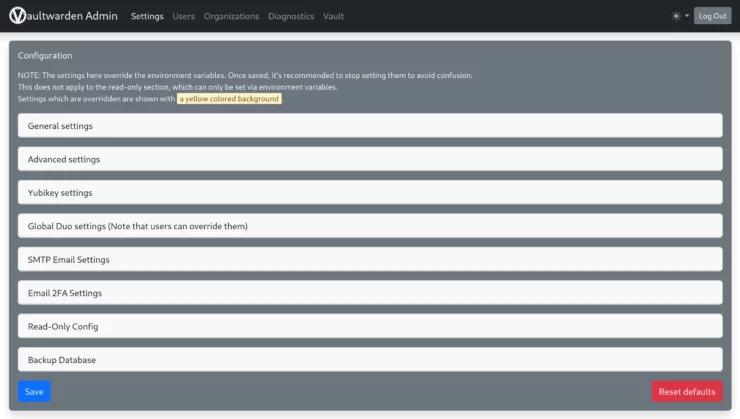
Enter your passphrase you used earlier when creating the token above, and you will be taken to the admin settings. There are too many to get to, and most are well-documented. But there are two I'd like to point out.
Disable new registrations
Under General Settings, you will see the Allow new signups option (default: true). I recommend switching this off to prevent anyone from creating an unwanted account on your Vaultwarden instance.
Note that you can still invite new users from this admin page if you setup the email server connection (discussed below); setting this option to false only turns off the ability to use the "create account" link on the login page.
Enable Email Notifications
Second, you'll find the SMTP Email Settings section further down. I also highly recommend using this feature to get email notifications, send invitations, and the ability to use Vaultwarden's "Send" feature.
Disable Admin Page
If you won't be needing the admin page, the best security would be to switch it off entirely. This is easily done by "commenting out" (putting a "#" sign in front of) the ADMIN_TOKEN line in your Vaultwarden Docker Compose section. You will need to recreate the container again as discussed above.

FAQ
How much does Vaultwarden cost?
Vaultwarden is a free and open-source software. That means it is free to use and the source code is accessible by all. Fortunately, Vaultwarden is also free as in cost! Plus, all of the associated Bitwarden clients can be used with your self-hosted Vaultwarden instance without any cost associated to them.
Is Vaultwarden as secure as alternatives?
There's never truly a guarantee of security for any application. Being open-source, means that generally the code is seen by all those working on it. However, the lack of a third-party security audit could leave room for vulnerabilities. Like most applications I run, I recommend taking the basic security precautions regardless:
- Secure the host machine
- Limit access to those who you know will be using the service.
- Follow the principle of least privilege
- Use security tools like Crowdsec or fail2ban
How-To Series: Crowd Security Intrusion Prevention System
What if I lose access to my Vaultwarden Vault?
Bad things happen, servers crash, hard drives fail. These are inevitable. We cannot prevent these things from happening, but we can mitigate their effects. One of the best ways is with a solid backup solution. I have written a small series on securely backing up your docker containers on my personal blog, and also show you how you can automate the process.
To me, this is one of if not THE most critical piece of self-hosting ANY application! With a solid backup, your Vaultwarden Vault can be recreated or restored in case of catastrophe.
Can I access Vaultwarden offline?
As Vaultwarden uses Bitwarden clients, we can see the offline caching policy available to the various clients. In most cases, your vault will be accessible from clients for 30 days before needing to re-sync. The only exception being mobile clients which have an expiration of 90 days
Conclusion
I hope you've found this guide helpful in setting up your Vaultwarden Docker compose file, along with a few tips to make using the password manager even easier.
As always, comments and feedback are welcome below. For more in-depth questions or if you're just looking for a chat, come join us on the SHB Discord server!
Vaultwarden is the de facto choice in the self-hosted password manager space. And this is for good reason. It is very simple to setup, well-maintained, and uses third-party audited (read: generally accepted as secure) clients for accessing your vault. The configurable options are plenty, and the base feature set is great for a small instance.
My significant other and I have found it an absolute joy to use, and Vaultwarden never "gets in the way" of our tasks. I hesitate to say it "just works" - there are a few hiccups from time to time.
However, that doesn't mean it is always the best or the only choice. There are new password managers on the rise that bring different features and great user experiences. If you find that Vaultwarden's lack of a third-party audit is a deal breaker, check out Bitwarden's unified container.
Regardless of how you feel about Vaultwarden, using a password manager is a MUST in our current age. Pair it with a VPN of your choice, and you have a secure way to store and access all of your account login information, and a way to share them with your family. I truly can't imagine switching back to a life without a password manager.

