Having shown how to setup VirtualBox Guest Additions on Ubuntu / Linux, it is now time to see how to update VirtualBox Guest Additions on Ubuntu / Linux guests. One of the minor annoyances of VirtualBox when compared to VMware is that update method for Guest Additions (known as VMware tools). VirtualBox requires a manual update guest additions. Although, it is not too difficult, we will show you how to update VirtualBox Guest Additions on Ubuntu guest. This method should work on other Linux distributions including Ubuntu Server and Debian.
Update VirtualBox Guest Additions on Ubuntu Guest
Note that guest additions are installed on guest OS (hence "Guest" additions). Therefore, the guest additions updates are also installed on the guest OS and not the host OS. On your Ubuntu / Linus guest, you will see notifications when Guest Additions update is available. This notification will also appear if your VirtualBox on host OS is a more recent version compared to your Guest Additions installed on guest OS.
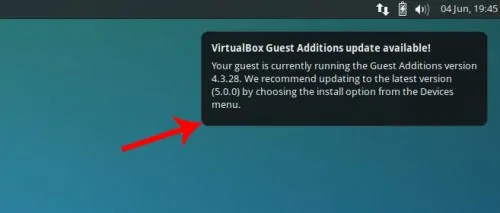
Once you see the notification above, you know it is time to update VBox guest additions on Ubuntu / Linux.
Recommended HTPC / Home Server Builds:
- Best Home Theater PC Build 2017 to do it all (Plex, Kodi, NAS, Gaming)
- Best Emby Server builds 2018 – Pre-built and DIY options
- Medium Budget 4K HTPC Build 2017 for Kodi, Plex and Gaming
- Cheap 4K HTPC Build for Kodi, OpenELEC, and LibreELEC 2017
- Low Power Home Server Build 2017 for Network File and Media Storage
- Best HTPC for Kodi with 4K on a Medium Budget 2017 (~$400)
- Energy efficient budget HTPC-NAS combo build 2016
Update VBox Guest Additions on Ubuntu
You do not have to download VirtualBox Guest Additions updates. All you have to do is, when Ubuntu or Debian virtual appliance is running, go to Devices->Insert Guest Additions CD image as shown in the picture below. This will mount the current version of VBox Guest Additions CD for installation.
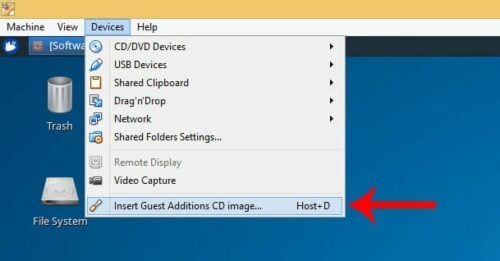
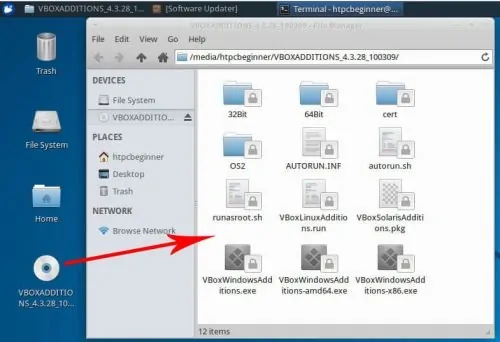
In some Linux distributions, the autorun script automatically opens. In others, the CD image is opened and contents are shown in file explorer. This is what happened with Xubuntu that is being used in this demo.
You may now right-click in the empty space within the file explorer and choose "Open Terminal Here". In some others, nothing happens after you insert CD image and you will have to manually open terminal and navigate the contents. The CD image is typically mounted under /media/USERNAME/CDNAME, where USERNAME is your username and CDNAME is name of the CD image. In this demo the path is:
/media/htpcbeginner/VBOXADDITIONS_4.3.28_100309/
Once you have a terminal window open and you are in the CD image folder, you are now ready to update VirtualBox Guest Additions on Ubuntu or Debian guest OS. Finally, run the VBox Guest Additions installer using the following command:
sudo ./VBoxLinuxAdditions.run
That is it, just sit and watch. The script will automatically prepare and update VBox Guest Additions on Ubuntu / Debian. In the above example picture below version 4.3.24 is being removed and version 4.3.28 is being installed.
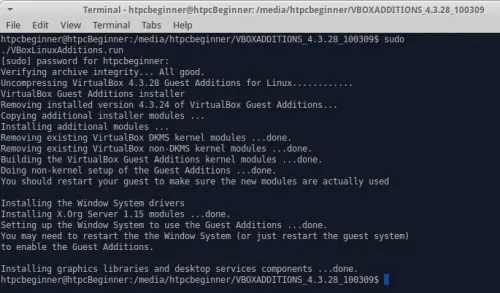
Once the installation finishes, reboot your guest OS, and you are done. You should now be able running the latest version of VBox Guest Additions on your Ubuntu guest. While a bit lengthy/cumbersome compared VMware tools update, it is not too difficult to update VirtualBox guest additions on Ubuntu.
Complete Guide to Setting Up a Home Server on VirtualBox Virtual Machine:
- Install VirtualBox - Windows 7/8/10 / Ubuntu/Debian
- Install VirtualBox Extension Pack - Linux and Windows Host
- Install Guest OS on Virtual Box - Ubuntu Server
- Install VirtualBox Guest Additions - Windows Guest / Linux Guest
- Update VirtualBox Guest Additions - Windows Guest / Linux Guest
- Setup VirtualBox Shared Folder - Windows and Linux
- Mount VirtualBox Shared Folder - Windows Guest / Ubuntu Guest
- Access USB Drive on VM - Windows and Linux Guest
- Configure Home Server on VirtualBox - Ubuntu Server


