Understanding Ubuntu Server partition scheme is critical for any enthusiast setting up a Ubuntu Home Server. Ubuntu Server, sits at the top of our list of home server operating systems. Yesterday, Ubuntu Server 16.04 LTS Xenial Xerus was released. My previous post explained how to install Ubuntu Server 16.04 in detail with screenshots and videos. One of the important steps in installation is Ubuntu partition scheme. Should you partition entire disk to use Ubuntu? Should you create a swap partition? How do you mount existing hard drives? In this Ubuntu Server partitioning guide, I will try to provide you with just enough information to partition your drives for Home Server setup. Keep in mind that this is just a general guideline and there are several other ways of setting up partitions for Ubuntu Linux.
Table of Contents
- Ubuntu Server Partition Scheme - Prework
- Step 1: Choose Manual Ubuntu Partitioning
- Step 2: Partition New Drives for Ubuntu Server Installation
- Step 3: Create New Partition Table
- Step 4: Create New Partition from Empty Space
- Step 5: Create a New Partition
- Step 6: Set Ubuntu Root Partition Size
- Step 7: Set Root Partition as Primary
- Step 8: Select Root Partition Location
- Step 9: Setup Root Partition
- Step 10: Setup Home Partition
- Step 11: Create Linux swap Partition
- Step 12: Mount Existing Hard Drive Partitions
- Step 13: Finish Ubuntu Server Partitioning
Ubuntu Server Partition Scheme - Prework
Before you can proceed with partitioning hard drive for Ubuntu installation, Ubuntu installer will detect any existing partitions and ask your permission to unmount them. On my Home Server / HTPC Combo Build 2016, I use a 4 TB HDD as a second hard drive to store my media. This second drive is already formatted to EXT4 and contains data. As shown in the picture below, this drive will be recognized as sdb and the installer prompts you to unmount the partitions. Umounting any existing partitions is required for disk partitioner to work on the drive.
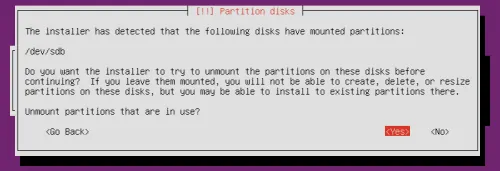
If have more than one hard drive, press "Yes" to unmount all existing partitions. Without further ado let us learn to partition hard disk for Ubuntu Server installation. [Read: How to run a Ubuntu home server on VirtualBox VM?]
Step 1: Choose Manual Ubuntu Partitioning
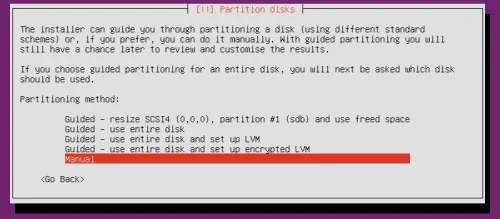
When the Ubuntu installer prompts you to partition disks, I recommend choosing the "Manual" partitioning method. Don't worry, manual partitioning is not that difficult.
Step 2: Partition New Drives for Ubuntu Server Installation
You should now see a list of all existing hard disks and partitions. In the example shown below, there are two disks:
- sda - 32.2 GB
- sdb - 5.6 GB
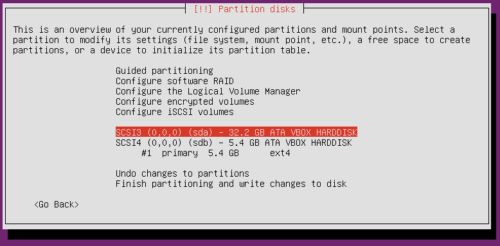
Note that the drive capacities presented above are just examples. A typical home server these days has several TBs of capacity.
Recommended Guides for Ubuntu:
There are no partitions in the first disk (sda). It is a new drive that will be partitioned to contain the Ubuntu operating system (on my Home Server this is an SSD). The second disk (sdb), already appears to contain one primary partition of 5.4 GB formatted as EXT4. First, we are going to choose sda to format it for Ubuntu Server installation. We will look at mounting and using the existing media partition in sdb, later in this Ubuntu partition guide. [Read: Install GUI on Ubuntu server 14.04 Trusty Tahr]
Step 3: Create New Partition Table
Since this is a brand new drive, you will first have to create a partition table. Press "Yes" and continue. If you drive already has partitions then you may not see this screen.

Step 4: Create New Partition from Empty Space
Once you create a new partition table, you see the amount of free space available in the selected drive. In this example, there is 32.2 GB of free space available in the new hard drive.
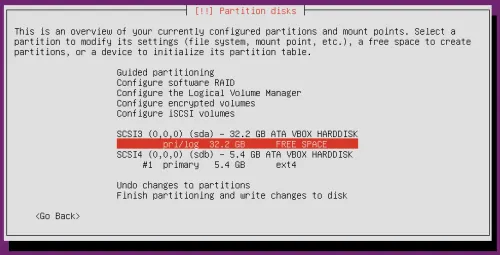
Select the free space to create a new partition.
Step 5: Create a New Partition
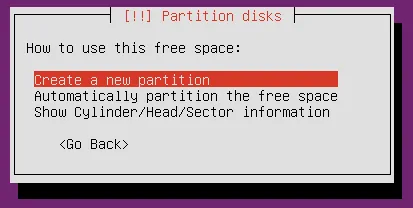
Nothing much to explain here. Just select "Create a new partition" to create the Ubuntu root partition.
Step 6: Set Ubuntu Root Partition Size
Ubuntu operating system can be split-installed into several separate partitions (the default is all OS in one partition). Many advanced Linux server administrators prefer installing the OS into multiple partitions. This allows easier maintenance and repairs. In this basic Ubuntu Server partitioning guide, I am not going to go crazy with partitioning. However, I do recommend installing Ubuntu Server in 2 separate partitions: one for root (/) and the other for home (/home).
First, let us create a root partition. Enter the size of the root partition. I recommend at least 10 GB for a headless server and 15 GB for a server with desktop environment.
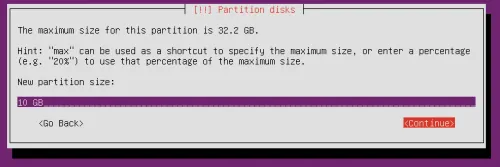
There is no real need for a typical Ubuntu home server to have more than 20 or 25 GB for root (/) partition.
Step 7: Set Root Partition as Primary
While, Ubuntu is robust and not picky about the type of partition (primary vs logical), I recommend setting the root partition to "primary".

Step 8: Select Root Partition Location
Next, select the location of the root partition in the hard drive. Either option is OK. I typically set up root partition in the beginning.

Step 9: Setup Root Partition
Then, you will be presented with a screen summarizing the settings for the to-be created new root partition. There are several options that need to be customized in this screen before finalizing Ubuntu partition scheme. Select each one of them and customize it as described below.

Use as: Select EXT4 for partition type. There are other partition formats for other purposes. If you are a newbie, stick with EXT4.
Mount point: Select / for mount point. This is the root partition.
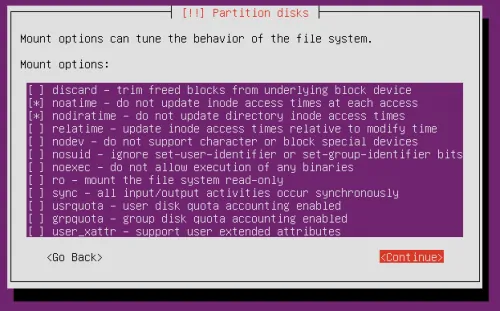
Select "Mount options". On the screen that follows, check "noatime" and "nodiratime" and uncheck everything else (unless you know what you are doing), as shown in the picture below. Ubuntu, by default keeps a log of when a file or directory is accessed. This is different than modified time. For home server applications, this is unnecessary write to hard disk. "noatime" and "nodiratime" options disable access logging for files and directories in the partition. Hit continue.
Label: Provide any label for the partition. Keep it short, simple, and without spaces or special characters.
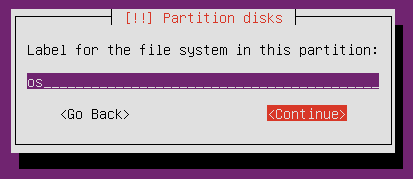
Leave "Reserved blocks" and "Typical usage" as is. For root partition, select "Bootable flag" and enable it.
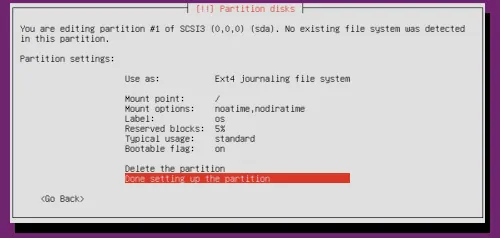
After customizing, the partition settings should look like what is shown in the picture above. Click "Done setting up the partition" to continue creating Ubuntu Server partition scheme.
Recommended Guides for Ubuntu:
Step 10: Setup Home Partition
The main advantage of creating a separate home partition is that all settings and customizations to user accounts are preserved through OS reinstalls. Also, if you have multiple Ubuntu installations, you can share the /home partition between them.
Pro Tip: I always setup my home server with 2 root partitions: one for current version of Ubuntu Server and the other for future version. When a new version comes around I install and set it up on second root partition. Until it is up and ready I still have the first partition with fully working Ubuntu Server. When the new setup is ready, I update GRUB and make it boot to the newer OS. This way my down time is very minimal. I share my /home partition between the two.
If you use our AtoMiC ToolKit to install home server apps, all these apps are installed in the user's home folder. When you reinstall or upgrade Ubuntu Server, all you have to do is recreate the startup scripts. All your apps, settings, and data will be loaded from the existing home folder. [Read: Install Monit on Ubuntu for home server monitoring]
Steps to create home partition are the same as steps 5 to 9 described above. Start by selecting the remaining free space in the hard disk. In the example used in this Ubuntu Server partitioning tutorial, it would be the 22.2 GB of free space after the newly created root partition (see picture below).
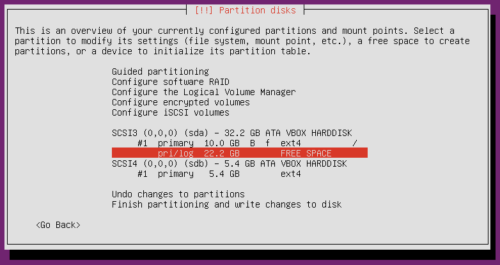
As in Step 5, Select "Create new partition". Then provide a size for the home partition. Typically this is the rest of the hard drive space minus a few GBs for swap partition. In this guide, I am using 20 of the free 22.2 GB for home partition and the rest for swap partition that will be created later.

You can setup home partition as "primary" or "logical", it does not matter. But know that there are limits on the number of primary partitions in a single hard drive. My recommended Ubuntu partition scheme includes only 3 partitions: root, home, and swap. I typically choose "logical" for home partition. Next, as in Step 8, select "Beginning" for partition location. Then, customize the home partition as follows:
Use as: EXT4
Mount point: Select /home
Mount options: Enable noatime and nodiratime
Label: home
Bootable flag: Leave it off
The final partition settings for home partition should look like what shown in the picture above.
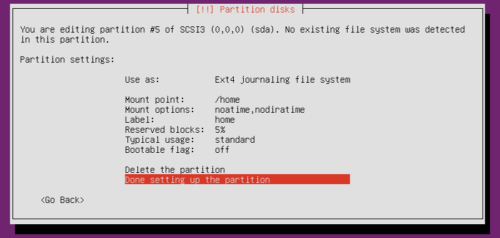
Select "Done setting up the partition" to continue.
Step 11: Create Linux swap Partition
Linux uses what is known as swap partition as backup RAM. If the hardware RAM is full, this reserved swap partition is used as RAM. Note that 1) setting up swap partition is optional and 2) swap partition is not as fast as hardware RAM. Ubuntu Server is very efficient. If your system has at least 4 GB of RAM memory, there is no need for setting up swap partition. But what is a few GBs in a multi-terrabyte home server worth? Not much, so I recommend having a small swap partition for any unforeseen situations. [Read: 5 Must have Android apps for HTPC or Home Server control]
Select the free space after home partition for creating a new swap partition.
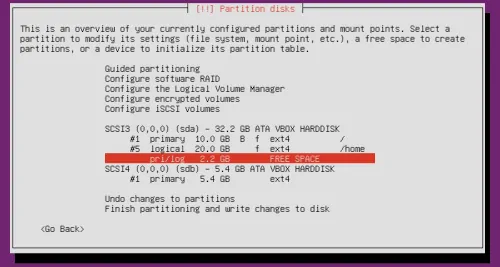
Once again, as in Step 5, you will have to select "Create new partition" and continue. Several years back the Linux recommended partition scheme was for the swap partition to be twice the size the capacity of hardware RAM memory. But in my opinion, this recommendation does not apply to today's setups where just the hardware RAM capacity is more than enough to run a Ubuntu home server. Swap size depends on your applications. For a typical home server, I recommend not more than 2 to 4 GB for Linux swap partition.
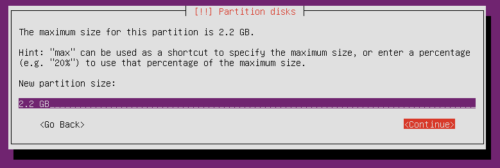
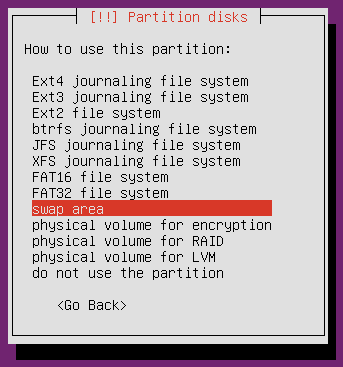
Once again, choose "primary" or "logical" (I choose "logical" for swap; as in Step 7) for partition type and "Beginning" for location (as in Step 8). Finally, customize the partition settings by selecting "Swap area" for "Use as", as shown in the picture below.
"Bootable flag" should be off. The final swap partition settings should look like what is shown in the picture below.
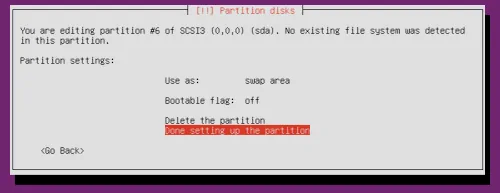
Once again, select "Done setting up the partition". If you have only one hard drive you may now select "Finish partitioning and write changes to disk".
Step 12: Mount Existing Hard Drive Partitions
As explained before, my Ubuntu home server includes two hard drives: a 250 GB SSD for OS and 4 TB HDD for media storage. How can you get your Ubuntu home server to load the media stored in the second hard drive? Well, by mounting the second hard drive (sdb) in the operating system to a known location. In the example shown in this guide, we have a second hard disk (sdb) with a capacity of 5.4 GB (in real-world this will be in TBs). In the picture below, notice that it is already formatted as EXT4. If your hard disk has more than one partition, then all of them will be listed here. All we have to do is to provide a mount point for each of the partitions in the second hard disk. No other customization is needed.
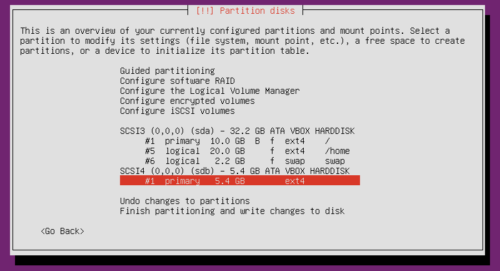
Select the partition in the second drive. You will be presented with partition settings screen as shown in the picture below.

For "Use as" select EXT4 since this partition is already formatted to EXT4. If the partition in second hard disk is formatted as NTFS then choose NTFS. After you set the partition type, several other settings will become available for customization. [Read: 10 best SSH Clients for Windows: free alternatives to PuTTY]
Recommended Guides for Ubuntu:
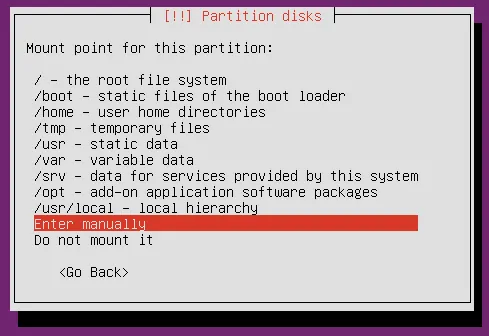
For "Format the partition" select "no, keep existing data". This is VERY IMPORTANT or you will lose any data in the second hard disk. Next select "Mount point" and "Enter Manually" as shown in the picture below:
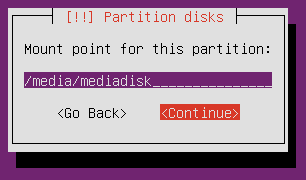
Then, enter a path to mount this existing partition. I typically mount all existing partitions under /media folder. In this example, since the second hard disk contains media files, I am calling it "mediadisk". So the full mount point is /media/mediadisk, as shown in the picture below.
Once again, select "noatime" and "nodiratime" for "Mount options" and leave the "Bootable flag" off. The final partition settings for the existing partition to be mounted should look like what shown in the picture below.
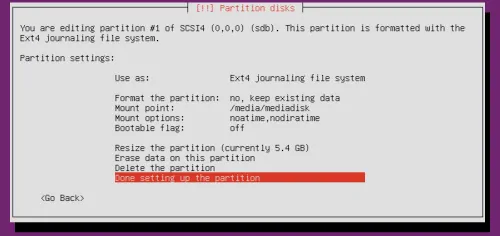
In the example used in this guide, there is only one partition in the second hard disk. If you have more, repeat Step 12 for each partition to be mounted. After server installation, you can access all your mounted partitions under the folder /media. For easier access, I create symbolic links to the mounted partitions within my home folder. [Read: How to create shortcut / aliases to commands in Ubuntu using .bash_aliases?
Step 13: Finish Ubuntu Server Partitioning
Finally, review the new Ubuntu partition scheme you created. Ensure that the capacities, partition formats, and mount points are accurate. Also ensure that all partitions that will be formmated have "f" and those that will not be formatted (keep existing data) have "K" listed before the partition format, as shown in the picture below.
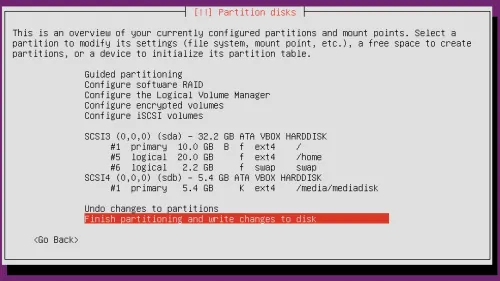
If everything appears correct, select "Finish partitioning and write changes to disk". Ubuntu installer will now partition your disks and continue with Ubuntu server installation. As I said at the beginning of this Ubuntu Server partitioning guide, there are several ways to format drives for a home server. This is the Ubuntu partition scheme I use for my home server and it has worked well for over 10 years. If you are a beginner, partitioning can be confusing and scary if there is potential to lose existing data. Hopefully, this basic Ubuntu Server partition scheme guide helps you in setting up your home server the best way you can.

![Ultimate Docker Server: Getting Started with OS Preparation [Part 1] Docker Server Tutorials 1 OS Preparation](https://www.smarthomebeginner.com/images/2024/01/Docker-Series-01-Intro-and-OS-Prep.png)
