To have Ubuntu boot to Kodi, you must either use a Kodi standalone service or autostart Kodi. The latter option usually goes along with disabling the login screen or prompt, launching and running Kodi in full-screen. Though there are many different ways to accomplish direct boot to Kodi in either of these two ways, they are variations of these two methods.
Having Ubuntu boot to Kodi directly without a window manager in the past was a bad idea. It was also hard to run Kodi from the command line in the past without Kodi-embedded Linux. The only easy way to have Ubuntu boot to Kodi directly without the desktop environment was by running Kodi full-screen in a window manager. Because many people do not use window managers over full desktop environments, very few people were able to learn and use this method.
Table of Contents
Install Kodi standalone service on Ubuntu

Today we are smarter and brighter and it is different. There is Kodi standalone service, which is different from the original Kodi in one great regard. It does not require a desktop environment (DE) or window manager (WM) to run. By installing Kodi standalone service, you can run Kodi all by itself with one simple command.
systemctl start kodi
To make that command run automatically at startup instead of your desktop environment or window manager, you can easily insert that command into a custom X session startup script. You can also use any of a great many available window managers with a custom X session instead of a desktop environment. The advantage of a WM is other apps can be configured to run at startup alongside Kodi as well, or you can just keep it only Kodi.
Downloading Kodi standalone service software
To get the Kodi standalone service software package, it is my preference to use the developer download. After all, as long as it is not broken or in development it should be the best way to acquire it. If you are a stranger to GitHub, do not be intimidated. It is a place for developers to share their source code and finished software. There are many packages hosted there, including Kodi hosted by team Kodi itself. To download and install this package, navigate to the developer's repository and click on the button that says Clone or Download.
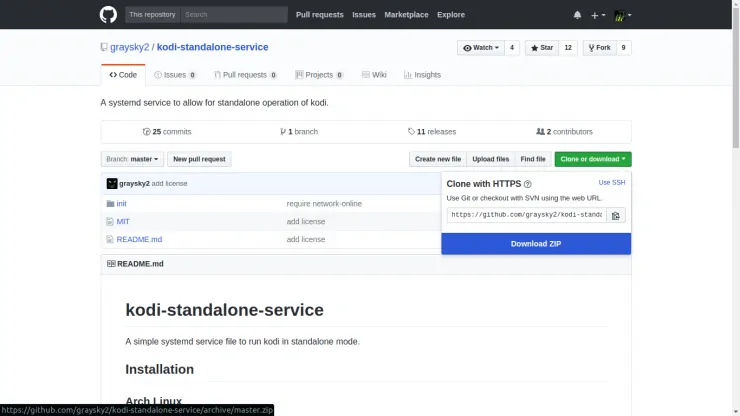
To download this package you simply select Download ZIP. This will download the file into your Downloads directory the way it would any other download. To clone it means using the "git" command, though for this package I would not even myself do such a thing though cloning is my preferred way. That is because this is a small yet simple and fully developed package that is not currently being developed to a new version and is proven to work on Linux systems. The only reason I would clone this is to develop it for my needs. I invite you to try this great hobby, but it is beyond the scope of this tutorial.
Ubuntu users can learn all about it on the Ubuntu wiki's CompilingEasyHowTo page. For our purposes, we will just download the zip file, and extract the folder we need to the destination directory. This is one of the easiest installations there is on GitHub. All we must do is open a terminal and extract the file we need from the zip archive in Downloads. Some people like to play around, but my motto is one command for all and all for one command. Wouldn't it be great if it always took only one command?
unzip -p kodi-standalone-service-master/kodi-standalone-service-master/init/kodi.service>/usr/lib/systemd/system/kodi.service
Has it ever been this easy to install software?
Installing required software dependencies
If you are paying attention, you will also notice on the GitHub developer page the software requires the X11 windows system to run. Though Ubuntu and the desktops provided with Ubuntu all use X11, we need to upgrade our X11 software to server packages.
apt install xauth
apt install xorg
apt install xinit
apt install xserver-xorg-core
apt install xserver-xorg
apt install xserver-common
The developer page shows different variations of package names for X11. So, the ones you see are different, as are the package names for other required software you do not have to install running Ubuntu.
You also need systemd and a version of polkit suited for your particular Linux, but these packages run natively in Ubuntu and most other Linux distros already. If your operating system does not use systemd, do not install it unless you have done your research and know what you are doing. It is better to use an operating system such as Ubuntu that already uses systemd.
Creating a Kodi user with no login and password
To keep Kodi from changing things in your user profile, I recommend always giving Kodi a true name in Ubuntu or your preferred Linux strain. For Kodi standalone service to work, you must create a user for Kodi and create a home directory for Kodi.
useradd kodi -u 420 -g kodi -G audio,video,network,optical \
-d /var/lib/kodi -s /usr/bin/nologin kodi
passwd -l kodi > /dev/null
mkdir /var/lib/kodi/.kodi
chown -R kodi:kodi /var/lib/kodi/.kodi
This is great. Now we have the ability to run Kodi without any desktop, windows, or mirrors (LOL!), but we still have to open up the terminal and execute "systemctl start kodi". There are ways to fix that too, because remember we want to make Ubuntu boot to Kodi only!
Configuring startup apps
An operating system usually provides a system application to help you configure apps to autostart on login. For instance, with Ubuntu it is Startup Applications Preferences. You may notice Startup Applications Preferences is not actually part of Ubuntu, but it is part of the Gnome desktop environment.
Startup Applications Preferences
You can use the search provided by the dashboard to find Startup Applications Preferences in Gnome, or you can navigate to it through Settings panel.
- GNOME Desktop on Ubuntu
- Autostart apps with Startup Applications Preferences
- 1. Command to open Startup Applications in Gnome:
"gnome-session-properties" - 2. Click on Add to configure a new startup app.
- 3. Use the browse button to find the app by navigating through the
"usr/bin/"directory. It will autofill the fields if you select the app this way. - Type in the name of the app, and the CLI command for the app.
- 1. Type in "Kodi" or "Kodi standalone service" in the name field.
- 2. In the command field use:
"kodi"(for Kodi);"systemctl start kodi"(for Kodi standalone service) - You can optionally fill the Comment field.
- 1. You can include special notes to yourself, such as "startx" launches the DE from the CLI
- 2. Comments can be used to describe what the appddcation does or how to begin using it.
- 3. Use the Edit button if you wish to make any changes later.
- 4. Add any other apps you might want to run at startup, such as your VPN service or SSH server.
By doing it this way, you will be able to log in as user "kodi" and run Kodi only. You can also login normally to your desktop, and run Kodi inside a window in the DE. You have to log in as a regular user (not "kodi") to see the desktop this way again. You can easily decide to keep it this way and add Kodi to startup apps, applications that autostart when you log in.
Almost every DE has a way to manage startup apps. If you can't find it or you are just lazy, or even if you are only working on the CLI, you can link Kodi to startup apps with one simple command.
ln -s /usr/bin/kodi ~/.config/autostart
If Kodi is not installed in this location, you can easily find the correct path using the "which" command.
which kodi
This will output the correct path.
Disable desktop login screen in Ubuntu
To use the dashboard in Ubuntu to disable the desktop login screen, mouse over to the Ubuntu main menu icon and open Dash. Navigate to Activities and utilize the search. Look for and click on Users and select the user you want to log in automatically. We want to log in to Kodi as the user "kodi". So, here we pick "kodi" and click Unlock. Enter the password and toggle the Automatic Login to ON.
This will allow to login to Kodi or Kodi standalone service, or Ubuntu boot to Kodi. If you exit Kodi to the command line, you can restore Kodi using the command "startx". This restores your default X session, which is particular to your desktop environment. You can also return to your desktop GUI. For Gnome the command to return to your desktop is "gnome-session". Every DE that uses X11 (this means Ubuntu) runs in an X session. You can read on to learn how to create your own custom X session. This method is a little more technical, but not much. It is also a lot more fun in the end.
Create a custom X session
If you want to create a custom X session for Ubuntu boot to Kodi running full-screen in a window manager you can. You can also boot directly to the Kodi standalone service using an X session script. This method of using a custom X session script also allows you to run Kodi alongside X11 server and client software.
This means you can not only use apps in a window manager but if you do not you can still use apps in the background and make X11 server/client app connections. That includes remote connections. If you want to further explore that world, I highly recommend visiting a more thorough read on Wikibooks.
Our custom X session script needs for Ubuntu boot to Kodi without a desktop GUI and start Kodi automatically. We can create a script by creating a new file with a text editor on the CLI.
nano ~/.xinitrc
This allows you to create a new file called ""xinitrc"". The dot that precedes the file name makes it a hidden file. The contents of that file should match the code displayed here. Note it is important the ampersand follows each line of command for the script to work.
#!/usr/bin/env bash
systemctl start /usr/bin/kodi &
To add a DE or WM you do so in the form "exec gnome-session" or "exec fluxbox" for a great window manager app. If you are not using Kodi standalone service, you can specify the option to run Kodi full-screen with the "-fs" switch. For instance, if you want to start Fluxbox and open Kodi in full-screen your file would look differently.
#!/usr/bin/env bash
exec fluxbox &
/usr/bin/kodi -fs &
If you don't want to try anything new and you don't want any fancy windows, just use the default X11 system WM. You can do that by adding using "exec /usr/bin/x-window-manager" instead of "exec fluxbox". You should use the "which" command here as well, to tell you the correct path to "x-window-manager".
which x-window-manager
So, your configuration should be only one line different.
#!/usr/bin/env bash
exec /usr/bin/x-window-manager &
/usr/bin/kodi -fs &
This is probably as close you can get to emulating the Kodi standalone service in terms of GUI only. It is much more beneficial to use the standalone service software because it provides Kodi real standalone service. Its higher purpose is not to free Kodi from a window frame.
Associating xinitrc with xsession
If you want to make your custom X session the session you always log in to (i.e. graphical desktop manager), you need to link it with "~/.xsession".
sudo -H -u kodi bash -c "ln -s ~/.xinitrc ~/.xsession"
Use sudo to apply the configuration only to user "kodi" or another specific user by linking the ".xinitrc" script file. This will create the ".xsession" file in the user's home directory. By associating your X session with Kodi, you can log in as Kodi to the X session from the login screen or CLI prompt. To associate the custom X session with another user substitute "kodi" with the other username. That way, you can keep your regular Ubuntu desktop session intact. It is important to know the ".xsession" file is stored in a user's home directory and is the one used to launch a session. The ".xinitrc" file is used only for configuration of ".xsession".
If you are not using Kodi standalone service, you do need to use at least a WM in place of a DE. That is because Kodi was designed to run on the X11 window system. It is impossible to even start the GUI for Kodi on the command line without a DE or WM or Kodi standalone service. Even if you boot without the DE or WM through Grub, you will have to either launch the DE or a WM to run Kodi when you are not using Kodi standalone service. For both options, I suggest creating a separate Grub entry for running Ubuntu without the installed DE, booting only to the CLI. That way nothing is in your way until you decide and put it there.
Grub is made to be modified, believe it or not. The way you can do that is by opening a terminal and using your preferred inline text editor add your own new Grub menu entry. It will actually be a duplicate entry of the operating system you want to run, only without the GUI. You will boot into the CLI for Ubuntu using this menu entry. The rest is up to our custom X session script.
Switch to root
First, make sure you are logged in as root in the terminal.
su
# If you have sudo installed use:
sudo su
Highlight and right-click copy the menu entry for your operating system from "/boot/grub/grub.cfg" and right-click paste it into "/etc/grub.d/40_custom"!
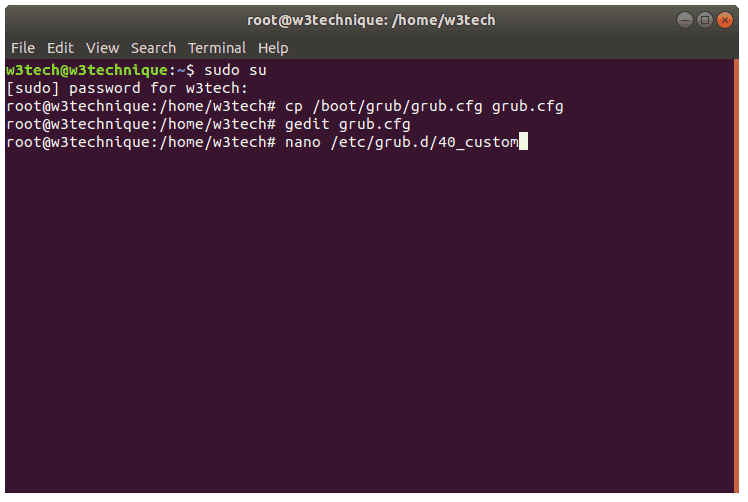
A note here that you will experience an issue copying and pasting portions of the text cut off by the size of the window of the terminal. I had to copy the configuration file and open it with gedit to right-click copy the menu entry.
cp /boot/grub/grub.cfg grub.cfg
gedit grub.cfg
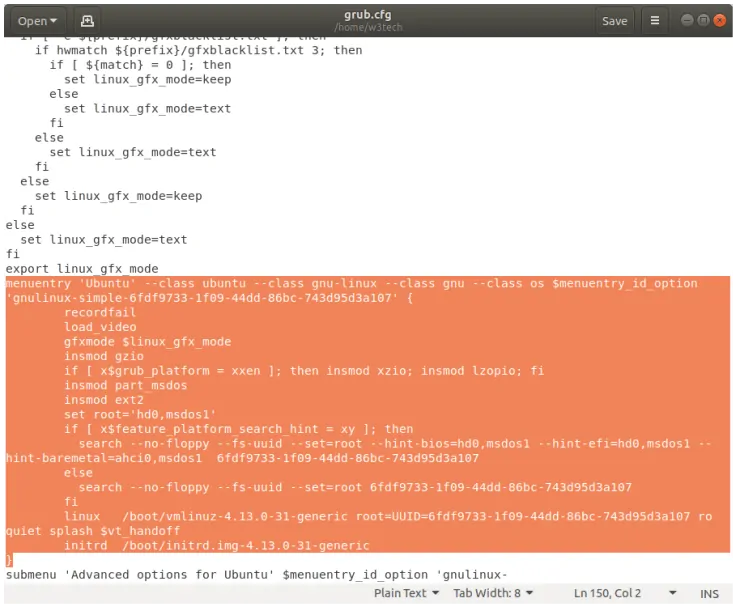
Where the menu entry contains "quiet splash" change it to "text" instead.
You should also change the name of the entry!
I just appended mine with "CLI" for command line interface.
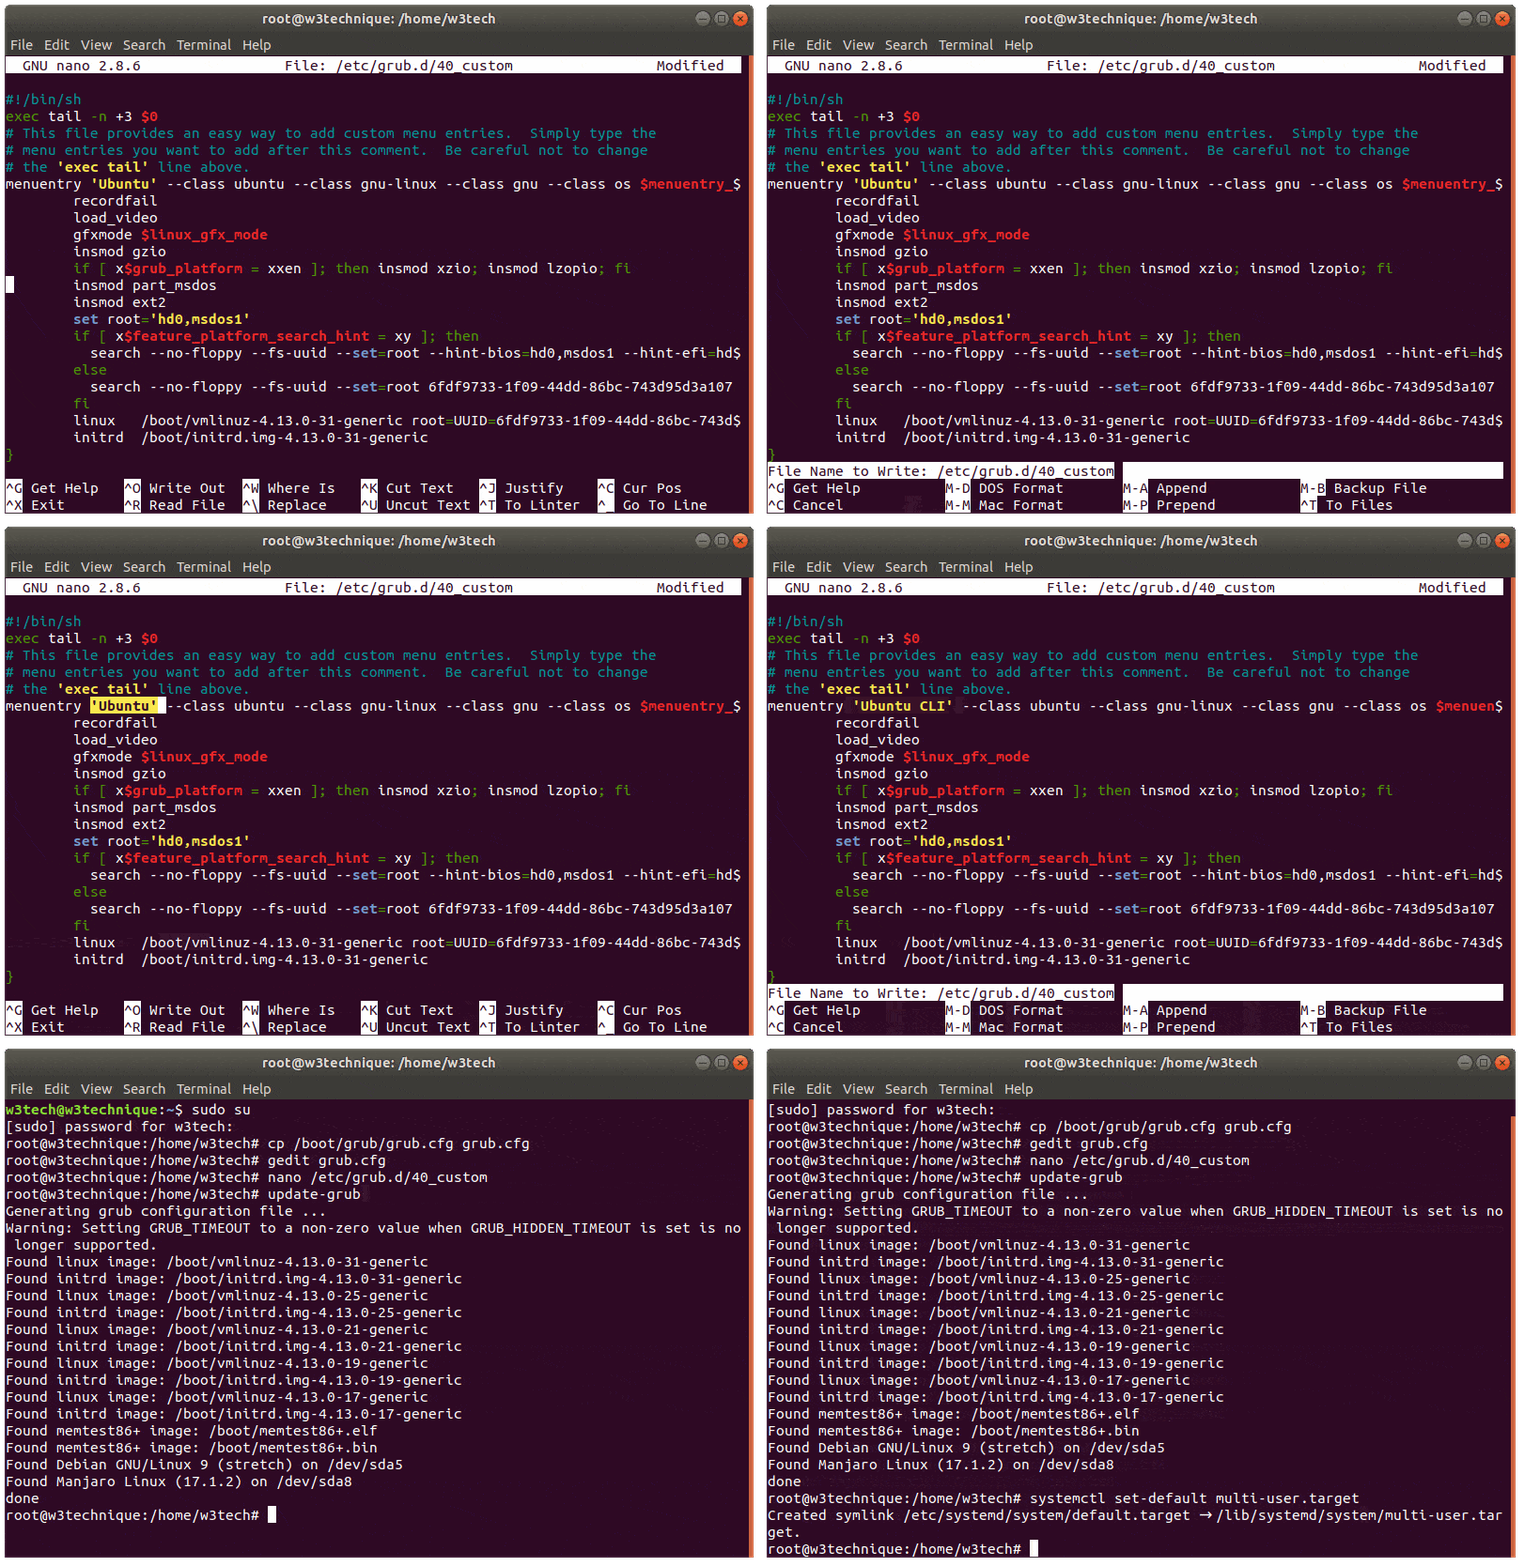
CTRL+O overwrites the current file after changes
CTRL+X exits the nano text editor
You must first answer "yes" to keep any changes when trying to exit nano.
Update changes to grub and systemd
You must update Grub for the changes to take effect.
update-grub
For Debian and derivatives such as Ubuntu or other Linux using the package systemd, you must also run an extra command. This changes the graphical login screen to the CLI login prompt.
systemctl set-default multi-user.target
If you do not like the change later, you can revert with another command.
systemctl set-default graphical.target
Disable login prompt
To disable the login prompt, create a custom configuration file for the LightDM data manager using your favorite text editor. Use nano and make a new configuration file for autologin with LightDM.
mkdir /etc/lightdm/lightdm.conf.d
nano /etc/lightdm/lightdm.conf.d/50-myconfig.conf
Inside this new file, type the following text.
[SeatDefaults]
autologin-user=kodi
This way you will go directly to your operating system. If you are using Ubuntu Server (or if you install it alongside Ubuntu Desktop), you will not be prompted by the CLI to log in.
Final thoughts
There are several inventive ways you can boot directly to Kodi, but before Kodi standalone service you had to run Kodi in full-screen. You could install Ubuntu Server alongside Ubuntu Desktop, and you can install Ubuntu without a desktop. There are also Linux distributions that are made to run only Kodi, such as OpenELEC and LibreELEC. There is also OSMC, for Open Source Media Center. Check out my guide comparing these three Kodi-embedded Linux distros next!

![8 Amazing Raspberry Pi Ideas [2022]: Beginners and Enthusiasts Raspberry Pi ideas](https://www.smarthomebeginner.com/images/2021/09/raspberry-pi-4-dev-board.jpg)

