In addition to the changes to Google Photos, the growing list of privacy concerns, is driving users to self-hosted replacements for the all encompassing Google suite. Enter Nextcloud.
This guide will show you how to setup your own instance of Nextcloud on Docker with some simple optimizations and easily-added security.
Of all the options I've tried (snap, bare metal, and Docker), I have found Docker and docker-compose to be simple enough with room for infinite tweaks and customization if you so desire.
We will be setting Nextcloud Docker up behind Traefik v2, a reverse proxy, which will take care of SSL (Secure Sockets Layer) certificates* automatically and allow other services to easily be added in the future. In the past, SSL certificates were sometimes an expensive thing to add, but now it couldn't be easier with Let's Encrypt - a nonprofit certificate authority.
*More precisely these are actually TLS (Transport Layer Security), SSL's successor, certificates but the name 'SSL' has stuck.
Table of Contents
Nextcloud Background
Nextcloud is a constantly growing and changing software that aims to include a wide developer and user base while focusing on core quality and usability.
What is Nextcloud?
In Nextcloud's own words, it is "the first completely integrated on-premises content collaboration platform on the market". In less ambiguous terms, Nextcloud is an open-source cloud software that allows for cross-platform syncing and sharing of files.
You can also use it to store and backup contacts, calendars, and sync them across your devices. There's nearly endless possibilities to build out your Nextcloud with the Nextcloud App hub as well.
It is aimed at everything from individuals running a single-user instance at home to huge enterprise and institutional implementations. That might sound overwhelming, but I believe it pulls off this strategy quite well.
Many Google suite users are looking for a direct 1:1 self-hosted replacement. Unfortunately, this is not it and you will have a hard time matching case-for-case with the Goliath that is Alphabet Inc. However, the malleability of Nextcloud can get us close to replicating Google's online suite of tools.
Nextcloud vs OwnCloud
Nextcloud vs OwnCloud topic could be an entire article on its own; full of drama and intrigue. In 2010, ownCloud was started by Frank Karlitschek. The product grew and built a solid base until Frank decided to part ways in 2016 and forked ownCloud to create Nextcloud.
Some might say Nextcloud is an evolution of a product that was getting stale and facing an internal identity crisis. The truth probably lies more in the vision ownCloud had for ownership of its product and a desire to move away from a truly open-source model. While that may have been true at the time, the two products have come into their own.
There are many comparisons on the web (some an obvious resentful riposte), but the short version is that ownCloud's core features are clearly focused on business and enterprise (as evident in its website) needs while Nextcloud is more focused on community involvement and adding many new features.
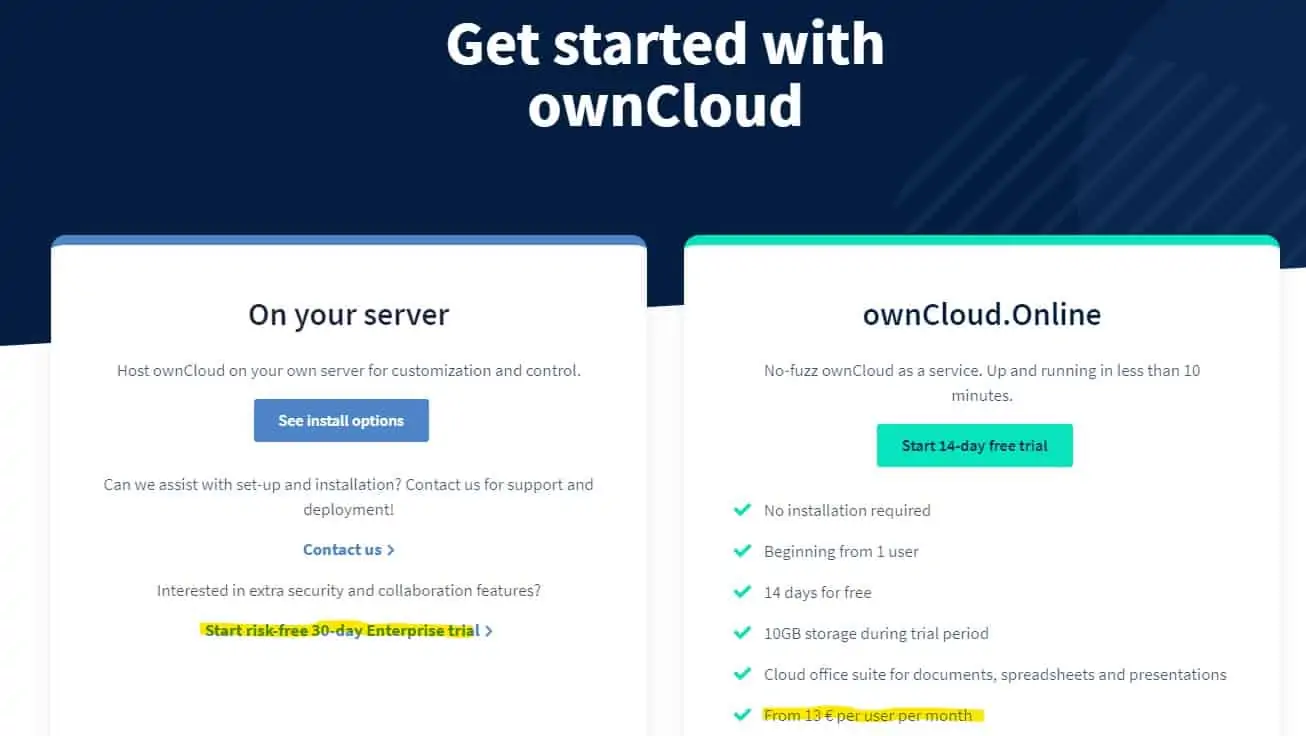
In my opinion, this means that ownCloud does a few things very well and Nextcloud does many things adequately. My personal experience with Nextcloud is it is stable enough with features that provide a good personal cloud and can be shared with my significant other and a few family members.
In the past, we have written about how to install OwnCloud using Docker on Raspberry Pi.
Recommended Guides on Docker:
Nextcloud Docker Setup
One consideration I must address is where you will be setting up this server. If you are setting this up in a home environment and wish for Nextcloud to be accessible outside of your LAN, you will need a static IP address (or use a Dynamic DNS service/updater) - see Cloudflare with Traefik.
Your router will also need to port forward the desired entry points (ports) for Nextcloud. If your ISP is blocking the typical ports for web servers (80 and 443), you can use an alternate set of ports (8080 and 8443 for example) and use port forwarding.
This guide will follow (although not exhaustively) recommendations in our Docker security best practices to ensure added layers of security for internet-facing applications.
Prerequisites for Docker Nextcloud Setup
In addition to what is mentioned above, the following are needed to successfully follow this guide:
- Ubuntu 20.04 LTS (or similar) - Basic familiarity with Linux terminal commands, although we will try out best to make it easy for newbies.
- Docker and docker-compose installed and working
- Traefik v2 up and running
- CNAME/A DNS record pointing to your server's IP address
I will be following the same guiding principles laid out in our comprehensive guide to setting up Traefik.
Nexcloud Installation Overview and Notes
We will begin by deploying a simple Nextcloud Docker stack to get it up and running. But before finishing the setup wizard, we will secure our connection by putting it behind our Traefik v2 stack.
Nextcloud Stack Services Versions
You may notice that I have chosen to use specific version numbers for each service. This is intentional. As software evolves and is updated, we can't guarantee the 'latest' version of one piece of software will necessarily be compatible with the rest.
If you plan to use a version number higher than what is used in this guide, you can always try it and if it does not work, switch to the versions listed below to get started. We will do our best to keep this Docker Nextcloud guide up-to-date.
We will be using the official release version 21 Docker image from Nextcloud although there are others (NextcloudPi, linuxserver.io). There are pro's and con's to each, but for simplicity and flexibility, I find the official image quite satisfactory.
Supporting Services - MariaDB and Redis
Alongside Nextcloud, we will be installing a MariaDB container for improved scalability and performance over the Nextcloud default SQLite database. The final piece is to include a Redis (cache system for database queries) instance which will be used to help deliver the content faster.
Be the 1 in 200,000. Help us sustain what we do.You will gain benefits such as Deployarr access, discord roles, exclusive content, ad-free browsing, and more.🔥 Holiday Sale! 25% Off Platinum Membership$399.99$299.99 (ends December 31).Join the Geek Army (starting from just $1.67/month)
Nextcloud Docker Setup Parameters
Let's start by creating the required folders and permissions. If your have followed our previous Docker guide and Traefik guide, you should already have some of the following.
Docker Folder
We will begin by creating a directory (folder) structure for Docker containers.
I like to keep my specific Docker related files in a subdirectory of my user while reducing permissions to any outside user. To do this we will first create a Docker directory using the following command:
mkdir ~/docker
Next, set a special permissions rule so that all files and directories created within it will have no access to anyone but the current user. This command is a bit outside the scope of this guide, but we are telling our system to create all files and directories below with only the read permission for the group, and no permission for other. This prevents files from accidentally becoming world-readable.
setfacl -d -m g::r -m o::--- ~/docker
Docker Secrets Folder
For a bit of added security, we will create a secrets folder to store passwords and any other sensitive information, as explained in our Docker Security best practices guide.
By adding sudo in front, it will be owned by the root user.
sudo mkdir ~/docker/secrets
Let's use the same trick as above but create even stricter permissions for the secrets directory.
sudo setfacl -d -m g::--- ~/docker/secrets
Secret Files
We need to create two secret files for passwords that will be used to secure our database. First will be the root password. If you can think of a strong password, go ahead and use it, otherwise we can generate a pretty strong random(ish) one with the following command:
date | md5sum
You can copy it by highlighting it and using Shift+Ctrl+C. We will then create a new file and paste it in:
sudo nano ~/docker/secrets/db_root_password
Shift+Ctrl+V to paste, Ctrl+O to save(hit enter to confirm), Ctrl+X to exit. We will repeat the steps above with a new password for the database user:
sudo nano ~docker/secrets/db_password
Environmental Variables
Next we will create a .env (environment) variable file, if you don't have it already, to give Docker a few bits of information that aren't secret enough that we need to keep them in secret files. We will be adding to this later:
nano ~/docker/.env
Add the following variables, again if you do not already have it from our previous guides. Rreplace 'shb' with your user name:
DOCKER_DIR=/home/shb/docker
DOCKER_SECRETS_DIR=/home/shb/docker/secrets
Building the Nextcloud Stack using Docker-Compose
That's it for the boring stuff. Now we need a Nextcloud docker-compose file to define our services!
If this is your first time seeing or using a YAML (.yml or .yaml) file, it should be noted that the structure is critical! We have high level declarations (no spaces before the start of a line), and declarations within (always two spaces further than the declaration above). Even a single space or the use of "tab" can render the file useless and fill your output with errors.
I like to add comments to my code/files so you have a better understanding of what the line of code below does and why we included it. They are denoted by a '#' sign; anything following it is a comment and not read by the program using the file. They are not necessary to use the code and can be safely removed if it is too cluttered for your liking.
Make sure you are in your Docker directory, and make a new file called nextcloud.yml.
cd ~/docker && nano nextcloud.yml
Add the following to it.
version: "3.7"
# Above we must declare the docker-compose file version which allows Docker to
#    understand the syntax we are using. Normally does not need to change.

# Services (containers) we would like this document to run
services:
  ## All services/containers go below this line (note the two space indentation in front).
Nextcloud Docker Compose
Next, let's add the Nextcloud Docker-Compose snippet (either to nextcloud.yml or docker-compose-t2.yml):
  # Nextcloud Docker Application
  nextcloud:
    # Use the official nextcloud image (v21.0.0 at time of writing this)
    image: nextcloud:21
    # Set to allow easy Docker DNS name resolution - not strictly necessary
    container_name: nextcloud
    # Same as above
    hostname: nextcloud
    # Container will restart unless we specifically stop it
    restart: unless-stopped
    # Defines how we want our container to connect outside
    networks:
      # Use an internal network for the nextcloud services
      - nextcloud
    # Open ports in the format host:container - We will remove this later
    ports:
      # INSECURE - we will remove this later after completing a few more steps in this guide
      - 80:80
    # Persistent volumes with bind mounts to easily move/backup data
    volumes:
      # I like to use the /opt folder to hold my Docker bind mounted volumes
      - /opt/volumes/nextcloud:/var/www/html
    # Environment (internal to the container) variables to simplify setup
    environment:
      # Redis host name (container_name)
      REDIS_HOST: nc-redis
There appears to be two schools of thoughts 1) Use a single supporting service container (eg. MariaDB) and share it with all services that need it (this is what our docker guides have followed), or 2) Isolate each service (eg. Nextcloud), with its own supporting services such as MariaDB.
MariaDB Database for Nextcloud
If you already have a MariaDB container running based on our Traefik 2 guide, then you may create a new database for Nextcloud and use that. You may skip the Nextcloud database part below.
Alternatively, if you prefer to create and isolated stack of Nextcloud, use the following docker-compose snippet to create a MariaDB instance for Nextcloud:
  # Nextcloud Database - Using MariaDB, but can also use MySQL or PostgreSQL
  nextcloud-db:
    # MariaDB 10.5 again not using latest to prevent future breakage
    image: mariadb:10.5
    # Set to allow easy Docker DNS name resolution - not strictly necessary
    container_name: nc-db
    # Same as above
    hostname: nc-db
    # Container will restart unless we specifically stop it
    restart: unless-stopped
    # Recommended database settings as listed in:
    # https://docs.nextcloud.com/server/21/admin_manual/configuration_database/linux_database_configuration.html
    command: --transaction-isolation=READ-COMMITTED --log-bin=msqyld-bin --binlog-format=ROW
    # Defines how we want our container to connect outside
    networks:
      # ONLY using an internal network and not exposing to the internet
      - nextcloud
    # Persistent volumes with bind mounts to easily move/backup data
    volumes:
      # I like to use the /opt folder to hold my Docker bind mounted volumes
      - /opt/volumes/nextcloud-db:/var/lib/mysql
    # We add our secrets here
    secrets:
      - db_root_password
      - db_password
    # Environment (internal to the container) variables to simplify setup (notice the secrets used below)
    environment:
      MYSQL_USER: nextcloud
      MYSQL_DATABASE: nextcloud
      MYSQL_ROOT_PASSWORD_FILE: /run/secrets/db_root_password
      MYSQL_PASSWORD_FILE: /run/secrets/db_password
Redis for Nextcloud
Here again, the two schools of thought listed above applies. You can use Redis docker-compose from our GitHub repo, which used in our Authelia and WordPress guides.
Or, create your own service using the Redis docker-compose snippet below:
  # Nextcloud (in memory) Redis Cache - speed up lookup transactions
  # Speeds up Nextcloud by reducing the time spent "looking" for things
  nc-redis:
    # Official REDIS 6.2 image based upon alpine Linux (to keep it lightweight)
    image: redis:6.2-alpine
    # Set to allow easy Docker DNS name resolution - not strictly necessary
    container_name: nc-redis
    # Same as above
    hostname: nc-redis
    # Container will restart unless we specifically stop it
    restart: unless-stopped
    # Defines how we want our container to connect outside
    networks:
    # ONLY using an internal network and not exposing to the internet
      - nextcloud
    # Persistent volumes with bind mounts to easily move/backup data
    volumes:
    # I like to use the /opt folder to hold my Docker bind mounted volumes
      - /opt/volumes/nextcloud-redis:/data
That is all the docker services you need to installing Nextcloud on Docker.
Docker Networks
Next, you will have to define the network blocks in your docker-compose. This is explained previously in our Docker Traefik Guide.
But, for added security we will create a separate network for nextcloud. Add the snippet below to your nextcloud.yml file or existing docker-compose file's networks: section:
# Declare networks at the high level to avoid confusion and to access those
#   not initially started by this document.
networks:
  # Internal facing network for Nextcloud Docker containers
  nextcloud:
    name: nextcloud
    # Define how we want the network created
    driver: bridge
Save it with Ctrl + O and close with Ctrl + X.
Docker Secrets
Next, as described in detail in our Docker security practices guide, add the secret files we created to the docker compose file.
As before, add this to your nextcloud.yml file or existing docker-compose file's secrets: section:
# Must use a high level declaration of our secrets (notice the use of the environmental variable
#   we set above in .env)
secrets:
   db_password:
     file: $DOCKER_SECRETS_DIR/db_password
   db_root_password:
     file: $DOCKER_SECRETS_DIR/db_root_password
Once again save it with Ctrl + O and close with Ctrl + X.
Starting Nextcloud, Adding Traefik, and More
Attention CloudFlare users! You might have to pause CloudFlare during this part of the setup so we don't end up with errors caused by CloudFlare. Refer to the Cloudflare Settings for Traefik Docker and the previously mentioned Ultimate Docker Home Server with Traefik 2" articles for tips on getting Traefik working with Cloudflare.
Start Your Nextcloud Docker Containers
Time to start up the Nextcloud Docker containers! By running the following command, we will pull the required images and start them!
sudo docker-compose -f nextcloud.yml up
Alternatively, you can use the docker commands or their aliases as described here, if you use one big docker-compose-t2.yml instead.
The -f option followed by our file name simply tells docker-compose that we want it to launch from a specific file name and not the default: docker-compose.yml
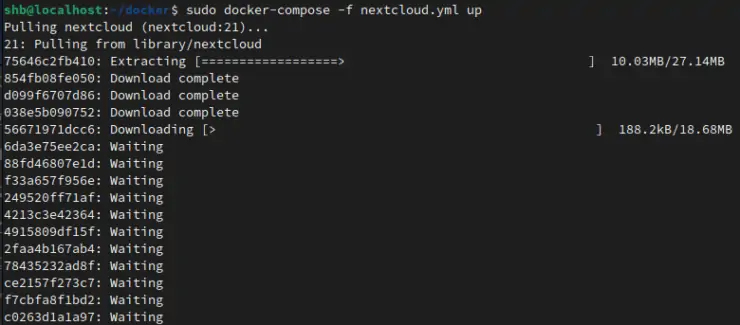
Once the images are pulled, you should start to see some logging information about each container.
After a minute or two, everything should be up and running, and the logs will stop. If you see multiple warnings, or the containers are restarting in an infinite loop, there's a problem - stop the containers with Ctrl + C and investigate the problem. The final line for the Nextcloud Docker container should include 'apache2 -D FOREGROUND'.
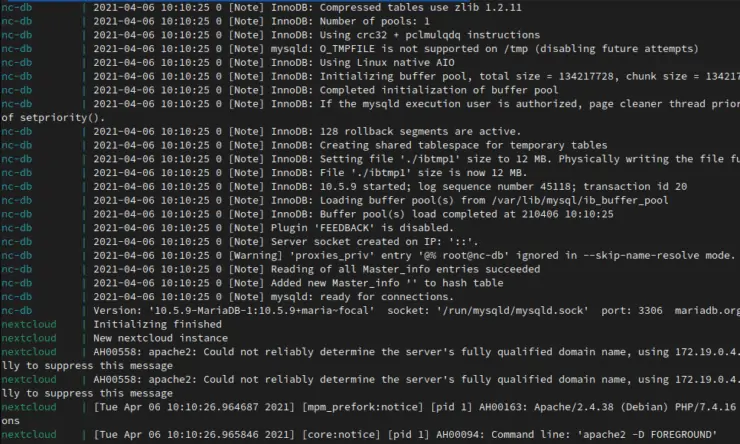
Note that in this guide we have not used -d flag while starting the containers, unlike in our Docker Traefik guides. We are not daemonizing the output and therefore logs will be displayed in real-time. Check our Docker Compose primer for basic commands (starting/stopping containers, checking logs, etc.) and to understand this concept better.
Open Nextcloud UI in a Browser
Visit the local IP address of your server in your browser (or public IP address if using a VPS). The local IP address will be the internal IP of the server on your network which might look something like 192.168.90.10 for example. If unsure, you can use the following command in your terminal:
ip addr
After navigating to the correct address in your browser, you should see the Nextcloud setup screen asking you to create an admin account.
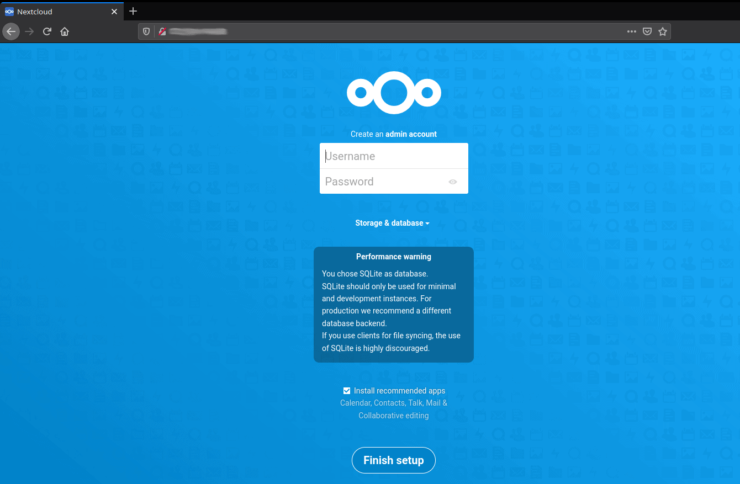
At this point it can be used locally, but since we are setting it up behind Traefik, let's secure it with SSL so we can connect via HTTPS.
Head back to your terminal and stop the Nextcloud Docker containers with Ctrl + C.
Traefik Setup for Nextcloud
Now that we have Nextcloud Docker containers working, let's secure them behind Traefik's reverse proxy.
Prepare Nextcloud for Traefik
Once again we will have a bit of setup before we start our Nextcloud containers. Let's begin by editing our .env file from before. We want to add the following line to the bottom, replacing the domain name with your own:
NEXTCLOUD_DOMAIN_NAME=nextcloud.example.com
Replace example.com with your actual domain.tld.
Next, edit your docker-compose snippets created previously in this guide and prepare it for working behind Traefik. Start by removing (or adding a # to the beginning of the lines) the following two lines under the nextcloud service:
...
#  ports:
#    - 80:80
...
We need to add Nextcloud to a second, outward facing network. This will give us one that will only be used internally to connect services (the nextcloud network), and one that will be used by Traefik to communicate with the internet (the proxy network).
...
services:
  # Nextcloud Docker Application
  nextcloud:
...
  # Defines how we want our container to connect outside
  networks:
    # Use an internal network for the nextcloud services
    - nextcloud
    ### Adding proxy network for communication with Traefik
    - t2_proxy
...
Also define the t2_proxy network (you may have already defined this if you followed our Traefik 2 guide.)
...
# Declare networks at the high level to avoid confusion and to access those
#   not initially started by this document.
networks:
  # Internal facing network for Nextcloud Docker containers
  nextcloud:
    name: nextcloud
    # Define how we want the network created
    driver: bridge
  ### Add to define external network to connect with Traefik
  t2_proxy:
    name: t2_proxy
...
Next, we define two more environmental variables for Nextcloud docker-compose to aid in the configuration:
...
services:
  # Nextcloud Docker Application
  nextcloud:
    ...
    # Environment (internal to the container) variables to simplify setup
    environment:
      # Redis host name (container_name)
      REDIS_HOST: nc-redis
      ### Add your domain name - Specifying trusted domain for security
      NEXTCLOUD_TRUSTED_DOMAIN: $NEXTCLOUD_DOMAIN_NAME
      ### Add local network as a trusted proxy - It's better to set the actual Traefik IP.
      ###   We will give it the range listed in the accompanying Traefik guide
      TRUSTED_PROXIES: 192.168.90.0/24
    ...
Finally, we need to add a new section to the end of our Nextcloud service to tell Traefik how to deal with this newly added application. I have added comments to aid in their understanding. This will go just below the section we just modified:
    ...
    labels:
      # We set 'enable by default' to false, so this tells Traefik we want it to connect here
      - "traefik.enable=true"
      ## HTTP Routers
      - "traefik.http.routers.nextcloud.entrypoints=https"
      - "traefik.http.routers.nextcloud.rule=Host(`$NEXTCLOUD_DOMAIN_NAME`)"
      - "traefik.http.routers.nextcloud.tls=true"
      ## Middlewares
      - "traefik.http.routers.nextcloud.middlewares=chain-no-auth@file" # No Authentication
      ## HTTP Services
      - "traefik.http.routers.nextcloud.service=nextcloud"
      - "traefik.http.services.nextcloud.loadbalancer.server.port=80"
    ...
To understand above code block better, you may review our Traefik Docker Compose explanation.
Start up Docker Nextcloud behind Traefik!
First, ensure that you have Traefik already running in the background.
As mentioned in the beginning of this guide, the assumption is that you already have Traefik running with appropriate middlewares (eg. chain-no-auth@file) created, as described in our Traefik setup with Docker compose.
Bring up the Nextcloud Docker stack next (notice how we are using the -d flag).
sudo docker-compose -f nextcloud.yml up -d
The containers will need a minute or so to full start again. You may follow traefik container logs and look for any errors.
And that's it! You have successfully started a Nextcloud Docker container behind your Traefik reverse proxy!
A few Nextcloud tips to get you started
Open your browser and head to your domain. You should see the Nextcloud setup wizard again, but the main difference this time is you should see a lock symbol next to your domain, indicating that it is indeed encrypted!
Start by creating your admin user account, clicking the MariaDB tab, and inputting the correct info:
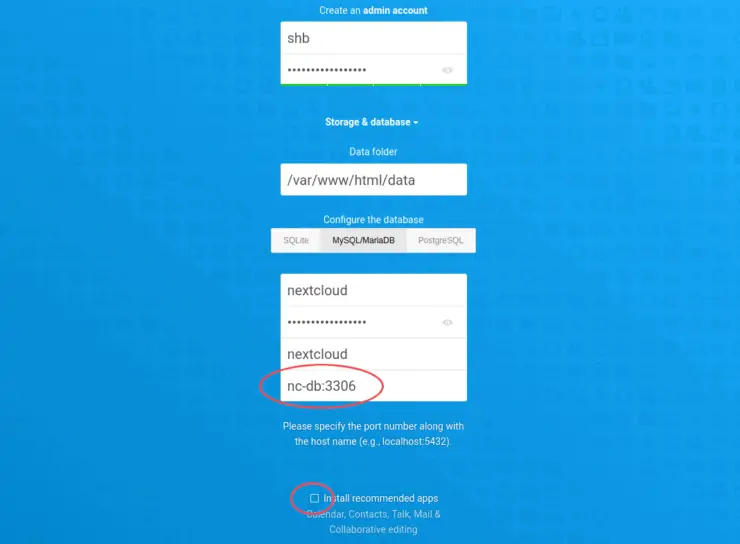
I do not recommend installing the recommended apps - only install what you need. The default "Collaborative editing" suite is a huge drag on performance and not very usable in my opinion.
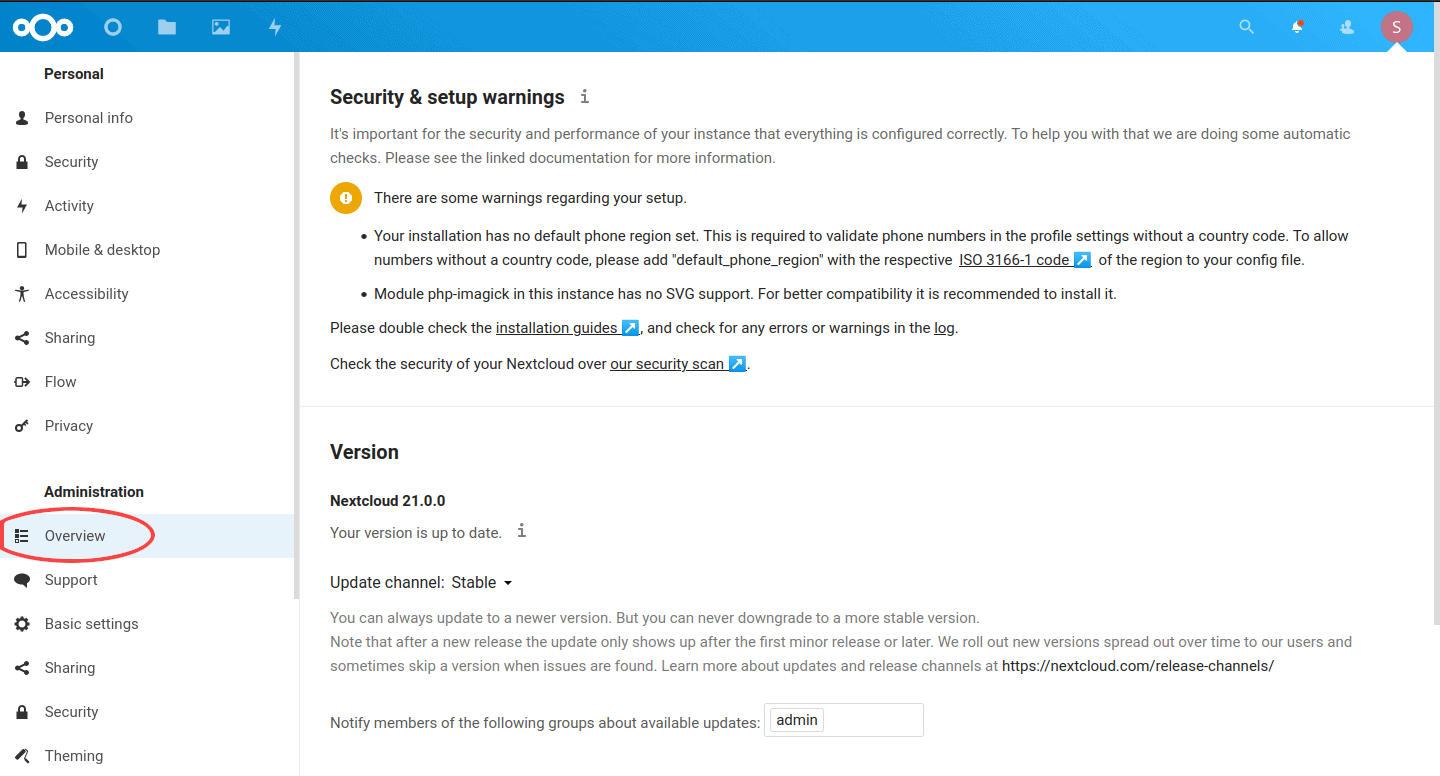
Once finished, you will be greeted with the default dashboard view. Before you get started syncing we will have a look at the Admin Overview page to ensure we don't have any glaring issues. To navigate to it, click on the profile "picture" in the top right corner which might just be a letter in a colored circle. Go to Settings.

In the left hand pane, navigate to Administration and click Overview. It will go through a quick scan, and as you can see on my setup, there were a few errors. These can be taken care of with two quick modifications.
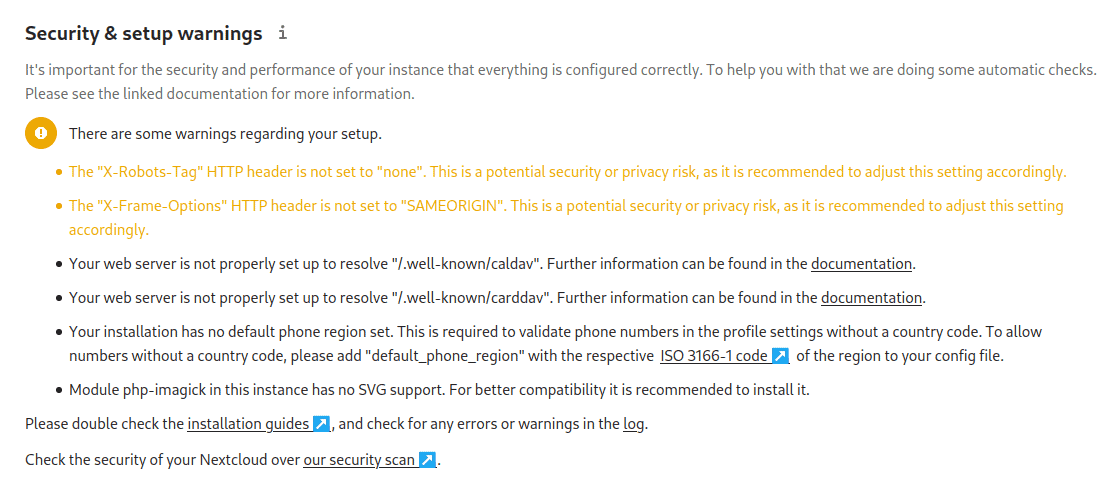
Note: The warnings about default phone region and php-imagick can safely be ignored.
Nextcloud has some specific quirks when it comes to security headers, so we will tweak the default middlewares file and get rid of these pesky warning messages!
Head to your Traefik dynamic rules directory (Docker Root Folder/traefik2/rules, if you followed our Traefik 2 guide).
Either open your existing middlewares.yml file, or create a new one called nextcloud-mw.yml and we will add the following snippet:
If you looking for TOML version, check out middlewares-nextcloud.toml.example in our GitHub Repo.
http:
  middlewares:
    ### Let's give them a new name so it won't conflict with others
    nextcloud-middlewares-secure-headers:
      headers:
        accessControlMaxAge: 100
        sslRedirect: true
        stsSeconds: 63072000
        stsIncludeSubdomains: true
        stsPreload: true
        forceSTSHeader: true
    ### We will modify this value for Nextcloud to remove the X-Frame-Options error:
        customFrameOptionsValue: "SAMEORIGIN" #CSP takes care of this but may be needed for organizr.
        contentTypeNosniff: true
        browserXssFilter: true
#       sslForceHost: true # add sslHost to all of the services
#       sslHost: "example.com"
        referrerPolicy: "no-referrer"
    ### While CSP is a good security setting, Nextcloud's Apache server takes care of this for us!
#       contentSecurityPolicy: "frame-ancestors '*.example.com:*';object-src 'none';script-src 'none';"
        featurePolicy: "camera 'none'; geolocation 'none'; microphone 'none'; payment 'none'; usb 'none'; vr 'none';"
        customResponseHeaders:
    ### Change this to none to remove the Robots error:
          X-Robots-Tag: "none"
          server: ""

### This section redirects requests for Nextcloud calendar and contacts service discovery
### source: https://docs.nextcloud.com/server/21/admin_manual/issues/general_troubleshooting.html#service-discovery
    nextcloud-redirect:
      redirectRegex:
        permanent: true
        regex: "https://(.*)/.well-known/(card|cal)dav"
        replacement: "https://${1}/remote.php/dav/"
Because we added and changed a few things, let's create a new middleware chain to put them all together. If you have followed along with the Traefik v2 guide, we will modify the middleware-chains.yml file to include the following at the bottom:
If you looking for TOML version, check out middlewares-chains.toml.example in our GitHub Repo.
http:
  middlewares:
    chain-nextcloud:
      chain:
        middlewares:
          - middlewares-rate-limit
          - nextcloud-middlewares-secure-headers
          - nextcloud-redirect
Here we have made a new chain to include the rate limit, Nextcloud-specific security headers, and finally the service discovery redirect for calendar and contact apps.
Lastly, let's modify the nextcloud.yml (or docker-compose-t2.yml) compose file one more time with our new chain (replace chain-no-auth@file):
services:
  # Nextcloud Application
  nextcloud:
...
    ## Middlewares
      ### We will modify from the default middlewares chain to use the new Nextcloud-specific middlewares
      - "traefik.http.routers.nextcloud.middlewares=chain-nextcloud@file"
...
And that's it! The good news is Traefik is smart enough to load these new settings dynamically, so the only thing to do is restart our Nextcloud docker-compose file and we should see the errors are gone:
sudo docker-compose -f nextcloud.yml up -d
Nextcloud Apps
To install and enable more applications, go back to the top right corner, click on your profile "picture" and select "Apps". In the default view, you can scroll down and see which apps are enabled. The app hub has quite a few things you can install to add functionality to your cloud.
A few notes about the App hub:
- Just because you install an app doesn't always mean it includes everything required. They are often "connectors" that enable you to add it only if you have the required backend working. This includes office editing suites, mail, antivirus, etc.
- As of writing this, not all apps are compatible with v21.
- End-to-end encryption (E2EE) is not working in v21. Even in v20 it is not 100% stable and should be considered a beta feature at best. If Encryption of specific files is critical, have a look into other tools.
Be the 1 in 200,000. Help us sustain what we do.You will gain benefits such as Deployarr access, discord roles, exclusive content, ad-free browsing, and more.🔥 Holiday Sale! 25% Off Platinum Membership$399.99$299.99 (ends December 31).Join the Geek Army (starting from just $1.67/month)
FAQs
Can I run Nextcloud on my home computer?
Yes, however, servers are designed to be run 24/7 and will degrade consumer-grade hardware over time. Make sure to have a separate backup of your data elsewhere.
Can I access Nextcloud outside of my home?
Absolutely! The point of adding the Let's Encrypt SSL certificates with Traefik is to allow access anywhere. That being said, there are some ISP specific issues you could run into which are too numerous to list. If you do not intend to share files with others, a VPN is a fairly easy workaround.
How do I update Nextcloud when running on Docker?
When running Nextcloud on Docker, it is not recommended to update the instance through the WebGUI. Although the images through Docker Hub may take a few days to populate, it is better to wait for the official build. To update, I recommend making a backup of your Nextcloud data first (my personal blog). Next you simply need to run the following commands:
sudo docker-compose -f nextcloud.yml pull
sudo docker-compose -f nextcloud.yml up -d
The first command pulls the new images from Docker Hub, and the second simply restarts the containers. Note that this does not delete the old container(s). If Nextcloud is unable to update for some reason, you can restore the old container. The steps for doing so are outside the scope of this article.
I followed your steps, why can't I see Nextcloud?
- Check your firewall rules - you will need to allow ports 80 and 443.
- Check if your ISP blocks the ports. You might need to enable port-forwarding in your router.
- If you set the Docker daemon to "iptables=false" you will need to add a NAT setting for your iptables yourself since Docker is no longer in charge of routing.
How do I add more storage to my Nextcloud?
Using Docker makes it quite easy, you have a few options (in order of increasing difficulty):
- option 1 - Enable to external storage app and select local. There are a few drawbacks however.
- option 2 - Mount the new drive into your system, stop your Nextcloud Docker containers, copy Nextcloud data directory (with same permissions) from old data folder onto new drive. Use a bind mount in your docker-compose file to mount your drive as such:
/path/on/host:/var/www/html/nextcloud/data
- option 3 - Create a data pool with zfs or lvm to quickly add more storage or replace defective drives.
Why doesn't X feature work? or Why don't they include X like they have in Y?
Keep in mind that Nextcloud is open source software and thus the developers are often not paid for the work they do. You can however contribute to the project yourself, donate to the developers whose feature you would like improved, or have a look through the various self-hosted and Nextcloud communities for answers.
Is Nextcloud Free?
Yes, Nextcloud is free and open source software under the AGPL v3 license. The hardware you must provide and can run a basic setup on as little as a single core CPU with 128MB of RAM. They do however recommend using at least 512MB of RAM.
As you add more apps and functionality, you will need more memory and processing power. For this basic setup, the recommendation from Nextcloud is fine, but with the addition of an office suite I would recommend a 2-core CPU with at least 2GB of RAM.
Are there alternatives to Nextcloud?
Seafile - Has similar functionality to Nextcloud and often touted as a simpler and more stable alternative. The Community Edition appears to have decent functionality, but to be comparable to Nextcloud, you would need to use the Pro Edition which only supports 3 users unless you pay an annual fee. Depending on what you want to use your cloud for, it could be a good alternative.
Syncthing - Not a cloud service at all, but offers continuous syncing between two or more computers in real time.
Concluding Remarks on Nextcloud Docker
With Nextcloud running on Docker, download and install the desktop app, mobile apps, and get syncing! For more intermediate and advanced Nextcloud topics, you can check out my personal blog linked previously.
Nextcloud is an extremely powerful tool and we have just taken the first baby steps into it with this article. As stated in the beginning, it can easily be run by an individual, and is also run by massive organizations with thousands of users. My experience so far has been good but not without hiccups. At times I must remind myself that it is open-source software and being continually developed with new features and improved stability.
Nextcloud will never be a true replacement for the monolith that is Google Drive/Docs/Gmail/Photos/etc. But it can come quite close while allowing you to keep control of your data. Thus far I'm a happy user, learning more about its capabilities by the day!


