We talked about SSH in the past and learned that SSH is a cryptographic network protocol for operating network services over an unsecured network. SSH provides an encrypted secure channel between you and the server without the need for a secure network. Today, I will show you how to simplify SSH access by using SSH config files. You will also have a few SSH config examples to get you started, so without further ado, let's get started. [Read: Introduction to SSH: What is SSH?]
Table of Contents
Prerequisites to simplify SSH access
In order to simplify SSH access, some prerequisites need to be checked:
- Have a Linux operating system available
In order to connect remotely to a host, via SSH, you need an SSH server. To install an SSH Server, you need a Linux operating system like Ubuntu, Debian, or others. If you don't already have a Linux server to connect to, you can learn how to install Ubuntu Server 16.04 LTS - Install SSH in order to connect remotely
The SSH service needs to run on your Linux Server in order to remotely connect to it. If you haven't installed the SSH server already, you can do it by following our guide on how to install SSH server on Ubuntu Linux.
Create SSH config files - SSH config examples
The first thing you need to do in order to simplify SSH access to your server is to create the SSH config files. Login via SSH to your server, and run the following commands:
Create the SSH folder to store the SSH config files:
mkdir -p ~/.ssh
Change permission to the folder to 0700 (read, write, and execute only for owner):
chmod 0700 ~/.ssh
Next, we need to create the SSH config file, and set the permissions to 0700:
touch ~/.ssh/config
chmod 0700 ~/.ssh/config
Now that our files are created, we need to connect to the SSH config file to configure it:
sudo nano ~/.ssh/config
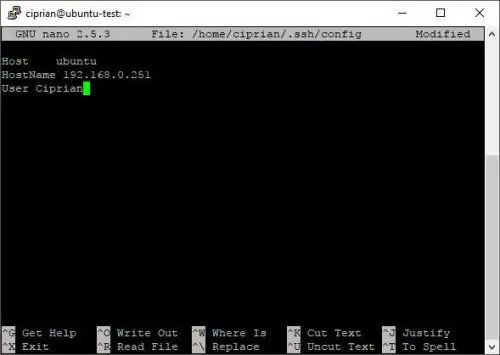
The file is initially empty, so we need to add the configuration. In my example, I configured the SSH server running on my local IP to be called Ubuntu, with the local IP as a hostname and the user Ciprian.
In the end, save the file by pressing CTRL+X, then Y to confirm.
Recommended Guides Secure Shell/SSH:
SSH config examples
There are various other configuration options to be used in the SSH config file to simplify SSH access. Here are the most used SSH config examples:
Host - specifies the alias for the server. Use an easy to remember name for your SSH connection for the server.
HostName - specifies the hostname of the server you want to connect to. You can also use the IP of the server if needed.
User - specifies the user used to perform the login, when connecting via SSH.
Port - specifies the port used to connect via SSH to the server. The default port is 22, but if you are using a different port for SSH, you can specify it with this option.
Compression - yes or no values can be used. This option is helpful only if you connect trough a high latency and low-speed internet connection. Usually, there is no performance improvement.
IdentityFile - with this option you can specify the file location from where the SSH client can read the key for connecting to the SSH Server.
For the complete SSH config examples, run the following command:
man ssh_config
Connect using the config file settings
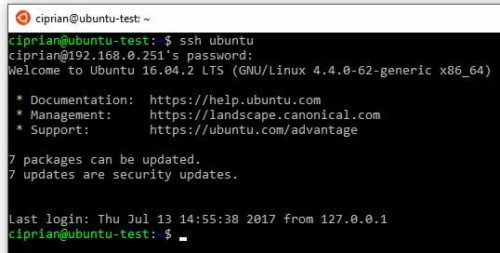
The configuration file is now running, so you can go ahead and connect to your host, with the new settings. Open up a Terminal and connect to your host:
ssh ubuntu
You will notice that the only required information in order to login is the password. After entering the password, you are connected to the SSH Server.
Wrapping up
Congratulations! You can now save a lot of typing by using a SSH config file. Expand your SSH knowledge by learning how to connect via SSH from your smartphone using JuiceSSH and if you need to connect from a Windows machine, here are 10 best SSH clients for Windows. Check back soon for more SSH guides in the future!


