VirtualBox shared folders allow you to share files between the guest and the host OSes on VirtualBox virtualization software. We have already showed you how to install VirtualBox on Windows and Ubuntu/Debian, and guest additions on Ubuntu/Debian and Windows. While VirtualBox Guest Additions increase the compatibility between guest and host OSes, I find that in some situations it is much more beneficial to have a VBox shared folder. For example, when I am writing a bash script on Windows, I can quickly run the script in my Ubuntu VM to check.
In this post, I will first show you how to setup a VirtualBox shared folder on host OS. VirtualBox interface is the same on both Windows and Linux. While I use VirtualBox on Windows 8 and Windows 10 for demonstration in this post, the procedure is exactly the same for Linux distributions, including Ubuntu.
Setup VirtualBox Shared Folders on Host OS
The first step in sharing a folder between guest and host OS is to create shared folder in VirtualBox. This is done while setting up the virtual machine on host OS (could be any OS) or at any point after setting up the virtual machine. The procedure to add Shared Folders in VirtualBox is the same for any host OS. If you are setting up a new virtual machine with shared folder then click on Shared Folder. On an existing and running VM click go to Devices-Shared Folder Settings.
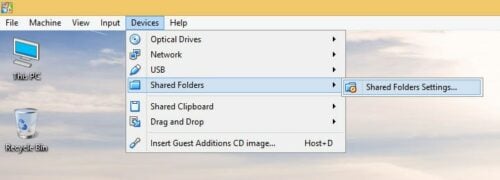
If you are adding a shared folder to an existing but powered-down VM then, right-click on the machine, and go to Settings->Shared Folder.
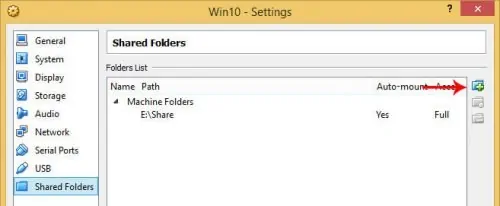
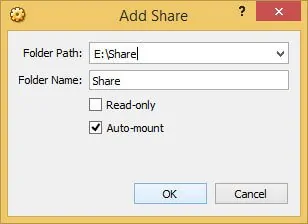
Next click on the + on the right to add VirtualBox shared folders as shown in the picture above. Browse and choose a folder to share for Folder Path. Then, provide a ShareName or Folder Name (keep this short and simple). In this tutorial I am choosing "Share". Finally check Auto-mount (see picture below). Auto-mount will automatically mount the shared folder upon boot (or immediately on a running VM).
Auto-mount vs Make Permanent: If you open Shared Folder Settings on a running VM, you may also see Make Permanent option that will be checked by default (as shown in the picture below).
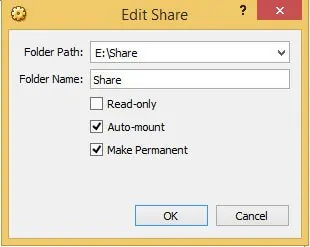
When adding a shared folder on a running VM, Auto-mount will mount the folder immediately but the mount will not stick after reboot. Make Permanent makes automount VirtualBox shared folder persistent (sticks on reboot).
So as you can see you can setup VirtualBox Shared folders at any point: during VM creation or while VM is running. Now you know how to share folder on VirtualBox. But how to share files with VirtualBox? In order to share files you will have to mount VirtualBox shared folders in the guest OS. So in the upcoming posts, we will show you how to mount and access VirtualBox shared folders in Linux and Windows guests.
Complete Guide to Setting Up a Home Server on VirtualBox Virtual Machine:
- Install VirtualBox - Windows 7/8/10 / Ubuntu/Debian
- Install VirtualBox Extension Pack - Linux and Windows Host
- Install Guest OS on Virtual Box - Ubuntu Server
- Install VirtualBox Guest Additions - Windows Guest / Linux Guest
- Update VirtualBox Guest Additions - Windows Guest / Linux Guest
- Setup VirtualBox Shared Folder - Windows and Linux
- Mount VirtualBox Shared Folder - Windows Guest / Ubuntu Guest
- Access USB Drive on VM - Windows and Linux Guest
- Configure Home Server on VirtualBox - Ubuntu Server


![Ultimate Docker Server: Getting Started with OS Preparation [Part 1] Docker Server Tutorials 1 OS Preparation](https://www.smarthomebeginner.com/images/2024/01/Docker-Series-01-Intro-and-OS-Prep.png)