Table of Contents
- Have you ever run out of space on your media center?
- But what ever can I do? Its too expensive to keep buying larger hard drives!
- Is this whole post going to be in rhetorical questions?
- What is LVM
- LVM Setup - First Steps
- Setting the LVM up:
- Formatting our new LVM LV (Logical Volume)
- Mount LVM LV (Logical Volume) on Boot
- Enable Smart Drive Monitoring
- All Done, Welcome to the world of LVM!
Have you ever run out of space on your media center?
Of course. We all use Sickbeard, Sonarr, and/or Couchpotato. And if your at all like me you add 20 movies at a time until your run out of space.
But what ever can I do? Its too expensive to keep buying larger hard drives!
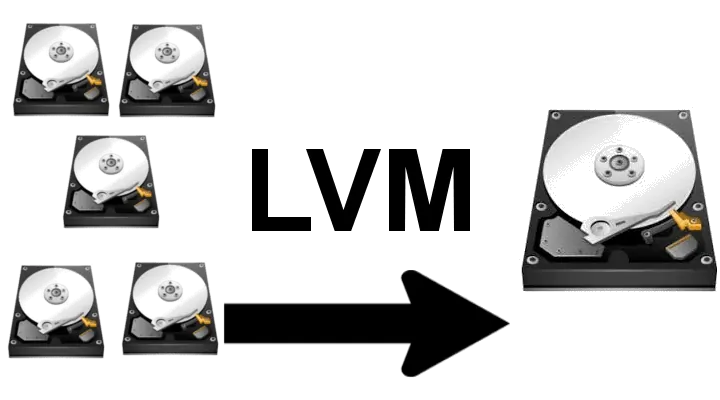
Easy, pool hard drives with LVM2. Its super easy to setup LVM. You can add drives and re-size it at any time.
Is this whole post going to be in rhetorical questions?
I'll stop...move on to LVM tutorial.
What is LVM
LVM is short for Logical Volume Management, its included in Ubuntu. Its similar to a software raid but has some differences. Mainly the way they differ is the way data is written to the disks. LVM by default writes to the drives linearly. Meaning drive one is filled before anything is written to the second disk. You can set LVM to stripe data like a RAID0 configuration. There are ups and downs to both that we will discuss. The best thing about LVM is you can use any storage device. You could make a LVM of SD Cards, HDD, SSD, USB Thumb drives, external hard drives, and others. You can use any mixture of storage options. My storage started with a few 1TB SATA drives, then some 2TB. At one point I found a great deal on 2TB USB3 external drives. I bought them and I add them as needed. I currently have 12GB.
Recommended HTPC / Home Server Builds:
- Best Home Theater PC Build 2017 to do it all (Plex, Kodi, NAS, Gaming)
- Best Emby Server builds 2018 – Pre-built and DIY options
- Medium Budget 4K HTPC Build 2017 for Kodi, Plex and Gaming
- Cheap 4K HTPC Build for Kodi, OpenELEC, and LibreELEC 2017
- Low Power Home Server Build 2017 for Network File and Media Storage
- Best HTPC for Kodi with 4K on a Medium Budget 2017 (~$400)
- Energy efficient budget HTPC-NAS combo build 2016
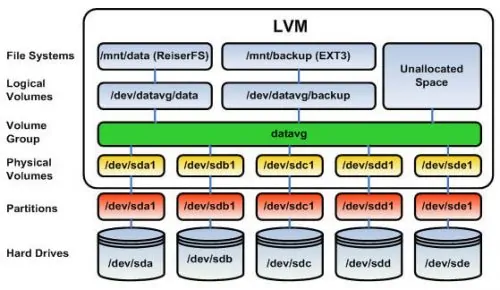
How a LVM is layed out
You can see in this image how things flow. Notice how you can make multiple Logical Volumes. You can add or remove space to any of these, make them any format, and much more. Its really very powerful. The majority of this guide will involve using the terminal. Read more about using a Linux terminal. You can install Putty on windows and copy and paste the commands.
LVM Setup - First Steps
Find your drive names
To setup LVM, first we need Ubuntu installed. I have done this with 12.04 and 14.04. Although this is officially supported and should work in any Ubuntu version. Next we need to attach, locate, and format your drives. Connect all your drives you want to use. (If you already have data that you want to move to the LVM start with one empty drive. You can copy data from your existing drive to the lvm then format it, and add it to the LVM. We will talk about adding drives to your LVM in the second part of this guide. For now attach all your drives you want to add to your LVM and run the command below in the Ubuntu command line.
sudo lsblk -o NAME,FSTYPE,SIZE,MOUNTPOINT,LABEL
NAME FSTYPE SIZE MOUNTPOINT LABEL
sda 29.8G
├─sda1 ext4 26.1G /
├─sda2 1K
└─sda5 swap 3.7G [SWAP]
sdb 1.8T
└─sdb1 LVM2_member 1.8T
└─storage-storage1 (dm-0) ext3 5.5T /data
sdc 1.8T
└─sdc1 LVM2_member 1.8T
└─storage-storage1 (dm-0) ext3 5.5T /data
sdd 1.8T
└─sdd1 LVM2_member 1.8T
└─storage-storage1 (dm-0) ext3 5.5T /data
Notice the sdb, sdc, sdd. Write these down. Make sure your only selecting the drives you want to use for your LVM setup. sda is typically your OS drive. Leave that alone.
Format your drives
Now we need to format the drives to setup LVM in Ubuntu. We are going to use the Ubuntu command
fdisk /dev/sdX
YOU WILL LOSE ALL YOUR DATA WHEN YOU FORMAT. I AM NOT RESPONSIBLE FOR DATA LOSS. TRIPLE CHECK THE DRIVES YOUR FORMATTING. IF YOUR UNSURE, DISCONNECT DRIVES WITH IMPORTANT DATA FOR THIS PROCESS.
 fdisk /dev/sdX

 Command (m for help): <-- n
 Command action
 e   extended
 p   primary partition (1-4)
 <-- p
 Partition number (1-4): <-- 1
 First cylinder (1-10443, default 1): <-- <ENTER>
 Using default value 1
 Last cylinder or +size or +sizeM or +sizeK (1-10443,
default 10443): <-- <ENTER> The largest value listed. (usually default)
Command (m for help): <-- t
 Selected partition 1
 Hex code (type L to list codes): <-- 8e
 Changed system type of partition 1 to 8e (Linux LVM)
Command (m for help): <-- w
 The partition table has been altered!
Calling ioctl() to re-read partition table.
 Syncing disks.
Do this for all your drives.
Setting the LVM up:
There are a bunch of steps to setup LVM and pool hard drives, but its actually very easy. The image below shows what we are doing. At this point we have already set up the first two levels from the bottom. Next we will tell Linux Logical Volume Manager which partitions we want to include in our pool. These are called Physical Volumes or PV's. After that we will group our PV's into a single Volume Group or VG. That VG is like a single physical drive. You can make partitions on it called Logical Volumes or LV's. For this LVM setup guide we are going to make one large LV taking the whole space. You can make several LV's and format them however you want. Ubuntu will see these like separate drives.
Pool Hard Drives and Add PV's (Physical Volumes) to LVM
pvcreate /dev/sd[bcd]
Thats it... Note the [bcd] This is a shortcut instead of writing /dev/sdb /dev/sdc /dev/sdd
Adding the VG (Volume Group) to the LVM
vgcreate {VG_NAME} /dev/sd[bcd]I told you it was easy to setup LVM. You can give the VG any name. I usually go for something easy to remember like storage or data_pool. Replace {VG_NAME} with the name you want. You should do the same /dev/sd[bcd] as you did when you added the PV's.
Adding the LV (Logical Volume) to the LVM VG (Volume Group)
This is where we need to make a decision. We can ether store data liner or stripped. Most people will be fine with the default linear. But we will talk about both anyway. This diagram from sysadmincasts shows how theses compare. They have a great article about the performance differences.
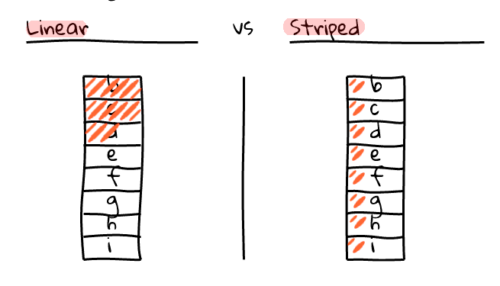
As you can see the default linear writes to disks one at a time. This has some pros and cons. On the positive side the unused drives spin down saving energy and extending their life. On the downside it can only read or write at the disks max speed. This is where striped comes in. Because data is split between the drives you can read or write to all the drives at once. So you can write or read at the sum of the hard drive speeds. For example let say you have 3 drives that can write at 20mb/s each. In linear mode you can write at 20mb/s where in striped mode you can write at 60mb/s. (there are many variables at play here, this is a perfect world example.) The downside to stripping is all the drives have to be spinning for data access. This causes more power usage and likely a lower overall life. Also, in order to extend the stripped LV you have to add the number of drives you started with. So if you start with three drives you have to add three drives before you can extend the LV. (Someone suggested to me just start with one drive. So each stripe is one drive. This is also known as linear... don't waste your time)
To sum that up unless you are serving 10+ different movies at the same time stick with the defaults.
Adding a linear LVM LV (Logical Volume)
lvcreate -l 100%FREE -n {LV_NAME} {VG_NAME}Replace the {LV_NAME} with any name you want to use for the LV and {VG_NAME} with the name you gave your VG earlier. I keep telling you this is super easy.
Alternately adding a stripped LVM LV (Logical Volume)
If you really want stripped data you can use this code instead:
lvcreate --extents 100%FREE --stripes {NUMBER_OF_PHYSICAL_DRIVES} --name {LV_NAME} {VG_NAME}Change the {NUMBER_OF_PHYSICAL_DRIVES} to the number of physical drives you added to your VG.
Formatting our new LVM LV (Logical Volume)
Now that we have an LV we can see this as a device and format it.
First run lvdisplay. You will see something like below.:
File descriptor 7 (pipe:[289122]) leaked on lvdisplay invocation. Parent PID 24975: bash
--- Logical volume ---
LV Path /dev/storage/storage1
LV Name storage1
VG Name storage
LV UUID gppBqJ-MTh8-fTQc-erdt-y8Bs-m78J-DmsdZ8
LV Write Access read/write
LV Creation host, time livingroom, 2014-09-17 07:49:59 -0400
LV Status available
# open 1
LV Size 5.46 TiB
Current LE 1430769
Segments 3
Allocation inherit
Read ahead sectors auto
- currently set to 256
Block device 252:0
We are interested in the LV path. We take that and use it to format the LV. I suggest ext4 but you can use ext3 or xfs if you know you want them. Replace {LV_PATH} with the LV path you found above.
mkfs.ext4 {LV_PATH}Mount LVM LV (Logical Volume) on Boot
Now that we have a ext4 file system made up of smaller drives we want to be able to use it. To use it we need to mount it.
To do this we first need to find the UUID of our filesystem.
blkid
You should see:
/dev/sda1: UUID="jh8f90jj-93ff-4fc4-8fe7-f85fbb25029b" TYPE="ext4"
/dev/sda5: UUID="gh65445g-8d9b-4883-a931-e5d7d784ee20" TYPE="swap"
/dev/sdb1: UUID="98dhjhj8-nkGc-wpAu-bMFx-Nw1l-Y7dn-QcFUwl" TYPE="LVM2_member"
/dev/sdc1: UUID="dh7659s-ik2D-9B0M-XtJl-5ckH-QbXN-VYQNOY" TYPE="LVM2_member"
/dev/sdd1: UUID="876shoi9-LeoA-QpW3-21p2-6v20-SypQ-81B6Rq" TYPE="LVM2_member"
/dev/mapper/storage-storage1: UUID="sjd76765a-40ed-431d-gs6d-58ced879d7l2" TYPE="ext4"
Grab the UUID of your storage space, it will be after the /dev/mapper/{VG_NAME}-{LV_NAME} ,and open your fstab file.
nano /etc/fstab
You will see this:
# /etc/fstab: static file system information.
#
# <file system> <mount point> <type> <options> <dump> <pass>
UUID=asd88has-93ff-4f4g-8fe7-f8ed7b25029b / ext4 errors=remount-ro 0 1
# swap was on /dev/sdd5 during installation
UUID=sadf9877hd-8d9b-4883-a931-e5d7d784a3d7 none swap sw 0 0
none /tmp tmpfs defaults 0 0
We will add the line below to the bottom of the file. Replace the {UUID_FOUND_ABOVE} with the UUID you found above and {MOUNT_LOCATION} with the location you want to have your LV mounted. This location needs to exist. You can use the mkdir command to make a location to mount to. You can put this anywhere. /home/{username}/storage is a good choice if your not sure. I personally mount mine at /data.
UUID={UUID_FOUND_ABOVE} {MOUNT_LOCATION} ext4 defaults 0 0mount -a
Enable Smart Drive Monitoring
We are going to install Smartmontools which should warn us if a drive has any errors and might be starting to fail. This is important to prevent any problems with our LVM. Start by installing smartmontools
apt-get install smartmontools
Edit the config file to start smartmontools automatically:
nano /etc/defaults/smartmontools
uncomment the “start_smartd=yes” line
Now edit the config file to scan the drives regularly and email you if there's an error:
nano /etc/smartd.conf
Add one of these lines for every drive in your system, replacing the /dev/sdc with your drives and replace your email.
/dev/sdc -a -I 194 -W 4,45,55 -R 5 -m [email protected]
All Done, Welcome to the world of LVM!
This is it. You now have an LVM drive pool. A few things to know. There is no redundancy with this system. If a drive fails the data on it will be lost. You can however replace the drive and recover the data that was stored on the other drives. If you stripped the data it can not be recovered if a drive fails at all. This is why we enable the smart monitoring to LVM systems so you will know if a drive is having trouble. Replacing drives before they fail can be done. Stay tuned for an advanced LVM tasks guide.
Adding drives is also super easy. Add the PV like above. Then use vgextend and lvextend to grow the LVM. Then use resize2fs to grow the file system. For more details check out the advanced LVM guide coming soon!
I know it will come up, Yes RAID 5 is better because it can recover from a failed hard drive. But you also loose one of your drives as a spare. So if you have 5 1TB drives you end up with 4TB of space. RAID 0 works exactly like a striped LVM. LVM is easier and more efficient, in my opinion. Unless you have a hardware RAID there's little performance difference. For our home media centers LVM provides a great price (FREE) and performance.
I hope you found this helpful. I am no expert on the subject. I must have read 20 guides when I first did this on my own and I read another 20 preparing to write this guide.
This is great for a mixed use computer, like this: All in one HTPC and Internet PVR How-To.
If your looking to make a network attached storage that does nothing else save yourself some trouble, use one of these: 7 Best home server software options to fit your needs.

![5 Best NAS with SSD Cache for Home and Office [2023] A feature image that shows all 5 of the best NAS that supports SSD caching for home and office](https://www.smarthomebeginner.com/images/2023/10/best-nas-with-ssd-cache-feature-image.png)
![8 Best NAS with Plex Server Support [2022] - 4k, Transcoding, etc. Best NAS Server for Plex](https://www.smarthomebeginner.com/images/2020/02/best-media-server-for-plex-ft.jpg)
