The Raspberry Pi might be small, but it's a very versatile computer. You can use it to build a Raspberry Pi music player or make your own Raspberry Pi Steam Box. Today, I'll be showing you how to build a Raspberry Pi Retro Console using a Raspberry Pi and RetroPie. RetroPie is a Raspberry Pi program that allows you to have multiple game emulators on Raspberry Pi. In addition to game emulators, RetroPie also has Kodi built into it. This means your Raspberry Pi game emulator can go straight into Kodi from RetroPie's menu, so it's a great HTPC option for those who want gaming to be part of their media center.
Table of Contents
How to build a Raspberry Pi Retro Console?
First you need to have all the required items to set up your Raspberry Pi Retro Console. I've listed everything you'll need below. I recommend using the more powerful Raspberry Pi 3 because it will have the best performance.
- Raspberry Pi B+ or newer
- Micro SD card
- Wi-fi adapter (not needed if your using Ethernet or the Raspberry Pi 3)
- HDMI cable to connect your Pi to a TV or monitor
- Wireless HTPC keyboard and mouse (only used for setup)
- USB game controller
| Build a Low-Cost Raspberry Pi Media Center | Price |
|---|---|
| Raspberry Pi 4B Starter Kit with case, power adapter, and heat sinks | ~$82.00 |
| Sandisk Ultra 32GB Micro SDHC UHS-I Card 98 MB/s | ~$8.00 |
| SANOXY Wireless USB PC Remote Control Mouse for PC | ~$8.00 |
Preparing the SD card
First we have to put RetroPie on an SD card for our Raspberry Pi game emulator. Go to the RetroPie download page and download the image for your version of the Raspberry Pi. Now simply extract the image file and write it to the SD card. In this tutorial, I'm using Win32DiskImager to write the image, but any image writer should work. Next, we'll boot up the Raspberry Pi Retro Console and start setting it up.
Configuring RetroPie
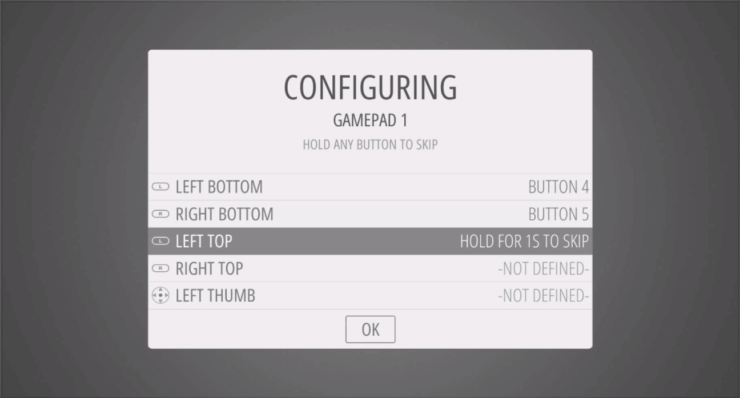
Once turned on, your Pi will boot up into Emulation Station, which acts as the menu for your Raspberry Pi game emulator. Emulation Station will begin setting up inputs for your controller. Press any button on your controller to begin the configuring process. Emulation Station will systematically ask you to map each button on your controller until all necessary buttons are mapped, when you reach OK, press the button you have mapped for A. [Read: A simple yet awesome IR Raspberry Pi remote control for $5]

Now that you've setup your controller, it's time to add some roms to your Raspberry Pi Retro Console. You might've noticed that the Emulation Station menu doesn't show all the emulators on Raspberry Pi that it claims to have, that's because we haven't added any roms yet. For this tutorial, we'll be using a USB stick to add our roms. Roms can also be added through a SFTP client, or even Samba-Shares. [Read: Enable and configure OpenELEC Samba share on Raspberry Pi]
Adding Roms
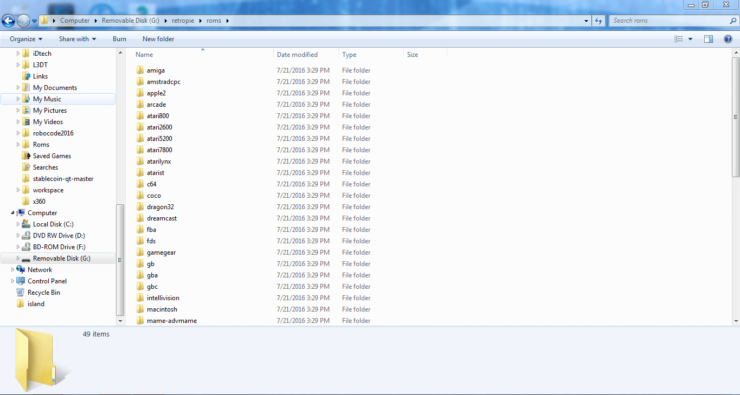
First, create a folder called retropie on the USB drive, then plug it into the Raspberry Pi. Wait 3-5 minutes, or for the light on your USB drive to stop blinking, then unplug your USB drive and plug it back into your computer. Open up the retropie folder on the USB drive. You'll notice that there are some newly created folders, open up the one named roms. In roms folder, there many more folders; they correspond to different emulators on Raspberry Pi. Now simply put your roms in their corresponding folders ( i.e. NES roms go in the folder titled nes). [Read: How to install Kodi ROM Collection Browser]

Now is a good time to point out some of the other folders that have been created on your USB drive, notably the bios folder. Some consoles, such as PSX, require a BIOS file in order to play roms for that console. The emulator will notify you if you need a BIOS file when you start up a rom. If this happens to you, you can download the console specific BIOS file online and put it in the bios folder on your USB drive. Then follow the same process we used for moving roms onto your Raspberry Pi. [Read: How to install OpenELEC on USB stick for Raspberry Pi]
Using your Raspberry Pi Game Emulator
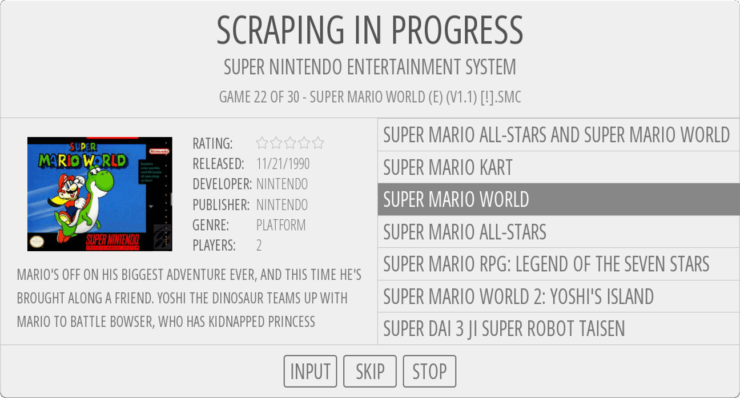
RetroPie should now be fully set up, so all you have to do to play a videogame is select it in the menu. Before you start using all those emulators on Raspberry Pi, lets make a few improvements. First, we should use Emulation Station's built in scraper to add game data and art to our Raspberry Pi Retro Console. The scraper is similiar to Kodi's various media scrapers, using a online database to grab data. To use Emulation Station's scraper, go into the start menu, select Scraper, and then select Scrape Now. The default setting are fine for the first run, so go ahead and press Start. If the scraper can't find anything for some game (usually because it's not actually a videogame), press Skip to skip it and start scraping the next game.

You can also install Kodi on your Raspberry Pi Retro Console. Once installed Kodi will show up in the Ports section of Emulation Section, and you can easily go back and forth between the two. To install Kodi, select RetroPie in the main menu and then pick Retropie-Setup or RP-Setup. From there, you'll be taken to the RetroPie menu, go ahead pick Experimental Packages. In the list, scroll down and select Kodi. After about 10 minutes, Kodi will be installed and ready to use on your Raspberry Pi Game Emulator. [Read: 6 Raspberry Pi Kodi addons to take your Pi to the next level]
Summary
Now that RetroPie is fully setup, all that's left to do is get some roms and start playing. Below are some helpful shortcuts that can be used while playing games on your Raspberry Pi Retro Console. It's important to note that these shortcuts only work with retroarch and libretro based emulators on Raspberry Pi.
| Shortcut | Action |
|---|---|
| Select+Start | Exit game |
| Select+Right Shoulder | Save game |
| Select+Left Shoulder | Load game |
| Select+Right | Input State Slot Increase |
| Select+Left | Input State Slot Decrease |
| Select+X | RGUI Menu |
| Select+B | Reset game |
In addition to Kodi, there other ports that can be installed on RetroPie, and some are already installed. There's a lot that RetroPie has to offer, so don't be afraid to explore all its features and options.


![8 Amazing Raspberry Pi Ideas [2022]: Beginners and Enthusiasts Raspberry Pi ideas](https://www.smarthomebeginner.com/images/2021/09/raspberry-pi-4-dev-board.jpg)
![10 Best Emby Client Devices [2023] - 4k, Hardware Transcoding, etc. setup emby server with raspberry pi](https://www.smarthomebeginner.com/images/2017/02/setup-emby-server-with-raspberry-pi.jpg)
![10 Best Jellyfin Client Devices [2022] - 4k, Hardware Transcoding, etc. Jellyfin Roku App](https://www.smarthomebeginner.com/images/2021/02/jellyfin-roku-client-app-ft.jpg)
![10 Best Plex Client Devices [2022] - STUTTER-free Streaming Best Plex Client Devices](https://www.smarthomebeginner.com/images/2022/02/best-nas-for-plex-server-featured-images-from-pexels-photography-maghradze-ph-3764958-e1648542743772.jpg)
![10 Best Media Server for Plex + one SURPRISING bonus [2022] Media Server for Plex](https://www.smarthomebeginner.com/images/2020/04/plex-free-movies-and-tv.jpg)
