One of the easiest ways to manage MySQL databases is using phpMyAdmin. phpMyAdmin is a free tool intended to handle the administration of MySQL using the web. There are several good reference materials available, in case you want to learn more about phpMyAdmin and what it can do. Recently, I described how to install phpMyAdmin in Ubuntu. In this post, I will provide a few phpMyAdmin tweaks to your liking. If find that with a little bit of tweaking I can increase my productivity within phpMyAdmin.
Table of Contents
- phpMyAdmin Tweaks
- 1. Increase phpMyAdmin import file size
- 2. Increase authentication timeout or login cookie validity
- 3. Change destination for table icon link
- 4. Change destination for table link
- 5. Change destination for database link
- 6. Increase the number of database listed
- 7. Change the default number of rows displayed
- 8. Add a Show All rows button
- 9. Show link to PHP info
- 10. Hide unwanted databases
- Honorable Mentions
phpMyAdmin Tweaks
Not all phpMyAdmin tweaks may be of interest to you and so just pick the ones that you like. Refer to phpMyAdmin Wiki for further details and tweaks.
1. Increase phpMyAdmin import file size
Although this is not one of the phpMyAdmin tweaks (it is a PHP tweak), it is one of the most commonly encountered one while exporting databases as files. By default, PHP allows importing files up to 2 MB. To increase this, edit /etc/php5/apache2/php.ini. Before you begin making changes, make a backup of the file:
sudo cp -a /etc/php5/apache2/php.ini /etc/php5/apache2/php.ini.bak
First, make sure file uploads are allowed. Find the following line and ensure file_uploads is set to On.
; Whether to allow HTTP file uploads.
; http://php.net/file-uploads
file_uploads = On
Next, to increase file import size, find the following line and set the file size to your desired value (example: 32M):
; Maximum allowed size for uploaded files.
; http://php.net/upload-max-filesize
upload_max_filesize = 32M
Then, find the following line and set the POST data size to your desired value (example: 32M):
; Maximum size of POST data that PHP will accept.
; http://php.net/post-max-size
post_max_size = 32M
Finally, find the following line and set the script memory limit to your desired value (example: 128M):
; Maximum amount of memory a script may consume (128MB)
; http://php.net/memory-limit
memory_limit = 128M
The "M" in the "128M" refer to MB or Megabytes. Note that you should have at least 128M of available memory. This should increase the file import size for PHP and phpMyAdmin. Reload Apache for the settings to take effect:
sudo service apache2 reload
You may have to exit and re-login into phpMyAdmin.
It can be annoying while you move to the other window and your phpMyAdmin session ends due to inactivity. You can increase the time your phpMyAdmin session remains active by editing /etc/phpmyadmin/config.inc.php. First backup the file:
sudo cp -a /etc/phpmyadmin/config.inc.php /etc/phpmyadmin/config.inc.php.bak
Then edit it and add the following line at the end of the file:
$cfg['LoginCookieValidity'] = 36000;
36000 is the number of seconds your phpMyAdmin session will remain active during inactivity. Reload your Apache server for the settings to take effect. You may have to exit and re-login into phpMyAdmin.
Please note that this loosens your security just a little bit. But doing so can help you greatly during development or initial database setup. But once your work is done, I recommend removing the line or commenting it out by adding // in the front.
3. Change destination for table icon link
![]() This is not the greatest of annoyances for most people but can be of help to some. Within a database, when you click one of the table names listed on the left side, it takes you to "Browse" tab of the table. Instead if you click on the little table icon, it takes you to "Structure" tab of the table. I personally like this. However, if you would like to make the table icon link take you to "Browse" tab instead, then
This is not the greatest of annoyances for most people but can be of help to some. Within a database, when you click one of the table names listed on the left side, it takes you to "Browse" tab of the table. Instead if you click on the little table icon, it takes you to "Structure" tab of the table. I personally like this. However, if you would like to make the table icon link take you to "Browse" tab instead, then /etc/phpmyadmin/config.inc.php and add the following line at the end of the file:
$cfg['LeftDefaultTabTable'] = 'sql.php';
Save, exit, and reload Apache for the settings to take effect. You may have to exit and re-login into phpMyAdmin. In addition, you can make the icon link take you any other tab if you like:
$cfg['LeftDefaultTabTable'] = 'tbl_structure.php'; //default. shows fields list
$cfg['LeftDefaultTabTable'] = 'tbl_sql.php'; //shows SQL form
$cfg['LeftDefaultTabTable'] = 'tbl_select.php'; //shows search
$cfg['LeftDefaultTabTable'] = 'tbl_change.php'; //shows insert row
Recommended Guides for MySQL and phpMyAdmin:
Note that you can have only one of the above options active at any time. If you want to reverse this, just delete the line or comment it out by adding // in front of it.
4. Change destination for table link
By default, clicking on the table name on the left takes you to the "Browse" tab. If you want to change this behavior add one of the following lines at end of /etc/phpmyadmin/config.inc.php:
$cfg['DefaultTabTable'] = 'sql.php'; // default. takes you to the Browse tab
$cfg['DefaultTabTable'] = 'tbl_properties_structure.php'; // shows fields list
$cfg['DefaultTabTable'] = 'tbl_properties.php'; // shows SQL form
$cfg['DefaultTabTable'] = 'tbl_select.php'; // shows search form
$cfg['DefaultTabTable'] = 'tbl_change.php'; // shows insert row
Save, exit, and reload Apache for the settings to take effect. You may have to exit and re-login into phpMyAdmin. If you want to reverse this, just delete the line or comment it out by adding // in front of it.
5. Change destination for database link
By default clicking on the database name on the left takes you to the "Structure" tab of the database. You can customize this by adding one of the lines below at end of /etc/phpmyadmin/config.inc.php.
Save, exit, and reload Apache for the settings to take effect. You may have to exit and re-login into phpMyAdmin. If you want to reverse this, just delete the line or comment it out by adding // in front of it.
$cfg['DefaultTabDatabase'] = 'db_structure.php'; // default. takes you to the Structure tab
$cfg['DefaultTabDatabase'] = 'db_details.php'; // shows SQL form
$cfg['DefaultTabDatabase'] = 'db_search.php'; // shows search form
$cfg['DefaultTabDatabase'] = 'db_operations.php'; // shows search form
6. Increase the number of database listed
In the main screen, phpMyAdmin by default lists only 100 databases on the left frame. You can customize this by adding the following line at end of /etc/phpmyadmin/config.inc.php:
$cfg['MaxDbList'] = 100;
Save, exit, and reload Apache for the settings to take effect. You may have to exit and re-login into phpMyAdmin. If you want to reverse this, just delete the line or comment it out by adding // in front of it.
7. Change the default number of rows displayed
It is one of my favorite phpMyAdmin tweaks. By default phpMyAdmin displays only 30 rows while browsing a table. It would be great change this pagination limit and see more rows on each page. You can customize this by adding the following line at end of /etc/phpmyadmin/config.inc.php:
$cfg['MaxRows'] = 100;
Save, exit, and reload Apache for the settings to take effect. You may have to exit and re-login into phpMyAdmin. If you want to reverse this, just delete the line or comment it out by adding // in front of it.
In addition to customizing the number of rows displayed, sometimes you may want to display all available rows while browsing a table.
Sure, there is a tweak for that. Add the following line at end of /etc/phpmyadmin/config.inc.php:
$cfg['ShowAll'] = TRUE;
Save, exit, and reload Apache for the settings to take effect. You may have to exit and re-login into phpMyAdmin. If you want to reverse this, just delete the line or comment it out by adding // in front of it.
9. Show link to PHP info
 Sometimes it is great to have easy access to PHP Info you can quickly find out your PHP configurations. This one of the phpMyAdmin tweaks adds a link on the phpMyAdmin main page that will display your PHP Info. Just add the following line at end of
 /etc/phpmyadmin/config.inc.php:
$cfg['ShowPhpInfo'] = TRUE;
Save, exit, and reload Apache for the settings to take effect. You may have to exit and re-login into phpMyAdmin. If you want to reverse this, just delete the line or comment it out by adding // in front of it.
10. Hide unwanted databases
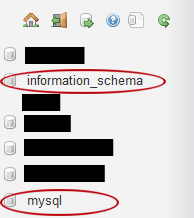
 This last of the 10 phpMyAdmin tweaks, shows you how to hide databases. Unwanted/Unused databases take up space. Worse, one might accidentally open and mess with it. You can hide these unwanted/unused databases by adding the following line at end of
 /etc/phpmyadmin/config.inc.php:
$cfg['Servers'][$i]['hide_db'] = '(information_schema|mysql)';
Save, exit, and reload Apache for the settings to take effect. You may have to exit and re-login into phpMyAdmin. If you want to reverse this, just delete the line or comment it out by adding // in front of it.
Recommended Guides for MySQL and phpMyAdmin:
Honorable Mentions
While the above 10 phpMyAdmin tweaks are my favorite, there are few others that might be of help to others. Just like the above tweaks, add each line at the end of /etc/phpmyadmin/config.inc.php. Save, exit, and reload Apache for the settings to take effect. You may have to exit and re-login into phpMyAdmin.
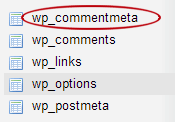
$cfg['MaxTableList'] = 250; // # of table names displayed in right panel
$cfg['LeftDisplayLogo'] = FALSE;  // removes phpMyAdmin Logo from left corner
$cfg['LightTabs'] = TRUE; // enables graphically less intense tabs
$cfg['TextareaCols'] = 40; // sets SQL query textarea number of columns
$cfg['TextareaRows'] = 15; // sets SQL query textarea number of rows
$cfg['TextareaAutoSelect'] = FALSE; //disables auto select all in SQL textarea
If you want to reverse any of the above tweaks, just delete the line or comment it out by adding // in front of it.
Hope these phpMyAdmin tweaks come in handy for you. You can find more tweaks in phpMyAdmin Wiki. Enjoy!


![Ultimate Docker Media Server: With 60+ Docker Compose Apps [2024] Ultimate Docker Media Server](https://www.smarthomebeginner.com/images/2024/01/Docker-Series-02-Docker-Stack.png)