This post explains how to overclock Raspberry Pi OpenELEC media center. In Part 1 and Part 2 of my comparison of Xbian, OpenELEC, and Raspbmc, I concluded that Xbian was the fastest and most responsive operating system. However, after overclocking OpenELEC compared favorably to Xbian. Raspberry Pi's default capabilities are 700 Mhz for ARM, 250 Mhz for Core, and 400 Mhz for SDRAM. As described here, Xbian comes overclocked by default to 840 Mhz, 275 Mhz, and 400 Mhz and it provides a very simple GUI XBMC option to change overclocking settings. OpenELEC however does not make overclocking options easily accessible. It is by design and not surprising as OpenELEC aims at building a robust media center operating system that is stable. But I have found no harm in low to moderate levels of overclocking. So let's go ahead and overclock Raspberry Pi running OpenELEC.
| Build a Low-Cost Raspberry Pi Media Center | Price |
|---|---|
| Raspberry Pi 4B Starter Kit with case, power adapter, and heat sinks | ~$82.00 |
| Sandisk Ultra 32GB Micro SDHC UHS-I Card 98 MB/s | ~$8.00 |
| SANOXY Wireless USB PC Remote Control Mouse for PC | ~$8.00 |
Table of Contents
Prerequisites
Before you proceed, make sure you have or know the following:
- A fully functional Raspberry Pi running OpenELEC (installation guide here)
- Benefits and risks of overclocking Raspberry Pi
- Remote SSH access to Raspberry Pi
- A heat sink to dissipate excess heat (recommended)
Overclock Raspberry Pi
Some media centers softwares such as Xbian and Raspbmc provide access to overclocking settings from within the XBMC interface. On OpenELEC, you will have to open and edit the "config.txt" file located in the system partition. There are two ways to do this. The first method requires SSH access. The second method requires access to a Linux system with an SD card reader.
1. Editing config.txt using SSH
If you have not yet enabled SSH on your Raspberry Pi, enable it before proceeding. The config.txt file is located under "/flash" partition which is by default read-only. So first remount "/flash" with read-write permission using the following command:
mount /flash -o remount,rw
Then cd into "/flash" folder and open the "config.txt" file for editing. The picture below shows the 3 commands in sequence:

2. Editing config.txt using a Linux System
This method can be quite tricky if you are not familiar with mounting partitions or drives in Linux. If you have access to a Linux system with a SD card reader then pop out the SD card from your Raspberry Pi and insert it into your card reader. The two partitions on your SD card should automatically mount under "/media" with the system partition as "System" and the storage partition as "Storage". If not, you may have to manually mount them. After mounting, cd into "/media/System/flash" and open the "config.txt file with root permissions for editing using the following command:
sudo nano config.txt
Configure Overclocking
Once the "config.txt" file is open, scroll down to the section called "Overclocking settings" and read through the instructions shown below.
################################################################################
# Overclocking settings
# WARNING: Do not change/enable if you do not know what you are doing!
#          The System may become unstable or you can have data corruption or
#          you can lose your warranty if you set wrong settings
#
# please read: http://elinux.org/RPi_config.txt#Overclocking_configuration
################################################################################
Right below the instructions, OpenELEC provides some recommended overclocking settings:
# Overclock mode settings.
#
# default recommended values are: arm_freq | core_freq | sdram_freq | over_voltage
# no overclocking               :    700   |    250    |    400     |      0
# mode 'Modest'                 :    800   |    300    |    400     |      0
# mode 'Medium'                 :    900   |    333    |    450     |      2
# mode 'High'                   :    950   |    450    |    450     |      6
# mode 'Turbo'                  :   1000   |    500    |    500     |      6
There are basically 4 parameters you can set to overclock Raspberry Pi: arm_freq, core_freq, sdram_freq, and over_voltage. You may set only the parameters you want to change, the rest will be at default levels ("no overclocking"). Keep in mind that overclocking can reduce the life of your device. My tests have shown that "Modest" level of overclocking is sufficient for smooth operation of OpenELEC without excessive heat generation. For any thing above this level, I recommend using good heat sinks. To set "Modest" level of overclocking change the following section of "config.txt" as shown below:
arm_freq=800
core_freq=300
# sdram_freq=400
# over_voltage=0
I recommend leaving he rest of the overclock Raspberry Pi settings untouched as they may cause data corruption and can void your warranty (especially setting "force_turbo=1"). Save "config.txt" in nano text editor by pressing Ctrl x, followed by w.
Complete OpenELEC Overclocking
If you edited "config.txt" on a Linux system, then unmount the SD card partitions, pop in the card into Raspberry Pi and boot it. If you SSHed into your Raspberry Pi, then reboot your OpenELEC using the following command:
reboot
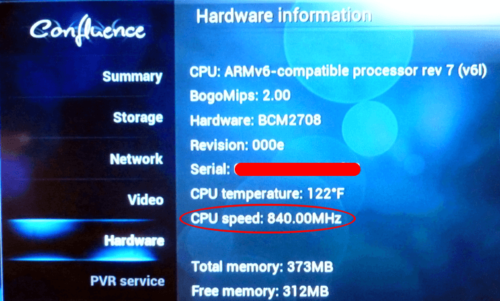
After OpenELEC reboots, you should now be running at overclocked speeds. You can verify if overclocking was successful by checking the current overclock levels as described in this post. The example below shows an example with arm_freq at 840 MHz.
Go ahead, overclock Raspberry Pi running OpenELEC and enjoy the smooth XBMC experience.


![8 Amazing Raspberry Pi Ideas [2022]: Beginners and Enthusiasts Raspberry Pi ideas](https://www.smarthomebeginner.com/images/2021/09/raspberry-pi-4-dev-board.jpg)


![10 Best Plex Client Devices [2022] - STUTTER-free Streaming Best Plex Client Devices](https://www.smarthomebeginner.com/images/2022/02/best-nas-for-plex-server-featured-images-from-pexels-photography-maghradze-ph-3764958-e1648542743772.jpg)

