Media Companion is another top tool to organize media for Kodi. It is one of the most complete apps from out list of media manager tools. If you are passionate about your collections it is a must have application. Media Companion is packed with features allowing you to download imagery and artwork, update synopsis information and add cast details. This only scratches the surface of what this product can do. In this post, I will describe how to organize media library with Media Companion. We will run through the install process and I will then take a look at how to add a library, download artwork and then adjust plot texts and ratings.
Table of Contents
Organize Media Library with Media Companion
I previously wrote about using Ember Media Manager for organizing media collection for Kodi, Plex, Emby and others. But Media Companion is the original app that one of our other writers started with and he recommended covering it in detail. So here it goes. [Read: 5 Media Manager Applications to Organize Your Media Files]
Install Media Companion on HTPC
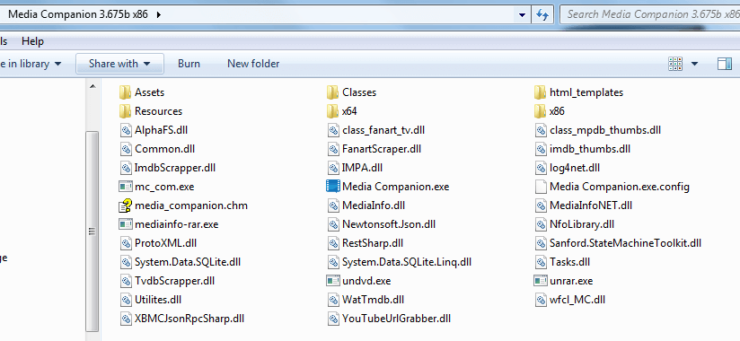
Before we are ready to organize media for Kodi we must deploy the Media Companion tool to our HTPC system. You can download the tool from the Media Companion down page. There is no Windows-based installation process needed. The download package comes in the form of a self extracting zip file. When the download has completed run the executable file and then select a folder to extract the contents. This will be the permanent location that your Media Companion application will run from. Once the extraction completes you are finished. Open the MediaCompanion.exe file to start the application for the first time.
Add a Movie Library to Media Companion
Once the Media Companion application is installed on your computer the first thing to do is import your media folders into the tool. We will do this for movies but the software also allows you to import TV shows, music videos and home movies. First select the Movies icon shown in the image below next to the red arrow. Next select the Folders tab identified by the green arrow. Finally, to add a Movie library click the Add Movie Folder Browser button shown next to the blue arrow.
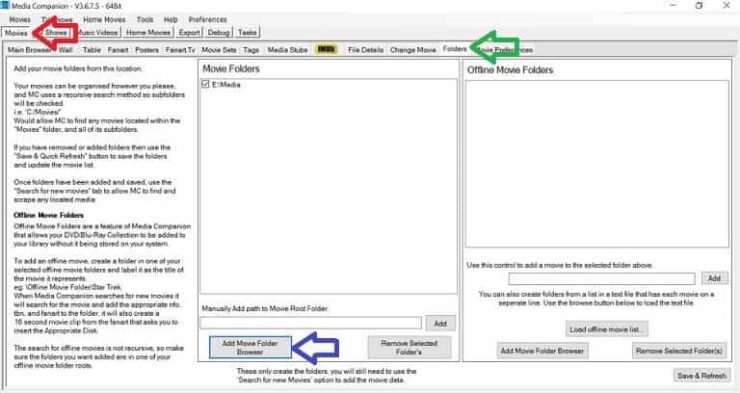
A browser window will pop-up. Navigate to your movie library folder and select it. You must do this for every folder on your HTPC system that contains movies. When you add a folder Media Companion will cycle through the movie files in that location and import them into the software.
Best Streaming Apps and Addons:
Download Media Artwork with Media Companion
When you initially organize media library with Media Companion the software automatically pulls in some standard artwork scraped from the internet. This is however fully customizable and you can choose from the many available box images and fanart. To do this select the movies icon shown in the image below next to the red arrow and then choose the Fanart tab. The automatically downloaded fanart image will be shown on the right. The left hand pane shows all of the available fanart images you can choose from. Check the radio button next to the image that you would like as highlighted by the blue arrow. [Read: 10 Best Kodi Movie Addons in 2017 for your HTPC]
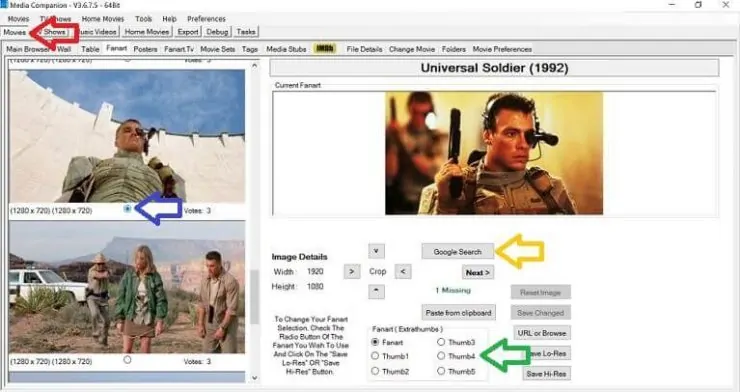
The green arrow in the above screenshot shows a series of radio buttons allowing you to download extra artwork for each movie in the form of thumbnails. Select a thumbnail option and then scroll through the left hand pane image options to add a thumbnail image. The final yellow arrow launches a web browser. This is a neat and simple feature that allows you to search Google images for box art and fanart that is not available by the default scrapers. Artwork is important when you organize media for Kodi and this search feature ensures that you get the very best images. [Read: 7 Must have Addons for Kodi Maintenance 2017 – Backup, Library Update]
Change Movie Plot Information and Ratings with Media Companion
When Media Companion loads in your movies it will pull down standard plot information but there may be cases where you wish to change this. To do this simply click on the Movies button at the top left of the screen. This will take you to the Main Browser tab. Select the movie that you would like to change from the drop down list. The red arrow in the image below highlights where the movie plot information can be found. Here you can edit the downloaded plot text or completely change it. [Read: 20 best Kodi addons 2017: Movies, TV Shows, Live TV and More]
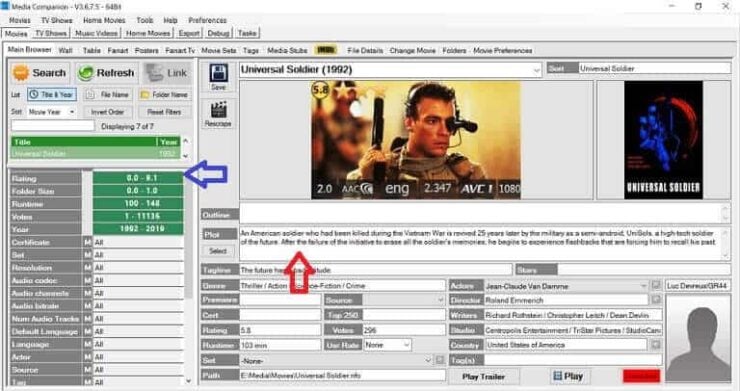
The software also gives you the ability to provide your own ratings for individual movies. This is done from the same Main Browser window and its location is shown by the blue arrow on the image above. Movie ratings are configured using a slider. Click on the green bar next to Rating and slide the bar to the rating that you see fit. There are many other configurable features on the Main Browser window so have a play around. Be sure to hit the save button in the middle of your screen when you are happy with your changes. [Read: 5 Best Kodi Alternatives for Media Enthusiasts – Kodi Like Apps]
Media Companion Media Organizer for Kodi and Others - Final Thoughts
Media Companion is one of the best media managers and is the perfect tool to organize media for Kodi. This guide only scratches the surface of what is possible with this tool. With Media Companion you can mange different types of media including music videos, TV shows and home video. You can use it to set naming standards to your library files so that all of your content remains structured. One of the great things about Media Companion is its ease of use. Compared to many other media managers it is extremely simple to use. If you are the true movie enthusiast then Media Companion is a must have tool. Best of all is its free!

![15 Best Plex Alternatives [2022] - FREE and BETTER Options Best Plex Alternatives feature image](https://www.smarthomebeginner.com/images/2022/08/best-plex-alternatives-feature-image.gif)

![15 Best Jellyfin Plugins [2023] - Supercharge your Media Server Jellyfin Intros Plugin Preview Pre-Roll](https://www.smarthomebeginner.com/images/2022/08/jellyfin-intros-preroll-preview.jpg)
