You may have setup VirtualBox shared folder as we had previous described but you cannot use it or copy files to it until you mount VirtualBox shared folder on Windows guest OS. Setting up a shared VBox folder allows you to easily share files between host OS and guest OS. This post shows how to mount VBox shared folder on Windows 10 guest. This method works on Windows 7 and Windows 8 as well.
Mount VirtualBox Shared Folder on Windows
The steps for mounting VBox shared folders is different for Windows and Ubuntu / Debian. Ubuntu / Linux guide for mounting VBox shared folder was published previously. This guide only shows how to mount VirtualBox shared folder on Windows guest OSes. Host OS on which Oracle VirtualBox VM is installed can be anything.
Before you try to mount a shared folder as described in this guide, make sure that you have setup shared folder on VirtualBox.
Recommended HTPC / Home Server Builds:
- Best Home Theater PC Build 2017 to do it all (Plex, Kodi, NAS, Gaming)
- Best Emby Server builds 2018 – Pre-built and DIY options
- Medium Budget 4K HTPC Build 2017 for Kodi, Plex and Gaming
- Cheap 4K HTPC Build for Kodi, OpenELEC, and LibreELEC 2017
- Low Power Home Server Build 2017 for Network File and Media Storage
- Best HTPC for Kodi with 4K on a Medium Budget 2017 (~$400)
- Energy efficient budget HTPC-NAS combo build 2016
Mount VirtualBox Shared Folders Windows Guest
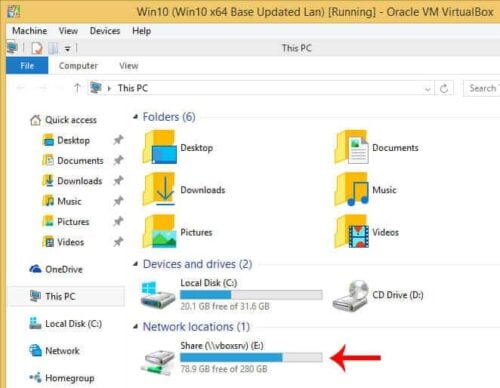
Mounting VBox shared directory on Windows happens automatically if you chose Auto-mount while setting up the shared directory.
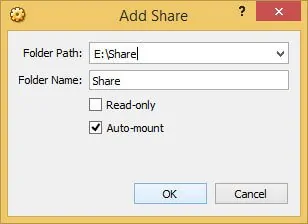
Folder Name in the above picture is also known as ShareName The shared folder will appear in your Windows Explorer as a network drive with the name ShareName (in this example Share) as shown in the picture below.
Manually Mount VBox Shared Folder on Windows
In case you did not auto-mount VBox shared folder then you may go to Device->Shared Folder Settings, edit the shared folder, and enable Auto-mount. You may also check "Make Permanent" if you want the mounting to stick on reboot.
Alternatively, you can manually map VBox shared folder on Windows as a network drive. To do that open "My Computer" or "My PC" depending whether you have Windows 7, 8, or 10 as guest OS. Go to "Map Network Drive" from the top menu and select any drive letter. For "Folder" type in \vboxsrv\ShareName, which in this example is \vboxsrv\Share. Check "Reconnect on Logon" and click "Finish".
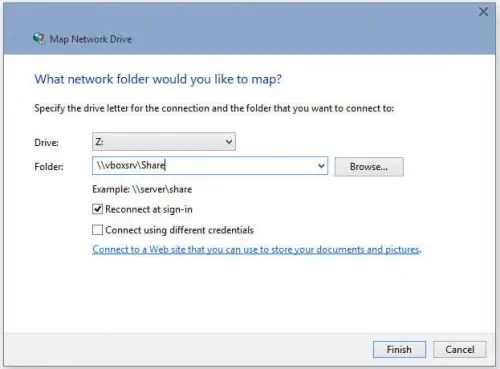
Or if you are a commandline fan, open Windows Command Line and type in the following command. Replace ShareName with Folder Name from the first picture and x with any available drive letter.
net use x: \vboxsvr\ShareName
Repeat the process for any other shared folders. Your Oracle VirtualBox shared folders should now be mapped as a Windows network drives. So there you go, mount VirtualBox shared folder on Windows, and enjoy seamlessly sharing files between the two OSes.
Complete Guide to Setting Up a Home Server on VirtualBox Virtual Machine:
- Install VirtualBox - Windows 7/8/10 / Ubuntu/Debian
- Install VirtualBox Extension Pack - Linux and Windows Host
- Install Guest OS on Virtual Box - Ubuntu Server
- Install VirtualBox Guest Additions - Windows Guest / Linux Guest
- Update VirtualBox Guest Additions - Windows Guest / Linux Guest
- Setup VirtualBox Shared Folder - Windows and Linux
- Mount VirtualBox Shared Folder - Windows Guest / Ubuntu Guest
- Access USB Drive on VM - Windows and Linux Guest
- Configure Home Server on VirtualBox - Ubuntu Server


![Ultimate QNAP Docker Compose and Container Station Guide [2023] QNAP Container Station](https://www.smarthomebeginner.com/images/2023/05/ContainerStation.png)
![Ultimate Synology NAS Docker Compose Media Server [2022] Synology Docker Media Server](https://www.smarthomebeginner.com/images/2020/07/synology-docker-media-server-ft.jpg)
