Nullmailer is a lightweight mail server and a great alternative to full-fledged mail transfer agents (MTA) such as sendmail or postfix. In fact, nullmailer's website describes it as "a sendmail/qmail/etc replacement MTA for hosts which relay to a fixed set of smart relays. It is designed to be simple to configure, secure, and easily extendable". I run a Linux server and know a few things in Linux, but do not know how to configure complex MTAs such as sendmail or postfix. As a matter of fact, a full-fledged mail server is not something I am looking for. All I need is to be able to relay mails using the PHP mail executable and the likes, make the forms and services on my server to send out emails. nullmailer perfectly fits in as a lightweight mail server. If you are like me, I strongly recommend you consider nullmailer as a lightweight MTA. Keep in mind though that nullmailer is a basic sendmail replacement and does nothing more than sending mails.
Install Nullmailer: Lightweight Mail Server
Installing nullmailer on Ubuntu is extremely simple. It is available through the repositories. All you have to do is this:
sudo apt-get install nullmailer
While configuration post-installation can be done, it is much easier to configure nullmailer during installation, as described below. Note you cannot have both sendmail/postfix and nullmailer installed. Therefore, you if you have sendmail/postfix already installed you may be required to remove them during nullmailer installation.
Recommended Guides on Linux Commands:
Configure Nullmailer
Nullmailler is a lightweight mail server and therefore configuring it is a cakewalk. Configuring nullmailer requires you to know your ISP's SMTP server details including the host, port, and login credentials (if required).
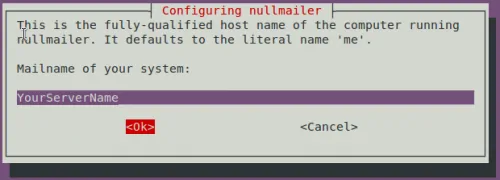
First you will have to enter your host name:
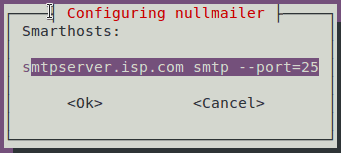
Then you will be asked for your SMTP server details. You can enter it now or you can always edit /etc/nullmailer/remotes file after installation. The syntax to configure nullmailer is:
smtpserver.isp.com smtp --port=PostNumber --user=Username --pass=Password
Note that Username and Password are optional. My ISP does not requires authentication to access their SMTP server. So my /etc/nullmailer/remotes looks like this:
Then edit /etc/nullmailer/adminaddr and enter the administrator's email address:
If ever your mail queue fills up and you want to cancel all pending emails, then delete everything inside /var/spool/nullmailer/queue.
Start/Stop Nullmailer
After configuring nullmailer, use the following commands to restart nullmailer for your settings to take effect:
sudo service nullmailer restart
To start/stop nullmailer, use "start" or "stop" instead of "restart".
And there you have it, if a simple, set it and forget it, and lightweight mail server is what you are looking for then look no further than nullmailer. Install it and take care of your website's basic mailing needs. If you have other options that have worked well for you, please share it with us in the comments section.


![Wireguard Android Client Setup [2022] - Simple and Secure VPN Wireguard android setup](https://www.smarthomebeginner.com/images/2021/09/wireguard-android-setup-header.webp)


