Among the addons that offer backup and restore capabilities for your watched marks, perhaps the Kodi Trakt addon is one of the most popular and useful ones. Not only because of its online backup capabilities, but also because Trakt.tv service offers social interaction capabilities, such as sharing your lists or the media you have watched. Thus, you could install Trakt not only to use the Kodi Trakt backup or Kodi Trakt restore capabilities, but also to automatically update your Trakt tv account lists with the media you watch on Kodi. However, if you're not interested in these features, you could benefit from running a local backup of your watched status marks with addons such as the Kodi WatchedList addon. [Read: Guide: How to use Kodi WatchedList backup and restore]
With online backup addons for your watched marks, you skip the step of setting up a database on your server or device. Therefore, you don't need to know how to install MySQL Server on Ubuntu or any other OS to be able to keep track of your media, if you use the cloud. With Kodi Trakt backup you can simply connect your Kodi media center to your Trakt service and, if you didn't yet disable Kodi watched status logging, you will be able to keep your Trakt account and your Kodi watched marks in sync. [Read: Kodi MySQL setup for sharing media library]
Recommended HTPC / Home Server Builds:
- Best Home Theater PC Build 2017 to do it all (Plex, Kodi, NAS, Gaming)
- Best Emby Server builds 2018 – Pre-built and DIY options
- Medium Budget 4K HTPC Build 2017 for Kodi, Plex and Gaming
- Cheap 4K HTPC Build for Kodi, OpenELEC, and LibreELEC 2017
- Low Power Home Server Build 2017 for Network File and Media Storage
- Best HTPC for Kodi with 4K on a Medium Budget 2017 (~$400)
- Energy efficient budget HTPC-NAS combo build 2016
How to use Kodi Trakt backup and restore?
If you don't yet know how to use Trakt TV addon on Kodi, let me tell you that this is a rather simple procedure. Simply running the addon, will synchronize your Kodi watched marks with Trakt, and the watched movies and TV shows on Trakt will be marked as watched on your Kodi.
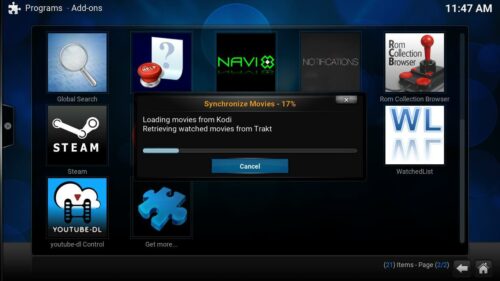
However, Kodi Trakt backup behavior can be changed. If you are interested on changing the addon default behavior, simply head to Programs -> Program add-ons and look for Trakt, then bring up its context menu, and go into Add-on settings. Here you will find options to auto-run Trakt on start up, setting exclusions, show notifications when a movie or TV show is scrobbled and others. In particular, on the tab named Synchronize, you will be able to define whether you want movies and TV shows watched marks synchronized to Trakt, and from Trakt to Kodi.
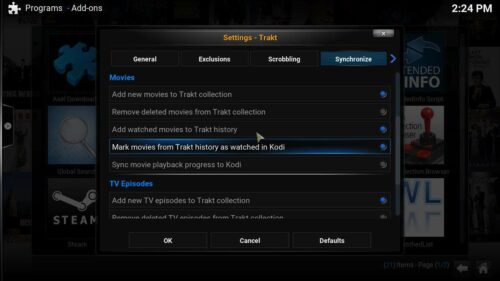
To backup watched marks, you should make sure that the options Add watched movies to Trakt history and Add watched TV episodes to Trakt history. Similarly, if you want to restore marks instead, make sure you enable the options Mark movies from Trakt history as watched in Kodi and Mark TV episodes from Trakt history as watched in Kodi.
Congratulations! You're ready to use the Kodi Trakt backup and Kodi Trakt restore features on the Kodi Trakt addon! I would suggest enabling all of these options so you seamlessly keep your watched marks synchronized between devices, if you use the Kodi Trakt addon on more than one. Take a look at the 7 best addons to backup watched status if you want more options. If you want to use an addon with Trakt integration, take a look at the Kodi Velocity addon and enjoy the content it offers!

![15 Best Jellyfin Plugins [2023] - Supercharge your Media Server Jellyfin Intros Plugin Preview Pre-Roll](https://www.smarthomebeginner.com/images/2022/08/jellyfin-intros-preroll-preview.jpg)
![15 Best Plex Alternatives [2022] - FREE and BETTER Options Best Plex Alternatives feature image](https://www.smarthomebeginner.com/images/2022/08/best-plex-alternatives-feature-image.gif)
![Watch NFL Games Live FREE 🏈: 23+ WORKING websites [2023] Watch NFL Games Live FREE](https://www.smarthomebeginner.com/images/2023/08/nfl-streaming-1.jpg)
![Watch College Football Online FREE [2022]- 25+ WORKING websites 2022 Watch College Football Online Free](https://www.smarthomebeginner.com/images/2022/08/2022-watch-college-football-online-free.jpg)
![Watch College Football Online FREE [2023]: 🏈 23+ WORKING websites Watch College Football 2023](https://www.smarthomebeginner.com/images/2023/08/college-football-2023-e1692045798880.jpg)