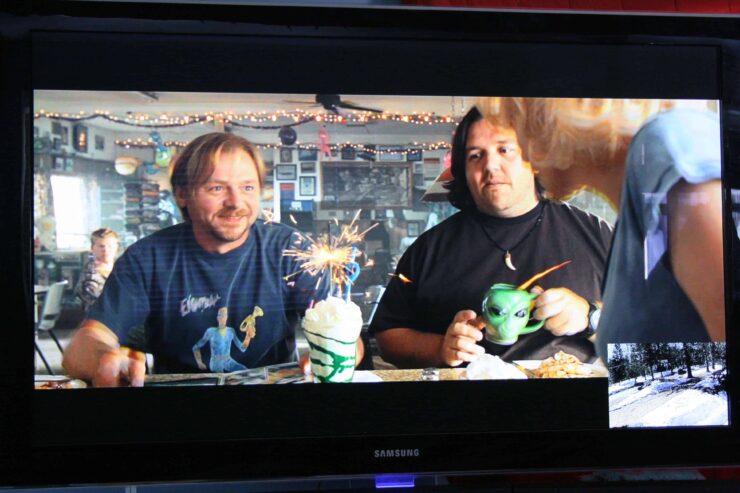
Ever wanted to know who was at the door before you miss the best part? Using the Xeoma Video Surveillance Software and a custom Kodi Entertainment Center Plugin you can see an automatic PIP style live view of a camera. Xeoma runs on any platform and is super easy to set up. It gives you video based motion sensing and http video trans-coding (We need this if your IP camera feed is not compatible with the Kodi Entertainment Center Plugin).
Table of Contents
What You Need:
- IP Camera or webcam (Use the android IP Camera app and re-purpose an old Phone)
- Kodi Entertainment Center (Older versions of XBMC work too)
- Xeoma Video Surveillance Software (If you want Motion Sensing or need to transcode)
- Security Cam Overlay Plugin (See the end of this post for several versions)
Things to Know:
This tutorial requires some basic knowledge of Kodi Entertainment Center, mainly adding and configuring plugins. A good ability to Google will be helpful. There are thousands of cameras out there and because of that some parts of this are vague. If your having trouble, start at the camera. Try viewing its stream with VLC. If you cant get a stream from it check the docs or Google.
In case you didn't know: Kodi entertainment center is the new XBMC
Where To Start (The easy way):
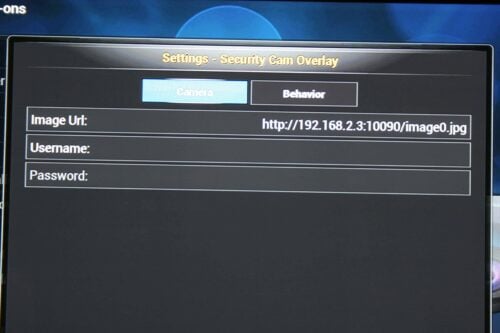
Start by adding one of the plugins listed below in the "Downloads" section to Kodi Entertainment Center. All the plugins are the same with different names. You can install more than one for different cameras. Open the plugin settings and enter the address of your camera. This MUST be a .JPG. If you use the Android IP Camera app it is http://{CAMERA_IP}:8080/shot.jpg.
You can adjust the size so it matches your cameras aspect ratio. You can have it as large as you want. The refresh interval may depend on your camera. I found 300 to be pretty safe and still video like. If the display flashes or cuts out after a few frames then raise the number. Auto close will close the window after the set time. Its up to you.
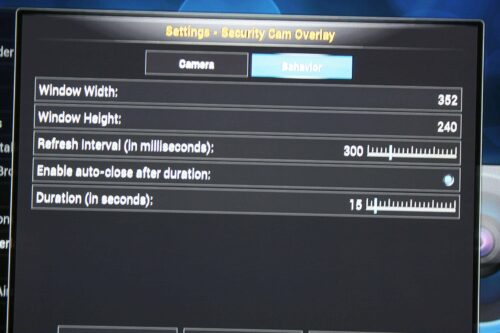
The plugin will update this image several times a second to make it look like video. You will want to give your IP camera phone a static IP. Check your routers documentation for instructions or search Google.
From here you can create a favorites link for the plugin to trigger the camera popup. Or you can map a remote key to activate the camera. Just add this line to your keyboard.xml file at {KODI_DIR}/userdata/keymaps/ (replace "green" with the keyname you want to use and CAMERA.PLUGIN_NAME with the plugin you select below) You can add another line for each plugin you use.
RunScript("CAMERA.PLUGIN_NAME")
Check here for Kodi userdata folder location on different OSes. Thats it for the easy method.
Adding Motion Detection:
Adding motion detection is a great way to be notified of visitors instead of a door bell. Xeoma Video Surveillance Software by Felenasoft takes care of motion sensing and triggering the Plugin. The free version of Xeoma Video Surveillance Software only allows 3 modules. You can use this to trigger the Plugin on motion OR convert the video. If you need both you have to purchase a license. 24.95 One time per camera. (they have discounts for multiple cameras). You can also schedule times to activate and deactivate motion, save records of motion, and much more.
Xeoma Video Surveillance Software can be installed on any platform. It will run headless on Kodibuntu and you can manage it remotely. You can also run it on Ubuntu, Windows, or Mac. Installation instructions can be found on Xeoma's site.
For Ubuntu or Kodibuntu download the linux version and extract the xeoma.app file. Enter sudo nano /etc/init/xeoma.conf. Copy the lines below and save with Ctrl X.
description "Upstart Script to run xeoma as a service on Ubuntu/Debian based systems, as well as others"
setuid xbmc
setgid xbmc
start on runlevel [2345]
stop on runlevel [016]
respawn limit 10 30
exec /home/{USERNAME}/xeoma.app -core
Start xeoma with:
sudo start xeoma
sudo /home/{USERNAME}/xeoma.app -showpassword
Download the Xeoma Video Surveillance Software app for your remote computer. It can be any OS that Xeoma supports. Start the client and connect to the Xeoma server using the server IP and the password shown by the last command.
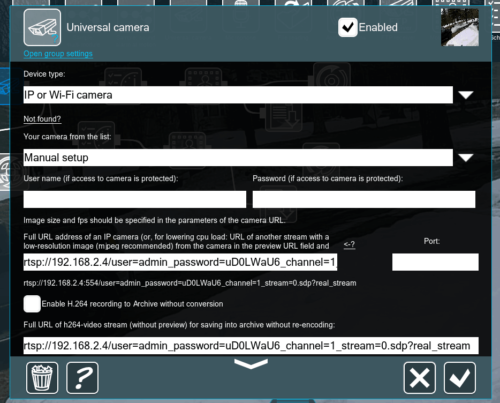
Start by adding a camera, Read the docs for more info. There are thousands of cameras. Xeoma Video Surveillance Software can automatically find a lot of them but not all. If your not sure start by connecting to your camera with VLC. Once you have a working URL you can enter like the image below:
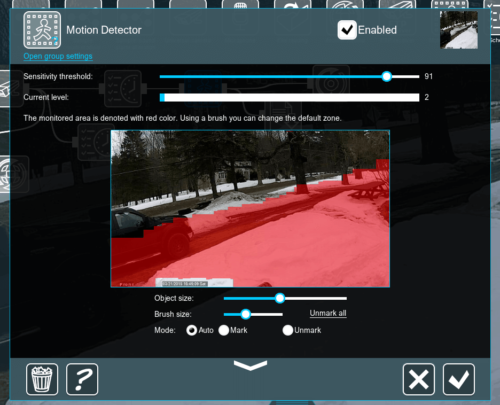
Then add the motion block, the red area is where motion is sensed. I keep the field below the road. It activates when people walk or drive in. You can raise or lower the sensitivity as needed. I would start at 95 and go down until you stop getting false positives. Also, if your camera has a time stamp you will want to make sure its ignored:
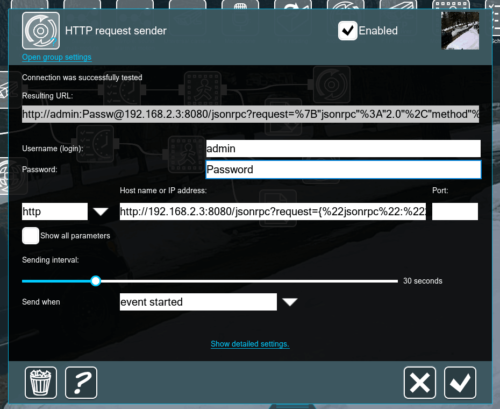
After the motion block add a HTTP request sender. You must enable the "Allow other devices to control Kodi" setting in Kodi Settings -> Services.
http://192.168.2.3:8080/jsonrpc?request={%22jsonrpc%22:%222.0%22,%22method%22:%22Addons.ExecuteAddon%22,%22params%22:{%22Addons.ExecuteAddon%22,%22params%22:{%22addonid%22:%22script.securitycam%22},%22id%22:%221%22}}Change script.securitycam to the name of the plugin you chose below. Also make sure the IP and PORT match. If your running this on the same computer you can use localhost. The sending interval is up to you. It should be the same or larger than the auto close option in the plugin. If you set it the same you overlay will stay open as long as there is motion. You can add more than one HTTP request sender to the same motion block and trigger the plugin on all your Kodi Entertainment Center installs. [Read: 20 Best Kodi addons in 2015 to help you cut the cord]
If you need to Convert your camera feed add a web server block. You will use the path to access images in the Kodi Entertainment Center Plugin. Only use this if your camera can not be shown directly by the plugin.

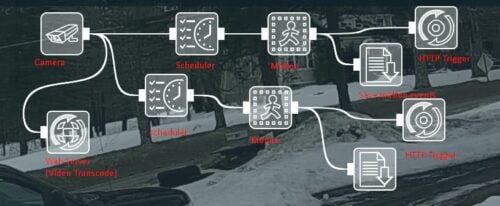
Here you can see my setup. The scheduler blocks allow me to set different motion areas and sensitivity. At night my camera has nothing over it and the IR lights surround the camera. So rain, snow, and bugs fly in front of the camera and light up the whole screen causing a motion event. I set motion to a lower sensitivity and require motion to last 3 seconds to activate. I also limit the motion sensing field. This keeps it pretty capable at night while stopping false positives. Your mileage might vary. You will need to try different settings depending on your camera and needs.
That's it.
Xeoma Video Surveillance Software Downloads:
These are 8 different versions of the Security Camera Overlay Plugin. You can install each one once. They can be activated at the same time but they overlap so only one is visible at a time.
Original Security Cam overlay: http://forum.kodi.tv/showthread.php?tid=182540
- script.FrontDoorCam
- script.SideDoorCam
- script.BackDoorCam
- script.Cam1
- script.Cam2
- script.Cam3
- script.Cam4
- script.Cam5
Xeoma Video Surveillance Software can be Downloaded / Purchased here.
More Reading:
If you are saving recordings with Xeoma and you want to access your files remotely try installing NFS server for serving files. You can do this on your own Ubuntu home server.


![15 Best Jellyfin Plugins [2023] - Supercharge your Media Server Jellyfin Intros Plugin Preview Pre-Roll](https://www.smarthomebeginner.com/images/2022/08/jellyfin-intros-preroll-preview.jpg)
![8 Amazing Raspberry Pi Ideas [2022]: Beginners and Enthusiasts Raspberry Pi ideas](https://www.smarthomebeginner.com/images/2021/09/raspberry-pi-4-dev-board.jpg)
