There are lots of options for you to backup Kodi watched status on your media. Most of them work online, with a service on the cloud, where you can upload this information automatically via a Kodi addon. The Kodi MyEpisodeCalendar addon is no exception, and works via the online MyEpisodeCalendar service. This service is focused on TV shows, so you might not be able to use it if you want to backup watched media status for movies. In this case, you might be better off installing the Kodi Trakt Addon. [Read: Guide: How to use Kodi Trakt backup and restore]

Using the Kodi MyEpisodeCalendarAddon is easy. You just need to install the addon and then give it your login information for the MyEpisodeCalendar service. The Kodi MyEpisodeCalendar plugin will automatically keep your watched status marks updated, with little or no intervention from you, in a set-and-forget way. You can get the Kodi MyEpisodeCalendar addon from the official Kodi addon repository, where you can find it among other Kodi services. [Read: Guide: How to install and configure Kodi MyEpisodes Addon]
Recommended HTPC / Home Server Builds:
- Best Home Theater PC Build 2017 to do it all (Plex, Kodi, NAS, Gaming)
- Best Emby Server builds 2018 – Pre-built and DIY options
- Medium Budget 4K HTPC Build 2017 for Kodi, Plex and Gaming
- Cheap 4K HTPC Build for Kodi, OpenELEC, and LibreELEC 2017
- Low Power Home Server Build 2017 for Network File and Media Storage
- Best HTPC for Kodi with 4K on a Medium Budget 2017 (~$400)
- Energy efficient budget HTPC-NAS combo build 2016
How to install Kodi MyEpisodeCalendar addon?
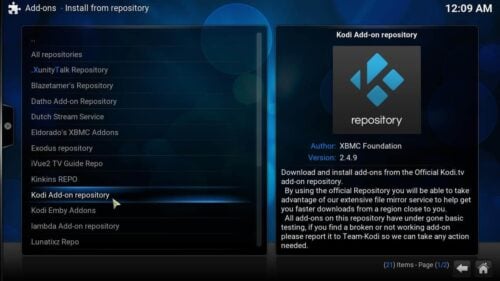
From the Kodi main menu, head to System -> Settings -> Add-ons -> Install from repository. Click on Kodi Add-on repository to browse the official addons you can install on Kodi.

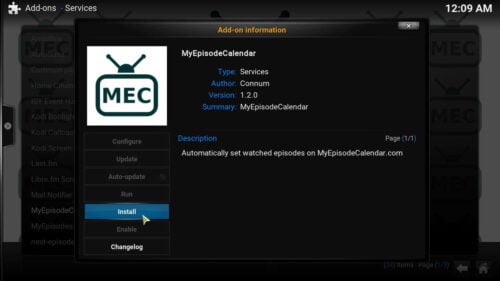
Once you do that, you will find a list of addon categories you can add to your Kodi media center. Since Kodi MyEpisodeCalendar addon is a service, head to the Services menu item. A list with all the services you can install on your media center will open. Scroll down until you find MyEpisodeCalendar. Click it. A popup will appear, with several options. Click Install to get this service added to your Kodi device. [Read: Guide: How to install and configure Kodi MyEpisodes Addon]

Wait a few seconds for your device to install Kodi MyEpisodeCalendar automatically. Once the installation is complete, you will see a notification on the bottom-right corner of your screen.

You have succesfully added Kodi MyEpisodeCalendar addon to your Kodi HTPC! All you need to do now is give it your account information for the MyEpisodeCalendar online service. To do this, simply head to System -> Settings -> Add-ons -> My add-ons -> Services. A list with the installed services will appear. Scroll until you find MyEpisodeCalendar, and then bring up its context menu (right-click or long-press, depending on your OS). Select the Configure option. A dialog will appear, with several options you can configure for this addon. In the General Settings tab, you will be able to specify your username and password. Write the required information and press OK.
That's it! You are now ready to use Kodi MyEpisodeCalendar addon and have your watched status marks automatically synchronized between your Kodi media center and your MyEpisodeCalendar account! You could also use the Kodi TVShow Time addon, if you have an account with the TVShow Time service instead. If you want to keep a local copy of your watched status marks instead, you could use the Kodi WatchedList addon. Not interested on keeping track of your watched media? Disable Kodi watched status logging, and focus only on watching your content. Kodi is fully configurable, even to the smallest detail, and you can make the most out of it with our tutorials!


![15 Best Jellyfin Plugins [2023] - Supercharge your Media Server Jellyfin Intros Plugin Preview Pre-Roll](https://www.smarthomebeginner.com/images/2022/08/jellyfin-intros-preroll-preview.jpg)
![15 Best Plex Alternatives [2022] - FREE and BETTER Options Best Plex Alternatives feature image](https://www.smarthomebeginner.com/images/2022/08/best-plex-alternatives-feature-image.gif)
![20 Working websites to watch March Madness online FREE [2022] Watch March Madness Online Free](https://www.smarthomebeginner.com/images/2022/03/march_maddness-scaled.jpg)

![8 Amazing Raspberry Pi Ideas [2022]: Beginners and Enthusiasts Raspberry Pi ideas](https://www.smarthomebeginner.com/images/2021/09/raspberry-pi-4-dev-board.jpg)
![Watch College Football Online FREE [2022]- 25+ WORKING websites 2022 Watch College Football Online Free](https://www.smarthomebeginner.com/images/2022/08/2022-watch-college-football-online-free.jpg)