Ubuntu 16.04 LTS Xenial Xerus, the next iteration of Ubuntu will be here shortly and we want to get you started by showing how to install Ubuntu Server 16.04 LTS Xenial Xerus. I strongly recommend LTS (Long Term Support) releases for Ubuntu based home server setup for stability and support reasons. Two years back I published Ubuntu Server setup guide for 14.04 LTS Trusty Tahr. I followed it by publishing a series of Ubuntu Home Server guides. This step-by-step screenshot guide will show you how to install Ubuntu 16.04 Server edition. If you do not have patience to read the text guide, there is a video guide on the 3rd page.
Table of Contents
- Install Ubuntu Server 16.04 LTS Xenial Xerus
- Step 1: Select Ubuntu Installer Language
- Step 2: Install Ubuntu Server 16.04
- Step 3: Select Operating System Language
- Step 4: Select Server Location
- Step 5: Keyboard Detection
- Step 6: Network configuration
- Step 7: Hostname
- Step 8: Server User Fullname
- Step 9: Server Username
- Step 10: Server Password
- Step 11: Home Directory Encryption
- Step 12: Confirm Timezone
- Step 13: Ubuntu Server Drive Partitioning
- Step 14: Confirm Partition Scheme
- Step 15: Write the Partitions to Disk
- Step 16: Base Ubuntu 16.04 Server Installation
- Step 17: Setup HTTP Proxy
- Step 18: APT Repository Configuration
- Step 19: Setup Automatic Updates
- Step 20: Ubuntu Server Tasksel
- Step 21: Ubuntu Server Installation
- Step 22: MySQL Password
- Step 23: Ubuntu Server Installation Continues
- Step 24: GRUB Notification
- Step 25: Installing GRUB
- Step 26: Finishing Ubuntu Server Installation
- Step 27: Reboot Ubuntu Server
- Step 28: Ubuntu GRUB Menu
- Step 29: First Login
- Step 30: Ubuntu Server Headless Commandline
Install Ubuntu Server 16.04 LTS Xenial Xerus
Some of you may know that I run an energy efficient Ubuntu home server that also doubles as a Ubuntu Home media server with 14.04 LTS release. [Read: 5 Most common NAS or Home Server uses]
Recommended HTPC / Home Server Builds:
- Best Home Theater PC Build 2017 to do it all (Plex, Kodi, NAS, Gaming)
- Best Emby Server builds 2018 – Pre-built and DIY options
- Medium Budget 4K HTPC Build 2017 for Kodi, Plex and Gaming
- Cheap 4K HTPC Build for Kodi, OpenELEC, and LibreELEC 2017
- Low Power Home Server Build 2017 for Network File and Media Storage
- Best HTPC for Kodi with 4K on a Medium Budget 2017 (~$400)
- Energy efficient budget HTPC-NAS combo build 2016
Note that Trusty Tahr 14.04 is still good for 3 more years with security updates and there is no real need to upgrade. If for some reason you want to or are starting from scratch follow this Ubuntu Server 16.04 setup guide.
To install Ubuntu Server 16.04, first download the Ubuntu 16.04 Server iso file and create a bootable USB. If you do not know how to do this, refer to my guide on installing Ubuntu Server from USB. Once you have the bootable USB ready, pop it in and make your system boot from USB (this has to be done through the System BIOS or UEFI).
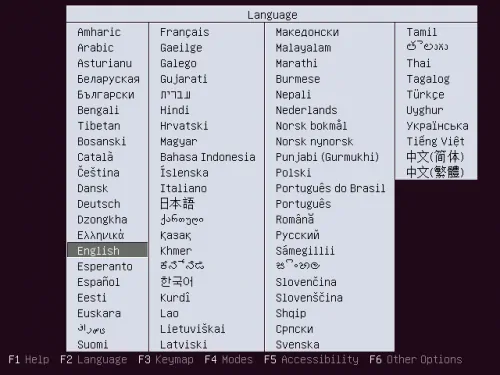
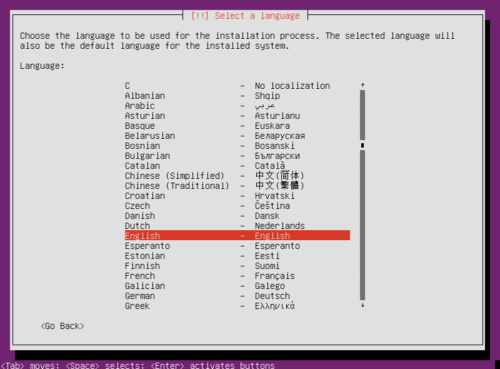
Step 1: Select Ubuntu Installer Language
First select the Ubuntu installer language to use.
Step 2: Install Ubuntu Server 16.04
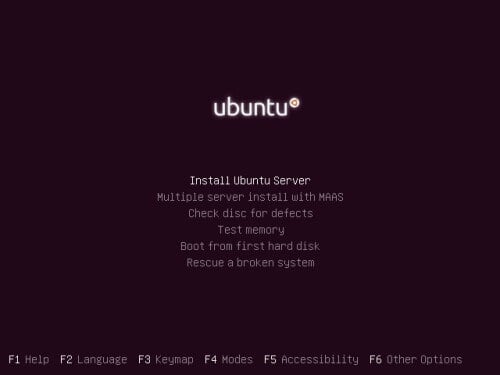
Click on Install Ubuntu Server to continue. For normal installations, you do not have to mess with any of the advanced options.
Step 3: Select Operating System Language
Next select the language for your Ubuntu server operating system.
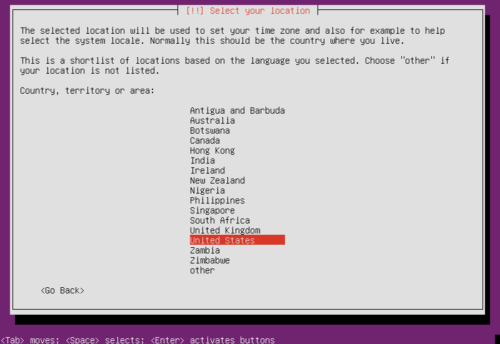
Step 4: Select Server Location
Select your servers location. This helps in determining timezone.
Step 5: Keyboard Detection
Nothing to explain here. Unless you are using a special keyboard, you may skip keyboard detection.
Step 6: Network configuration
Installer, in most home application cases automatically configures the network. Your server will automatically get its network IP from your DHCP server (typically your router). If you are on a Wifi network, you may need to configure it manually.
Step 7: Hostname
A hostname is used to refer to your server (your server's nick name). You may provide any name here. My recommendation is to pick something short, easy to remember, and without a space or special characters.
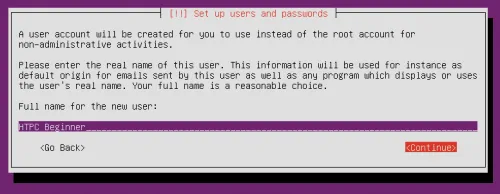
Step 8: Server User Fullname
Next, provide a Fullname for the primary account. This is not the root (administrator) user but this user can temporarily gain admin privileges using the sudo command.
Step 9: Server Username
Then provide the login username for the primary account.
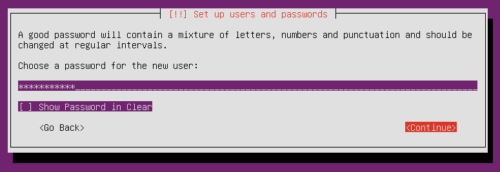
Step 10: Server Password
Select a password for the user created above. You will have to re-enter the password to confirm.
Make sure you set an easy to remember but strong password with a mix of upper case letters, lower case letters, numbers, and special characters.
Step 11: Home Directory Encryption
Generally speaking, you do not have to encrypt your home directory. But you may do so if you want to.
Step 12: Confirm Timezone
The installer should automatically pick your timezone. Confirm the choice and move forward.

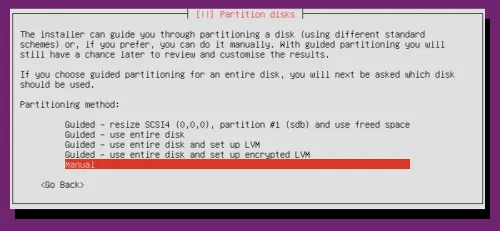
Step 13: Ubuntu Server Drive Partitioning
This is one of the key steps and probably most complicated of all steps. We will have a separate partitioning guide shortly. For now, ensure that you have at least 8GB (headless - no desktop environment) or 10 GB (with desktop environment) of space. In this guide we are going to assume that the homeserver has 2 physical hard disks (sda and sdb). sda is the drive that will be formatted for Ubuntu Server 16.04 installation. sdb is a storage drive containing all media collection (will not be formatted). Choose Manual partitioning method and proceed.
My recommendation is to create a separate /home partition and put everything else under /. The reason I suggest this is that almost all customizations are saved in home partition. They will be saved if you decide to reinstall OS for some reason. Furthermore, if you use AtoMiC ToolKit to setup home server apps such as CouchPotato, SABnzbd, SickBeard, etc. then those apps are installed in /home partition. These will be preserved between reinstall and OS upgrades. If you decide to do this, then I suggest about 10 GB for OS / and the rest of the disk for /home where all your data will be stored. Also create about 2 GB of Swap partition (will be used as backup RAM for server). Once again, all these will be explained in detail in my upcoming partitioning guide.
Step 14: Confirm Partition Scheme
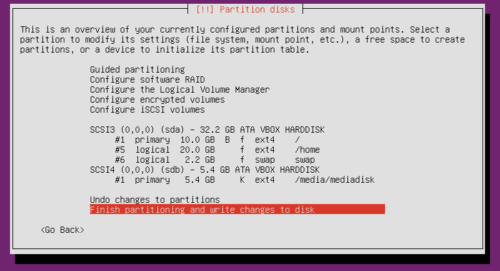
Once you have setup a partitioning scheme, the installer will show you a preview of the partition scheme. Confirm and continue to create the partitions. As explained before, in this example we are creating one primary partition of 10 GB that will contain the OS (/ folder), rest of the space on the hard disk minus ~2 GB for /home partition, and the final ~2 GB for Linux swap partition. This is shown in the picture below.
In the picture above, /home partition is only 20 GB. In reality, this would be the total hard disk capacity minus space used for / partition and swap partition. Also, second hard disk containing media files would much larger than 5.4 GB shown above. Note that hard disk 1 (sda) with 3 new partitions shows "f" (to be formatted) and hard disk 2 (sdb) with one existing partition shows "K" (to be kept / not to be formatted). Ensure that the drive containing your media files is set to "K" as shown above.
Step 15: Write the Partitions to Disk
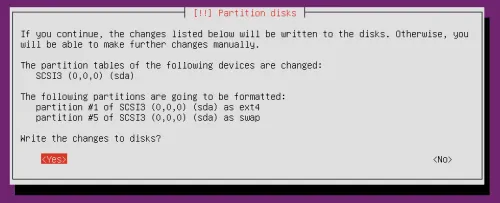
Because partitioning is critical, you will be asked one more time to confirm before partitions will be written to the hard disk.
The above picture shows only 2 partitions (/ and swap). For the partition scheme shown in previous step you will see 3 partition (/, /home, and swap) listed for creation.
Step 16: Base Ubuntu 16.04 Server Installation
After partitioning, the installer continue to install Ubuntu Server 16.04 base system. Nothing to do here than wait for it to complete.
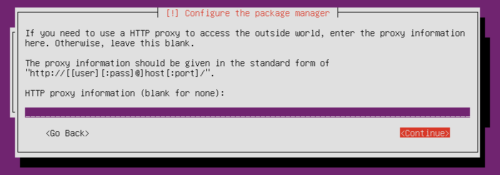
Step 17: Setup HTTP Proxy
In typical Ubuntu Home Server setup, this is generally not needed. So, leave it blank and continue to install Ubuntu 16.04 Server.
Recommended HTPC / Home Server Builds:
- Best Home Theater PC Build 2017 to do it all (Plex, Kodi, NAS, Gaming)
- Best Emby Server builds 2018 – Pre-built and DIY options
- Medium Budget 4K HTPC Build 2017 for Kodi, Plex and Gaming
- Cheap 4K HTPC Build for Kodi, OpenELEC, and LibreELEC 2017
- Low Power Home Server Build 2017 for Network File and Media Storage
- Best HTPC for Kodi with 4K on a Medium Budget 2017 (~$400)
- Energy efficient budget HTPC-NAS combo build 2016
Step 18: APT Repository Configuration
Ubuntu software are installed from the APT repository. Wait for the installer to configure it.

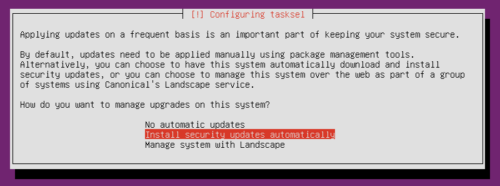
Step 19: Setup Automatic Updates
Ubuntu Server can automatically install updates when they are available. While this can break things sometimes installing just the security updates shouldn't. So I recommend installing security updates automatically on your Ubuntu home server.
When non-security updates are available, you will see a notification upon login and you can force an update using sudo apt-get upgrade command.
Step 20: Ubuntu Server Tasksel
After partitioning, this is the step that requires most user intervention. You will have to select what services you want to install on your Ubuntu 16.04 Server. "Standard System Utilities" should already be selected. In addition, for a typical Ubuntu homeserver setup, I recommend LAMP server, Samba file server, and OpenSSH server.
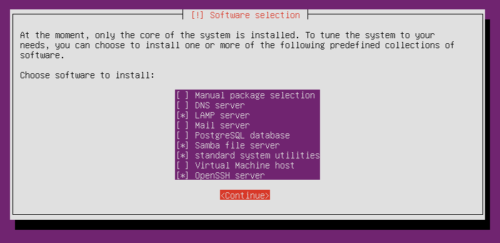
LAMP server installs Apache web server, MySQL database server, and PHP. MySQL may be needed for running a dynamic website. But for a home setup it can also allow sharing Kodi database between devices. Samba file server will allow you share files with Windows systems. And OpenSSH will allow you to remotely connect and administer your Ubuntu Home Server through SSH. [Read: 10 best SSH Clients for Windows: free alternatives to PuTTY]
Step 21: Ubuntu Server Installation
Ubuntu Server installer will continue to setup Ubuntu home server packages you selected in Tasksel. Nothing to do here than just wait.

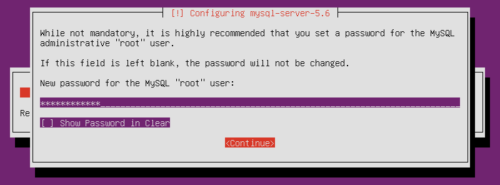
Step 22: MySQL Password
Next, the Ubuntu server installation will proceed ask you for an administrator password for MySQL database. Provide something strong but also something you can remember.
You will have re-enter the password to confirm. The default administrator username is "root".
Step 23: Ubuntu Server Installation Continues
Once again, nothing much to do here. Let the installation continue.
Step 24: GRUB Notification
GRUB is the boot menu that is shown immediately after your Ubuntu Server powers on. It shows a list of all OSes installed on the system. It is installed to the hard drive containing the OS. In most cases this is /dev/sda.
Step 25: Installing GRUB
As explained above, it is safe to install GRUB to /dev/sda. No input needed. Let the installer do its thing.
Step 26: Finishing Ubuntu Server Installation
Again, nothing to do here. Let the installer finish a few things to complete setting up Ubuntu 16.04 LTS server.

Step 27: Reboot Ubuntu Server
Yah! you are done. After installation completes, hit continue to reboot server.

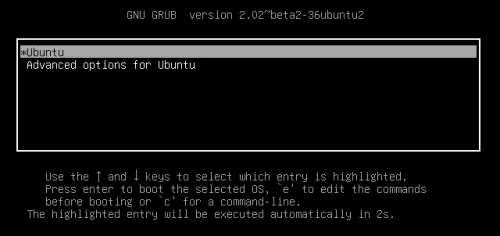
Step 28: Ubuntu GRUB Menu
As explained above you will see the GRUB menu while booting. Nothing to do here. Your server will automatically boot to Ubuntu, which is the default setting.
Step 29: First Login
When you are presented with the login screen enter the username and password you created earlier in the Ubuntu 16.04 Xenial Xerus installation process. Remember that Linux commandline does not show anything (asterisk) while typing passwords.
Step 30: Ubuntu Server Headless Commandline
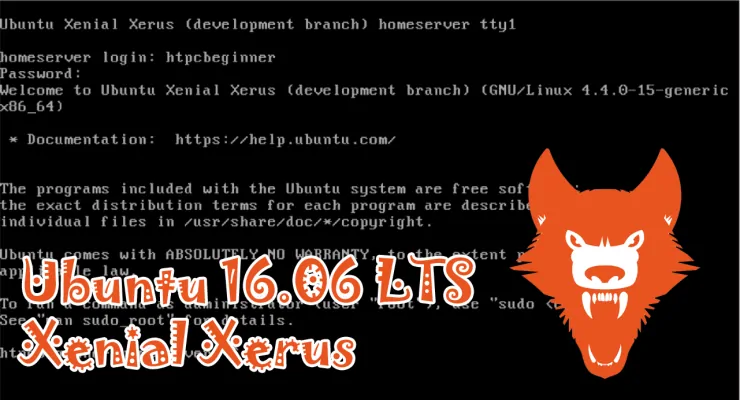
There you go. You should be on your Ubuntu Server commandline after successful login.
While there are 29 steps to install Ubuntu 16.04 Server, most steps require no interaction from you. The whole installation can be done in less than 30 min. What the whole process in this 5 minute video guide.
I have previously presented several options for home server operating systems. In my opinion, Ubuntu server is the best Linux distro for home server, period. And LTS release such as 16.04 Xenial Xerus ensures that you are set for 5 years. Once you get a handle of it you will begin to appreciate what it can do for you. If you are not tech savvy or are just feeling a bit lazy today then try our AtoMiC ToolKit to automate installation and management of home server software. Go ahead, install Ubuntu Server 16.04 and begin the journey.












![Ultimate Docker Server: Getting Started with OS Preparation [Part 1] Docker Server Tutorials 1 OS Preparation](https://www.smarthomebeginner.com/images/2024/01/Docker-Series-01-Intro-and-OS-Prep.png)