While setting up your HTPC, securing your connection is a very important thing to consider. Whether you use addons or apps to get your content, it is crucial to keep your connection away from prying eyes. If you want to do so, you need to install a VPN. What is a VPN? We have covered this topic previously. In this article we will tell you that it is a way to make it appear to online websites as if you are connecting from somewhere else. This is useful to secure your connection, and also to watch geoblocked content. DNS are another way to get geoblocked content, but they don't secure your connection, so we will focus on VPN for this post. In particular, VPN from a provider called StrongVPN. Learn with us how to install StrongVPN on Windows. [Read: VPN vs DNS: Which one should you choose and why?]

How to install StrongVPN on Windows?
First things first: StrongVPN is a paid service to keep your browsing safe, so you will need an account to use it. This being said, installing the client is really easy. You can install StrongVPN on Windows in a few simple steps, and I will talk to you about those now.
Surfshark VPN Exclusive Offer - 82% off ($2.39/month):
♦ Hide your browsing (no logs), Anonymize Streaming and Downloads
♦ Wireguard Protocol support for VPN.
♦ Circumvent Geo/Country Restrictions and access worldwide content
♦ Works on Windows, Mac, Linux, Android, iOS, Router, and more
♦ 1 TB Encrypted Storage
♦ Money back guarantee - Sign Up Now
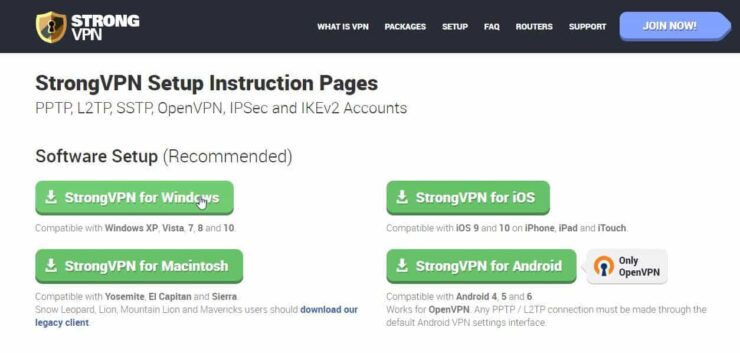
Head to the StrongVPN home page. Navigating through it, you can learn a little bit more about this software, if you are so inclined. However, if you want to get right away to the StrongVPN Windows install executable, you should head on to the Setup section of the website. Here you will see all the options available. Click on the one labeled StrongVPN for Windows.

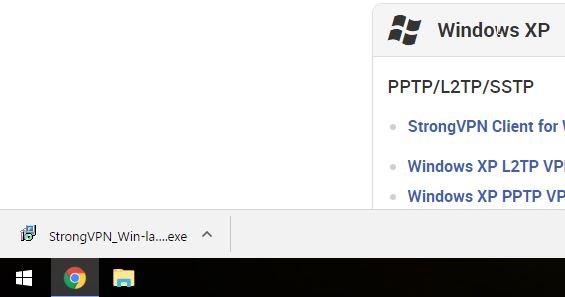
An executable file will start downloading. Once it is done, click on it, or head on to your downloads folder and double click it (this depends on your browser). For example, if you use Chrome, you will see it on the bottom left corner of your screen.

Using the installation wizard.
Once you open the executable, the assistant to add StrongVPN to Windows will appear. You may be asked to allow the app to make changes on your device. If this happens, click Yes in order to continue to install StrongVPN on Windows. After that, you will be prompted to select an installation language. Select English (unless you want another language). Click Next >. Accept the license agreement and click Next >. Select a location on your system where you want to add StrongVPN to Windows. Click Next >. Select the location where the shortcuts on the Start menu will be created for StrongVPN and then click Next > (you can use the default values if you want). Then you will be asked whether or not you want a desktop icon. Mark the option and click Next >.
After all these steps you will see a summary of the way you have configured the installation. Check everything is in order and click the Install button. Wait some minutes and a dialog will pop up, telling you that StrongVPN has been installed. Mark the option to launch it and click Finish.

You will be asked whether or not you want the application to make changes to your device. In order to fully install StrongVPN on Windows, select Yes.
Using the software after you install StrongVPN on Windows

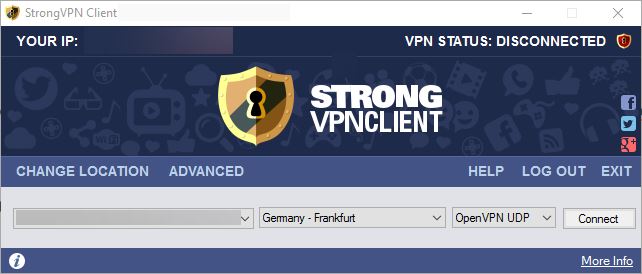
As you can see, it is very easy to use this VPN client once you install StrongVPN on Windows. Simply log in with your account information. You will get a small window where you can select the country you want to connect from, the protocol, and click the Connect button. Congratulations! Your browsing is now safer! You can also use StrongVPN with OpenVPN. To do so, you should first install OpenVPN on Windows and then configure OpenVPN on your Windows system. You could then set up your system to auto connect to OpenVPN on boot. Lots of ways to keep your system safe with StrongVPN!

![20 Working websites to watch March Madness online FREE [2022] Watch March Madness Online Free](https://www.smarthomebeginner.com/images/2022/03/march_maddness-scaled.jpg)
![Watch NFL Games Live FREE 🏈: 23+ WORKING websites [2023] Watch NFL Games Live FREE](https://www.smarthomebeginner.com/images/2023/08/nfl-streaming-1.jpg)
![Watch College Football Online FREE [2023]: 🏈 23+ WORKING websites Watch College Football 2023](https://www.smarthomebeginner.com/images/2023/08/college-football-2023-e1692045798880.jpg)
![Watch College Football Online FREE [2022]- 25+ WORKING websites 2022 Watch College Football Online Free](https://www.smarthomebeginner.com/images/2022/08/2022-watch-college-football-online-free.jpg)

