We all have our preferred media center solutions to play and watch our media content. Whilst these solutions are great for opening media files and displaying them on our TV screens they lack in the file organization department. If we take Kodi as an example it requires a strict naming standard to display TV show collections but no tools to implement this convention. You must change your file and folder structures manually. Thankfully, there are tools to do this: 5 Media Manager Applications to Organize Your Media Files. In this post, I will take a look at perhaps the best media manager for Kodi out there. Ember Media Manager provides a massive tool set to manipulate your collections. In this post I will show how to setup Ember Media Manager, add collections, scrape artwork and customize individual movies.
Table of Contents
Install & Setup Ember Media Manager for Organizing Movies
Ember Media manager can be used to organize movies and TV shows but in this post my focus will be on movies (organizing TV Shows is also very similar). The aim is to get you up and running with Ember with an understanding of the basic tool set. Before we organize media with Ember we must first deploy it to a Windows PC.
Install Ember Media Manager on Windows
To setup Ember Media Manager, download it from Ember Media Manager download page, run the executable and hit next, on the first welcome screen. You can also hit next on the second Choose Components screen as these can be left as default. The third screen you will see allows you to Choose Install Location. You can set a custom location or hit next to accept the default. Screen 4 allows you to choose your start menu folders. You can change these if you wish or hit Install to accept the default locations. The install process will now take around 30 seconds and you must then select finish.
Ember Media Manager Initial Setup
When you first launch the application you will be asked a series of questions to initially organize media with Ember. The first screen is pretty self explanatory. Select your language and then hit next. The second screen is more important and asks you to define the locations of your media libraries. Select Add Source and navigate to the the location of your first Movie or TV Show collection. After you have selected it you will be shown a series of tick boxes for this media source (these are shown below). It is important here that you choose the right options for the layout of your folders. If you keep all of your movies in one folder you must uptick the option Movies are in separate folders. Click OK and then Next to move to the next set of options. [Read: 5 Best Kodi Alternatives for Media Enthusiasts – Kodi Like Apps]
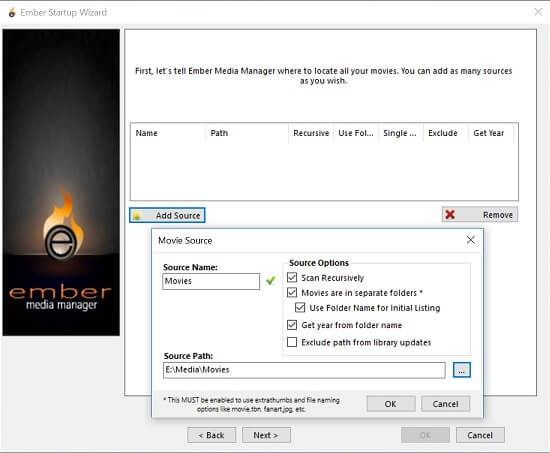
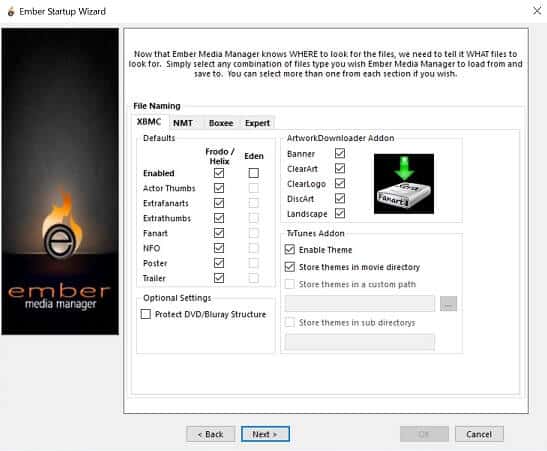
On the screen that follows you will be asked to select the types of art work you would like Ember to pull in. Leave all of these ticked if you would like to download everything.
The final screen you will see asks you to select the artwork scrapers you would like to use. I suggest you leave these settings as default and hit Finish. The installation is now complete and the best media manager for Kodi is ready on your system. In the sections that follow I will show you how to organize media with Ember.
Best Kodi Addons:
- 20 Best add-ons for Kodi 18 Leia with installation instructions - 2019
- Top Kodi Addons: Ultimate List of 93 Working Kodi Addons in 2018
- 6 Must have Kodi addons for Broadcast TV streaming
- 6 best legal Kodi TV show addons – TV show addons for Kodi
- The 6 best legal Kodi movie addons – Movie addons for Kodi
- 5 Best Legal Kodi Anime Addons for your Kodi HTPC
- 10 Best Kodi Kids Addons List for your HTPC
Adding a Movie Library to Ember Media Manager
In this section I will talk you through some simple steps to organize media with Ember. If you have missed any libraries on install you must add them manually. Once the software is installed you can add additional libraries by selecting Edit from the top menu followed by Settings. This will present you with the generic settings page. Each media library type has its own set of options available to you. Select the Movies icon at the top of the settings screen and you will be presented with the following:
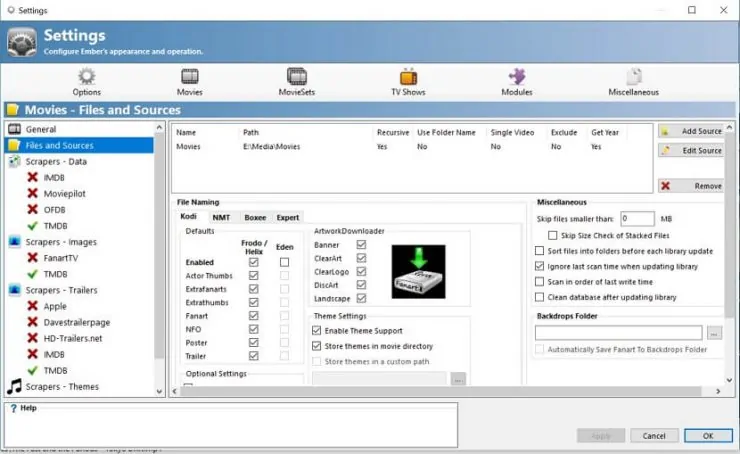
On the left hand side of this window select Files & Sources. Click on the Add Source button on the right hand side of the screen. This will allow you to browse to the location of your movie media files. You must follow this process for every folder on your HTPC that contains movies. Please note that for each source you add you will be prompted with the following screen. [Read: 10 Best Kodi Movie Addons in 2017 for your HTPC]
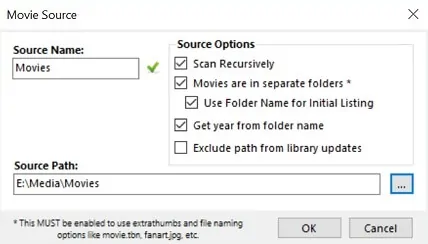
As with the installation if your movies are all stored in one folder and you do not have a separate sub folder for each ensure that you untick Movies are in separate folders. If you fail to do this Ember will only pickup the first movie in your collection. Once you have completed this for every movie folder on your HTPC you are ready to go. Although our focus is movies you can repeat this process for other media types on their own settings screens. [Read: 10 Best Legal Android Streaming Apps for Movies and TV Shows]
Surfshark VPN Exclusive Offer - 82% off ($2.39/month):
♦ Hide your browsing (no logs), Anonymize Streaming and Downloads
♦ Wireguard Protocol support for VPN.
♦ Circumvent Geo/Country Restrictions and access worldwide content
♦ Works on Windows, Mac, Linux, Android, iOS, Router, and more
♦ 1 TB Encrypted Storage
♦ Money back guarantee - Sign Up Now
Scraping Movie Artwork & Trailers in Ember Media Manager
Now that all of your movies are loaded into Ember it is time to pull in some artwork. This is simple to do and Ember will store each artwork type (box art, actors, fan art etc) in separate sub folders under each movie source. To do this return to the Ember home screen and select the Scrape movies option shown by the red arrow in the image below:
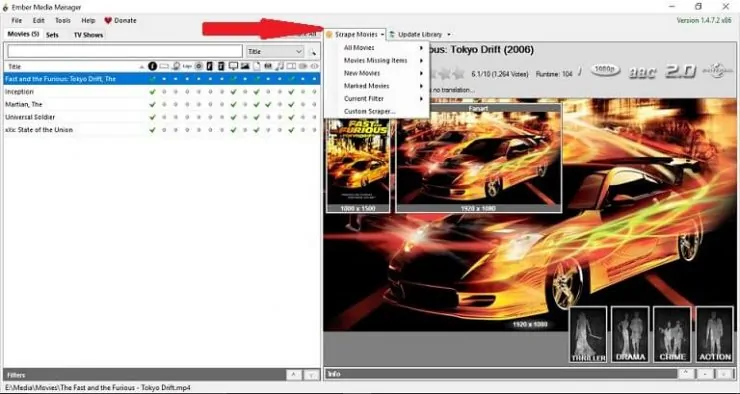
The menu option will drop down presenting you with a range of different methods for scraping your movies. You can do all movies, selected movies, missing movies or custom filters. Select All Movies and Ember will run though your entire collections refreshing all art work images. Ember will talk to multiple sources to find the right images and this process may take some time. Once the process is complete run through all of your movies to ensure that all art work types have been downloaded. If anything is missing you can customize that particular movie by double clicking on it on the main Ember home screen. I will take you through this in the next section. [Read: 7 Must have Addons for Kodi Maintenance 2017 – Backup, Library Update]
Edit Individual Movie Files with Ember Media Manager
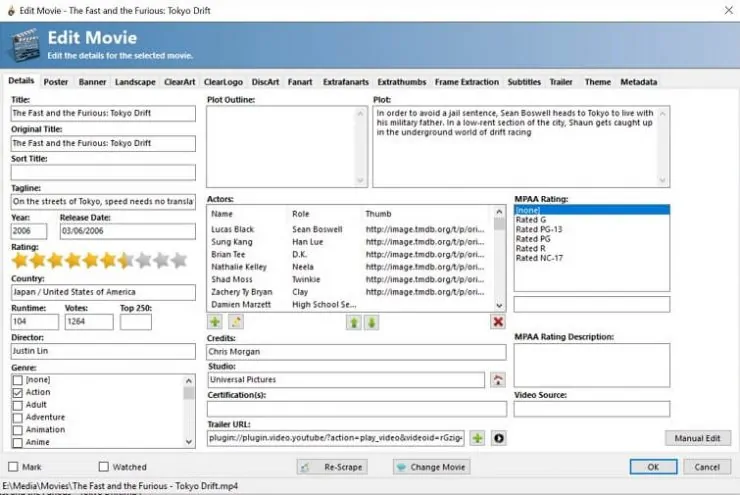
Ember Media manager allows you to change settings and customize individual movie files. You may want to do this if the scrapers do not pick up the correct details for certain movies. This is done by simply double clicking on your chosen movie on the main home screen. You will then be presented with the following screen:
The first screen you will see is the details tab and the majority of options are fully editable. You can change the movie title, alter the synopsis information, select a different genre or manually change the movie's rating. Running along the top of this window you will see separate tabs for each piece of artwork. Here you can re-scrape, change the scraping source or add your own images from your local computer. There are also tabs for subtitle customization and movie trailers. [Read: Guide: How to Watch Kodi Movie Trailers on your Media Center]
Best Media Manager for Kodi - Final Thoughts
If you are a keen movie collector and want perfect libraries on your HTPC or NAS then Ember Media Manager can deliver this for you. It will provide perfect movie information, a whole host of artwork files and even trailers for each film in your set. In this post I have focused on movies but the same principles can be applied to your TV show collections. It will take you around 10 minutes to setup Ember Media Manager. Organize media with Ember and it will get your collections looking stunning and fully descriptive. Ember is perhaps the best media manager for Kodi out there. It is the perfect addition to media center software platforms like Kodi.

![15 Best Jellyfin Plugins [2023] - Supercharge your Media Server Jellyfin Intros Plugin Preview Pre-Roll](https://www.smarthomebeginner.com/images/2022/08/jellyfin-intros-preroll-preview.jpg)
![15 Best Plex Alternatives [2022] - FREE and BETTER Options Best Plex Alternatives feature image](https://www.smarthomebeginner.com/images/2022/08/best-plex-alternatives-feature-image.gif)

