Some of you may know that due to increasing traffic and popularity, we recently moved htpcbeginner.com to reliable Linux hosting on GoDaddy.com. In this post, I will explain how to install rsync on GoDaddy Linux Hosting account. Rsync is a utility software and network protocol for Unix-like systems that synchronizes files and directories from one location to another while minimizing data transfer. It is a great tool for backing up files and directory and so I decided to use it to backup my GoDaddy files to my home server. Unfortunately, rsync is not installed (and GoDaddy will not) on their hosting servers. So I had to come up with another way to use rsync. So let us go ahead and install rsync on GoDaddy hosting for the purposes of backing up files to a remote server.
Table of Contents
1. Enable SSH on GoDaddy
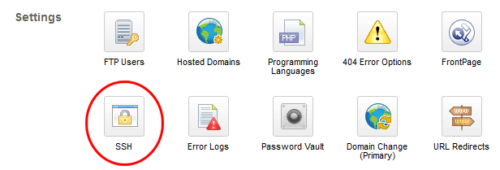
The very first step is to enable SSH on GoDaddy Linux hosting. To do that login to your hosting control panel and click on "SSH" under Settings.
If it is not already enabled, click on "Enable" to enable SSH on GoDaddy.
It may take a few minutes for SSH to be enabled.
2. Rsync Not Installed on Godaddy
After enabling SSH if you now try to backup your files using rsync over SSH, you will see the "rsync: command not found" error.
As I said before, this is because GoDaddy does not have rsync installed on their servers and this post explains a workaround that will install rsync on GoDaddy.
3. SSH To Your Hosting
After SSH is enabled on GoDaddy, connect to it using your favorite SSH client (such as PuTTY for Windows) or your Linux terminal. Connect to your hosting account using your GoDaddy hosting username and password as shown in the picture below.

If all goes well you should be at the bash prompt. While you are create a folder called bin in the root folder using the following command:
mkdir bin
4. Determine Your Server's OS Details
GoDaddy currently runs CentOS. To confirm and find out the version, issue the following command while connected through SSH:
cat /etc/*release
The output should look something like this:
CentOS release 5.8 (Final)
In this case, the hosting server runs version 5.8 of CentOS. If the above command does not work you may also try lsb_release -a or cat /proc/version.
5. Download rsync For Your Server OS
After finding out your hosting server's OS version, visit the following page:
http://vault.centos.org/5.8/os/i386/CentOS/
Remember to replace 5.8 in the URL with the version number of your server OS. Scroll down, find rsync, and click on it to save it to a known location in your local computer.
If you are on a Linux terminal you could use the wget command:
wget http://vault.centos.org/5.8/os/i386/CentOS/rsync-3.0.6-4.el5_7.1.i386.rpm
Your download URL may be different based on your server OS version.
6. Extract the RPM file
On Windows you could use 7-zip to extract the contents of the downloaded RPM package. On Linux commandline, you need the rpm2cpio package installed. Then you can use the following command to extract the RPM file:
rpm2cpio rsync-3.0.6-4.el5_7.1.i386.rpm | cpio -idmv
Upon successful extraction, there should be a usr/bin folder. The rsync file inside it needs to be uploaded to your hosting server.
7. Install rsync on GoDaddy Hosting
The rysnc file extracted above should be uploaded to the bin folder created in step 3. There are multiple ways to do this. On Linux commandline, from within the usr/bin, you could use the scp command:
user@myhomeserver:~/usr/bin$ scp rsync [email protected]:~/bin/
On Windows, you could use Filezilla to SFTP to your hosting account, create the bin in the root folder, and upload the rsync to it. If you use regular FTP, you will connect directly to the html folder that is inside the root folder and you cannot access the root folder. In this case, you will have to upload the rsync file to your html folder and then connect through SSH and move it the bin folder. For moving the file you could use the following command:
sudo mv ~/html/rsync ~/bin/
Finally, ensure that rsync file has executable permissions:
chmod 755 ~/bin/rsync
This is all you have to do to install rsync on GoDaddy Linux hosting. The rest depends on how use the rsync command.
Using the rsync command
Now that you have installed rsync on GoDaddy you should know how to use the rsync command. The --rsync-path attribute in the rsync command allows you to specify the path where rsync executable is present. So your rsync command should look something like this:
rsync -rv -e ssh --rsync-path-bin/rsync [email protected]:~/html/ /home/user/godaddybackup/
This command to sync all files on your hosting account (html folder) to your local folder (/home/user/godaddybackup). You can setup a cron job to run this periodically to keep your local folder synced with your GoDaddy hosting account. There you go install rsync on GoDaddy hosting, keep your files backed up, and enjoy the peace of mind.


![30 Best SSH Clients for Windows [2022]: Free and Paid Best SSH Clients for Windows featured image](https://www.smarthomebeginner.com/images/2022/11/image-by-geralt-9301-gerd-altmann-from-pixabay-dotcom-matrix-2883623-1280.jpg)
![Ultimate Docker Server: Getting Started with OS Preparation [Part 1] Docker Server Tutorials 1 OS Preparation](https://www.smarthomebeginner.com/images/2024/01/Docker-Series-01-Intro-and-OS-Prep.png)


