Installing RasPlex on Raspberry Pi is a relatively simple process. This article will outline how to install RasPlex (rasplex.com) in a few easy steps. RasPlex is an open source and community maintained port of Plex Home Theater which runs on OpenELEC. This is client software which allows you to access a Plex Media Server. If you have an extra Raspberry Pi kicking around the house, you can setup RasPlex and hook it up to that extra TV or even give it to a friend or family member so that they can access your media library. Even if you don't already have a Raspberry Pi, they are relatively cheap and the base Raspberry Pi 2.0 computer can be purchased for $35 and the previous versions for even less. [Read: A budget HTPC-NAS Combo with an old PC and OpenELEC]
What is needed to Install RasPlex on Raspberry Pi?
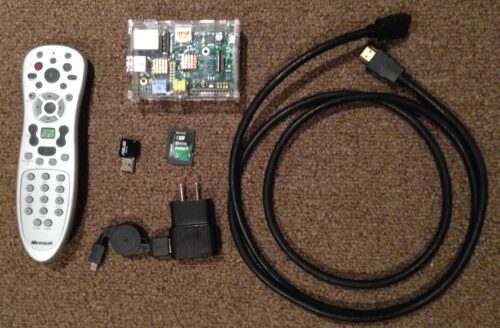
First, read and understand our Plex vs Kodi comparison to understand how Plex works. You may already have some of the Raspberry Pi accessories lying around. To install RasPlex, the following items are necessary / recommended:
- A Raspberry Pi computer (Raspberry Pi 2.0, 1.0 B+, or 1.0 B)
- A 2GB or larger SD card (class 10+) - microSD for RPi 2.0
- A compatible SD card reader (not shown)
- A USB micro power supply (should be at least 2A at 5v, if you experience crashing it’s probably because you have a bad or insufficient power supply)
- A HDMI cable (to connect to your TV/monitor)
- A remote control (recommended) but you can use a keyboard
- A compatible Wifi adapter (optional - if you don't want to or can't use an Ethernet connection)
You will also need to have a Plex Media Server to connect to. Either on your network or one which somebody has shared with you. [Read: 5 Most common NAS or Home Server uses]
Creating a Disk Image to Install RasPlex
The first step to install RasPlex on Raspberry Pi, including Raspberry Pi 2.0, is to create a disk image on your SD card. This process is simple as RasPlex now provides a RasPlex installer. RasPlex download can be done from the RasPlex site. The following steps can be used for installation from a Windows machine.
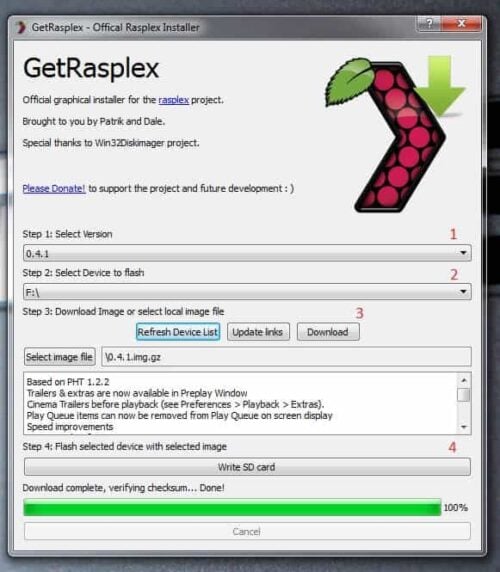
First, you will need to insert the SD card you are going to use in your card reader and ensure that it's plugged into your machine. Once that is done, launch the installer and follow the steps listed and shown in the graphic below.
- Select the version of RasPlex to install
- Select the drive letter of your SD card
- Download the image
- Write to the SD card (this will take a couple of minutes)
When writing to the card is complete, a message at the bottom of the window should say "Writing done!" You are now ready to continue RasPlex installation on your Raspberry Pi. [Read: What Plex Client Hardware is Right for You?]
Raspberry Pi Installation
Now it's time to continue to install RasPlex on Raspberry Pi. First, do not plug in the power cable. Second, you will need to connect the Raspberry Pi to your TV with the HDMI cable, connect your remote control or keyboard, plug-in your Wifi adapter or wired network cable, and insert the SD card. Once this is all done, plug in the power cable. Your Raspberry Pi will boot up and begin to expand RasPlex.
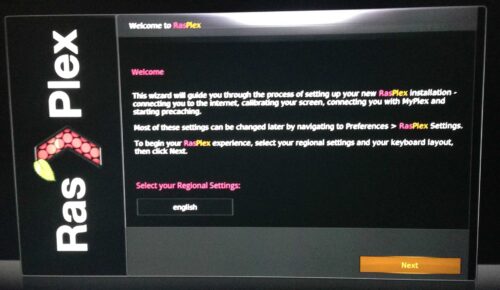
Now all that is left is to go through the following steps in the RasPlex Setup Wizard:
- Select your regional settings (most likely 'English' if you are reading this!)
- Setup networking - you will need to select you wireless network and login. Wired networks should not need any configuration. If all is working well, you should be assigned an IP address by your router or DHCP server
- Calibrate your screen - You will be asked to setup the corners, subtitle location, etc.
- Login to your 'My Plex'. You will be asked to use your computer (or any device with a web browser really) to navigate to plex.tv/pin and input you pin and connect.
- Pre-caching - you will be asked to 'pre-cache' much of the meta data from your Plex server to improve performance. You will need to reboot after install is complete for this to take effect.
That's it! You're done! Your RasPlex installation is complete and you can now enjoy all your media from the compact and relatively cheap Raspberry Pi! [Read: 20 Best Kodi addons in 2015 to help you cut the cord]
You may notice however, that the menus feel a bit clunky. I've also found that play back, especially of full 1080p videos with 5.1 audio, can be a little choppy. On Raspberry Pi 1 B and B+, overclocking should reduce any lags. Raspberry Pi 2.0, there should be any lags. Next up will be an article on overclocking your RasPlex on Raspberry Pi setup.


![8 Amazing Raspberry Pi Ideas [2022]: Beginners and Enthusiasts Raspberry Pi ideas](https://www.smarthomebeginner.com/images/2021/09/raspberry-pi-4-dev-board.jpg)

![10 Best Plex Client Devices [2022] - STUTTER-free Streaming Best Plex Client Devices](https://www.smarthomebeginner.com/images/2022/02/best-nas-for-plex-server-featured-images-from-pexels-photography-maghradze-ph-3764958-e1648542743772.jpg)
![15 Best Plex Alternatives [2022] - FREE and BETTER Options Best Plex Alternatives feature image](https://www.smarthomebeginner.com/images/2022/08/best-plex-alternatives-feature-image.gif)