In our previous posts, you learned how to install Sonarr in Ubuntu, a service that allows you to automate your TV show download by creating watch lists and automatically download them when they are available. Radarr is a similar service, made specifically for movies. You just add your wanted movies and Radarr will automatically search them and download the best quality. Radarr is a breath of fresh air for users that were looking for an alternative to Couchpotato and by having a really similar interface with Sonarr, new users will feel right at home. Sounds interesting? Continue reading and learn how you can install Radarr on Ubuntu, Ubuntu Server, and variants.
Usenet is Better Than Torrents:
For apps like Sonarr, Radarr, SickRage, and CouchPotato, Usenet is better than Torrents. Unlimited plans from Newshosting (US Servers), Eweka (EU Servers), or UsenetServer, which offer >3000 days retention, SSL for privacy, and VPN for anonymity, are better for HD content.
| Provider | Rating | Features | Monthly | Yearly |
|---|---|---|---|---|
| Newshosting | >3000 days, unlimited, SSL, VPN | $9.99 | $99.99 ($8.33 / month) | |
| UsenetServer | >3000 days, unlimited, SSL, VPN | $9.99 | $99.99 ($8.33 / month) | |
| Eweka | >3000 days, unlimited, SSL, EU Servers | €7,50 (Special!!!) | ||
| For more plans that may fit your needs please read our Usenet plan selection guide. | ||||
Table of Contents
Install Radarr on Ubuntu
Before we begin Ubuntu Radarr installation, make sure you have a working Ubuntu or Ubuntu Server installation. If you need to learn how to install Ubuntu Server, follow our screenshot guide on how to Install Ubuntu Server 16.04 LTS Xenial Xerus.
1. Install Radarr dependencies
In order for our Ubuntu Radarr installation to run successful, we first need to install the dependencies:
sudo apt update && sudo apt install libmono-cil-dev curl mediainfo -y
Looking for an automated solution? Try our AtoMiC ToolKit, which makes installation and management of Home Server software such as SickBeard, CouchPotato, Torrent clients, etc. easy.
2. Download Latest Radarr for Ubuntu
First, from the Radarr GitHub page right-click on the .tar.gz file for latest release and copy the link to the file. Alternatively, you can note down the full download URL.
Next, open Terminal in Ubuntu and download the latest Radarr release using the following command. Note that the release the release number and the filename may be different at the time you are following this guide.
sudo wget https://github.com/Radarr/Radarr/releases/download/v0.2.0.299/Radarr.develop.0.2.0.299.linux.tar.gz
After downloading the latest release, we need to extract the tar file using the following command (again change the file name accordingly):
sudo tar -xvzf Radarr.develop.0.2.0.299.linux.tar.gz
3. Configure Radarr to autostart
In order to configure Radarr to autostart, first we need to go to the /etc/systemd/system/ folder:
cd /etc/systemd/system/
Next, we need to create the radarr.service file by running the following command:
sudo nano radarr.service
Paste the following systemd script that enables Radarr to autostart:
[Unit]
Description=Radarr Daemon
After=syslog.target network.target

[Service]
User=root
Group=root
Type=simple
ExecStart=/usr/bin/mono /opt/Radarr/Radarr.exe -nobrowser
TimeoutStopSec=20
KillMode=process
Restart=on-failure

[Install]
WantedBy=multi-user.target
Press Ctrl+x exit, Y for yes then enter to save.
After saving the startup script, run the following command to enable autostart for Radarr:
sudo systemctl enable radarr
4. Start and Stop the Radarr service
If you used the correct commands, you can go ahead and start the Radarr service you have just created, using the following command.
sudo service radarr start
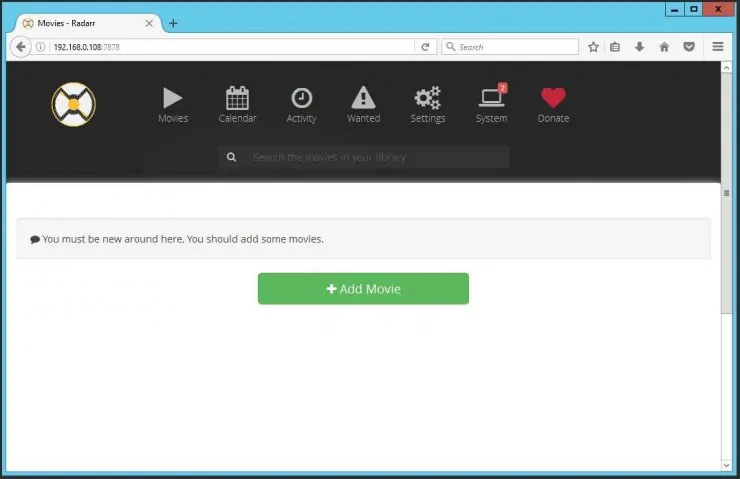
After starting the Radarr service, you will be able to open the web interface on port 7878. In my case the IP is http://192.168.0.108:7878.
Updating your Ubuntu Radarr installation
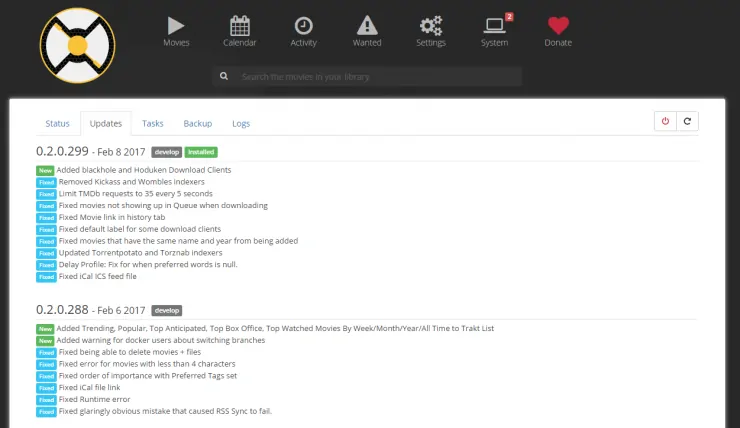
Radarr is now running on Ubuntu and you may be wondering how to update Radarr. All you need to do is check for updates regularly and update from the Radarr web interface, as shown below.
In order to do that, we need to click on the System icon, then click on the Updates tab. On this page, we can see the currently installed Radarr version and the available updates. By clicking on the blue Install Latest button, we can trigger the update to the latest version of Radarr. If you can't see any blue install button, then you are running the latest version. You don't need to worry about backups because Radarr will do a config backup before each update. When the update has been completed, reload Radarr and start enjoying the latest version.
Radarr is now installed on Ubuntu. What to do next?
Congratulations! You managed to install Radarr on Ubuntu successfully in order to automate your Movie downloads. Next, you can learn how to install qBittorrent and SABnzbd on Ubuntu and use them to download the media served by Radarr. You can also learn how to Install Sonarr on Ubuntu in order to automate your TV Show downloads. Alternatively, you can use our famous AtoMiC ToolKit to install and manage several home server apps with ease, including Radarr. Go ahead, install Radarr on Ubuntu and enjoy your new automated media server.



![Traefik Forward Auth Guide - Simple, Secure Google SSO [2022] OAuth Featured Image_final](https://www.smarthomebeginner.com/images/2019/10/OAuth-Featured-Image_final.jpg)
![Ultimate Docker Media Server: With 60+ Docker Compose Apps [2024] Ultimate Docker Media Server](https://www.smarthomebeginner.com/images/2024/01/Docker-Series-02-Docker-Stack.png)