To use a VPN on Kodi while using a Windows device, you need to first install a VPN client on Windows itself. Mostly, Windows VPN connnections are handled by applications external to Kodi (running on your OS), while there are addons that act as an interface within Kodi. A similar strategy, with a different goal, is used by the Kodi Steam addon, which simply acts as a shortcut within Kodi to run the Steam application itself. If you are familiar with this addon, you will have an idea how most of the VPN addons on Windows work. In this guide, we will learn how to install OpenVPN on Windows, to enable your device to use the OpenVPN service, and in future guides we will learn how to install addons to control OpenVPN from within Kodi in this operating system, as well as others. [Read: Guide: How to install Kodi on Windows in three easy steps]

If you still don't know what is a VPN or when you should use one, I recommend you read our first article in this series, where we explain what is a VPN and what does it do. Basically, you will find yourself using VPN services when you want to access geoblocked content, such as the one you can find in some Kodi sports addons; or when you want to keep your connection secure and private. If you install OpenVPN on Windows you will be enabling your device to connect via VPN, and will be able to use Kodi addons to control other aspects of your connection from within Kodi.
Surfshark VPN Exclusive Offer - 82% off ($2.39/month):
♦ Hide your browsing (no logs), Anonymize Streaming and Downloads
♦ Wireguard Protocol support for VPN.
♦ Circumvent Geo/Country Restrictions and access worldwide content
♦ Works on Windows, Mac, Linux, Android, iOS, Router, and more
♦ 1 TB Encrypted Storage
♦ Money back guarantee - Sign Up Now
How to install OpenVPN on Windows?
Since this is a Windows application, you need to download the installer first, in order to install the OpenVPN Windows client. Head to the OpenVPN downloads page, where you will find lots of links to proceed. Select the one that's most appropriate for your OS. Since I am writing this tutorial on a Windows 10 64-bit machine, I will select the last option:

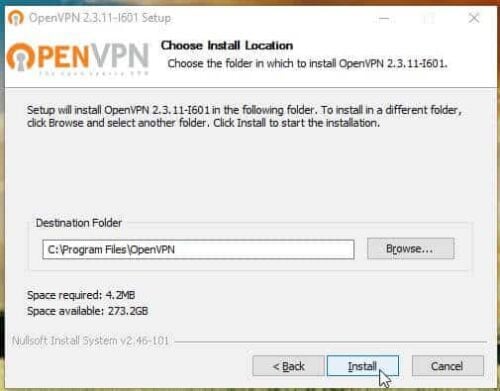
When you click it, an executable file will download. Once the download is done, open the file to start the OpenVPN Windows setup process. If you see a window asking if you want to make changes to your system, click Yes. You will now see the installer window, and you should click the Next > button, to proceed normally as with any windows installer. Read the user agreement and click I agree to continue to install OpenVPN on Windows. Click Next > again to perform the OpenVPN Windows setup with the default options. At this point, you will see a screen where you can specify the installation directory. Leave as it is (unless you want to change the location) and click Install.

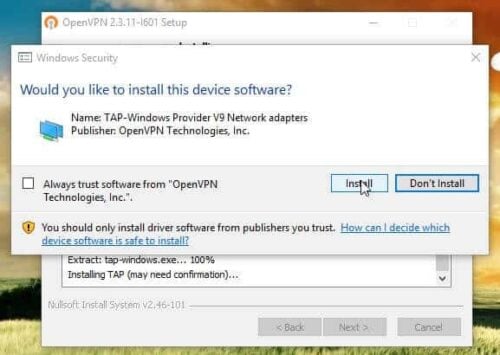
Wait a few moments while OpenVPN Windows client installs on your device. You may get a confirmation window, where you will be asked whether or not to install TAP- Windows Provider V9 Network adapters. If this happens, check whether or not you want to always trust software from OpenVPN (I didn't enable that option but it depends on user preference) and then click Install.

The installation will be marked as completed a few seconds after you click the Install button. Click Next > and you will have the option to Show Readme file, and whether or not to Start OpenVPN GUI. At this point the program is installed. You should check the option to start the GUI, if you want to start the OpenVPN Windows Setup. You should see OpenVPN as a tray icon on your taskbar.
That's it! You were successful to install OpenVPN on Windows! You can now configure it, as well as enabling access to it from within Kodi with one or several addons. These are tasks we will show in future tutorials so stay tuned! In the meantime, take a look at these 10 best Kodi movies addons and plugins such as Kodi Exodus addon. Stream your favorite movies and TV shows with just a few clicks!


![15 Best Jellyfin Plugins [2023] - Supercharge your Media Server Jellyfin Intros Plugin Preview Pre-Roll](https://www.smarthomebeginner.com/images/2022/08/jellyfin-intros-preroll-preview.jpg)
![8 Amazing Raspberry Pi Ideas [2022]: Beginners and Enthusiasts Raspberry Pi ideas](https://www.smarthomebeginner.com/images/2021/09/raspberry-pi-4-dev-board.jpg)


![30 Best SSH Clients for Windows [2022]: Free and Paid Best SSH Clients for Windows featured image](https://www.smarthomebeginner.com/images/2022/11/image-by-geralt-9301-gerd-altmann-from-pixabay-dotcom-matrix-2883623-1280.jpg)
![15 Best Plex Alternatives [2022] - FREE and BETTER Options Best Plex Alternatives feature image](https://www.smarthomebeginner.com/images/2022/08/best-plex-alternatives-feature-image.gif)