OpenELEC is one of the four media center operating systems available for Raspberry Pi. In this post, I will explain how to install OpenELEC on Raspberry Pi using a computer running Linux. OpenELEC has quickly become my favorite operating system for my Raspberry Pi media center. In my recent comparison of OpenELEC with Xbian and Raspbmc, OpenELEC was the clear winner with ease of installation, speed, and performance. Some people might feel OpenELEC might be a bit restrictive but I think that the benefit is a much stable system. While you could also install OpenELEC on Raspberry Pi using NOOBS, some people might find installation on a Linux system is much simpler.
| Build a Low-Cost Raspberry Pi Media Center | Price |
|---|---|
| Raspberry Pi 4B Starter Kit with case, power adapter, and heat sinks | ~$82.00 |
| Sandisk Ultra 32GB Micro SDHC UHS-I Card 98 MB/s | ~$8.00 |
| SANOXY Wireless USB PC Remote Control Mouse for PC | ~$8.00 |
Table of Contents
Download and Extract OpenELEC for Raspberry Pi
Download the latest version of OpenELEC build available for Raspberry Pi. Visit this page, scroll down to the Raspberry Pi builds, and download the current version (as .tar file).
Open terminal and issue the commands below one at a time. First, cd into the folder where you downloaded the OpenELEC tar file. Typically, files are downloaded in to the "Downloads" folder on Ubuntu (unless you specified a different location). Then extract the tar file and cd into the OpenELEC folder.
cd ~/Downloads
tar xvf OpenELEC-RPi.arm-3.2.4.tar
cd OpenELEC-RPi.arm-3.2.4
At the time of writing this post the latest version of OpenELEC was 3.2.4. Replace "3.2.4" in the above commands with the version number in the tar file you downloaded. You are now ready to install OpenELEC on Raspberry Pi.
Determine SD Card Path
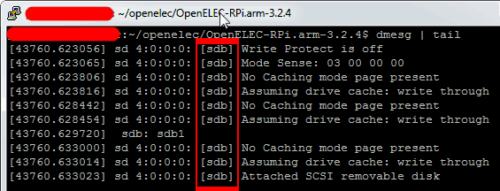
If you have not already done so, I suggest that you consider purchasing the recommended accessories for the Raspberry Pi media center. One of the most important accessory is a good and compatible SD Card. Insert the SD card into the slot and identify its path. This step is very critical as specifying a wrong device path could wipe out data in the wrong drive. To determine the correct device path for the SD card, issue the following command in the terminal window.
dmesg | tail
The output should look something like what is shown in the picture below. Your SD card's device id will be in the format "sdX", where X can be a,b,c, etc. (but it is almost never a). In this case, the SD card's device id is "sdb".
Sometimes, SD cards can appear as mmcblk0 with suffix pX, where X standards for partion number. In such cases, replace sdb with mmcblk0 in the above command.
Install OpenELEC on Raspberry Pi
Issue the following command to install OpenELEC on Raspberry Pi.
sudo ./create_sdcard /dev/sdX
Replace "sdX" with the device id (in this case sdb) of the SD card you determined above. Let the installation proceed and come to completion.

Verify OpenELEC Installation
Before closing all windows, ensure that OpenELEC was installed successfully by issuing the following command:
sync
That is it. You may now remove your SD card, insert it into your Raspberry Pi, and proceed with configuring OpenELEC. Go head install OpenELEC on Raspberry Pi and enjoy your media center.


![8 Amazing Raspberry Pi Ideas [2022]: Beginners and Enthusiasts Raspberry Pi ideas](https://www.smarthomebeginner.com/images/2021/09/raspberry-pi-4-dev-board.jpg)
![10 Best Plex Client Devices [2022] - STUTTER-free Streaming Best Plex Client Devices](https://www.smarthomebeginner.com/images/2022/02/best-nas-for-plex-server-featured-images-from-pexels-photography-maghradze-ph-3764958-e1648542743772.jpg)

![10 Best Emby Client Devices [2023] - 4k, Hardware Transcoding, etc. setup emby server with raspberry pi](https://www.smarthomebeginner.com/images/2017/02/setup-emby-server-with-raspberry-pi.jpg)
![10 Best Jellyfin Client Devices [2022] - 4k, Hardware Transcoding, etc. Jellyfin Roku App](https://www.smarthomebeginner.com/images/2021/02/jellyfin-roku-client-app-ft.jpg)
