Install OpenELEC on Raspberry Pi 2 Model B and take your Kodi media center to the next level. Raspberry Pi 2 Model B was released earlier this year with a quad-core CPU and 1 GB RAM. In our previous comparisons on Raspberry Pi 1, OpenELEC was one of the top performers along with Raspbmc (which is now OSMC). We have shown you OpenELEC installation on RPi 1 as well as running OpenELEC from USB stick. With OpenELEC Kodi enthusiasts upgrading to the new Raspberry Pi, it is time show how to install OpenELEC on Raspberry Pi 2 Model B on a Windows system. In a separate post, we will show Linux installation as well.
Table of Contents
OpenELEC Setup on Raspberry Pi 2
OpenELEC enables running Kodi on Raspberry Pi 2. There are multiple ways to install OpenELEC on RPi 2. While you could use NOOBS, this guide shows you the step-by-step screenshot guide to get your Raspberry Pi 2 OpenELEC up and running quickly. I recommend that you recommended all the Raspberry Pi 2 accessories ready before you start. Remember unlike RPi 1, RPi 2 requires as micro SD card. In this tutorial I am using a 8 GB micro SD card.
| Build a Low-Cost Raspberry Pi Media Center | Price |
|---|---|
| Raspberry Pi 4B Starter Kit with case, power adapter, and heat sinks | ~$82.00 |
| Sandisk Ultra 32GB Micro SDHC UHS-I Card 98 MB/s | ~$8.00 |
| SANOXY Wireless USB PC Remote Control Mouse for PC | ~$8.00 |
1. Prepare the SD Card
OpenELEC setup on Linux creates all required partitions automatically. Unfortunately, on Windows OpenELEC setup requires you to manually create the partitions. For this I recommend the free MiniTool Partition Wizard. Download, set it up, and open it. We are going to create 2 partitions:
- SYSTEM - FAT32 of 256 MB size (for OpenELEC OS files)
- STORAGE - Ext 4 with the remaining SD card space (for file storage)
Using the partition wizard, first delete all existing partitions on the SD card. Then create a new SYSTEM partition as shown below:
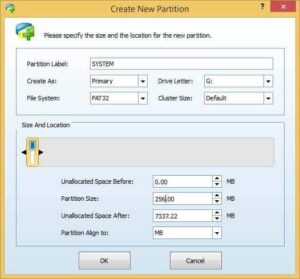
When you create the second partition for Storage, you will see "The new created partition cannot be used in Windows. Because Windows could only recognize the first partition on a removable disk." warning. Press "yes" and continue to create the second partition as shown below:
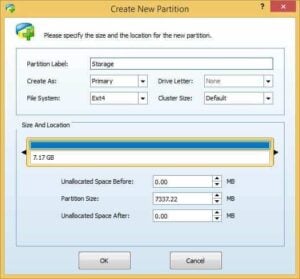
After creating the two partition your SD card partitions should look something like this:
Now your SD card is ready for RPi 2 OpenELEC installation.
2. Download OpenELEC for RPi 2
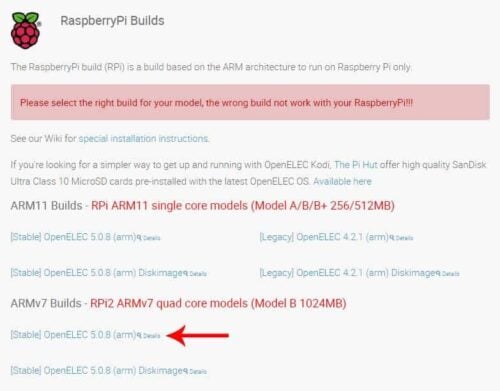
Head over to OpenELEC download page and download OpenELEC for Raspberry Pi 2. There are specific builds for Raspberry Pi Version 1 and 2. So pay attention to the titles and download the one for quad-core Raspberry Pi 2 (not the Diskimage) as pointed out in the picture below.
Once downloaded, extract the .tar compressed file. You may need 7zip or other similar programs to extract .tar file on Windows.
3. Install OpenELEC on Raspberry Pi 2
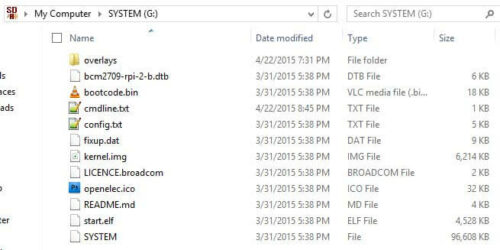
To install OpenELEC on Raspberry Pi 2 on Windows, navigate to the extracted OpenELEC folder, in this example OpenELEC-RPi2.arm-5.0.8, and copy the following files to the root of the SYSTEM partition on the micro SD card.
openelec.ico(if available) andREADME.mdfilesKERNELandSYSTEMfiles from thetargetfolder- All files from the
3rdparty\bootloaderfolder
After copying, rename the file KERNEL to kernel.img. The SD card base folder should look like the screenshot below. Don't worry about the cmdline.txt file because that needs to be created as described below.
Now in the SD card base folder create a file called cmdline.txt, copy the following content, and save it.
boot=/dev/mmcblk0p1 disk=/dev/mmcblk0p2 console=ttyAMA0,115200 kgdboc=ttyAMA0,115200 console=tty1 ssh
That is it. Your RPi 2 OpenELEC Kodi media center is ready to boot. Eject the SD card pop it into Raspberry Pi 2 and go through the initial setup. You may want to check out the following posts to take your Raspberry Pi 2 XBMC / Kodi system to a new level:
- 8 Raspberry Pi OpenELEC tweaks to do after installation
- Enable and configure OpenELEC Samba share on Raspberry Pi
- 5 Best XBMC skins for Raspberry Pi
- Strategies to fix XBMC buffering issues on Raspberry Pi
Go ahead install OpenELEC on Raspberry Pi 2 Model B and enjoy the low-energy but powerful Kodi experience that RPi 2 has to offer.


![8 Amazing Raspberry Pi Ideas [2022]: Beginners and Enthusiasts Raspberry Pi ideas](https://www.smarthomebeginner.com/images/2021/09/raspberry-pi-4-dev-board.jpg)
![10 Best Plex Client Devices [2022] - STUTTER-free Streaming Best Plex Client Devices](https://www.smarthomebeginner.com/images/2022/02/best-nas-for-plex-server-featured-images-from-pexels-photography-maghradze-ph-3764958-e1648542743772.jpg)
![10 Best Jellyfin Client Devices [2022] - 4k, Hardware Transcoding, etc. Jellyfin Roku App](https://www.smarthomebeginner.com/images/2021/02/jellyfin-roku-client-app-ft.jpg)
![10 Best Emby Client Devices [2023] - 4k, Hardware Transcoding, etc. setup emby server with raspberry pi](https://www.smarthomebeginner.com/images/2017/02/setup-emby-server-with-raspberry-pi.jpg)

