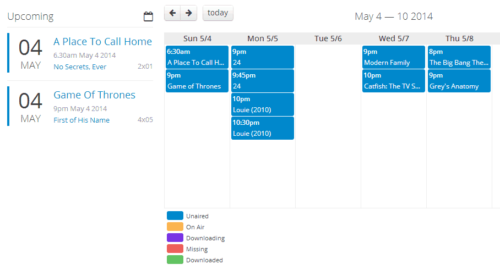
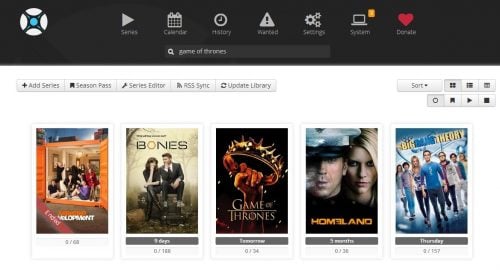
This post shows you how to install NzbDrone on Ubuntu, including 14.04 Trusty Tahr, as a SickBeard alternative. We have written numerous guides on SickBeard, including installation on Ubuntu and Windows, our famous 1-step installer, installation video, and Configuration. But NzbDrone (nka Sonarr) has been developing at a rapid pace and some have already started using NzbDrone as SickBeard replacement. NzbDrone's moto is 'cut the cord' and like SickBeard, it has a great looking web interface that allows managing TV shows to provide an automated media center. So let us look at how to install NzbDrone on Ubuntu as a SickBeard alternative.
Looking for an automated solution? Try our AtoMiC ToolKit, which makes installation and management of Home Server software such as SickBeard, CouchPotato, Torrent clients, etc. easy.
Usenet is Better Than Torrents:
For apps like Sonarr, Radarr, SickRage, and CouchPotato, Usenet is better than Torrents. Unlimited plans from Newshosting (US Servers), Eweka (EU Servers), or UsenetServer, which offer >3000 days retention, SSL for privacy, and VPN for anonymity, are better for HD content.
| Provider | Rating | Features | Monthly | Yearly |
|---|---|---|---|---|
| Newshosting | >3000 days, unlimited, SSL, VPN | $9.99 | $99.99 ($8.33 / month) | |
| UsenetServer | >3000 days, unlimited, SSL, VPN | $9.99 | $99.99 ($8.33 / month) | |
| Eweka | >3000 days, unlimited, SSL, EU Servers | €7,50 (Special!!!) | ||
| For more plans that may fit your needs please read our Usenet plan selection guide. | ||||
Table of Contents
NzbDrone / Sonarr Features
 NzbDrone is a PVR for newsgroup users. It can monitor multiple RSS feeds for new episodes of your favorite shows and will grab, sorts and renames them. It can also be configured to automatically upgrade the quality of files already downloaded if a better quality format becomes available. A detailed post on NzbDrone's features and how they compare with Sick Beard was presented in an earlier post. So let us go ahead and look at NzbDrone installation on Ubuntu.
Step 1: Prerequisites for NzbDrone Ubuntu Installation
NzbDrone requires mono to run properly, preferably version 3.2. If you are trying to install NzbDrone on Ubuntu 14.04 then you are in luck because the repository already has the required version. For earlier versions of Ubuntu, use the following command to add the mono PPA repository (skip this step for Ubuntu 14.04):
sudo add-apt-repository ppa:directhex/monoxide
Next (applies to Ubuntu 14.04 as well), update your packages and upgrade any existing packages (if mono is already installed it will be upgraded):
sudo apt-get update
sudo apt-get upgrade
If mono was not already installed, then install it using the following command:
sudo apt-get install mono-complete
Let the mono installation run and complete.
Step 2: Install NzbDrone on Ubuntu
It is much easier to install NzbDrone on Ubuntu than SickBeard. First, add the NzbDrone Ubuntu respository using the following commands:
sudo apt-key adv --keyserver keyserver.ubuntu.com --recv-keys FDA5DFFC

echo "deb http://update.nzbdrone.com/repos/apt/debian master main" | sudo tee -a /etc/apt/sources.list
Then, update packages and install NzbDrone on Ubuntu:
sudo apt-get update
sudo apt-get install nzbdrone
A bunch of packages will be installed along with NzbDrone. Let the NzbDrone installation proceed and complete.
Best Standalone Bittorrent Downloaders:
Step 3: Start NzbDrone
After you install NzbDrone on Ubuntu, you can start it using the following command:
mono /opt/NzbDrone/NzbDrone.exe
NzbDrone is now running on your system (unless you encounter any errors). NzbDrone runs on port 8989 by default. So you can access the NzbDrone web interface by going to:
http://localhost:8989
If your NzbDrone is on your internal network and port 8989 is not blocked, you can also access it through its network IP address (see example below; may be different in your case):
http://192.168.0.20:8989
If you have port forwarding enabled on your router and you have a domain name referring to your server running Sick Beard, you may also view it through the internet using your domain name:
http://domain.com:8989
For now (if you are on the system running NzbDrone), http://localhost:8989 should be enough.
Configure NzbDrone
After you install Sonarr on Ubuntu, you can configure it through its wonderful web interface. The NzbDrone configuration directory is located here: ~/.config/NzbDrone. Setting it up is very similar to SickBeard Configuration.
In order to make NzbDrone function properly, you will have to install and configure SABnzbd to listen to download requests from NzbDrone. Refer to my SABnzbd installation guide and configuration guide to properly automate downloading TV Shows. As mentioned earlier, you also require a reliable Usenet account. You may get a free Usenet account as described in this post, or go with a reliable Usenet service from Astraweb or Newshosting.
Step 5: Autostart NzbDrone
Manually starting NzbDrone all the time can be cumbersome. Therefore, after you install NzbDrone on Ubuntu, I recommend making it autostart at boot as described here. There are multiple ways to autostart NzbDrone on Ubuntu Linux. One way is using Upstart on Debian based distros. First, create the file nzbdrone.conf inside /etc/init folder:
sudo nano /etc/init/nzbdrone.conf
Then copy and paste the following contents into the file:
author "Simon Tallmyr - Nosscire"
description "Upstart Script to run NzbDrone as a service on Ubuntu/Debian based systems, as well as others"

#Set username for the process. Should probably be what you use for logging in
setuid yourusername

#This is the install directory. If you installed using a deb package or the NzbDrone Repository you do not need to change this
env DIR=/opt/NzbDrone

setgid nogroup
start on runlevel [2345]
stop on runlevel [016]

respawn

exec mono $DIR/NzbDrone.exe
Replace yourusername with your username that you use to login. Then save (Ctrl X and then Y) and exit the editor. Then give it execute permissions:
sudo chmod +x /etc/init/nzbdrone.conf
Finally, issue the following command:
sudo start nzbdrone
This should start NzbDrone and also make it autostart on boot. If you want to be able to start/stop NzbDrone from commandline then enable NzbDrone autostart using the Method 2 described here.
Optional Improvements
That's it. You are now fully done. Go ahead install NzbDrone on Ubuntu and enjoy.



![[Video] Install Docker and Docker Compose on Ubuntu - Don't Do It WRONG Video Thumbnail: Install Docker on Ubuntu (with Compose) – Don't Do It WRONG](https://www.smarthomebeginner.com/images/2023/03/install-docker-on-ubuntu-with-co-1.jpg)