DLNA allows you to play home network media on all compatible devices over the network. In this post, I will explain how to compile and install MiniDLNA on Ubuntu (now ReadyMedia) from the Git repository. Previously, I wrote posts on how to install MiniDLNA on Ubuntu 10.04 by downloading the files and setup MiniDLNA on Ubuntu 12.04 using the PPA repository. While a bit lengthy, there are certain advantages to compiling the latest version from Git and so I decided to provide updated installation instructions. MiniDLNA is being developed quite actively developed with several good fixes and upgrades. Without further delay, let us see how to compile and install MiniDLNA on Ubuntu 12.04 from the Git repository. These instructions should work on releases 12.10 and 13.04 as well.
Find some of the best rated dlna compatible Bluray players here.
Once setup, you will be able to stream content (with subtitles) to any DLNA compatible devices. In my case the devices are: LG 42" LED TV and LG Bluray Player.
Enjoy unlimited streaming of Movies and TV Shows on several devices, free 2-day shipping on orders, and free Kindle books for only $6.60 per month. Sign-up now to get a free 1-month trial.
Table of Contents
Guide to Compiling from Source Code
We have made every attempt to make this guide newbie-friendly. Where ever possible we have provided pictures to guide you through the process. It would greatly help if you have a basic understanding of compiling packages from source on Ubuntu and we strongly recommend reading our 2-page beginner's guide. Also as described in that guide, install the prerequisites for compiling packages using the command below:
sudo apt-get install autoconf g++ subversion linux-source linux-headers-`uname -r` build-essential tofrodos git-core subversion dos2unix make gcc automake cmake checkinstall git-core dpkg-dev fakeroot pbuilder dh-make debhelper devscripts patchutils quilt git-buildpackage pristine-tar git yasm checkinstall cvs mercurial
Why is this Method Better?
There are three other methods to install MiniDLNA on Ubuntu:
- Download the latest version from here and follow this guide.
- You can setup the PPA repository and follow this guide.
- MiniDLNA is available to Ubuntu official repositories. You can install it using easily using
sudo apt-get install minidlna.
The first method requires that you download, extract, and replace files every time there is an update. The second method relies in the PPA being up-to-date for all releases. At the time of writing this guide, the PPA has been updated to only until 11.10 Oneiric. The third method installs whatever version is currently available in the official Ubuntu repository. While the latest version is 1.1.0 the Ubuntu repository currently has version 1.0.21, which several versions behind. So if you want the latest and the greatest you will have to wait. It takes about the same amount to compile and install MiniDLNA on Ubuntu compared to the method 1. But the advantage is that MiniDLNA is now custom-built to your system/OS environment and may be a bit more responsive. Furthermore, as explained later in this guide, it may be a bit more easier to install updates. So here it goes.
Install Prerquisites
MiniDLNA depends on several packages to compile successfully: libexif, libjpeg, libid3tag, libFLAC, libvorbis, libsqlite3, and libavformat (the ffmpeg libraries). Some of them may already be installed but the two that were missing in my test system were libexif and libid3tag and the command below installed the two. It probably also installed a few more unneeded packages (few extra MBs) but it is much easier to do it this way.
sudo apt-get install libexif* libid3tag*
How do you know which ones are needed in your case? When you run the configure script as described later, you will encounter errors if any of the above packages are missing. Retry configure after installing the missing package until all the errors go away.
Download MiniDLNA
First create a folder called .minidlna in your home directory:
mkdir ~/.minidlna
Note that the . in the beginning makes it a hidden folder. Then cd to the .minidlna folder and issue the following command to clone the latest MiniDLNA files from the Git repository:
git clone git://git.code.sf.net/p/minidlna/git minidlna-git
The output should look something like this:
Cloning into 'minidlna-git'...
remote: Counting objects: 3006, done.
remote: Compressing objects: 100% (888/888), done.
remote: Total 3006 (delta 2242), reused 2858 (delta 2111)
Receiving objects: 100% (3006/3006), 1.04 MiB | 846 KiB/s, done.
Resolving deltas: 100% (2242/2242), done.
A folder called minidlna-git should be downloaded to the .minidlna folder. These are the files that need to be compiled.
Compile and Install MiniDLNA on Ubuntu
The first step to compile and install MiniDLNA on Ubunt us is to generate the files needed for compilation. cd into the minidlna-git folder that was downloaded and issue the following command:
./autogen.sh
You should see an output like the picture below when the autogen.sh script finishes running.
Next, configure the files for compilation using the following command (this will run for a few minutes at least):
./configure
If you encounter any errors due to missing packages, follow instructions described previously under Install Prerequisites. If the configure script runs successfully, it would end with the following (or similar) output.
Then make the installation files (the actual compilation process) using the following command:
make
If successful, the make process will end with a message similar to the one below.
The final step is to install MiniDLNA on Ubuntu from the compiled files. While you could use the sudo make install command we recommend using the checkinstall command:
sudo checkinstall
Best Standalone Bittorrent Downloaders:
This command takes you through a series of steps. If the documentation package directory is not available you will be asked to create one (doc-pack).

Say yes and proceed. You will then be asked for a description for the package. You may provide any description that helps you recognize the package. An example is shown below.

Finally, a summary of the parameters that will be used to create the package will be displayed, as shown in the example below. You may edit any of them if you know what you are doing. In the example below, the version was edited to add the version number.
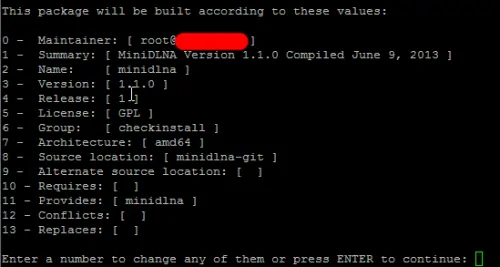
Upon continuing the compiled MiniDLNA package will be installed and it will appear in the package manager (example: Synaptic) for clean, easy removal later. In addition, a .deb package will be created that you can use to install the package in other similar machines or the same machine in future without going through compilation again.

Configure MiniDLNA
MiniDLNA comes with a default configuration file. You will find it (minidlna.conf) inside the downloaded MiniDLNA folder. Create a copy of the file in the ~/.minidlna folder:
sudo cp minidlna.conf ~/.minidlna/minidlna.conf
Then edit the file to make some minor changes. An example configuration file is shown below:
# port for HTTP (descriptions, SOAP, media transfer) traffic
port=8200

# network interfaces to serve, comma delimited
#network_interface=eth0

# specify the user account name or uid to run as
user=user

# set this to the directory you want scanned.
# * if you want multiple directories, you can have multiple media_dir= lines
# * if you want to restrict a media_dir to specific content types, you
#   can prepend the types, followed by a comma, to the directory:
#   + "A" for audio  (eg. media_dir=A,/home/jmaggard/Music)
#   + "V" for video  (eg. media_dir=V,/home/jmaggard/Videos)
#   + "P" for images (eg. media_dir=P,/home/jmaggard/Pictures)
#   + "PV" for pictures and video (eg. media_dir=AV,/home/jmaggard/digital_camera)
media_dir=V,/home/user/media/Movies
media_dir=P,/home/user/media/Photos
media_dir=A,/home/user/media/Music

# set this if you want to customize the name that shows up on your clients
friendly_name=My DLNA Server

# set this if you would like to specify the directory where you want MiniDLNA to store its database and album art cache
db_dir=/home/user/.minidlna

# set this if you would like to specify the directory where you want MiniDLNA to store its log file
#log_dir=/var/log

# set this to change the verbosity of the information that is logged
# each section can use a different level: off, fatal, error, warn, info, or debug
#log_level=general,artwork,database,inotify,scanner,metadata,http,ssdp,tivo=warn

# this should be a list of file names to check for when searching for album art
# note: names should be delimited with a forward slash ("/")
album_art_names=Cover.jpg/cover.jpg/AlbumArtSmall.jpg/albumartsmall.jpg/AlbumArt.jpg/albumart.jpg/Album.jpg/album.jpg/Folder.jpg/folder.jpg/Thumb.jpg/thumb.jpg

# set this to no to disable inotify monitoring to automatically discover new files
# note: the default is yes
inotify=yes

# set this to yes to enable support for streaming .jpg and .mp3 files to a TiVo supporting HMO
enable_tivo=no

# set this to strictly adhere to DLNA standards.
# * This will allow server-side downscaling of very large JPEG images,
#   which may hurt JPEG serving performance on (at least) Sony DLNA products.
strict_dlna=no

# default presentation url is http address on port 80
#presentation_url=http://www.mylan/index.php

# notify interval in seconds. default is 895 seconds.
notify_interval=895

# serial and model number the daemon will report to clients
# in its XML description
serial=12345678
model_number=1

# specify the path to the MiniSSDPd socket
#minissdpdsocket=/var/run/minissdpd.sock

# use different container as root of the tree
# possible values:
#   + "." - use standard container (this is the default)
#   + "B" - "Browse Directory"
#   + "M" - "Music"
#   + "V" - "Video"
#   + "P" - "Pictures"
# if you specify "B" and client device is audio-only then "Music/Folders" will be used as root
#root_container=.
Notes:
- If you have firewall enabled then allow port 8200.
- Uncomment "network_interface=eth0" if you want MiniDLNA to bind to your ethernet port.
- Add your Video, Music, and Photos sources.
- Specify your username for user to run MiniDLNA as (user=user).
- Add a directory to store the MiniDLNA database. I recommend storing it in my home directory: db_dir=/home/user/.minidlna.
- I set the log level to "fatal" as I do not like extensive logging.
- Set inotify=yes (default) to automatically add new files (although I have found this to be not reliable. Below I have described how I automatically refresh my library).
- Ignore "presentation_url=http://www.mylan/index.php". I my research shows that this does not work as there is not web interface for MiniDLNA.
- I left this is a default "notify_interval=895". You can set it to a lower value if you want MiniDLNA to check for new files more frequently (again, this was unreliable as well).
- You normally will not have to mess with the remaining settings.
You are almost done.
ASUS (RT-AC68U) Wireless-AC1900 Dual-Band Gigabit Router
Find out why it is rated the best wireless router in its class.
Starting MiniDLNA
Start MiniDLNA using the following command:
/usr/local/sbin/minidlnad -f ~/.minidlna/minidlna.conf
By default MiniDLNA does not scan for new media files during start. To rescan media files during start include the -R parameter:
/usr/local/sbin/minidlnad -R -f ~/.minidlna/minidlna.conf
Upon starting MiniDLNA builds the index of all the files. CPU usage will go up significantly during the indexing process but should come down to normal levels in a few minutes. "My DLNA Server" should now appear on the list of DLNA / UPNP Devices.
Now you should be able to browse and play media from your DLNA server on your client. Note that not all clients support all features of MiniDLNA. In my case I had no troubles playing avi, mkv, mp4, mov, mp3, flac, and jpg files.
Best Android TV Boxes:
- NVIDIA SHIELD TV Pro Home Media Server - $199.99
- Amazon Fire TV Streaming Media Player - $89.99
- WeTek Play 2 Hybrid Media Center - $134.00
- Kukele Octacore Android TV Box - $179.99
- U2C Android TV Box - $95.99
Autostarting MiniDLNA
To autostart MiniDLNA during system boot, create the file /etc/init.d/minidlna with the following lines in it.
#!/bin/sh
# Mini DLNA
### BEGIN INIT INFO
# Provides:          scriptname
# Required-Start:    $remote_fs $syslog
# Required-Stop:     $remote_fs $syslog
# Default-Start:     2 3 4 5
# Default-Stop:      0 1 6
# Short-Description: Start daemon at boot time
# Description:       Enable service provided by daemon.
### END INIT INFO

case "$1" in
'start')
        /usr/local/sbin/minidlnad -f /home/user/.minidlna/minidlna.conf
	echo Started
        ;;
'stop')
	PID=`/bin/pidof minidlnad`
	if [ ${PID} ]; then sudo kill -SIGTERM ${PID}
	else echo Already Stopped
	fi
        ;;
'restart')
	PID=`/bin/pidof minidlnad`
	if [ ${PID} ]; then sudo kill -SIGTERM ${PID}
	fi
	/usr/local/sbin/minidlnad -f /home/user/.minidlna/minidlna.conf
	echo Restarted
	;;
'status')
	PID=`/bin/pidof minidlnad`
	if [ ${PID} ]; then echo Running. Process ${PID}
	else echo Stopped
	fi
	;;
'rescan')
	PID=`/bin/pidof minidlnad`
	if [ ${PID} ]; then sudo kill -SIGTERM ${PID}
	fi
	/usr/local/sbin/minidlnad -R -f /home/user/.minidlna/minidlna.conf
	echo Rescanning
	;;
*)
        echo "Usage: $0 { start | stop | restart | status | rescan }"
        ;;
esac
exit 0
If you want MiniDLNA to rescan library during boot, then in the above code, replace:
/usr/local/sbin/minidlnad -f /home/user/.minidlna/minidlna.conf
with this:
/usr/local/sbin/minidlnad -R -f /home/user/.minidlna/minidlna.conf
Keep in mind that this will make your system slow during boot as a lot of CPU will go into indexing your files.
Save, exit, and give the file execute permissions:
sudo chmod +x /etc/init.d/minidlna
Then run the following command to update your init scripts:
sudo update-rc.d minidlna defaults
That is it. Apart from autostarting during boot, you can now start, stop, restart, check status, and rescan MiniDLNA using the following commands:
sudo service minidlna start
sudo service minidlna stop
sudo service minidlna restart
sudo service minidlna status
sudo service minidlna rescan
Updating MiniDLNA
When there is a newer version of MiniDLNA out you would essentially have to go through the compilation process again but not entirely. Navigate to the ~/.minidlna/minidlna-git folder where you first downloaded the MiniDLNA files using the git clone command. Issue the following command:
make distclean
git pull
The distclean will clean and remove any files created during the last compilation. The git pull will automatically sync the local source files to the latest version in the git repository. Only the files that have changed since the last downloaded will be re-downloaded. Then then you compile and install MiniDLNA on Ubuntu as explained above. Issue the following commands in sequence:
./configure
make
checkinstall
When checkinstall finishes you should have the latest version installed.
Removing MiniDLNA
If you want to uninstall MiniDLNA and cleanout all the files, then issues the following commands in sequence:
sudo apt-get remove minidlna
sudo update-rc.d -f minidlna remove
sudo rm /etc/init.d/minidlna
sudo rm -r ~/.minidlna
The first command removes the MiniDLNA package, the second disables the MiniDLNA service, the third command removes the MiniDLNA autostart script, and finally the fourth command removes all MiniDLNA files and folders including settings. If you want to keep the settings and the files downloaded from Git for possible future installation, you may choose not to run the last command.
My MiniDLNA runs on a headless server with Webmin running. If yours is a similar setup then this webmin module offers an easy way to edit your configuration file, restart, and rescan MiniDLNA.
UPDATE (7/17/2013): MiniDLNA init script updated based on Jonathan's comment below.
UPDATE (3/18/2014): MiniDLnA init script updated based on personal communication from j.adamslsmo.



![Ultimate Docker Server: Getting Started with OS Preparation [Part 1] Docker Server Tutorials 1 OS Preparation](https://www.smarthomebeginner.com/images/2024/01/Docker-Series-01-Intro-and-OS-Prep.png)
