Some days ago we spoke to you about the new Kore official Android remote for Kodi. This remote is a great option when you are using XBMC/Kodi on your HTPC. Kodi has been one of the most reliable and known applications to run HTPCs, mainly because of the fact it is available on several operating systems; you can install Kodi on Windows or XBMC/Kodi on Ubuntu, and you can even use it with minicomputers like the Raspberry Pi with OSMC or OpenELEC.
Kore official remote for Kodi is a welcome addition to any setup. In fact, it could be a nice way to save money, if do not want to spend on a keyboard and mouse combo, although some of these wireless keyboards for HTPC do offer certain advantages over an app.
Best Wireless HTPC and Android TV Box Keyboards:
- Logitech K410 Living-Room Wireless Keyboard with Built-In Touchpad - $37.75
- Logitech Illuminated K830 HTPC Wireless Keyboard and Touchpad - $69.99
- iPazzPort KP-810-10AS Wireless Mini Keyboard Remote with Touch - $15.99
- Rii i8+ 2.4GHz Mini Wireless Keyboard with Touchpad - $22
- LYNEC C120Pro Mini Wireless Gyro Remote Keyboard Mouse - $13
But there is something for everyone, so if an Android remote app is your preferred option, we will now show you how to install it and configure it on your phone or tablet. Here is our tutorial on how to install Kore, and also how to configure Kore to take advantage of its convenient features.
How to install Kore Remote app?
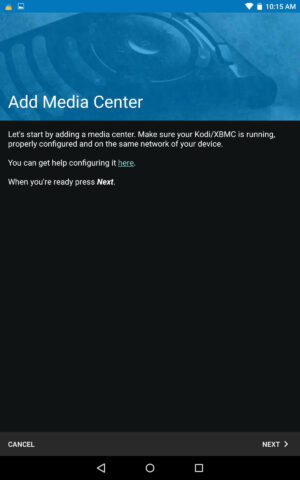
First, you must locate the Play Store on your Android device, and search for the Kore Remote App for Android. Once you find it, press the Install button. This will install Kore on your compatible mobile device. Then open the Kore app to be greeted by the following screen:
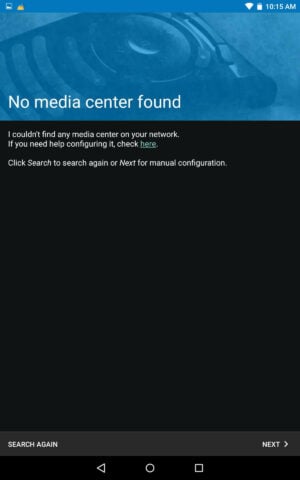
After you install Kore and open it, you should click next. Kore remote app will start looking for Kodi media centers within your network. This allows you to configure Kore automatically. If this step works, you will be able to enjoy Kore without delay. Sometimes it doesn't work, though, and then you will see an error such as this one:
If this happens, you will have to continue to configure Kore remote manually. But don't panic! It is easy, too. Just press "Next" and Kore will enter into manual configuration mode. In here you need to input some parameters. The parameters you need to configure are:
- Media center name: The name you will give to the media center you are using. This name will be only for identification purposes, so in theory you can name it anything you like.
- Address: In here, you need to input the IP address of the machine running Kodi, which you wish to control from Kore.
- Username: This username can be found (or set) within the Kodi settings, we will check this in detail in a bit.
- Password: This password can be found (or set) within the Kodi settings as well.
- Port: The port used for communication between Kodi and Kore. Usually set to 80.
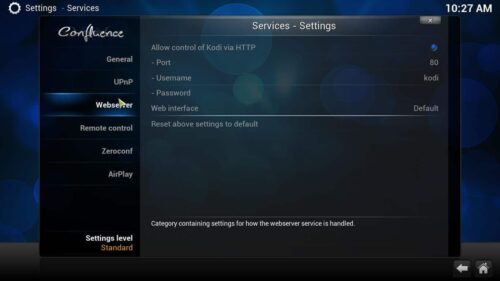
To know the username and password Kore should use (or to set them), from Kodi homescreen head to System->Settings->Services->Webserver. In this case, the username was "kodi" (default one) and password was intentionally left blank. In here you can also find what port is Kodi using for communication. You can use the default username, password (none), and port 80 or set them to your liking. Customizing them is better for security reasons. But whatever you have here should be used exactly to configure Kore android remote.
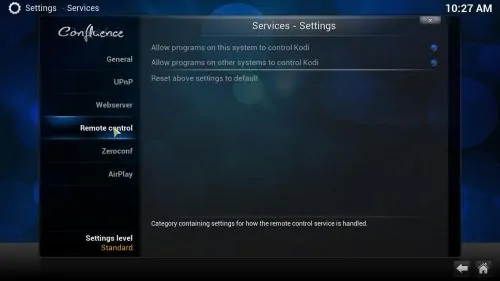
Make sure to allow remote control of Kodi from other programs. This can be done from the Remote control option, right below Webserver. Make sure both buttons are checked as in the image below.
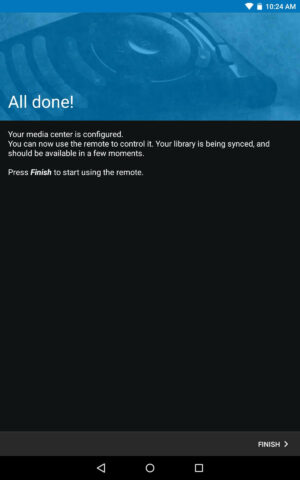
Once you configure the parameters in Kore manually, based on the parameters present in your Kodi installation, you should be good to go. After pressing "Test", you should see this screen:
Congratulations! You are now ready to take advantage of all the features offered by Kore! It is a relatively new app, so surely there are things to be improved, however, it is the official Kodi remote app, which means you should expect maximum compatibility and fewer issues by using this app alongside Kodi than any other existing app. You can now control your HTPC from your couch without the need to buy additional hardware, which is also a plus. [Read: 15 XBMC keyboard shortcuts you should know]
All in all, Kore seems to be a free and easy to install alternative that will bring comfort and ease of use to your HTPC setup. The whole configuration process should not take more than 15 minutes with manual configuration, and the app is available from the Play Store, which means it is safe for your mobile device. Do not hesitate, and try this remote app for yourself to see its many advantages.

![8 Amazing Raspberry Pi Ideas [2022]: Beginners and Enthusiasts Raspberry Pi ideas](https://www.smarthomebeginner.com/images/2021/09/raspberry-pi-4-dev-board.jpg)

![10 Best Plex Client Devices [2022] - STUTTER-free Streaming Best Plex Client Devices](https://www.smarthomebeginner.com/images/2022/02/best-nas-for-plex-server-featured-images-from-pexels-photography-maghradze-ph-3764958-e1648542743772.jpg)
