If you want to get your favorite music on your media center, Kodi has many ways to help you. Several addons allow you to access the best tracks for you to listen. There are paid solutions as well as free solutions for this. Among the free alternatives we get addons such as MP3 Streams Kodi addon. In recent times, a music service has taken this market segment by storm, and of course, it would not be absent from Kodi. I am talking about Spotify. There is an addon that enables you to listen to your favorite music on Spotify from within Kodi. Learn with us how to install Kodi Spotify addon on your media center! [Read: How to Listen to Google Music on XBMC?]

How to install Kodi Spotify addon
Some addons may contain pirated content. Consider using legal Kodi addons or a VPN ($3.29/mo).
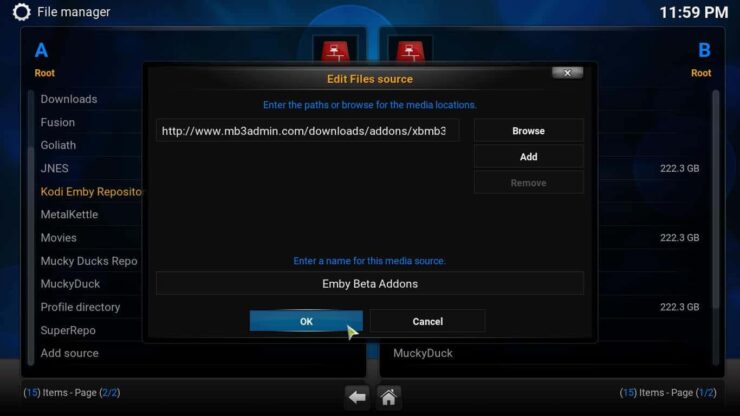
In order for you to be able to install the Kodi Spotify addon, you will need to add the Emby Beta addons repository. This is easily done by adding to your sources the correct route. Go to
System -> File manager -> Add source and paste or type the following, exactly:http://www.mb3admin.com/downloads/addons/xbmb3c/kodi-beta-repo/repository.beta.emby.kodi/
After you do this, set a name for the source. Emby Beta Addons will do. Click OK.

This will have added the source to your system. Now, from the main menu again, head to System -> Settings -> Add-ons -> Install from zip file. You will see a list with all the sources you have added and possible locations to install from. Scroll until you find the Emby Beta Addons source you just added, and then click it. Select the .zip within the Emby Beta repository, typically named repository.beta.emby.kodi-x.x.zip (with the name including the version number). Wait a few seconds and you should get a notification confirming it was installed.

Installing the Kodi Spotify plugin
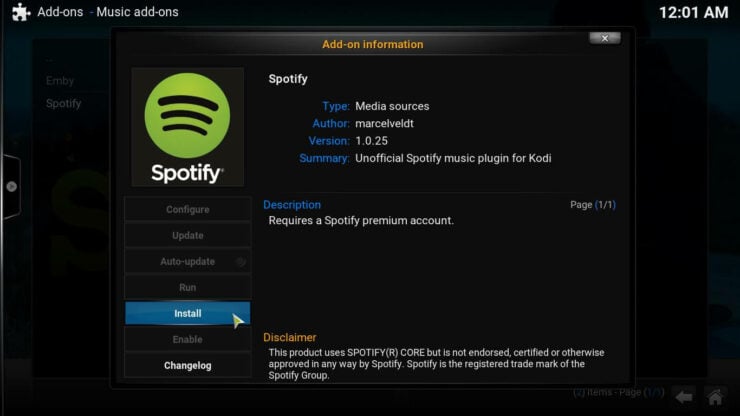
After you're done installing the repository, you can finally get the plugin. In order to install Spotify on Kodi, all you need to do is go to System -> Settings -> Add-ons -> Install from repository from the main menu. On the repository list, select Kodi Emby Beta Addons and then click on Music Addons. You will see the option to install Spotify, so click it, and then press the Install button on the dialog that appears.

Wait a few seconds and you should get a notification on the bottom right corner, telling you that the Spotify Addon has been successfully added to your media center.
What to do after you install Kodi Spotify Plugin?
Best Media Player Sticks / Dongles:
That's it! You have now installed the Spotify addon on your media center. You will still need to configure it properly for it to work, but I will cover this in the next tutorial. Do you want more music options? Build a Raspberry Pi Music Player in order to enjoy tracks from your favorite artists, or get to watch movies on Kodi instead, with one of these 10 best Kodi movies addons. The possibilities are endless with our guides and tutorials so stay tuned!

![15 Best Jellyfin Plugins [2023] - Supercharge your Media Server Jellyfin Intros Plugin Preview Pre-Roll](https://www.smarthomebeginner.com/images/2022/08/jellyfin-intros-preroll-preview.jpg)
![10 Best Plex Client Devices [2022] - STUTTER-free Streaming Best Plex Client Devices](https://www.smarthomebeginner.com/images/2022/02/best-nas-for-plex-server-featured-images-from-pexels-photography-maghradze-ph-3764958-e1648542743772.jpg)
![15 Best Plex Alternatives [2022] - FREE and BETTER Options Best Plex Alternatives feature image](https://www.smarthomebeginner.com/images/2022/08/best-plex-alternatives-feature-image.gif)
![20 Working websites to watch March Madness online FREE [2022] Watch March Madness Online Free](https://www.smarthomebeginner.com/images/2022/03/march_maddness-scaled.jpg)
![Watch College Football Online FREE [2022]- 25+ WORKING websites 2022 Watch College Football Online Free](https://www.smarthomebeginner.com/images/2022/08/2022-watch-college-football-online-free.jpg)
![Watch College Football Online FREE [2023]: 🏈 23+ WORKING websites Watch College Football 2023](https://www.smarthomebeginner.com/images/2023/08/college-football-2023-e1692045798880.jpg)