Wouldn't it be awesome if you are able to remotely connect to your system using Windows Remote Desktop, VNC, Telnet, SSH, SFTP, or Kubernetes protocols, just using a modern web browser and without the need for any client apps? Install Guacamole on Docker and do exactly that.
Apache's Guacamole can be handy for system administrators and tinkerers, such as myself, who run servers at home. Unfortunately, setting up Guacamole on Ubuntu and other Linux systems requires several steps and can be a pain.
I have been a fan of Docker for the last 2 years. From my Docker Server guide, you may know that I run several apps on Docker already. [Read: 60+ Best Docker Containers for Home Server Beginners 2023]
I was thrilled to learn that I could install Guacamole on Docker. So in this Guacamole Docker tutorial, I will show you how to setup Guacamole using Docker and remotely administer various systems using just a modern web browser.
I will also provide the Docker-compose file to make Guacamole setup much easier.
Table of Contents
- What is Guacamole?
- Why use Guacamole? - Advantages and Features
- Install Guacamole on Docker
- Guacamole Intial Setup and Security
- Using Guacamole for VNC, SSH (SFTP), and RDP
- Apache Guacamole Setup on Docker - Final Remarks
What is Guacamole?
Apache Guacamole, or Guacamole, is a client-less remote desktop gateway. It provides a unified HTML5 web interface to access remote systems using VNC, Telnet, RDP, Kubernetes and SSH/SFTP protocols.
Why use Guacamole? - Advantages and Features
VNC, RDP, Telnet, and SSH all require client apps on the local system to be able to connect to remote systems. For example, connecting to an SSH server on Linux from a Windows system requires an SSH client such PuTTY or similar app.
Similarly, VNC and RDP require client apps as well. But wait, what if you can't install these client apps on the local system (eg. Work computers or public computers)? Here is where Guacamole comes to save your life, as all it requires is a HTML5 web browser.
- You can access your systems from anywhere with just a web browser
- No configuration needed on the local system. Fire up a browser, go to your Guacamole app URL, login, and you are good to go.
- You do not even need a physical computer. You can use Guacamole to connect to your cloud systems such as Virtual Private Servers.
Let's go ahead and configure Apache Guacamole to make our lives a little bit easier.
Install Guacamole on Docker
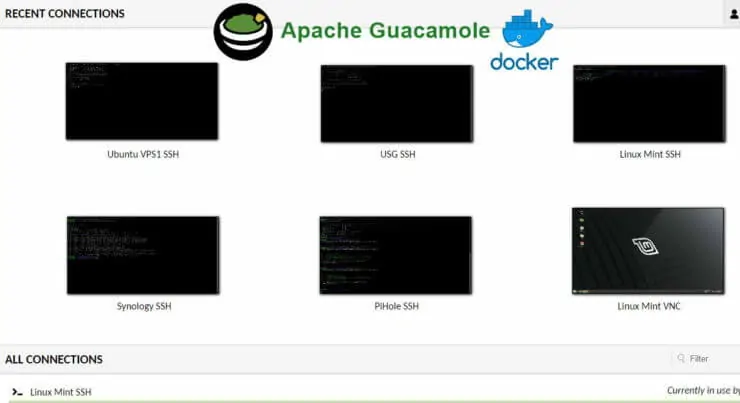
In my setup, I have over several systems that I SSH into (eg. USG, PiHole, Linux Server, Ubuntu VPS, couple of Raspberry Pis, etc.). Guacamole provides a unified interface for me to manage these. When needed, I can even VNC into my Linux Mint desktop for additional tasks.
With Docker you can have Guacamole running in just a few minutes without any major changes to the host system.
1. Requirements
In order to successfully follow this Guacamole Docker guide, you will need a few things ready.
- Docker Server with or without a reverse proxy such as Traefik: If you followed my Docker Media server guide or Docker Traefik v2 guide, you should be good here.
- Docker Compose: This should also be taken care of if you followed the guides linked above.
- MySQL Database Server: Don't worry we will talk about this later.
- Docker Network: We are going to be using a network named t2_proxy. This could be different in your case. If you followed the network setup in my Docker Traefik 2 guide, you should already have this.
- WebUI for MySQL: A WebUI for MySQL such as PhpMyAdmin or Adminer makes things very easy. On my GitHub repo, I have docker compose examples for both MariaDB (MySQL) and PhpMyAdmin. But this is optional and if you do not have one running, no problem.
The assumption is that you already are familiar with Docker and some of the useful docker commands. If not, I urge you to read my Docker Traefik 2 guide before proceeding.
2. Setup MySQL Server
As said before, Guacamole requires a MySQL Database Server. In this Guacamole Docker tutorial, we are going to be using the open-source MariaDB server.
In my case, I already have MariaDB running on my Synology NAS and I use that for all my database needs. If you are in a similar situation, you can use your existing database server.
Alternatively, you can add MariaDB to your Docker stack using the following Docker compose snippet:
# MariaDB - MySQL Database
  mariadb:
    container_name: mariadb
    image: linuxserver/mariadb:latest
    restart: always
    networks:
      - t2_proxy
    security_opt:
      - no-new-privileges:true
#    ports:
#      - "3306:3306"
    volumes:
      - $USERDIR/docker/mariadb/data:/config
      - /etc/timezone:/etc/timezone:ro
      - /etc/localtime:/etc/localtime:ro
    environment:
      - PUID=$PUID
      - PGID=$PGID
      - MYSQL_ROOT_PASSWORD=$MYSQL_ROOT_PASSWORD
A few notes about the MariaDB Docker Compose snippet:
- There are several MariaDB images on Docker Hub. We are going to use Linuxserver.io's image.
- The ports block is optional. Guacamole should be able to access MariaDB using hostname mariadb on port 3306. Alternatively, you can enable ports block and access MariaDB on your host system's IP on port 3306.
- We are mapping $USERDIR/docker/mariadb/data to /config of the container. All databases will be stored in this folder. Note that the environmental variable $USERDIR must already be set as explained in my Docker Traefik guide.
- Variables $PUID, $PGID, and $MYSQL_ROOT_PASSWORD must also be defined.
Start the MariaDB container and check the logs to make sure everything is OK. If you do not know what commands to use here, check the requirements section where I provided a link to basic docker commands.
That is it for setting MySQL server of Guacamole. Now let us move on to the Guacamole setup part of the guide.
3. Guacamole Database Setup and Initialization
This is explained in detail in Guacamole Wiki. But if you follow these key steps, you should be fine.
Create Guacamole Initialization Script
Guacamole requires that the database be initialized first. This involves several steps. However, Guacamole provides a script that can simplify this process.
From your host system's commandline, run this command to create the initialization script.
docker run --rm guacamole/guacamole /opt/guacamole/bin/initdb.sh --mysql > guac_initdb.sql
This should output a SQL file with the name guac_initdb.sql, which has all the SQL commands needed to initialize the guacamole database.
Copy Initialization Script to MySQL Server
Next, we need to move guac_initdb.sql file into the MySQL container or the external MySQL host. We will discuss both options.
If you set up and started the MariaDB container using the docker-compose snippet given above, you should have a mariadb folder inside your docker root folder. Copy the initialization script into the mariadb folder.
As I said before, I use MariaDB on my Synology NAS. In this case, I just copied the guac_initdb.sql initialization script to a known location on my NAS.
Create MySQL Database for Guacamole
Then you need to create a MySQL database for Guacamole. If you have phpMyAdmin open, this is quite easy as shown below.
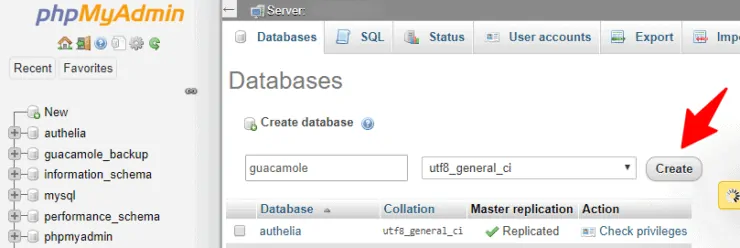
To do this using the commandline, you need to SSH into the external MySQL server or the MariaDB container. Describing how to SSH into an external host is outside the scope of this post. But in the case of MariaDB container, use the following command to reach the server's commandline.
docker exec -ti mariadb /bin/bash
Next, let us connect to the MySQL server. On MariaDB container, use the following command:
mysql -u root -p
On Synology NAS, use the following command to connect to MariaDB version 10:
/usr/local/mariadb10/bin/mysql -u root -p
When asked for the MySQL root password, enter the password you used while setting up MariaDB. This should get you to the MySQL prompt as shown below:

From here, the procedure is the same on both MariaDB container and external host (eg. Synology) to create the database and other relevant information.
From MySQL prompt, create a database called guacamole (you can use any name for the database) using the following command:
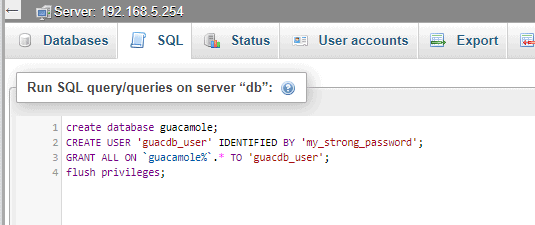
create database guacamole;
Next, create a username (guacdb_user) and password (my_strong_password) for Guacamole app to connect to MariaDB server. Customize the username and (strong) password to your needs.
CREATE USER 'guacdb_user' IDENTIFIED BY 'my_strong_password';
Then, we are going to provide full access for guacdb_user to the database guacamole. To do this, use the following MySQL command (pay attention to the backticks and single quotes usage):
GRANT ALL ON `guacamole%`.* TO 'guacdb_user';
Finally, flush privileges and exit using these following commands in sequence:
flush privileges;
quit
The whole process should look something like what is shown in the screenshot below.
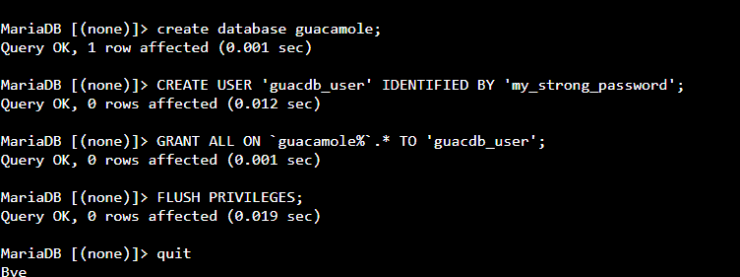
Alternatively, you can run some or all the above SQL commands on phpMyAdmin as shown below:
Check Guacamole MySQL Credentials
Now, make sure you are able to connect to the MariaDB server using the Guacamole database credentials:
mysql -u guacdb_user -p
Use /usr/local/mariadb10/bin/mysql -u root -p on Synology. After you enter the password (my_strong_password), you should be able to reach the MySQL prompt.
Initialize Guacamole MySQL Database
To initialize the database, we need to run the SQL script we copied over the MariaDB server previously. From the MariaDB server's commandline, run the following command (Synology Example shown):
cat /volume1/ds918/guac_initdb.sql | /usr/local/mariadb10/bin/mysql -u guacdb_user -p guacamole;
If you are using MariaDB on Docker, then use the following command instead:
cat /config/guac_initdb.sql | mysql -u guacdb_user -p guacamole;
Few notes about the above command:
- /volume1/ds918/guac_initdb.sql is the location where the initialization script is saved on my Synology. For MariaDB container, it is /config/guac_initdb.sql (or whatever you chose previously).
- Replace guacdb_user with the username you chose.
- guacamole is the name of the database. Change this if you named the database differently.
When asked, enter the password (my_strong_password) and the execution should complete in a few seconds.
Confirm Proper Initialization
Before proceeding further with Guacamole setup, let us check to make sure that the guacamole database was initialized properly with all the required information. To do this, login into MariaDB server and issue the following commands from the MySQL prompt:
use guacamole;
show tables;
If you see an output like what is shown below, you should be good to go.
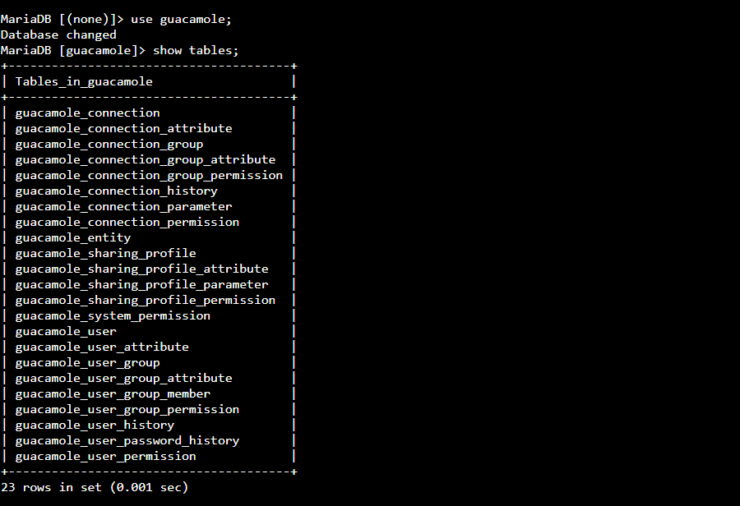
Alternatively, you can look at the database structure on phpMyAdmin to ensure that the required tables have been created (there should be several tables listed after initialization).

4. Setup Guacamole Daemon on Docker
Apache Guacamole setup requires Guacamole daemon to be running and accessible. Guacamole Daemon (guacd) is the proxy that translates various protocols to Guacamole protocol and vice versa.
Setting up guacd is quite easy with Docker. Here is the docker-compose snippet to use to start Guacamole daemon.
# Guacamole Daemon - Needed for Guacamole
  guacd:
    image: guacamole/guacd
    container_name: guacd
    restart: unless-stopped
    security_opt:
      - no-new-privileges:true
    networks:
      - t2_proxy
The only requirement I have found here is that guacd must be on the same network (t2_proxy) as Guacamole. There is nothing else to configure or change.
That is it. Start the guacd container and you should be ready to install Guacamole next. Again, refer to the requirements section above for the link to basic docker commands (eg. for starting and stopping containers).
5. Setup Guacamole on Docker
Phew! now that foundation is done, let us move on to Apache Guacamole Docker setup using Docker Compose. Add the following code block to your docker-compose file:
# Guacamole - Remote desktop, SSH, on Telnet on any HTML5 Browser
# Create all databases and tables first
  guacamole:
    image: guacamole/guacamole:latest
    container_name: guacamole
    restart: unless-stopped
    networks:
      - t2_proxy
    security_opt:
      - no-new-privileges:true
#    ports:
#      - "$GUACAMOLE_PORT:8080"
    environment:
      GUACD_HOSTNAME: guacd
      MYSQL_HOSTNAME: mariadb
      MYSQL_PORT: $DB_PORT
      MYSQL_DATABASE: guacamole
      MYSQL_USER: $GUAC_MYSQL_USER
      MYSQL_PASSWORD: $GUAC_MYSQL_PASSWORD
    labels:
      - "traefik.enable=true"
      ## HTTP Routers
      - "traefik.http.routers.guacamole-rtr.entrypoints=https"
      - "traefik.http.routers.guacamole-rtr.rule=Host(`guac.$DOMAINNAME_CLOUD_SERVER`)"
      - "traefik.http.routers.guacamole-rtr.tls=true"
      ## Middlewares
      - "traefik.http.routers.guacamole-rtr.middlewares=chain-authelia@file,add-guacamole"
      - "traefik.http.middlewares.add-guacamole.addPrefix.prefix=/guacamole"
      ## HTTP Services
      - "traefik.http.routers.guacamole-rtr.service=guacamole-svc"
      - "traefik.http.services.guacamole-svc.loadbalancer.server.port=8080"
Below are a few notes about the Guacamole docker-compose example.
Docker Compose Blocks
- Network: Once again, Guacamole will part of the t2_network, which is already setup and was previously discussed in this guide.
- Ports: I commented out the ports because I want Guacamole interface to be available only via Traefik reverse proxy. If you want access to Guacamole WebUI via ports (eg. on internal network) then enable the ports block. Also set the $GUACAMOLE_PORT environmental variable.
- Environmental Variables: GUACD_HOSTNAME can be left as guacd. MYSQL_HOSTNAME is mariadb (name of the MariaDB service) or the IP address of the MySQL server host.
MYSQL_PORT must be set using $DB_PORT environmental variable. The default MySQL port is 3306. The rest of the variables are Guacamole MySQL database credentials we previously set: guacdb_user and my_strong_password. Define these in the .env file as well.
Traefik 2 Labels Block
The labels block is optional and needed only if you want to put Guacamole behind Traefik reverse proxy (highly recommended).
If you do leave out the Traefik labels, then you will have to enable the ports block and access Guacamole web interface using HOST-IP:Port. You may also setup port-forwarding on your router and make Guacamole available from the internet. But I highly discourage exposing an app and port directly to the internet. Having a reverse proxy, such as Traefik, in front is more secure.
Explaining Traefik 2 labels is beyond the scope of this post. I recommend reading my Traefik 2 guide to setup Traefik 2.
Below are a few notes on the Traefik 2 labels.
- The defined router rule will make Guacamole WebUI available at guac.example.com, where $DOMAINNAME_CLOUD_SERVER is defined as example.com in the .env file.
- We are putting Guacamole behind Authelia authentication by defining the middleware chain-authelia@file. Check my Docker Traefik 2 guide if you do not understand. You also have the option to use Google OAuth instead.
- We are adding another middleware (add-guacamole). This middleware sets the addPrefix, which makes opening Guacamole WebUI easier. Guacaomle will now be available at guac.example.com instead of guac.guacamole.com/guacamole.
Nothing else to customize. Save your docker-compose file and start the Guacamole container (shortcut dcup2 if you followed by Traefik 2 guide strictly). As always after starting the container, follow the docker logs to ensure there are no glaring errors errors.
Be the 1 in 200,000. Help us sustain what we do.You will gain benefits such as Deployarr access, discord roles, exclusive content, ad-free browsing, and more.🔥 Holiday Sale! 25% Off Platinum Membership$399.99$299.99 (ends December 31).Join the Geek Army (starting from just $1.67/month)
Guacamole Intial Setup and Security
Now that Guacamole docker container is up and running, let's test it out. Visit https://guac.example.com and you should see the Guacamole login screen.
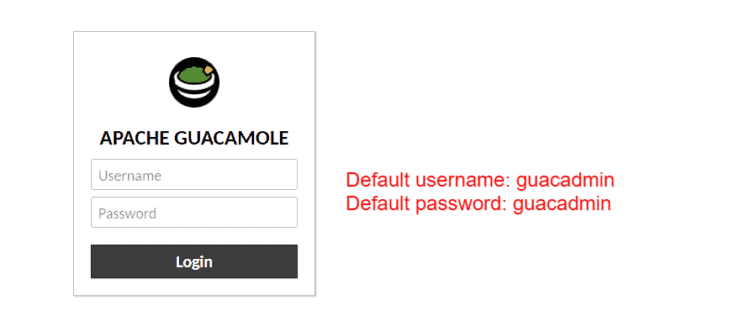
If you are able to get in, then great.
Guacamole Security: Delete Default User
One of the first things you should do is change the default login details. This is less of a concern if you have an authentication system in front (eg. Authelia or Google OAuth) but is still strongly recommended.
Go to Settings->Users, and add a new user.
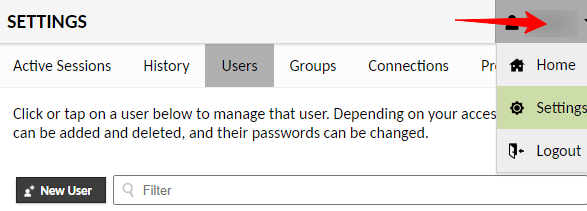
Fill out the username and password. Then scroll down to Permissions and check all of them as shown below.
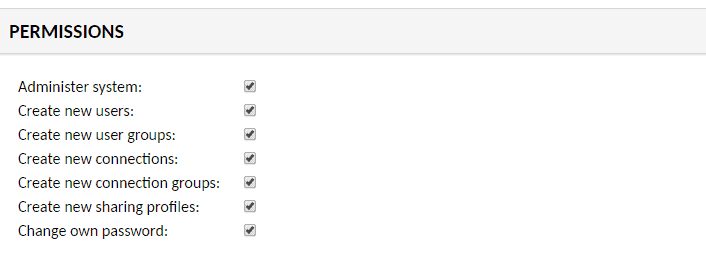
The rest of the settings on this page are optional. Hit Save to save the user.
Next, logout and login as the new user you created. Once again go to Settings->Users. Click on guacadmin, scroll all the way down, and hit DELETE to delete the default Guacamole user.
Guacamole Security: Duo Multifactor Authentication
Guacamole supports Duo two-factor authentication. Setting this up requires additional configuration.
However, if your Guacamole app is behind Authelia or even Google OAuth, then you already have two-factor authentication built-in. It can be via Duo, which I use, or any other authentication method (text, Authy, Google Authenticator, etc.).
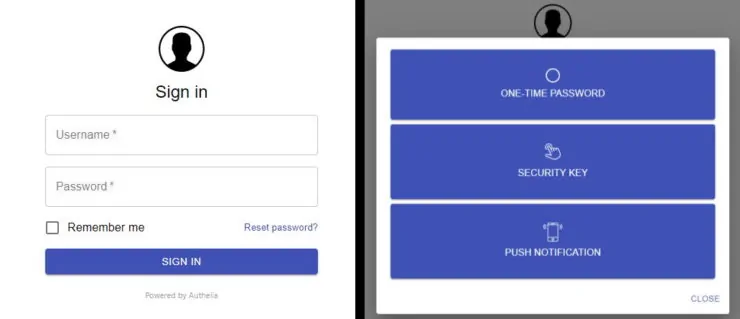
I highly recommend protecting yourself via Authelia or Google OAuth, as shown in my Traefik 2 tutorial.
Next, let us see how to configure Guacamole.
Using Guacamole for VNC, SSH (SFTP), and RDP
Now let us look the main reason we actually installed Guacamole - accessing our systems via VNC, SSH, SFTP, or RDP remotely using the web browser. Setup a new Guacamole connection by going to Settings->Connections.

1. VNC using Guacamole
Virtual Network Computing (VNC) is a way of connecting to GUI desktop environments. Before you can get started with this, you will need a VNC server to be running on the remote host that you want to connect to. [Read: Setup VNC Server on Ubuntu: Complete Ubuntu Remote Desktop Guide]
Assuming that you already have a VNC server running, let us look at how to configure VNC on Guacamole. I will show you the basic/minimum requirements to setup VNC on Guacamole and get started.
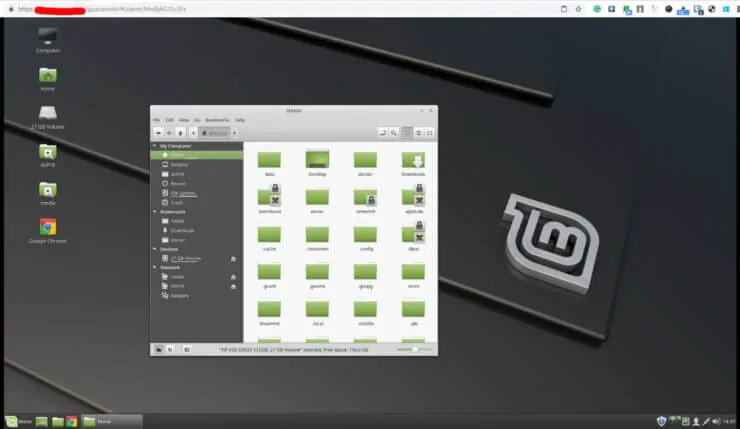
Add a new connection and provide some descriptive connection details as shown below. In the example below, we are connecting my Linux Mint home server. [Read: My Smart Home setup – All gadgets and apps I use in my automated home]
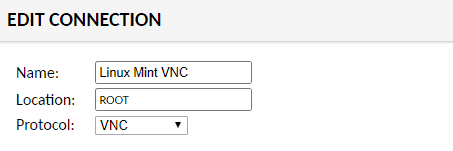
Next, scroll down to PARAMETERS and provide the VNC Host IP, port, and VNC password. The default port can vary but is typically 5900, 5901, 5902, etc.
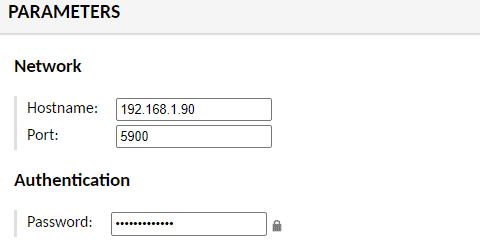
If you know what you are doing, you can configure the rest of the VNC settings on this page. Otherwise, you can safely ignore the rest of the settings on this page and hit Save at the bottom of the page.
Return back to Guacamole home page and you should see the link to start this VNC connection.
How to return to Home Screen on Guacamole?
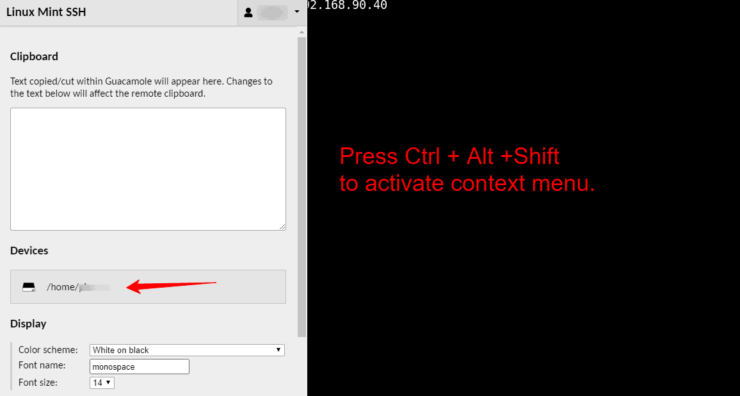
While on any connection, press Ctrl+Alt+Shift to activate the Guacamole context menu that provides various options, including, return to home screen.
Some of the apps in my GitHub Repo, such as jDownloader, firefox, handbrake, MakeMKV, etc., use VNC servers to make the interface available via the web browser. Using Guacamole's VNC I was able to connect to these as well.
2. SSH/SFTP using Guacamole
SSH is one of the most common remote connection protocols used by system administrators. We have covered SSH in detail through various posts and I recommend checking out some of these posts to get the best out of SSH.
- Introduction to SSH and htop for Linux Server Monitoring from Commandline
- How to simplify SSH access by using SSH config file on remote server
- How to SSH into Raspberry Pi for remote administration?
- 15 most used SSH commands for Raspberry Pi – SSH for Raspberry Pi
- Install SSH server on Ubuntu Linux
- Connecting to Ubuntu Server using SSH Keys and Putty
Frankly, I did not understand its power until I started using it pretty much every day. The problem is SSH requires a client software or app to connect to the server. There are several awesome SSH Clients for Windows and Android platforms. However, if you have restricted permissions on the device (eg. Corporate devices) then you may not be able to install them.
Sometimes corporate connections detect and block any known remote connection protocols. So even portable SSH clients like Portable PuTTY become useless.
This where Guacamole can save the day (or the rest of your life) for you. So let's go ahead and configure Guacamole for SSH connections.
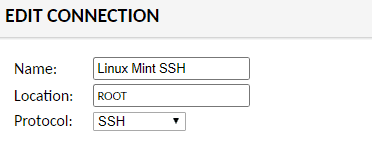
Go to Settings->Connections and add a new connection. Provide a descriptive name for the SSH connection and choose SSH for protocol, as shown below.
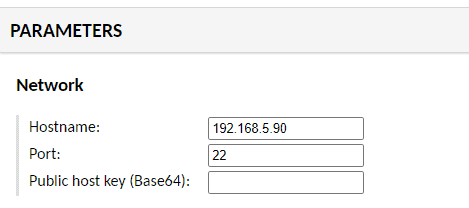
Next, under parameters, provide your SSH server host and port to use for the SSH connection (default is 22).
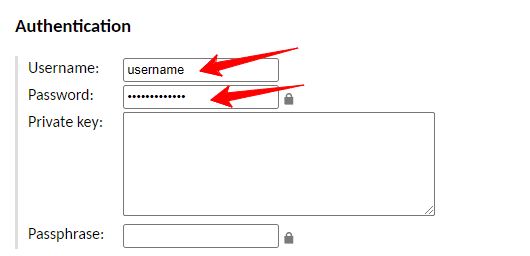
Then provide the username and password for SSH connection. Alternatively, you may use your private key and passphrase, although this did not work for me (maybe I am doing something wrong).
Optionally, if you want to be able to browse your folders using SFTP, enable the SFTP option at the end of the page and enter the remote folder you want to access.

That is it. Save the connection, return to your home screen and try it out. You should reach the command prompt of your SSH server.

While on SSH connection, if you want to access the SFTP browser, you may do so from the Guacamole context menu, which can be activated using Ctrl+Alt+Shift.
3. Windows RDP using Gaucamole
Thanks to David Woody for providing the screenshots for setting up Windows Remote Desktop Protocol with Guacamole.
Note that you will need a version of Windows that supports RDP.
As with other connections, go to Settings->Connections and add a new connection. Provide a descriptive name and choose RDP for protocol.
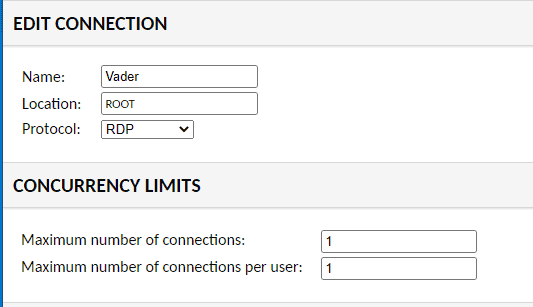
Next, provide connection details for the RDP connection as shown below: IP address or hostname, the RDP port (default is 3389), username, and password.
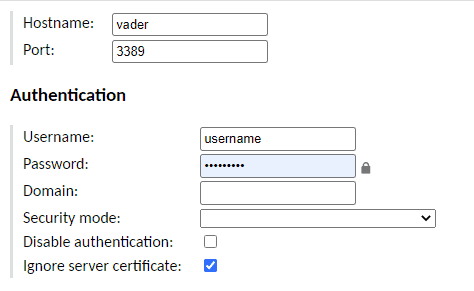
There are several more settings that you can configure if you know what you are doing. Otherwise, you can leave them be and you are good to go.
Apache Guacamole Setup on Docker - Final Remarks
Configuring Guacamole for SSH and VNC was one of the best things I did for my smart home setup. And with my recent move to Traefik 2, I added Authelia to significantly improve the security of Guacamole app.
In addition to VNC and SSH/SFTP, I have also tried Telnet and it worked great. However, I could not test RDP connections to Windows because the version of Windows 10 I use does not support RDP (SMH!). If RDP worked for any of you and you are willing to share the steps/screenshots, I would be glad to add it to this guide to help others (Thanks! David Woody).
I hope this Guacamole Docker tutorial was helpful and you were able to successfully setup Guacamole for remote connections. Please share any thoughts or feedback using the comments.

![30 Best SSH Clients for Windows [2022]: Free and Paid Best SSH Clients for Windows featured image](https://www.smarthomebeginner.com/images/2022/11/image-by-geralt-9301-gerd-altmann-from-pixabay-dotcom-matrix-2883623-1280.jpg)
