Glype is a web-based proxy script written in PHP with focus on features, functionality, and ease of use. In this post, I will explain how to install Glype on Ubuntu Server. A web-based proxy script can be hosted on a website and it provides proxy service to users via the web browser. It downloads requested web pages, modifies them for compatibility with the proxy, and forwards them to the user. Proxies, such as Glype are commonly used for anonymous browsing and bypassing censorship and other restrictions placed by certain countries and work environments. One can use a Glype proxy server privately or make it available to public. In fact, if you do not want to go the trouble (which it isn't) setting up Glype, there are nice people out on Glype forum that have shared their proxies for public use. When browsing through glype proxy, your server (running glype) IP address will appear as the IP address of your current system. But we at htpcBeginner, find ways to make your Linux home server even more useful. So let us go ahead and install Glype on Ubuntu server.
Table of Contents
 Glype Features
Glype is free for personal use and is affordable for commercial use. Some of its key features include:
- Plug and Play. Simply upload, configure and go!
- Admin Control Panel for easy management and configuration.
- JavaScript Support provides increased compatibility with websites.
- Skinable. A theme system allows for customization of your proxy.
- Access Controls blacklist users by IP address and websites by domain name.
- BlockScript® Integration protects the proxy by blocking specified countries, filtering companies, malicious traffic, bots and spiders, and more.
- Unique URLs provide greater privacy by expiring URLs in the browser history at the end of a browsing session.
- Plugins allow for easy installation of site-specific modifications. Useful for adding new functionality to websites.
- Advanced Options let users change their user-agent and referrer, manage cookies, and remove JavaScripts and Flash.
- Source Viewable and webmasters may modify the source code subject to the terms of the license.
Glype may not have as many features as dedicated VPN service such as PureVPN but if you already run a server, it is a nice little addon to extend your server.
Requirements
One can install Glype on Ubuntu server or in fact any server that supports the requirement. This includes paid hosting space such as those from HostGator or GoDaddy. There are only 2 main requirements:
- A webserver that as PHP5+ installed. If you do not have a webserver running on your Ubuntu Server, check our guides on Apache webserver installation, PHP installation, and PHP configuration.
- cURL enabled - If you followed our PHP installation and configuration guides, you should have cURL enabled. If not you can install cURL using the command below.
sudo apt-get install curl php5-curl
Then reload your Apache server:
sudo service apache2 reload
Even if you already have the above two packages installed there is no harm in running the above commands. If you want to check if cURL support is enabled, you can create a phpinfo.php file in your webserver's root with the following contents in it:
< ?php
phpinfo();
?>
Then, open the file in your browser and look for something like this:
Once you ensure that cURL support is enabled you can delete the phpinfo.php file and proceed to install Glype on Ubuntu.
Install Glype on Ubuntu Server
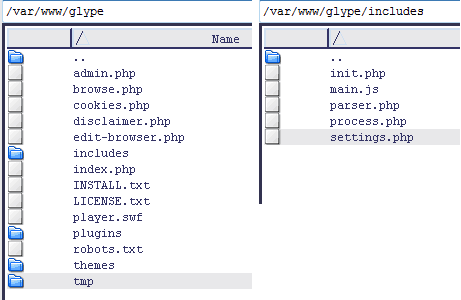
Download the latest Glype version from here and extract the zip file. Read the INSTALL.txt. Then upload the contents to your webserver. In this case, we are assuming that Glype is being installed in the root folder (/var/www).
Then, provide write permissions to tmp folder and the includes/settings.php file highlighted in the above picture. You may use the following commands:
sudo chmod 775 /var/www/glype/tmp
sudo chmod 775 /var/www/glype/includes/settings.php
Make sure to use the correct path that applies in your case. You are done (well almost). It is that easy to install Glype on Ubuntu.
Accessing Glype
After uploading Glype files and setting up required permissions, you may access Glype through your web browser. You can access it with the domain name or IP address of your server:
http://www.domain.com/glype

or

http://XX.XX.XX.XX/glype
XX.XX.XX.XX is the external IP address of your server.
First Time Use Installation
The first time you access your Glype web proxy you will be presented with the following screen:
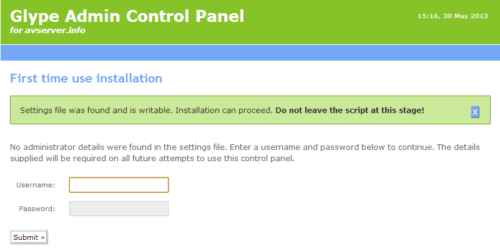
Ensure that there are no errors (red boxes) and you see the message that says you can proceed to install Glype on Ubuntu. Enter a strong username and password to create the administrator account. Needless to say, remember these as you will need them to enter the admin area again.
Glype Configuration
Once you login, you will enter the Glype Admin area where you can configure various settings to ensure Glype works the way you want it to. First, change the username and password from default to something strong. Glype development team has done a great job by providing tips and descriptions for various settings. While they are self-explanatory and can be left to their defaults, we will work to bring you a basic configuration and security guide shortly.
Anonymous Surfing with Glype Web Proxy
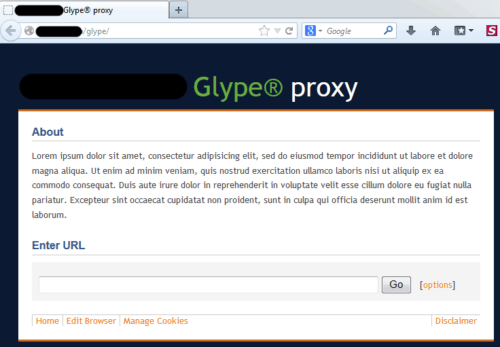
After installing and configuring just visit your Glype page and enter the address you would like to browse anonymously. The interface looks very similar to a search page and is shown below:
You can make your life even easier by using plugins such as Proxilla for Firefox. Go ahead install Glype on Ubuntu and use your own web proxy to surf the web anonymously and circumvent internet access restrictions.


 Glype Features
