The release of Ubuntu 14.04 Trusty Tahr is imminent and we have shown you how to setup Ubuntu Server 14.04, install a GUI, and if needed how to boot Ubuntu server to command line. Now it just feels like the time to show you how to configure NFS server on Ubuntu Server edition. Ubuntu Server edition is my go to distribution to setup a home server. When it comes to serving media content within your local network, a NFS share is way better than Samba/CIFS share in terms of speed and resource usage. If you have a XBMC box to watch TV shows and movies from a central server then a Network File System (NFS) share should be the choice for a media source. It only takes a few minutes to install and configure NFS server in Ubuntu, and it is a must have item on my server.
Table of Contents
Setup NFS Server on Ubuntu
If you do not have NFS yet, you will have to install NFS server first using the following commands:
apt-get install nfs-kernel-server
That's the easiest part. It requires just bit more effort to configure NFS server to share files with right permissions.
Configure NFS Server
After installation you can configure NFS server by editing the /etc/exports file. First make a backup copy of the default NFS configuration file:
sudo cp -a /etc/exports /etc/exports.backup
Then open the /etc/exports file using the following command:
sudo nano /etc/exports
Edit and comment out all existing lines by adding a "#" in front the line. Next, setup NFS share for each folder you want to make available to the client devices as shown below.
One of the primary purposes I configure NFS server on Ubuntu home server is to share my media to all my OpenELEC Raspberry Pi HTPCs. As I said before, for sharing within a network the performance of NFS is better than SAMBA. If you a media folder on your central Ubuntu server, then add the following line to line to /etc/exports to setup NFS share for it.
#Export media to all IP address under 192.168.1.X
/home/user/media   192.168.1.0/24(rw,async,insecure,no_subtree_check,nohide)
This will make your media folder located under /home/user available to every device in your local home network. The options within parenthesis are specifically chosen to improve performance. We are sharing "non-critical" media files and we are making them available only to devices in your home network (192.168.1.X). So we can afford to go lower on security to improve speed and performance.
rw - allows read/write if you want to be able to delete or rename files from XBMC or other devices. On XBMC you write permission to download subtitles.
async - Increases read/write performance. Only to be used for non-critical files.
insecure - Does not mean the files are insecure but rather this setting allow clients (eg. Mac OS X) to use non-reserved ports connect to a NFS server.
no_subtree_check - Improves speed and reliability by eliminating permission checks on parent directories.
nohide - This option allows the client device to see multiple file systems but only works on one host. Since this is rare, you may choose to omit this option as it can potentially cause problems in some cases.
Again we are sharing "non-critical" media files and we are making them available only to devices in your home network (192.168.1.X). So we can afford to go lower on security to improve speed and performance.
To configure NFS server to share your home folder, the settings are slightly different for improved security with a with a slight compromise on speed. Add the following line to /etc/exports file:
#Export home folder to a specific IP
/home     192.168.1.59(rw,sync,no_root_squash,no_subtree_check)
First, notice that in this case are specifying an IP to share the home folder with rather than allowing all clients within a network. This relies on your client having a static IP address. If not, specify 192.168.1.0/24 to allow all your network clients to connect. But remember that anybody who connects to your network can now access your files. Other options are explained below:
sync - Reliable transfer of files with any chance for file corruption but slower than the async option.
no_root_squash - Allows the root user on the client machine will have same level of access to the files as the root on the NFS Server. This can be a security risk and should only be used when you know what you are doing or need to perform administrative work.
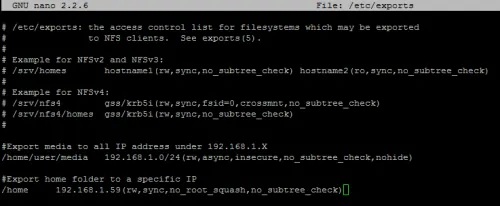
The final /etc/exports file may look like what is shown above. Of course, the folder paths and options may vary depending on your situation.
Starting, Stopping, and Restarting NFS Server
Once you have setup NFS server, you can start NFS share using the following command:
sudo exportfs -ra
Any time you make changes to /etc/exports I recommend that you restart your NFS server using the following command:
sudo service nfs-kernel-server restart
I find it easier to setup bash_aliases to simplify NFS starting, stopping, and restarting.
On your XBMC just choose Network Filesystem (NFS) when you select the source. Note that NFS does not work on Windows clients but they should work on all Linux-based OSes that run XBMC. For Windows, you will still have to Setup Samba as the file server. So there you go, install and configure NFS server and enjoy better streaming of media files from your network storage.


![Ultimate Docker Server: Getting Started with OS Preparation [Part 1] Docker Server Tutorials 1 OS Preparation](https://www.smarthomebeginner.com/images/2024/01/Docker-Series-01-Intro-and-OS-Prep.png)
