Shell-In-A-Box a web based AJAX terminal emulator to remotely control you Linux Server. Recently, I explained how to install Shellinabox on Ubuntu and how to install SSH server on Ubuntu. This post explains, how to increase Shellinabox security on Apache webservers. Shellinabox allows users to login using their username and password and grants access to their login shell, exactly like SSH remote access. While Shellinabox offers great convenience to system administrators, it can offer an easy entry point for hackers if it is not secured properly. Without further delay, let us look at some of the ways you can increase Shellinabox security.
Table of Contents
5 Easy Steps to Increase Shellinabox Security
There are multiple ways to secure your Shellinabox installation. Described below are 5 easy things you can do to increase your Shellinabox security. Before we begin, it is good to know how to start, stop, and restart Shellinabox and Apache. Use the following commands to restart Shellinabox and Apache:
sudo service shellinabox reload
sudo service apache2 reload
To find out how to start, stop, and restart Shellinabox using simple and convenient aliases, refer to this post.
1. Change default listening port
Shellinabox by default listens on port 4200. You would access Shellinabox by going to http://localhost:4200. The problem is hackers know this as well. So if they know your IP address they could access your Shellinabox by going to http://XXX.XXX.XXX.XXX:4200, where the XXX.XXX.XXX.XXX represents your IP address. Therefore changing the default listening port to a random port makes it difficult for hackers to reach your Shellinabox. To do this on Linux/Ubuntu you will have to edit /etc/default/shellinabox:
sudo nano /etc/default/shellinabox
Find the lines below and change the port number from the default 4200 to another random port (eg. 6125):
# TCP port that shellinboxd's webserver listens on
SHELLINABOX_PORT=6125
Save and exit. Restart Shellinabox as described above. Your Shellinabox should now be available at http://localhost:6125. If you have setup port forwarding on your router/DHCP server, you can access your Shellinabox using http://XXX.XXX.XXX.XXX:6125, where XXX.XXX.XXX.XXX is your external IP address. If you have a domain name setup that refers to your IP address, then you can reach your Shellinabox using http://domain.com:6125
2. Enable SSL
Accessing Shellinabox through http sends all information as unencrypted data. This could be dangerous if you are working on your Shellinabox remotely from the internet. The solution is to encrypt the data during transfer, which makes sniffing by hackers harder. To enable and enforce HTTPS access on Linux servers with Apache, install the following run-time libraries:
sudo apt-get install libssl0.9.8 libpam0g openssl
Restart your Shellinabox and Apache server. It should now be accessible only through https://localhost:6125. Note that you may have to have a SSL certificate generated. Refer to Apache documentation if you want to generate your own certificate. By default, the system will install self-signed certificates for you. These certificates are likely to raise warnings when you point your browser to the site.
Recommended Guides Secure Shell/SSH:
3. Restrict Shellinabox to Localhost Only
You can restrict access to Shellinabox from Localhost only. In other words you can access Shellinabox only from the system on which it is running. To do this on Linux/Ubuntu you will have to edit /etc/default/shellinabox as shown below:
sudo nano /etc/default/shellinabox
Find the line below and add --localhost-only at the end (as shown below):
SHELLINABOX_ARGS="--no-beep --localhost-only"
Save and restart Shellinabox. While this can increase Shellinabox security, it will prevent access to your Shellinabox from others systems and remote access through the internet. This can be a great inconvenience. You can overcome this drawback by setting up Apache reverse proxy as described in Step 4.
4. Setup Shellinabox Apache Reverse Proxy
To add a layer of convenience to your Shellinabox security, you can setup Apache reverse proxy. To do this, you will have to first enable mod_proxy on Apache:
sudo a2enmod proxy
Then, make a backup of /etc/apache2/mods-available/proxy.conf:
sudo cp -a /etc/apache2/mods-available/proxy.conf /etc/apache2/mods-available/proxy.conf.backup
Next, edit /etc/apache2/mods-available/proxy.conf and make sure it looks like what is shown below. Add and edit any existing lines as necessary.
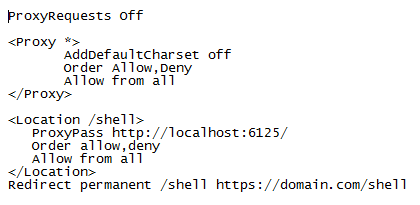
Save and exit. Restart Shellinabox and Apache. Now you can access your Shellinabox through https://localhost/shell or https://XXX.XXX.XXX.XXX/shell (from internet using your IP address - requires port forwarding). The last line in the code above allows you to access Shellinabox through https://domain.com/shell. Ignore it if you do not have a domain name that refers to your IP address.
What this does is to increase Shellinabox security by not revealing the Shellinabox port to the outside world.
Recommended Guides Secure Shell/SSH:
5. Enable Apache Authentication
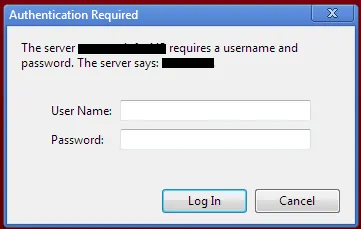
Last but not the lease, enable Authentication. Every time you access Shellinabox, you will be asked for a username and password as shown in the picture below:
To do this you will, first have to create a .htpasswd file. More information is available in Apache documentation. But the easiest way to achieve this is to use one of the htpasswd generators available online.
After you enter the username and password two code blocks will be generated. Copy the contents of the .htpasswd code block and save it to /etc/apache2/.htpasswd_siab. Next, copy the contents of the .htaccess code block and add it to /etc/apache2/mods-available/proxy.conf as shown below:
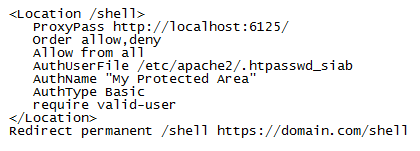
Save and exit. Restart Shellinabox and Apache. You should be prompted for a password everytime you try to access Shellinabox.
After you are done with all the configuration/editing, run the following command to ensure that your new Shellinabox defaults are updated:
sudo update-rc.d shellinabox defaults
Restart your Apache and Shellinabox one last time. Each step adds one additional layer of security. Together they increase your Shellinabox security and make it nearly impervious.
There you go. Install Shellinabox and follow the above steps to increase Shellinabox Security. Enjoy the convenience of web based terminal emulator.

