In this post, I am going to explain how to install Webmin on Ubuntu and secure it to prevent unauthorized break-ins. Webmin is a web-based interface for system administration for Unix. Using any modern web browser, you can setup user accounts, Apache, explore files, setup cron jobs, DNS, file sharing and much more. Webmin removes the need to manually edit Unix configuration files, and lets you manage a system remotely. Several posts, such as, setting up MiniDLNA, backing up XBMC, and tracking a website's social stats, published here take advantage of Webmin's ease of use. Therefore, it is time we explain how to install Webmin on Ubuntu to help those of you who are not comfortable with commandline. Webmin Wiki is a very good place to visit if you have questions on any of the features in Webmin.
Table of Contents
1. Install Required Packages
Webmin requires certain other packages to be present for it to run smoothly. While you may already have some of the packages, you can still issue the following command to install all the Webmin dependencies:
sudo apt-get install perl libnet-ssleay-perl openssl libauthen-pam-perl libpam-runtime libio-pty-perl apt-show-versions python
2. Download and Install Webmin on Ubuntu
You can download Webmin from its download page for any Linux distribution. Although there is nothing wrong with downloading and installing directly, we recommend you install Webmin on Ubuntu using the repositories as described below.
Recommended Guides:
Webmin installation from the repository has several advantages: 1) you are installing from a trusted source, 2) you will be notified of updates, and 3) keeping your Webmin up-to-date is much easier. To add the respository to your sources list, edit /etc/apt/sources.list:
sudo nano /etc/apt/sources.list
Add the following lines at the end of the file:
deb http://download.webmin.com/download/repository sarge contrib
deb http://webmin.mirror.somersettechsolutions.co.uk/repository sarge contrib
Then, you will have to install the GPG key to access the repository. Use the following commands to achieve this:
wget http://www.webmin.com/jcameron-key.asc
sudo apt-key add jcameron-key.asc
Finally, update your packages list and install webmin:
sudo apt-get update
sudo apt-get install webmin
In case you have missing dependencies, they should be resolved automatically.
3. Accessing Webmin Interface
Webmin runs on port 10000 by default. So you can access the Webmin web itnerface by going to:
http://localhost:10000
If your Webmin server is on your internal network, you can also access it through its network IP address (see example below):
http://192.168.0.20:10000
If you have port forwarding enabled on your router and you have a domain name referring to your server running Webmin, you may also access it through the internet using your domain name:
http://domain.com:10000
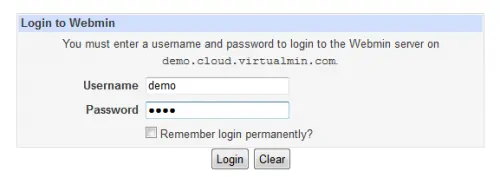
For now, http://localhost:10000 should be enough. You will have to login using your system username and password.
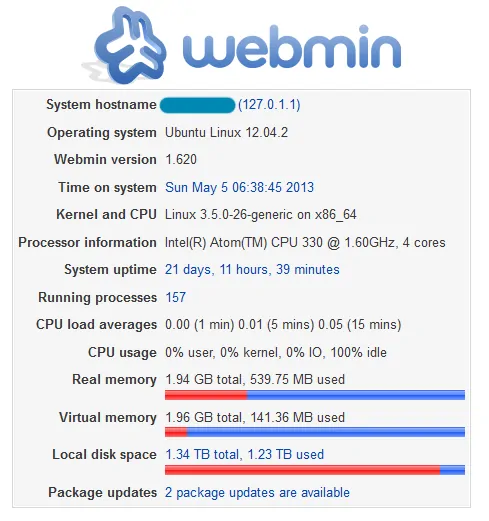
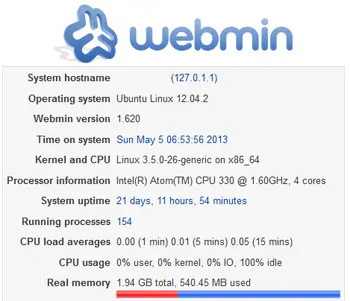
As soon as you login, you will be presented with the system information page that provides a summary of your server.
Webmin Configuration
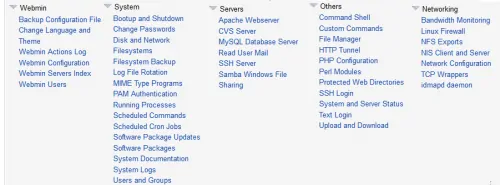
One of the first things to after you install Webmin on Ubuntu Server or Debian is to understand Webmin configuration. Configuring Webmin with the right settings allows it to run the way you want. Below is a screenshot of what is available for configuration in Webmin. For a newbie, the above list can be quite overwhelming. Do not worry, you normally will not have to know or visit every option to use Webmin. Some of the configuration options are self-explanatory. For example, you can change the appearance by going into Webmin Themes.
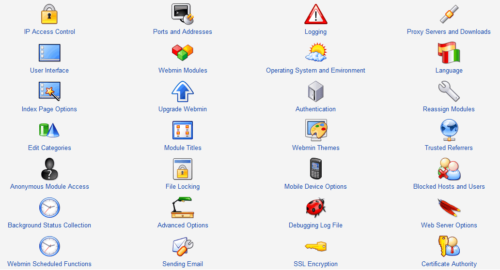
To setup a mobile theme that makes navigating through Webmin much easier on mobile devices, check this post. If required, you can learn other options as you go along. Again, Webmin Wiki is a very good place to visit if you have questions or would like to learn more about Webmin.
Recommended Guides:
Webmin Modules
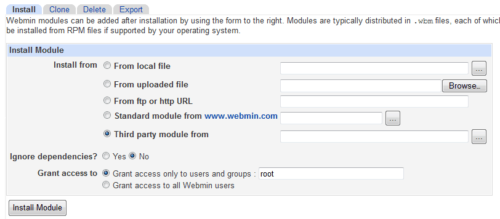
On the left side the list of modules available for you to configure. Webmin offers a ton of modules and a typical user may not use every module. Below is a screenshot of what modules are available:
In the rare event that you need other modules, you may install them by going to Webmin Configuration -> Webmin Modules. Several modules are available from Webmin as well as third-parties.
Secure Webmin
Remember that Webmin allows web-based system administration. Therefore, if your username and password fall into wrong hands they can take full control of your system. I suggest that you do the following immediately after you install Webmin on Ubuntu or any other system. Changing just two configuration options can go a long way in securing your Webmin installation.
Change Default Port
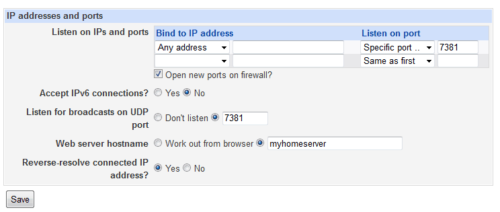
Everybody knows that Webmin runs on port 10000 by default. Changing this to random number decreases the chances of a hacker reaching your Webmin. You can do this by gong to Webmin Configuration -> Ports and Addresses and specifying a random port number that Webmin will listen to. In the example below, Webmin is configured to listen to port 7381.
After you change the port number, you can no longer access Webmin through its default port (10000).
Enable SSL Access
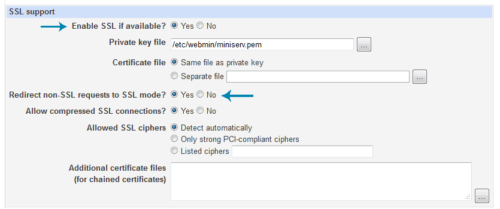
As you may know SSL offers a secure connection and therefore any information transmitted from your browser to your server is encrypted, reducing the chances of someone sniffing the content (which may include even your username and password). Webmin allows access through SSL (or HTTPS). To enable it go to Webmin Configuration -> SSL Encryption. Check "Yes" for "Enable SSL if available?" and "Yes" for "Redirect non-SSL requests to SSL mode?" as shown in the picture below.
After you save, you will only be able to access Webmin using only HTTPS. All HTTP connections will automatically be forwarded to HTTPS.
That is about it for a basic introduction to Webmin. Go ahead and install Webmin on Ubuntu and enjoy administering your system through a user-friendly web interface.

![Ultimate Docker Server: Getting Started with OS Preparation [Part 1] Docker Server Tutorials 1 OS Preparation](https://www.smarthomebeginner.com/images/2024/01/Docker-Series-01-Intro-and-OS-Prep.png)
![Traefik Forward Auth Guide - Simple, Secure Google SSO [2022] OAuth Featured Image_final](https://www.smarthomebeginner.com/images/2019/10/OAuth-Featured-Image_final.jpg)
