In our previous posts, you learned how to install Sonarr in Docker by following just a few easy steps in order to automate your downloads. You also learned how to install Plex in Docker in order to organise and stream your media collection, and you are probably wondering if there is some way to manage your HTPC services in a single, easy-to-use interface. Well, today i will show you how you can install Muximux in Docker.
Must Read: Docker Media Server Ubuntu: Compose for 23 Awesome Apps
Muximux is a lightweight portal that allows you to manage and view your HTPC services and apps. By using Muximux, you will be able to manage everything from a single unified interface, without the need of keeping multiple tabs open or bookmark the URLs for each app. Continue reading and learn how you can install Muximux in Docker in just a few easy steps.
If you do not know what Docker is, be sure to read our What is Docker guide and comparison to VirtualBox in advance and get familiarized with the terms used. [Read: What is Usenet and why is it better than Torrents?]
Table of Contents
Install Muximux using Docker
Before starting the Docker Muximux installation guide, make sure to follow our previous guides where you can learn to Install Docker on Ubuntu, Windows 10 Pro/Ent, and Windows 7 and 8.
You can install Muximux in a new Docker container from scratch. But, ready-made containers are already available for several apps on Docker Hub. So all you need to do is pull those containers and install. If you are ready, open Docker command prompt and get ready to setup Muximux in Docker.
Surfshark VPN Exclusive Offer - 82% off ($2.39/month):
♦ Hide your browsing (no logs), Anonymize Streaming and Downloads
♦ Wireguard Protocol support for VPN.
♦ Circumvent Geo/Country Restrictions and access worldwide content
♦ Works on Windows, Mac, Linux, Android, iOS, Router, and more
♦ 1 TB Encrypted Storage
♦ Money back guarantee - Sign Up Now
1. Muximux Pull Command
To install Muximux using Docker, you will first need to grab the latest version of Muximux container from the linuxserver Docker Hub. LinuxServer is a Docker repository with several HTPC and home server app containers.
docker pull linuxserver/muximux
Pull the ready-made Muximux docker container using the above command.
2. Set Muximux Configuration Parameters in Docker
After pulling the container with the latest version of Muximux, we need to configure the usage parameters such as download folders, port number, etc. for the service. Copy all lines in the code block below (it is one single command) and paste it into docker prompt.
sudo docker create --name=muximux \
--restart=always \
-v /home/docker/muximux/config:/config \
-e PGID=1001 -e PUID=1001 \
-e TZ=Europe/London \
-p 80:80 \
linuxserver/muximux
While you can just copy and paste the settings mentioned above, I recommend that you understand each parameter using the description below and customize it to your liking. Therefore, before issuing the above docker command, change certain parameters (eg. port number, folders, etc.) to fit your situation.
sudo docker create --name=muximux \- Creates a new docker container with the name "muximux"--restart=always \- Starts the Muximux container automatically during boot. If you don't want the container to be started automatically, you can skip this command.-v /home/docker/muximux/config:/config \- Specifies the location of the Muximux config files. In this case, the config folder is located in /home/docker/muximux/ directory.-e PGID=1001 -e PUID=1001 \- Specifies the user id in order to minimize permission issues that can arise between the host OS (Ubuntu) and the container.-e TZ=Europe/London \- Specifies the timezone information. You can check your timezone by following this link.-p 80:80 \- Specifies the ports used by Muximux . In this case, the port is 80:80.
3. Start and Stop Muximux Container in Docker
If you used the correct parameters, you can go ahead and start the Muximux container you have just created, using the following command.
sudo docker start muximux
After starting the Muximux Docker container, you will be able to open the web interface on port 80. In my case the ip is http://192.168.0.109:80.
You can now start and add your services to the Muximux interface, so you can manage them all in a single interface. In order to do that, click on the hamburger menu button from the top-right side, then click on settings to bring the settings page.
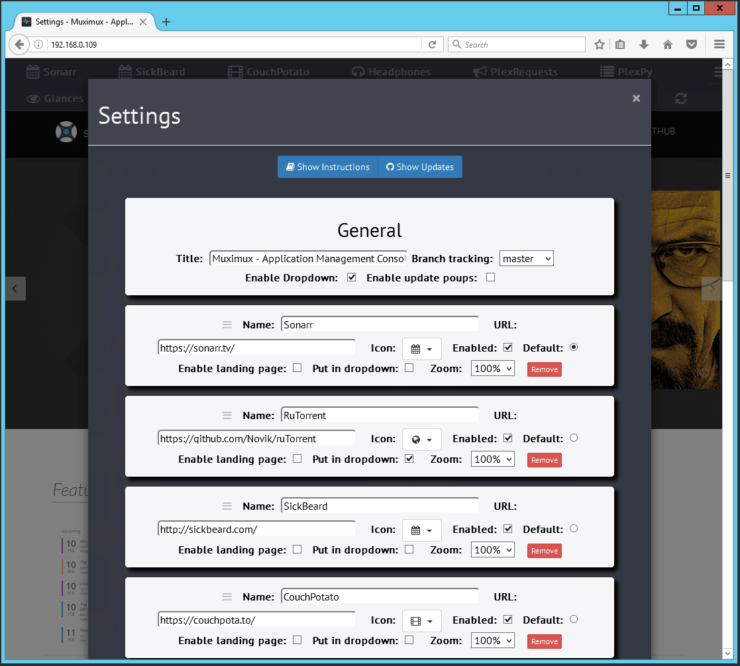
Here, you will need to modify the link for the specific service you want to configure, set an icon then save. In my example, i configured Sonarr with the ip http://192.168.0.109:8989. Make sure you select an icon then save your settings, then you can start enjoying Sonarr in Muximux.

Docker Muximux Install is Done. What to do next?
Congratulations! You managed to setup Muximux in Docker successfully. Once Docker is setup, it is extremely simple to create and destroy containers with apps. If you want to be able to access the Muximux interface outside your home network, be sure to setup port forwarding on your router. You will have to forward the Muximux port to the local/internal IP address of the system with Docker installation.
You can also learn how to install RuTorrent in Docker, which you can also add in Muximux in order to control it from a single and unified interface. Check back soon to learn more about Docker and how you can install various other services in Docker containers.

