I was so excited to find that thomseddon’s image, Traefik Forward Auth, could secure my Docker services. This image provides a lightweight forward authentication using Traefik Google OAuth2.
Why use Google OAuth for Docker Services?
Google OAuth2 enables you to use your Google account to sign in to your services. Using Google OAuth with Traefik will allow you to whitelist accounts, implement Google’s 2FA, as well as provide a Single Sign-On (SSO) to your services. This not only offers the convenience of not having sign-in frequently but also improves security.
For this reason, our smart home setup, which uses several docker services, recently enabled Google OAuth SSO for many of the services.
If you're already running Docker based Media Server behind a Traefik reverse proxy, then this is a logical next step. Adding Google OAuth with Traefik for your Docker services will be an easy step. This was demonstrated in our Traefik 2 Docker guide as well.
Table of Contents
- Why use Google OAuth for Docker Services?
- How to check if my login credentials are already compromised?
- Protecting Docker Services with Traefik's Basic Auth
- Configure Google OAuth SSO for Docker
- Bypassing OAuth / Selective Authentication
- OAuth and Security Headers
- FAQs
- Final Thoughts
This guide was originally written for Traefik v1.7.16 but has since been updated to Traefik v2.2 (at this time). But in this Traefik OAuth guide, I will provide instructions for Traefik 1 as well (this may be removed at some point in future).
Changelog
- November 30, 2020: Added traefik.http.routers.oauth-rtr.tls=true to OAuth container as some of the readers had 404 issues without it (1d6053ca7829c7320471c74c156c21835acb0a31).
- June 2, 2020: Updated instructions for Traefik v2.2, which is now the default and recommended version of Traefik. Moving forward, we will not be updating Traefik v1.7 related files in our GitHub Repo.
How to check if my login credentials are already compromised?
With security and privacy in mind, our goal for this Docker Google OAuth guide is to limit access only to authorized users. Therefore, we need to start by looking at the quality of our credentials, and whether those credentials are already prone to attack.
Hackers will use the usernames and passwords from data breaches in their attacks, so I strongly recommend that you go to Have I Been Pwned and check both your emails and passwords. Have I Been Pwned has built a database of information that has been compromised during a data breach, and this site will compare your credentials to those in the database.
Now you may be asking – How do I know that I can trust this website with such sensitive info?!
The trick to comparing these values securely is that the data is stored as an SHA-1 hash, and an abbreviation of your data is checked against that list. Learn more by checking out this video for a great explanation and walk-through of how it all works.
Protecting Docker Services with Traefik's Basic Auth
Adding the basic authentication that Traefik provides is the simplest way to protect your docker services (Traefik 2).
- "traefik.http.middlewares.test-auth.basicauth.users=user1:$$apr1$$H6uskkkW$$IgXLP6ewTrSuBkTrqE8wj/,user2:$$apr1$$d9hr9HBB$$4HxwgUir3HP4EsggP/QNo0"
In our previous guide we walked through how to use .htpasswd login credentials and Traefik 2 middlewares for adding basic authentication using labels (Traefik 2):
- "traefik.http.routers.traefik-rtr.middlewares=middlewares-basic-auth@file"
For a single service, this can be useful, but I found it quickly became inconvenient and tedious once I had to sign-in to multiple services and for every browser session.
Recommended Guides on Docker:
After implementing Traefik forward authentication, I now only need to sign-in once, and by implementing Google OAuth with Traefik I can add 2-factor authentication (2FA), making this method much more secure and convenient than using basic auth.
Configure Google OAuth SSO for Docker
What is OAuth?
OAuth is an open standard for access delegation, commonly used as a way for Internet users to grant websites or applications access to their information on other websites but without giving them the passwords. This mechanism is used by companies such as Amazon, Google, Facebook, Microsoft, and Twitter to permit users to share information about their accounts with third-party applications or websites.” - Wikipedia
Google OAuth now protects this website which runs on WordPress on Docker.
Before configuring Google OAuth for Docker using Traefik, how it all fits together.
How does Google OAuth with Traefik work?
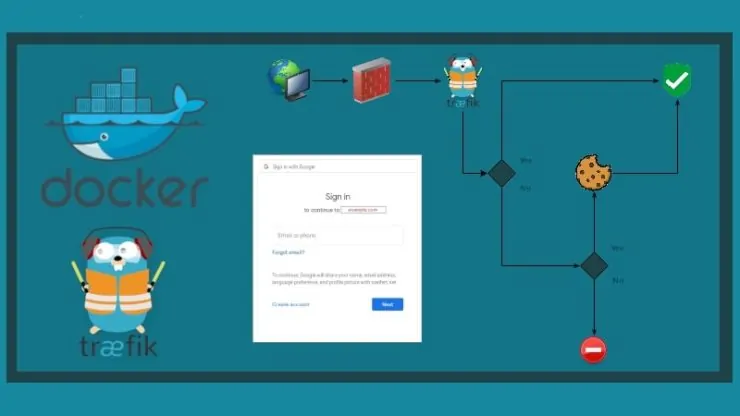
Google OAuth with Traefik acts like a gatekeeper for your services, allowing or denying access after checking for an authorized cookie in your browser. To sum it up, the process goes something like this:
- A request is made for our Host ( e.g.: https://traefik.example.com)
- The request is routed by our DNS provider to our WAN IP, where ports 80 and 443 are forwarded to the Traefik container.
- Traefik sees the incoming request and recognizes that Forward Auth is defined in the labels for that Host, therefore the request is forwarded to the Traefik Forward Auth container.
- The container then checks to see if the browser already has an authorized cookie. If there's no cookie, the request is sent to Google's OAuth2 Authorization Server.
- After successfully logging in to Google, the request is sent to the redirect URI identified for the Web Application (https://oauth.example.com/_oauth).
- An authorized cookie is then saved in the browser, and the user is sent to the backend service.
The next time that this browser tries to access a service protected by OAuth, the cookie will be recognized and the user will be taken to their service, without being prompted to sign in!
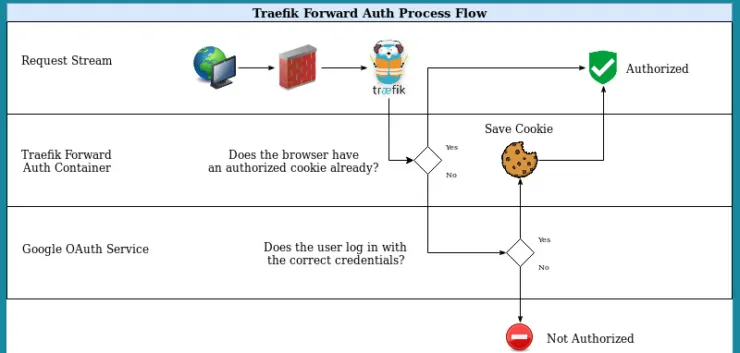
This process happens very quickly, and once your browser receives the cookie you'll forget you've even enabled Google OAuth with Traefik!
With the basics taken care of let's move on to setting Google OAuth Traefik forward authentication for our Docker services.
How do I setup OAuth?
Setting up Google OAuth for Docker using Traefik, involves 3 steps: 1) create DNS records, 2) configure Google OAuth2 Service and 2) modify Docker compose files and adding the Traefik labels to activate forward authentication.
So, first, we'll need to configure the Google OAuth service. Let's set up all of the prerequisites now:
Step 1: Create DNS Records
Start by creating a new CNAME DNS record for our OAuth service (Google will redirect to this address after authentication). For clarity, throughout this guide we'll use the domain name “example.com”.
Set the DNS record as oauth.example.com. The pictures below a screenshot from Cloudflare. Depending on your DNS provider, things may look different for you but essentially have the same content.
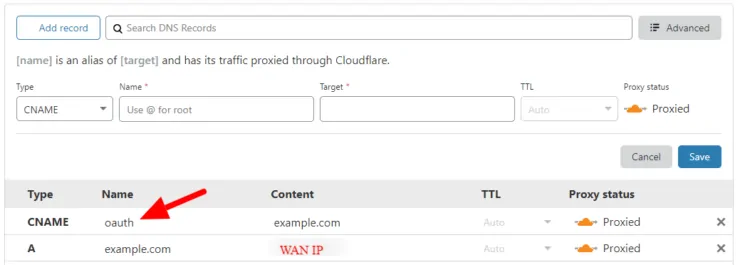
Note that DNS records can take several ours to propagate and become active.
Step 2: Configure Google OAuth2 Service
With the DNS records created, let us move on the configuring Google OAuth.
Step 2a: Create a Google Project
We need to create a Google Project that will contain our Web App, Consent Screen, and Credentials. This process is very similar to what is described in our guide on setting up Google Assistant for Home Assistant.
Navigate to the Google Cloud Developers Console and make sure that you are signed into the correct Google account that you want to use (This will normally be your own e-mail address).
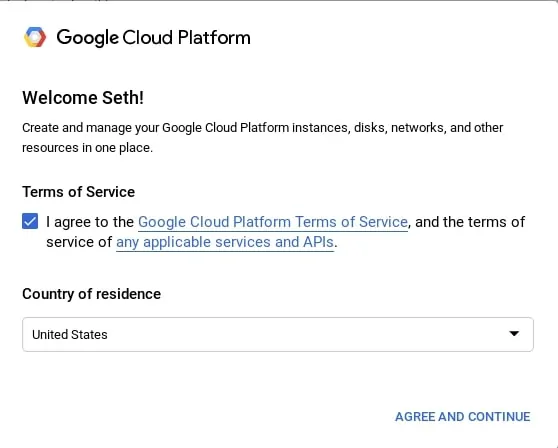
If prompted, you'll need to agree to the Google Cloud Platform Terms of Service in order to use their API:
It's free to use Google's OAuth service, so we can Dismiss the free trial for now. Click on Select a project and New project.
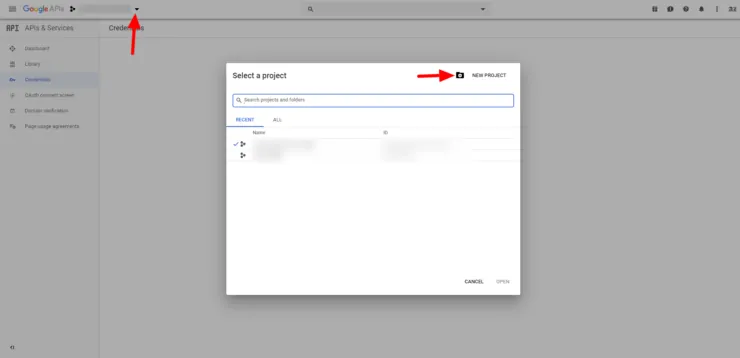
Enter a unique name to identify the project, such as “Traefik Authentication”. Click Create.

Step 2b: Create OAuth Credentials
Now that our project has been created, we need to create a client ID and client secret in order to authenticate with Google. Choose our Traefik Authentication project, and under the Navigation menu select APIs & Services > Credentials. Click on Create Credentials > OAuth client ID.
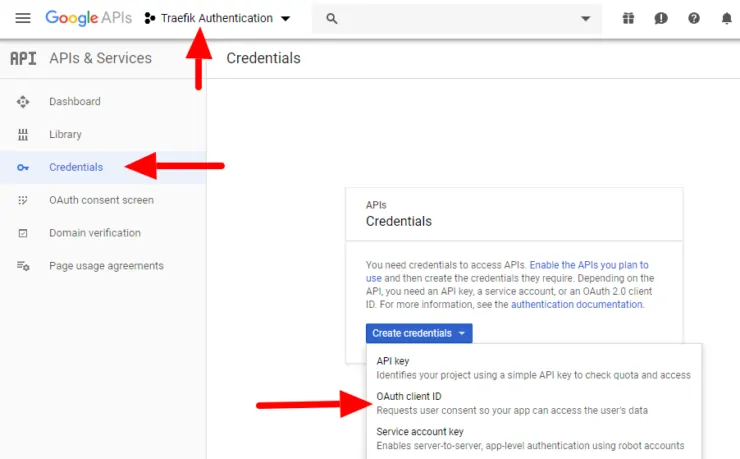
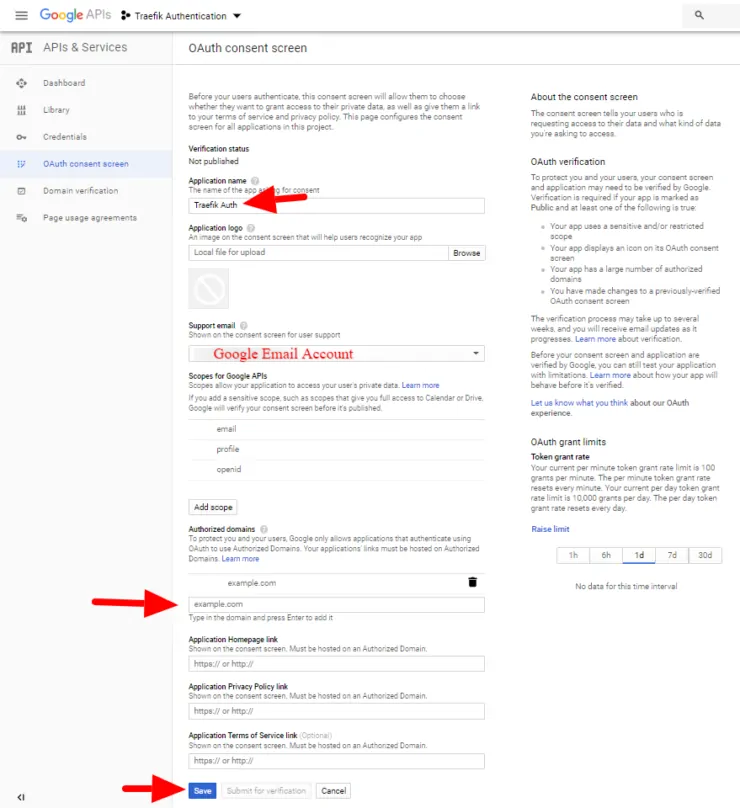
Step 2c: Configure the Consent Screen
Once you click OAuth Client ID, you will see the note to configure the consent screen as shown below. A configuring a consent screen is required before proceeding.

If you're not automatically prompted, select the OAuth consent screen from the left panel.
Choose a name for your app, such as "Traefik Auth", then under the Authorized domains section enter your domain, for instance, “example.com”. Make sure that you press Enter to add it, and then click Save.
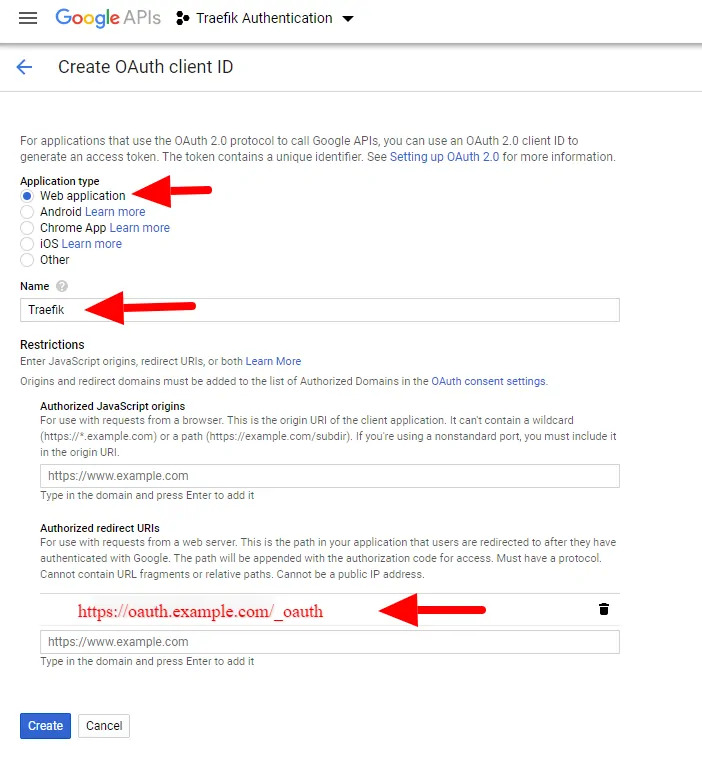
After hitting Save, you will return back to creating an OAuth Client ID.
Step 2d: Create the OAuth client ID
Now select the Web Application type and enter a name for your web application, such as “Traefik”. In addition, you'll need to enter your Authorized redirect URI as https://oauth.example.com/_oauth. Make sure that you press Enter to add it, and then click Save.
The credentials for our SSO for Docker have been created! Copy and save the client ID and client secret; we'll need to use them in the next step.

Step 3: Setup Traefik Forward Authentication
Now that the OAuth credentials have been configured, the last thing to do is set up the OAuth container. Sign-in to your local machine, or use one of the several awesome SSH clients to sign in remotely.
Recommended Guides on Docker:
Make sure to stop Traefik (if necessary), and edit your docker-compose file to add the Traefik labels and OAuth container.
Be the 1 in 200,000. Help us sustain what we do.You will gain benefits such as Deployarr access, discord roles, exclusive content, ad-free browsing, and more.🔥 Holiday Sale! 25% Off Platinum Membership$399.99$299.99 (ends December 31).Join the Geek Army (starting from just $1.67/month)
OAuth Forward Authentication for Traefik 2
As mentioned before, Traefik 2 is now the recommended reverse proxy version. So let's check it out first. The assumption is that you have already read and followed most of my Traefik 2 guide and are reading this post just to implement Google OAuth. If you are using Traefik v1, skip to the next section.
By using external middlewares and chains we can simplify our configuration, avoid errors, and also makes our config much easier to update. We can reuse our security headers to improve data transmission security. [Read: 20 Docker Security Best Practices – Hardening Traefik Docker Stack]
Step I: Create OAuth Middleware and Chain
Let us now specify a middleware for OAuth. Open middlewares.toml file and add the following lines below what is already present:
  [http.middlewares.middlewares-oauth]
    [http.middlewares.middlewares-oauth.forwardAuth]
      address = "http://oauth:4181" # Make sure you have the OAuth service in docker-compose.yml
      trustForwardHeader = true
      authResponseHeaders = ["X-Forwarded-User"]
In addition, let us create a new middleware chain for services that will use Google OAuth. Open middleware-chains.toml and add the following lines below what is already present:
  [http.middlewares.chain-oauth]
    [http.middlewares.chain-oauth.chain]
      middlewares = [ "middlewares-rate-limit", "middlewares-secure-headers", "middlewares-oauth"]
Next, let us setup the OAuth Forwarder container.
Step II: Add OAuth Forwarder Container
Open your docker-compose file (docker-compose-t2.yml) that was created based on our previous Traefik 2 tutorial and add the following to it.
  # Google OAuth - Single Sign On using OAuth 2.0 for Traefik 2.2
  oauth:
    container_name: oauth
    image: thomseddon/traefik-forward-auth:latest
    # image: thomseddon/traefik-forward-auth:2.1-arm # Use this image with Raspberry Pi
    restart: unless-stopped
    networks:
      - t2_proxy
    security_opt:
      - no-new-privileges:true
    environment:
      - CLIENT_ID=$GOOGLE_CLIENT_ID
      - CLIENT_SECRET=$GOOGLE_CLIENT_SECRET
      - SECRET=$OAUTH_SECRET
      - COOKIE_DOMAIN=$DOMAINNAME_CLOUD_SERVER
      - INSECURE_COOKIE=false
      - AUTH_HOST=oauth.$DOMAINNAME_CLOUD_SERVER
      - URL_PATH=/_oauth
      - WHITELIST=$MY_EMAIL
      - LOG_LEVEL=warn
      - LOG_FORMAT=text
      - LIFETIME=2592000 # 30 days
      - DEFAULT_ACTION=auth
      - DEFAULT_PROVIDER=google
    labels:
      - "traefik.enable=true"
      ## HTTP Routers
      - "traefik.http.routers.oauth-rtr.entrypoints=https"
      - "traefik.http.routers.oauth-rtr.rule=Host(`oauth.$DOMAINNAME_CLOUD_SERVER`)"
      - "traefik.http.routers.oauth-rtr.tls=true"
      ## Middlewares
      - "traefik.http.routers.oauth-rtr.middlewares=chain-oauth@file"
      ## HTTP Services
      - "traefik.http.routers.oauth-rtr.service=oauth-svc"
      - "traefik.http.services.oauth-svc.loadbalancer.server.port=4181"
Notice that we are using the OAuth middleware chain (chain-oauth) here for authentication instead of basic auth. Before starting the OAuth service, ensure that you have added the following environmental variables to your .env file:
- Image: Use the correct image for your system's architecture. For example, Raspberry Pi has a different image tag.
- GOOGLE_CLIENT_ID and GOOGLE_CLIENT_SECRET: Obtained by following our Traefik Google OAuth 2.0 guide.
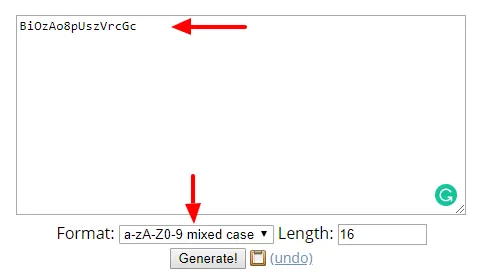
- OAUTH_SECRET: This is used to sign the cookie and should be random. Generate a random secret with:
openssl rand -hex 16
Alternatively, you may use an online service like this one, to generate your random secret.
- MY_EMAIL: Google email id which will be used to authenticate.
- URL_PATH: This is the same path as the Authorized redirect URI (https://oauth.example.com/_oauth) as explained in our Traefik Google OAuth 2.0 guide.
If you want more than one email id to be able to authenticate and reach your services, use different variables (eg. MY_EMAIL2, MY_EMAIL3, etc.) and list them all separated by commas for WHITELIST:
- WHITELIST=$MY_EMAIL,$MY_EMAIL2,$MY_EMAIL3
You may also change the duration (LIFETIME) for which the authentication is valid from 30 days specified in seconds to another duration. Optionally, the rest of the environment variables defined for the oauth can be configured to your liking (if you know what you are doing).
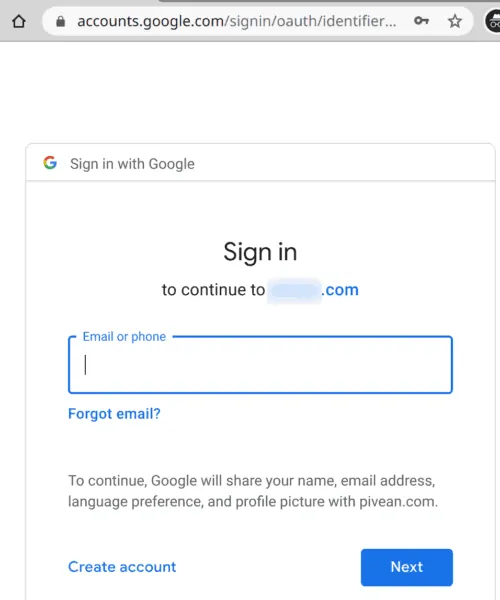
Once done, use the docker-compose up command listed above or the shortcut dcup2 if you have bash_aliases setup. You should now be redirected to Google OAuth login page before reaching the service.
Step II: Adding Google OAuth for Docker Services
Let's take the example of Traefik 2 Dashboard. At this point (previous guide), it is setup to use basic authentication. Let us now change it to use Google OAuth. This is now as simple as changing chain-basic-auth to chain-oauth in the docker-compose file (shown below).
- "traefik.http.routers.traefik-rtr.middlewares=chain-oauth@file"
So there you go, Docker Traefik 2 setup with Google OAuth 2.
Once done, use the docker-compose up command (or the shortcut dcup2 if you have bash_aliases setup as described in my Docker Traefik 2 tutorial).
Step III: Adding OAuth to Other (Non-Docker) Services
Traefik’s File provider allows us to add dynamic routers, middlewares, and services. Earlier we only used our rules directory to add middlewares, but we can easily add an external host by adding a new file to this directory. Traefik will auto-detect and update its configurations.
[http.routers]
  [http.routers.hassio-rtr]
      entryPoints = ["https"]
      rule = "Host(`hassio.example.com`)"
      service = "hassio-svc"
      middlewares = ["chain-oauth"]
      [http.routers.hassio-rtr.tls]
        certresolver = "dns-cloudflare"

[http.services]
  [http.services.hassio-svc]
    [http.services.hassio-svc.loadBalancer]
      passHostHeader = true
      [[http.services.hassio-svc.loadBalancer.servers]]
        url = "http://HASSIO-IP:8123"
As you can see there are three sections: routers, middlewares, and services. Home Assistant Supervised frontend will be available at hassio.example.com. The service (backend) will be available at HASSIO-IP:8123, which is the IP address of the system that runs HASSio (or Home Assistant Supervised).
Since the rules directory is dynamic, simply by adding this file to that directory we have created the route. If you’ve added an external host you should be able to connect to your service now, without restarting Traefik!
OAuth Forward Authentication for Traefik 1
Traefik v1 is now frozen. You can find the last version of the our configuration in our GitHub Repo. If you do not use Traefik 1, you can skip this section.
Step A: Add OAuth Container
Open your docker-compose file that was created based on our previous Traefik tutorial (docker-compose-t1.yml) and add the following to it.
  # Google OAuth - Single Sign On using OAuth 2.0 for Traefik v1.7
  oauth:
    image: thomseddon/traefik-forward-auth:latest
    container_name: oauth
    restart: always
    networks:
      - t1_proxy
    environment:
      PROVIDERS_GOOGLE_CLIENT_ID: $GOOGLE_CLIENT_ID
      PROVIDERS_GOOGLE_CLIENT_SECRET: $GOOGLE_CLIENT_SECRET
      SECRET: $OAUTH_SECRET
      COOKIE_DOMAIN: $DOMAINNAME_CLOUD_SERVER
      INSECURE_COOKIE: "false"
      AUTH_HOST: oauth.$DOMAINNAME_CLOUD_SERVER
      URL_PATH: /_oauth
      WHITELIST: $MY_EMAIL
      LOG_LEVEL: warn
      LIFETIME: 2592000 # 30 days
    labels:
      traefik.enable: "true"
      traefik.backend: oauth
      traefik.port: 4181
      traefik.frontend.rule: Host:oauth.$DOMAINNAME_CLOUD_SERVER
      traefik.frontend.headers.SSLHost: oauth.$DOMAINNAME_CLOUD_SERVER
      traefik.docker.network: t1_proxy
      traefik.frontend.passHostHeader: "true"
      traefik.frontend.headers.SSLForceHost: "true"
      traefik.frontend.headers.customResponseHeaders: X-Robots-Tag:noindex,nofollow,nosnippet,noarchive,notranslate,noimageindex
      traefik.frontend.headers.SSLRedirect: "true"
      traefik.frontend.headers.browserXSSFilter: "true"
      traefik.frontend.headers.contentTypeNosniff: "true"
      traefik.frontend.headers.forceSTSHeader: "true"
      traefik.frontend.headers.STSSeconds: 315360000
      traefik.frontend.headers.STSIncludeSubdomains: "true"
      traefik.frontend.headers.STSPreload: "true"
      traefik.frontend.auth.forward.address: "http://oauth:4181"
      traefik.frontend.auth.forward.authResponseHeaders: X-Forwarded-User
      traefik.frontend.auth.forward.trustForwardHeader: "true"
The environmental variables used are exactly the same as those for Traefik 2. Therefore, to configure or tweak these refer to the previous sections in this guide.
Step B: Adding Google OAuth for Docker Services
Alright, let’s test it out! With the OAuth container added to our stack, we can now add the Traefik labels to the rest of the services to enable Traefik forward authentication for them. As an example, let's replace the basic authentication for Traefik dashboard, defined in our previous Traefik guide, with Google OAuth2.
To accomplish this, add the following 3 traefik labels to the services:
      traefik.frontend.auth.forward.address: "http://oauth:4181"
      traefik.frontend.auth.forward.authResponseHeaders: X-Forwarded-User
      traefik.frontend.auth.forward.trustForwardHeader: "true"
The entire docker-compose for Traefik should look something like this (basic authentication disabled by commenting out with a #):
  # Traefik - Reverse Proxy
  # Touch (create empty files) traefik.toml and acme/acme.json. Set acme.json permissions to 600.
  traefik:
    image: traefik:maroilles
    container_name: traefik
    restart: unless-stopped
    networks:
      - default
      - t1_proxy
    ports:
      - "80:80"
      - "443:443"
      # - "$TRAEFIK_DASHBOARD_PORT:8080"
    domainname: $DOMAINNAME_CLOUD_SERVER
    dns:
      - 1.1.1.1
    volumes:
      - /var/run/docker.sock:/var/run/docker.sock:ro
      - $USERDIR/docker/traefik1:/etc/traefik
      - $USERDIR/docker/shared:/shared
    environment:
      CF_API_EMAIL: $CLOUDFLARE_EMAIL
      CF_API_KEY: $CLOUDFLARE_API_KEY
      # DUCKDNS_TOKEN: $DUCKDNS_TOKEN
    labels:
      traefik.enable: "true"
      traefik.backend: traefik
      traefik.protocol: http
      traefik.port: 8080
      traefik.frontend.rule: Host:traefik.$DOMAINNAME_CLOUD_SERVER
      traefik.frontend.headers.SSLHost: traefik.$DOMAINNAME_CLOUD_SERVER
      traefik.docker.network: t1_proxy
      traefik.frontend.passHostHeader: "true"
      traefik.frontend.headers.SSLForceHost: "true"
      traefik.frontend.headers.SSLRedirect: "true"
      traefik.frontend.headers.browserXSSFilter: "true"
      traefik.frontend.headers.contentTypeNosniff: "true"
      traefik.frontend.headers.forceSTSHeader: "true"
      traefik.frontend.headers.STSSeconds: 315360000
      traefik.frontend.headers.STSIncludeSubdomains: "true"
      traefik.frontend.headers.STSPreload: "true"
      traefik.frontend.headers.customResponseHeaders: X-Robots-Tag:noindex,nofollow,nosnippet,noarchive,notranslate,noimageindex
      traefik.frontend.headers.customFrameOptionsValue: "allow-from https:$DOMAINNAME_CLOUD_SERVER"
      # traefik.frontend.auth.basic.users: '$HTTP_USERNAME:$HTTP_PASSWORD'
      traefik.frontend.auth.forward.address: "http://oauth:4181"
      traefik.frontend.auth.forward.authResponseHeaders: X-Forwarded-User
      traefik.frontend.auth.forward.trustForwardHeader: "true"
Save the docker-compose files and update your stack using the docker-compose up -d command as described in our previous docker guide.
Now try to reach Traefik's dashboard on a web browser. You should be directed to the Google sign-in page.
To put other docker services behind OAuth, you simply need to add the following three Traefik v1 labels to the service:
      traefik.frontend.auth.forward.address: "http://oauth:4181"
      traefik.frontend.auth.forward.authResponseHeaders: X-Forwarded-User
      traefik.frontend.auth.forward.trustForwardHeader: "true"
The auth.forward.address label tells Traefik where to send the request. Here we are taking advantage of Docker's internal networking, sending the request to our container named oauth at port 4181.
Step C: Adding OAuth to Other Services
OAuth works great for all docker apps. What if you have some non-docker apps that are running on your docker host or any other system in your network for that matter (eg. PiHole, Webmin, Synology DSM, etc.)?
You can put non-docker apps behind Google OAuth2 as well.
All you have to do is to create Traefik rules just as in Traefik v2. You can see my example on GitHub.
So if you have configured Traefik to uses rules folder (in traefik.toml) then create a new file (eg. appname.toml) and add the following to it. Be sure to replace what needs to be replaced.
# Replace APPNAME, LAN-IP, PORT, example.com
[backends]
  [backends.backend-APPNAME]
    [backends.backend-APPNAME.servers]
      [backends.backend-APPNAME.servers.server-APPNAME-ext]
        url = "http://LAN-IP:PORT"
        weight = 0
[frontends]
  [frontends.frontend-APPNAME]
    backend = "backend-APPNAME"
    passHostHeader = true
    [frontends.frontend-APPNAME.routes]
          [frontends.frontend-APPNAME.routes.route-APPNAME-ext]
        rule = "Host:APPNAME.example.com"
    [frontends.frontend-APPNAME.headers]
      SSLRedirect = true
      SSLHost = "APPNAME.example.com"
      SSLForceHost = true
      STSSeconds = 315360000
      STSIncludeSubdomains = true
      STSPreload = true
      forceSTSHeader = true
      frameDeny = true
      contentTypeNosniff = true
      browserXSSFilter = true
      customFrameOptionsValue="allow-from https:example.com"
    [frontends.frontend-APPNAME.auth]
      headerField = "X-WebAuth-User"
      [frontends.frontend-APPNAME.auth.forward]
        address = "http://oauth:4181"
        trustForwardHeader = true
        authResponseHeaders = ["X-Forwarded-User"]
Now any time you access these apps, you should be presented with the Google login.
Bypassing OAuth / Selective Authentication
I use NZB360 app on Android for remotely managing SABnzbd, Sonarr, Radarr, etc. When these apps are behind OAuth, I could not use the NZB360 app remotely. There are other such apps that do not support OAuth (eg. LunaSea).
This was until I discovered rule-based OAuth bypass as described in Auth Forwarder's GitHub page.
You can bypass authentication based on specific keys in the Headers, regular expressions, host, path, query, and more.
Identifying Bypass Rule
How can we figure out what specific rules to use?
This can be quite tricky. As discussed in the link below, a generic way to bypass authentication would be using the path. For example, NZB360 app requests have /api in the path. You may disable authentication for all those requests.
But this can loosen the security and I recommend setting specific rules. For example, if the request header contains the SABnzbd API key then bypass authentication.
Then the next question, how did I know to look for SABnzbd API key? This requires some trial and error.
First, ensure SABNzbd is behind OAuth. Then set the OAuth container's log level to trace in the environmental variable:
LOG_LEVEL: trace
Then check the docker logs for the OAuth container (Basic Docker Commands). This will spit out pretty much everything going on in that container, which can be overwhelming. You can trim this down to your app of interest by piping in the grep sabnzbd command.
Now when I try to open SABnzbd through the app of interest, in my case NZB360, it creates an OAuth log entry like the one below.

Specifying OAuth Bypass Rule
Notice the the uri in the above log screenshot contains the SABnzbd API key. So you can set the bypass use based on this, as follows:
command: --rule.sabnzbd.action=allow --rule.sabnzbd.rule="HeadersRegexp(`X-Forwarded-Uri`, `$SABNZBD_API_KEY`)"

For Radarr, Sonarr, Lidarr, etc, you may use the following rule (should work for NZB360 or similar apps):
command: --rule.radarr.action=allow --rule.radarr.rule="Headers(`X-Api-Key`, `$RADARR_API_KEY`)"
For the full docker compose, check my GitHub Repo. All the above codes assume that you followed my previous Traefik guides and the API keys are defined correctly in your .env file. Otherwise, the above rules won't work.
Restart the OAuth container and try to access SABnzbd now via the app and browser. The browser should present the OAuth login and the App should take you to the service directly.
There several more ways to specify rules. Check out OAuth Forwarders to GitHub page for all available options.
Alternative Bypass Methods
Although OAuth Forwarder allows bypassing, I do not prefer/recommend this method.
Traefik has built-in mechanisms for conditional bypassing. If you are interested in this, check out the bypassing section on my Traefik 2 guide.
I also recommend you to check out the docker-compose examples I have for apps such as SABnzbd, Radarr, Sonarr, and Lidarr in my GitHub Repo.
OAuth and Security Headers
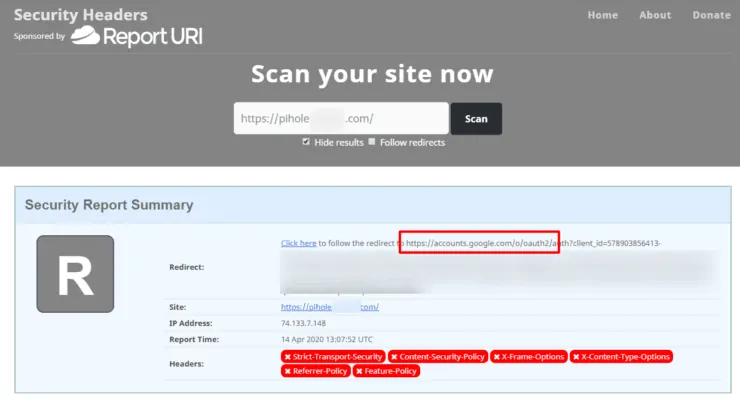
One thing to note about using Google’s OAuth service with your security headers. If the service is behind OAuth and you’re trying to check whether your security headers are applied, you will probably receive a lower rating. This caused me a lot of concern at first, until realizing that the headers I was seeing were not actually for my service, but for Google’s.
FAQs
What is the difference between OIDC and OAuth?
OIDC or OpenID Connect (OIDC) is a protocol for authentication. It is a set of specifications based on OAuth 2.0, which adds extra features. In essence, OIDC is the authentical protocol while OAuth is the set of specifications for resource access and sharing.
Are there other (more private) alternatives to Google OAuth?
Yes. Authelia and Keycloak are two I can think of. IMHO, Authelia was much simpler to setup. Both I and Seth (co-author of this and Traefik 2 guide) started with OAuth and now have moved completely to Authelia. [Read: Authelia Tutorial – Protect your Docker Traefik stack with Private MFA]
Final Thoughts
Implementing Google OAuth with Traefik forward authentication has been one of the easiest and most secure ways for me to protect my docker services. By whitelisting accounts and implementing Google’s 2FA, I have confidence that I will be the only one that's able to access those services.
I hope you enjoyed learning about Google OAuth with Traefik for Docker services! If you have any questions feel free to leave a comment below.

![Traefik Forward Auth Guide - Simple, Secure Google SSO [2022] OAuth Featured Image_final](https://www.smarthomebeginner.com/images/2019/10/OAuth-Featured-Image_final.jpg)
![Google OAuth Traefik Forward Auth [2024]: Most Convenient MFA Google Oauth](https://www.smarthomebeginner.com/images/2024/04/Docker-Series-07-Google-OAuth.png)
