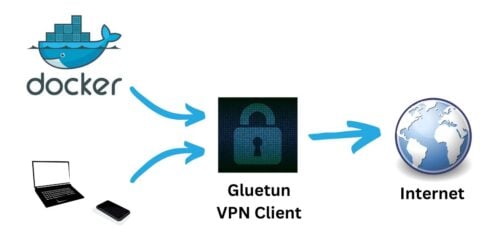
So, have you heard of the Gluetun Docker image? It's a lightweight VPN client that can be used to connect to multiple VPN services with ease. Self-proclaimed "Swiss Army knife for VPNs", but appropriately so.
I have been using TransmissionBT docker image, with OpenVPN built in. It felt clunky and finicky. Although it served its purpose, I was always looking for a universal VPN client that could provide VPN to docker containers as well as non-docker apps. [Read: 60+ Best Docker Containers for Home Server Beginners 2023]
Gluetun was the answer. Here is the icing, with the Gluetun killswitch, when VPN disconnects all the containers that rely on the VPN are cut off from the network, ensuring privacy.
This guide will cover everything needed to set up Gluetun using Docker. I will also provide you Gluetun docker-compose I use as well as the most common use cases. We will also look at some of the most common issues you may face and the solutions to them. So be sure to check out the entire guide.
Table of Contents
- What is Gluetun?
- Gluetun Docker Setup
- Accessing Docker Servers Behind VPN
- Autohealing
- FAQs
- Conclusions
What is Gluetun?
With Gluetun, you can easily switch between VPN providers without having to configure your network settings every time. It supports various VPN protocols, including OpenVPN and WireGuard, so you can choose the one that works best for you.
But that's not all! Gluetun also includes a kill switch feature that will disconnect you from the internet if your VPN connection drops. This can help prevent your real IP address from being exposed if your VPN connection suddenly fails. [Read: What is a VPN kill switch and how does a VPN kill switch work?]
Plus, Gluetun is open source, so you can tinker with the code and customize it to your heart's content. It's like having your own personal VPN Swiss Army knife that you can modify and adapt to your needs.
Gluetun Docker Setup
If you are reading this guide, chances are you already have a wonderful Docker stack running. We are going to run a few basic commands and our Gluetun docker container should be up in just a few min.
Requirements for Gluetun Setup
1. Docker and Docker Compose
If you do not have these yet, install Docker and Docker Compose, setup up the Docker environment, and return to this guide to continue.
2. VPN Service
I strongly recommend Surfshark VPN because:
- Wireguard support - faster speeds compared to OpenVPN.
- One of the very few VPN providers officially supported by Gluetun for Wireguard protocol.
- Less than half the cost of other Wireguard VPN providers.
- OpenVPN support too if you prefer that instead.
I ditched IPVanish after a few years and tried Mullvad, which was great. But at less than half the cost, I am getting the same features and performance with SurfShark.

This guide is written for Surfshark but the Gluetun VPN client supports various providers, as shown above. The procedure should be similar for any provider.
Step 1. Create VPN Provider Credentials for Gluetun Docker
Wireguard is the protocol I would recommend over OpenVPN described below. Check out our Wireguard guides to understand what is Wireguard and why it is better than OpenVPN:
Other Posts in the Wireguard Series:
- Wireguard VPN Intro in 15 min: Amazing new VPN Protocol
- Complete Wireguard Setup in 20 min – Better Linux VPN Server
- Wireguard Windows Setup: Powerful VPN for Windows
- Wireguard Mac OS Client Setup – The sleek new VPN
- Wireguard Android Client Setup – Simple and Secure VPN
- Ultimate WireGuard Docker Compose: with CF and Traefik Support
Assuming that you have Docker ready and a good Wireguard-supported VPN, let's proceed to Gluetun Docker setup.
1a. Wireguard Credentials
First, you will have to log in to your VPN provider and create Wireguard credentials (configuration file). As said before, I am using Surfshark as an example, but you may use any other Wireguard VPN provider supported by Gluetun.
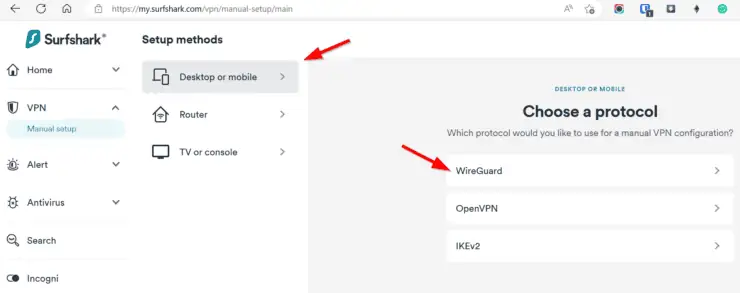
Choose VPN -> Manual Setup as shown below.
Next, under Desktop or mobile, pick I don't have a key pair.
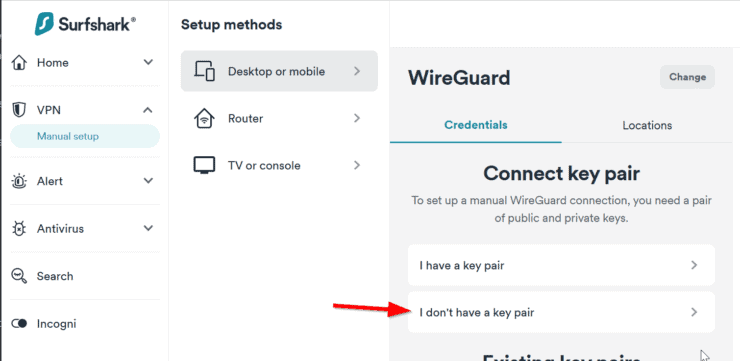
Hit Next, and name your key pair (I creatively named mine Gluetun). Hit Next again, followed by Generate a new key pair.
You do not need the public key. But copy/note down the private key.
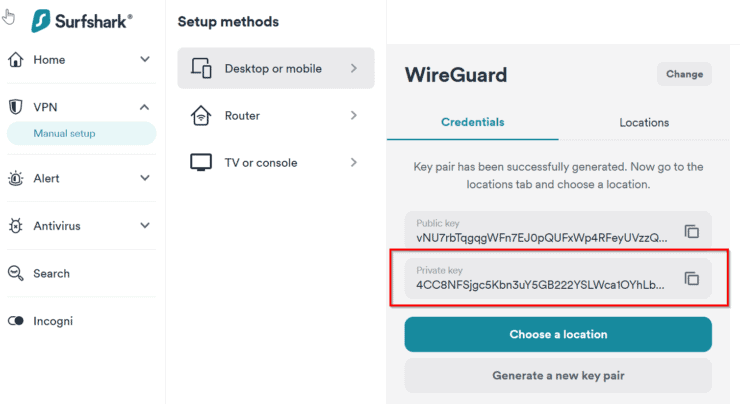
Optionally, pick a location as shown below.

Download the Wireguard configuration file to a known location on your computer.
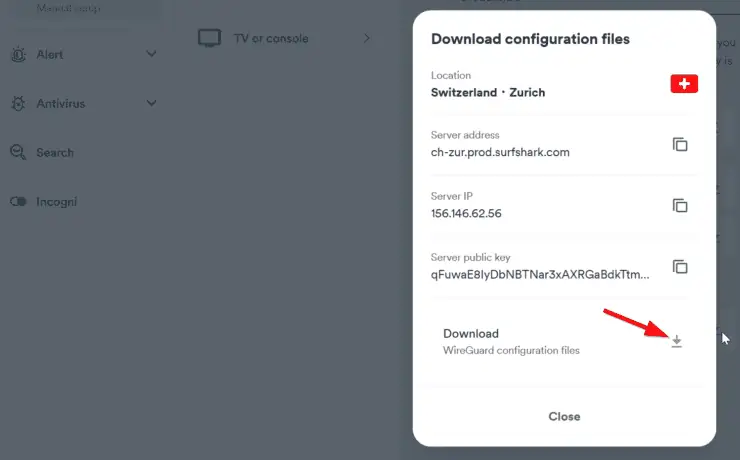
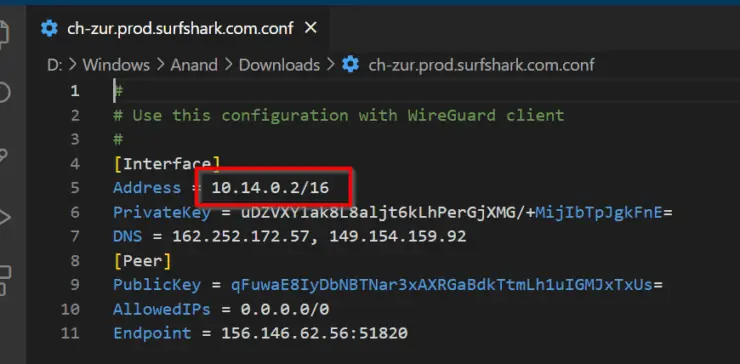
Open the downloaded file and note down the Address, as highlighted below.
For Gluetun Docker Wireguard configuration, this is all you need for now.
Be the 1 in 200,000. Help us sustain what we do.You will gain benefits such as Deployarr access, discord roles, exclusive content, ad-free browsing, and more.🔥 Holiday Sale! 25% Off Platinum Membership$399.99$299.99 (ends December 31).Join the Geek Army (starting from just $1.67/month)
1b. OpenVPN Credentials
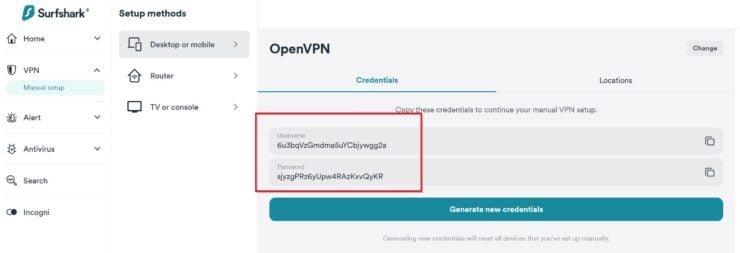
If you prefer to use OpenVPN instead of Wireguard, all you need is the username and password. You may generate pretty much the same way as described above but choose OpenVPN instead of Wireguard. Note down the username and password.
The process should be the same for any other VPN provider. In fact, in this Gluetun Docker guide, I am going to use NordVPN, which is a great OpenVPN provider.
Step 2. Gluetun Docker-Compose Setup
As in all of my Docker guides, we are going to use Docker-Compose to setup Gluetun. If you are reading this, you probably are not completely new to Docker but I strongly recommend you check my basic Docker guide before proceeding.
First, as described in my Docker guide, create the following environmental variables:
SURFSHARK_WG_PRIVATE_KEY=Private key generated previously
Or,
NORDVPN_USERNAME=OpenVPN username
NORDVPN_PASSWORD=Open VPN password
You only need one of the above, depending on whether you choose Wireguard or OpenVPN.
Next, here is the Gluetun docker-compose to add to your docker-compose.yml file:
  # Gluetun - VPN Client for Docker Containers and More
  gluetun:
    image: qmcgaw/gluetun
    container_name: gluetun
    restart: always
    cap_add:
      - NET_ADMIN
    devices:
      - /dev/net/tun
    volumes:
      - $DOCKERDIR/appdata/gluetun:/gluetun
    environment:
      TZ: $TZ
      # Wireguard
      VPN_SERVICE_PROVIDER: surfshark
      VPN_TYPE: wireguard
      WIREGUARD_PRIVATE_KEY: $SURFSHARK_WG_PRIVATE_KEY
      WIREGUARD_ADDRESSES: 10.14.0.2/16
      # SERVER_COUNTRIES: Netherlands
      # # OpenVPN
      # VPN_SERVICE_PROVIDER: nordvpn
      # VPN_TYPE: openvpn
      # OPENVPN_USER: $NORDVPN_USERNAME
      # OPENVPN_USER: $NORDVPN_PASSWORD
Few comments on the above Gluetun docker-compose snippet:
- As with any VPN container, Gluetun needs NET_ADMIN capabilities to create the required adapters on the host machine.
- You also need to ensure /dev/net/tun is available. If you are on a bare-metal server this is not an issue. But if your Docker host is on a Proxmox LXC container, like in my situation, ensure that you make /dev/net/tun available inside the container with right permissions.
- Gluetun stores the list of available VPN servers in the mounted volume. You do not need to define the volumes if you do not want to see the list of servers (I don't).
- I commented out the environmental variables for OpenVPN. Enable OpenVPN and comment out Wireguard variables, if you need OpenVPN instead.
- For Wireguard, specify WIREGUARD_PRIVATE_KEY, which is stored in the environmental variable SURFSHARK_WG_PRIVATE_KEY we created above. WIREGUARD_ADDRESSES is the address we noted down from the previously downloaded configuration file.
- For OpenVPN, specify OPENVPN_USER and OPENVPN_USER using the environmental variables we created previously.
- If your VPN provider is not Surfshark or NORDVPN, change the VPN_SERVICE_PROVIDER. If your VPN provider is not supported, check custom providers.
- Optionally, specify a VPN server location using SERVER_COUNTRIES.
- Above docker-compose for Gluetun will slightly differ from what you will find in my GitHub Repo because in my setup I use Docker extension fields to minimize repetitions. The restart policy, along with other network and security policies are specified under the field common-keys-core.
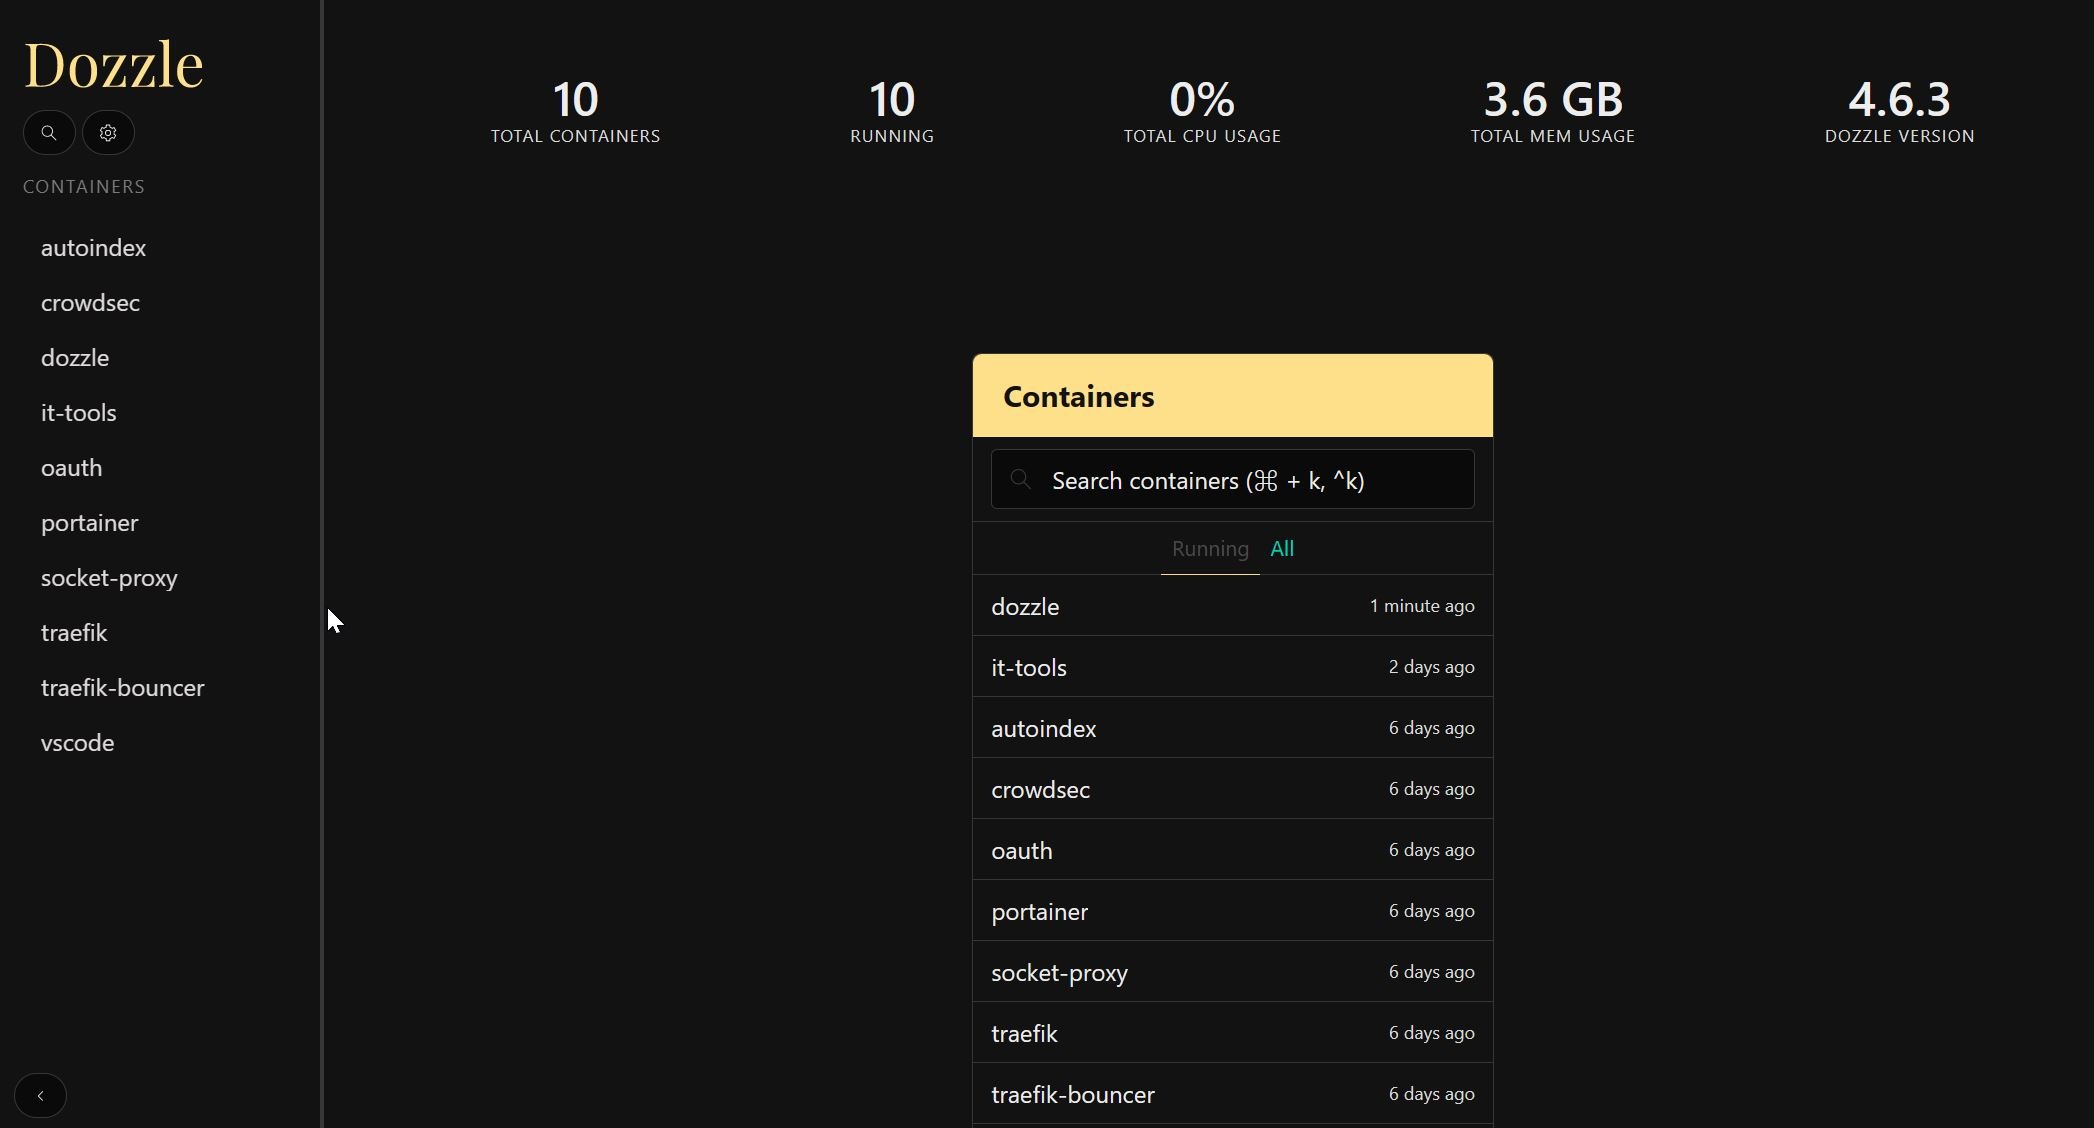
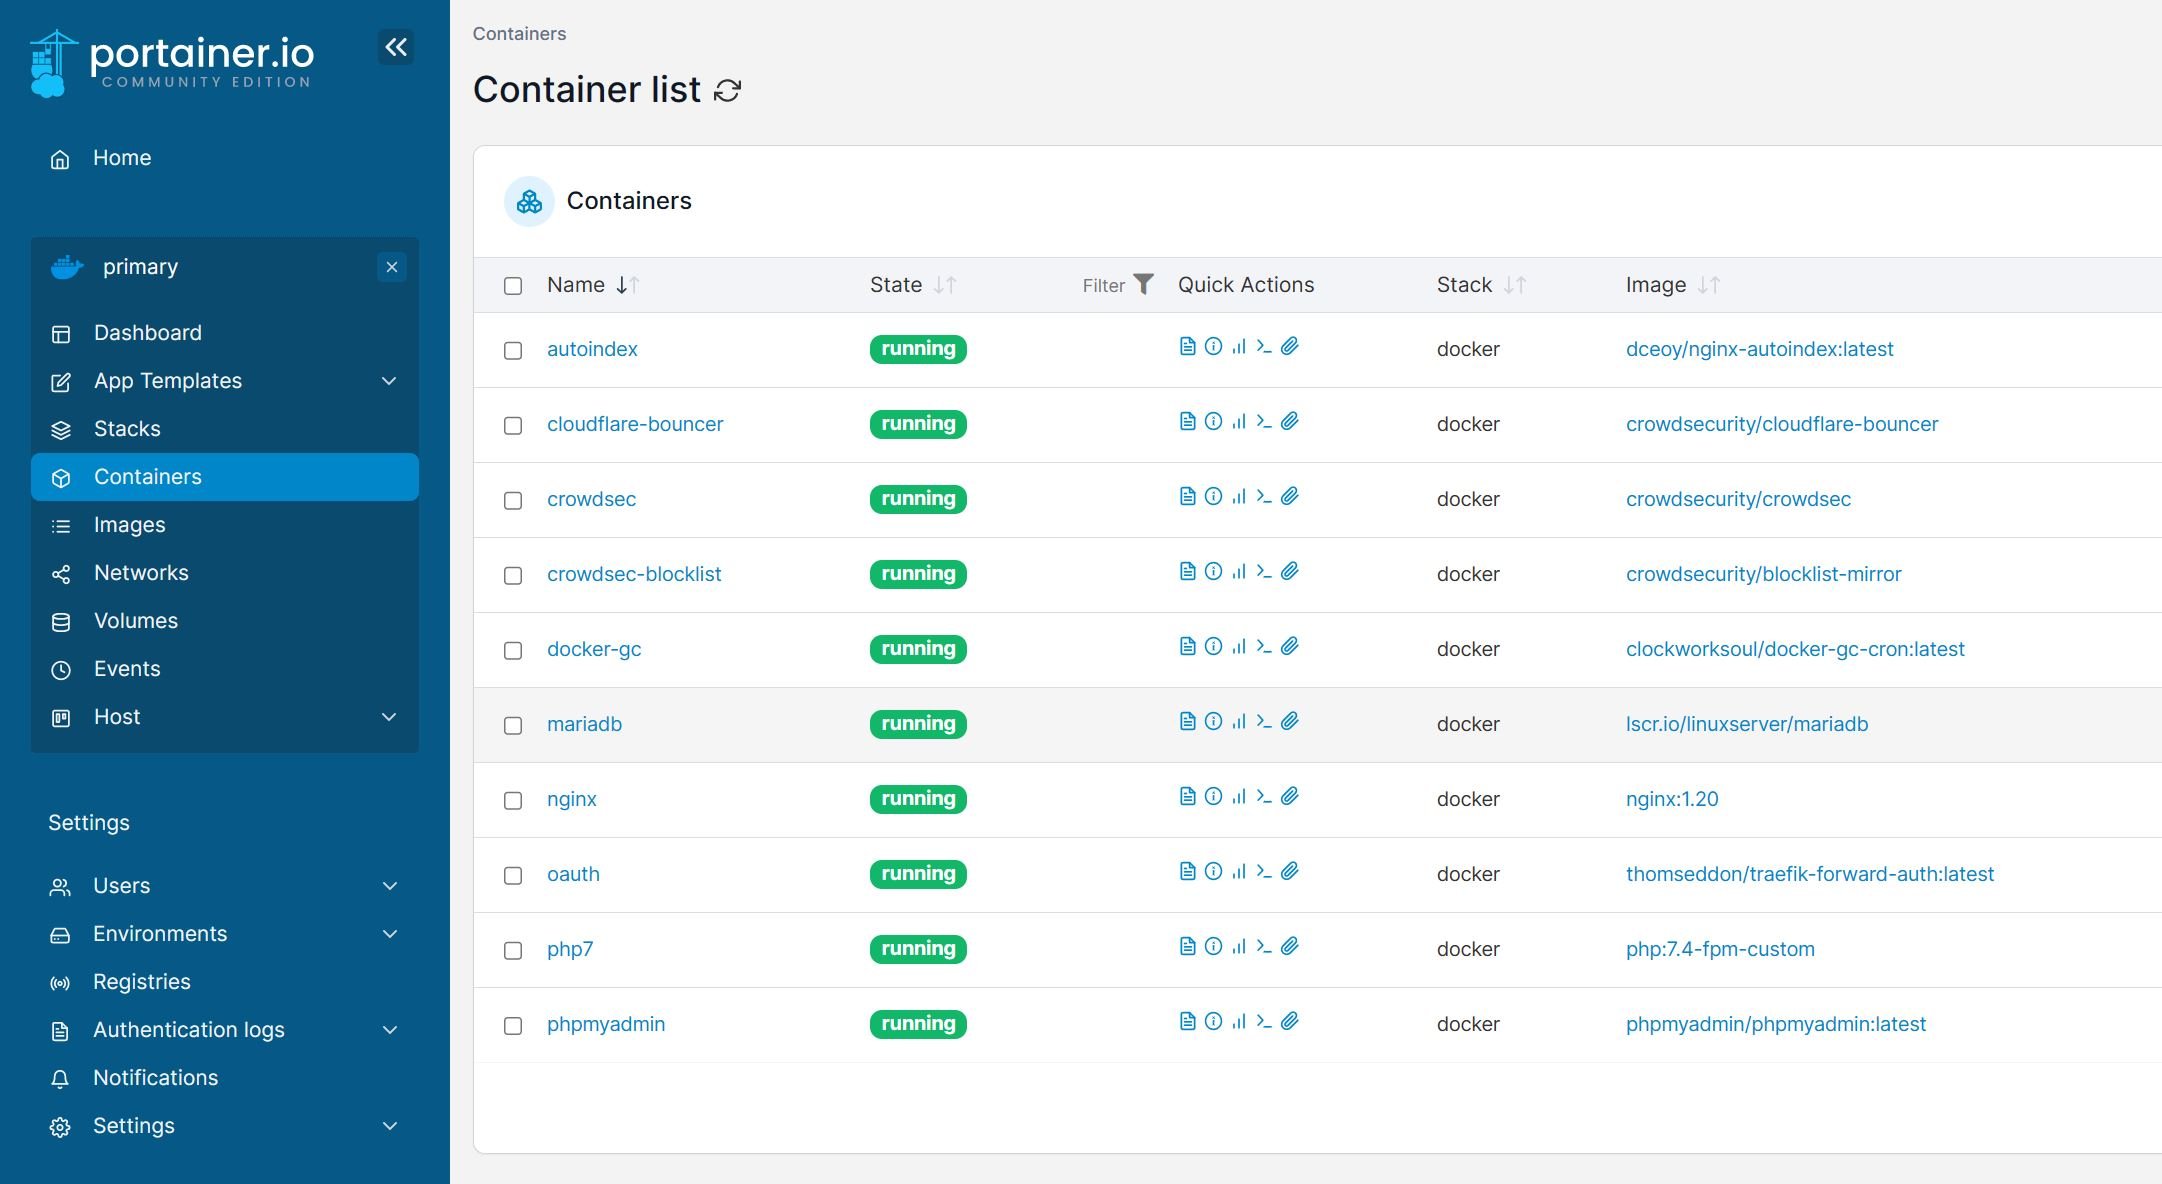
Save the Gluetun docker-compose file and exit. Start the Gluetun docker container and follow the logs. You may use Portainer or Dozzle to follow the logs in a GUI if you prefer.

You should see something similar to what is shown above. I specified the country to be "Netherlands" while testing and I was connected to a server there.
I was able to reconnect to the Netherlands server after a few minutes.
You may observe similar behaviors with other VPN providers too.
Step 3. Putting Docker Containers behind Gluetun
Now comes the interesting part. But what containers or services should consider putting behind a VPN? Be sure to check the FAQs below for the answer.
In this Docker Gluetun tutorial, I am going to put my dockerized Qbittorrent behind Surfshark Wireguard VPN on Gluetun. We do that by specifying the following for qBittorrent container's network:
network_mode: "service:gluetun"
The whole docker-compose for qBittorrent should look like this:
  # qBittorrent - Torrent downloader
  qbittorrent:
    <<: *common-keys-apps # See EXTENSION FIELDS at the top
    image: lscr.io/linuxserver/qbittorrent:latest
    container_name: qbittorrent
    network_mode: "service:gluetun"
    # ports:
    #   - "$QBITTORRENT_PORT:8080" # Explosed via gluetun
    volumes:
      - $DOCKERDIR/appdata/qbittorrent:/config
      - $EXTDRIVE/downloads:/data/downloads # Ensure that the downloads folder is set to /data/downloads in qBittorrent
    environment:
      <<: *default-tz-puid-pgid
      UMASK_SET: 002
Let me explain a few things:
- As mentioned, I use Docker extension fields. common-keys-apps specifies the restart, network, and security policies.Wait! I thought you said no other networks can be specified if network_mode is used. This is still correct. My common-keys-apps field specifies that qBittorrent is put behind another network (t2_proxy). But what is specified in the compose snippet will take precedence and therefore, qBittorrent will not be part of t2_proxy network but will become part of the Gluetun service network.
- My qBittorrent ports are commented out because, once qBittorrent becomes part of the Gluetun service's network, you can no longer access it the previous way. It is almost as if qBittorrent is running on the same container as Gluetun and so qBittorrent ports will have to be exposed from the Gluetun container - explained later in this guide.
- Extension field default-tz-puid-pgid specifies TZ, PUID, and PGID, as explained in my Docker guide.
Save, exit, and start/recreate the qBittorrent container. Check the logs to ensure there are no errors.
Step 4. Testing if VPN Works
qBittorrent container started OK. But how do we know if it is being routed through Gluetun VPN? In addition, at this point, you will not have access to the qBittorrent web interface too (more on this later).
To check if qBittorrent is being routed through Gluetun's VPN network, we will have to enter the commandline inside the container. To do that, use the following command:
sudo docker exec -ti qbittorrent /bin/bash
Once you are in the terminal of the container, we can check the public IP of the container using curl ifconfig.io command, as follows:

Notice that the returned IP address matches the IP address of the VPN server in the Netherlands I connected to previously.
So it's all good. Well, not so fast.
Step 5. Testing Gluetun Kill-Switch
We still can't qBittorrent web UI and we do not know if the Gluetun Killswitch is working. Let's tackle the latter first. Let's restart the Gluetun Docker container to simulate a VPN disconnect (yeah I know it is not the same) using the command:
sudo docker restart gluetun
Or, use dcrestart2 gluetun, if you are using .bash_aliases based on my GitHub Repo.
Now, get into the terminal of qBittorrent and rerun the curl command from above.

Voila! No no internet access for qBittorrent.

So Gluetun VPN Killswitch is working as intended.
Wrong! So what happens if Gluetun loses VPN connectivity but reconnects again later? Or, when the Gluetun container is updated and restarts? Read on to find out.
Accessing Docker Servers Behind VPN
We still have no way to access the qBittorrent Web UI. But there are a few things around it ad we will cover them one at a time.
Accessing on LAN using IP
First, how do you access qBittorrent within your LAN? Normally, you would expose port 8080 (qBittorrent default web UI port) from inside the qBittorrent container to a free port on the Docker host. If port 8080 on the host is free, then the ports block would look like this:
    ports:
      - "8080:8080"
When qBittorrent is behind Gluetun's VPN network, doing the above won't work.
Remember what I said previously? When we make qBittorrent a part of the Gluetun VPN network, it is almost as if qBittorrent is running on the same container as gluetun. Therefore, instead of adding the above ports block to qBittorrent docker-compose, we will have to add it to gluetun docker-compose. So let's go ahead and add the following to gluetun:
    ports:
      - "8080:8080" # qBittorrent
Notice that I added a comment to notify myself that this port is mapped for qBittorrent.
Accessing From Within Another Container
Next, it is not uncommon to add qBittorrent or other torrent clients to Arr apps (e.g. Sonarr, Radarr, etc.). The same concept from above applies.
If the Arr apps are on the same network as Gluetun then from within the Arr app you can reach qBittorrent using Gluetun's hostname and port 8080, as shown below.
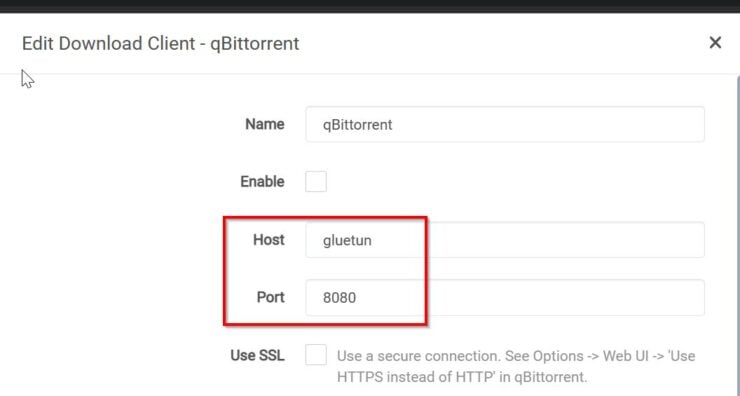
In my setup (GitHub), I add the Arr apps and Gluetun to t2_proxy network. So they can each other with the hostname.
If they are on different networks, then exposing port 8080 to the Docker host as described above would come in handy. In this situation, you would use DOCKER-HOST-IP:8080 (replace port number if mapped it to a different port).
Enabling Traefik Reverse Proxy
Lastly, how can we put qBittorrent web interface behind Traefik reverse proxy so we have still reach qBittorrent using a fully qualified domain name from anywhere in the world?
For this, instead of adding all the Traefik docker-compose labels to qBittorrent, we will have to add them to Gluetun's docker-compose as shown below:
    labels:
      - "traefik.enable=true"
      ## HTTP Routers
      - "traefik.http.routers.gluetun-qbittorrent-rtr.entrypoints=https"
      - "traefik.http.routers.gluetun-qbittorrent-rtr.rule=Host(`qbit.$DOMAINNAME_CLOUD_SERVER`)" # qBittorrent
      ## Middlewares
      - "traefik.http.routers.gluetun-qbittorrent-rtr.middlewares=chain-oauth@file" # qBittorrent
      ## HTTP Services
      - "traefik.http.routers.gluetun-qbittorrent-rtr.service=gluetun-svc" # qBittorrent
      - "traefik.http.services.gluetun-svc.loadbalancer.server.port=8080" # qBittorrent
Here are some notes explaining the differences between putting qBittorrent directly behind Traefik and indirectly via Gluetun:
- I renamed router names from qbittorrent to gluetun-qbittorrent, purely for identification and organizational purposes. It makes it easier to identify which label belongs to what service, as you add more apps behind Gluetun.
- I also recommend adding comments at the end of the line for identification purposes.
- traefik.http.routers.gluetun-qbittorrent-rtr.service=gluetun-svc refers to the gluetun service, instead of qBittorrent - remember qBittorrent is listening on port 8080 in the gluetun container.
- Lastly, for the port we specify port 8080 on gluetun-svc, instead of qbittorrent-svc.
In addition to the above, we need to add gluetun to the same network as Traefik - t2_proxy. In my case, this is taken care of by the Docker extension common-keys-core. Here is the full Gluetun docker-compose with Traefik support:
  # Gluetun - VPN Client for Docker Containers and More
  gluetun:
    <<: *common-keys-core # See EXTENSION FIELDS at the top
    image: qmcgaw/gluetun
    container_name: gluetun
    cap_add:
      - NET_ADMIN
    devices:
      - /dev/net/tun
    ports:
      - "$QBITTORRENT_PORT:8080" # Exposing qBittorrent through Docker Host LAN IP
    volumes:
      - $DOCKERDIR/appdata/gluetun:/gluetun
    environment:
      TZ: $TZ
      # Wireguard
      VPN_SERVICE_PROVIDER: surfshark
      VPN_TYPE: wireguard
      WIREGUARD_PRIVATE_KEY: $SURFSHARK_WG_PRIVATE_KEY
      WIREGUARD_ADDRESSES: 10.14.0.2/16
      # SERVER_COUNTRIES: Netherlands
      # # OpenVPN
      # VPN_SERVICE_PROVIDER: nordvpn
      # VPN_TYPE: openvpn
      # OPENVPN_USER: $NORDVPN_USERNAME
      # OPENVPN_PASSWORD: $NORDVPN_PASSWORD
    labels:
      - "traefik.enable=true"
      ## HTTP Routers
      - "traefik.http.routers.gluetun-qbittorrent-rtr.entrypoints=https"
      - "traefik.http.routers.gluetun-qbittorrent-rtr.rule=Host(`qbit.$DOMAINNAME_CLOUD_SERVER`)" # qBittorrent
      ## Middlewares
      - "traefik.http.routers.gluetun-qbittorrent-rtr.middlewares=chain-oauth@file" # qBittorrent
      ## HTTP Services
      - "traefik.http.routers.gluetun-qbittorrent-rtr.service=gluetun-svc" # qBittorrent
      - "traefik.http.services.gluetun-svc.loadbalancer.server.port=8080" # qBittorrent
My setup changes constantly. So I strongly recommend you to check my GitHub Repo for the latest versions of compose files.
Autohealing
The last point I want to cover is "autohealing". What does this mean?
Remember a few steps back we restarted the VPN for testing Gluetun Killswitch? When we restarted Gluetun, qBittorrent's internet connection did not automatically resume. For qBittorrent to be reconnected to the internet it has to be restarted. Autohealing takes care of this for us. This used to be a problem with my previous Transmission setup.
What I have today is not perfect. I will most likely change it. But here is what I have today.
There are 3 basic steps involved:
- Add the healthcheck listed below to qBittorrent. When qBittorrent is not able to reach example.com (do not change this), i.e. no internet connectivity (e.g. VPN is down), the status of the container becomes unhealthy.
healthcheck: # https://github.com/qdm12/gluetun/issues/641#issuecomment-933856220 test: "curl -sf https://example.com || exit 1" interval: 1m timeout: 10s retries: 1 - Add DeUnhealth to your stack. You can find deunhealth docker-compose in my GitHub Repo in docker-compose-t2.yml.
- Lastly, add the following label to the qBittorrent container. With this label, DeUnhealth will check the status of qBittorrent. When it turns unhealthy it restart the qBittorrent container, which restores internet connectivity via VPN.
It has worked well in my trials, as shown by the DeUnhealth container logs below.

DeUnhealth is not perfect and there appears to be some issues. The alternative is Autoheal, which I am evaluating now. I may replace DeUnhealth with Autoheal.
FAQs
What Docker Services to Enable VPN for?
VPN is only needed for Bittorrent clients and on-demand LAN devices. You do not need to enable VPN for Arr apps, including Prowlarr. In fact, enabling VPN for Arr apps may result in unexpected behavior and is discouraged. The only exception is if you have any ISP/country restrictions.
What about adding HTTP Proxy, SOCKS, etc.?
This is documented well in Gluetun wiki. You will have to enable the appropriate ports and add environmental variables to enable these features.
Conclusions
So there you have it, Gluetun Docker container. It won't make you a delicious loaf of bread, but it is a docker container for multiple VPN providers that enables managing your VPN connections.
In my testing, Gluetun worked great for both Wireguard and OpenVPN. Wireguard connections appeared to be slightly faster during the connection process.
I have not tried anything other than VPN for docker containers, which was my primary need. On other devices, I have the Surfshark app, which works great.
As for adding VPN to torrent clients, I could not be happier about moving from Transmission with built-in OpenVPN to Gluetun with Surfshark Wireguard VPN. Try Gluetun on Docker and let me know your thoughts.


