Setting up video surveillance can be quick and straightforward, especially with solutions like ZoneMinder, which we have covered in our ZoneMinder Docker guide. This Frigate docker tutorial provides another popular option.
However, one caveat is that going through events or footage is quite a hassle sometimes and may leave you with the feeling that you are not using your setup to its full potential. In this regard, Frigate, which is one of the best alternatives to ZoneMinder, offers significant advantages over other surveillance systems.
Frigate tool harnesses the power of artificial intelligence and combines useful NVR features with our beloved Home Assistant software. Why bother? You may already have an NVR that you like and trust. The reason is simple: Frigate will help you manage your attention and time better.
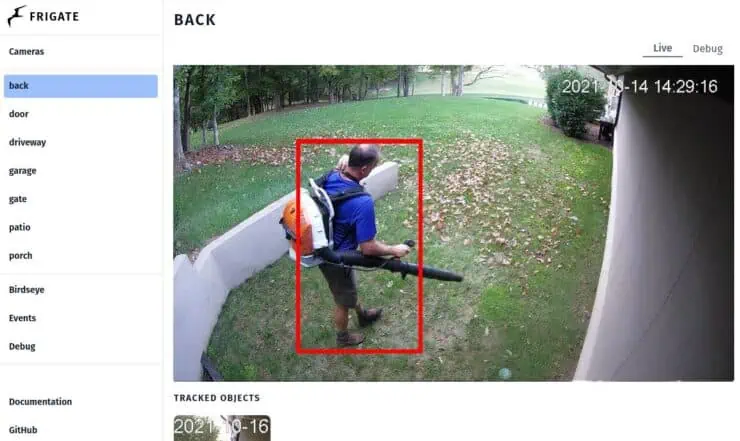
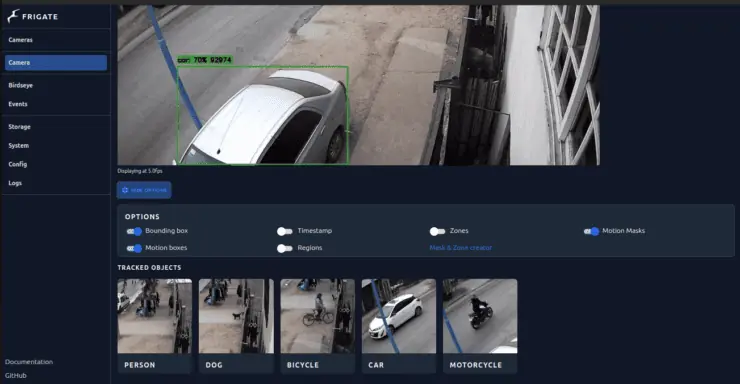
Frigate can detect and classify nearly a hundred different object types by using OpenCV and TensorFlow. Based on these detection events, Frigate generates short clips that can be easily browsed and filtered. This makes looking through footage much easier.
This Docker Frigate guide will cover the essentials to get started with this amazing tool and how to put it to use.
Table of Contents
- What is Frigate NVR?
- Frigate Installation
- Installing Frigate Docker Container
- FAQ
- Concluding Remarks on Docker Frigate Setup
What is Frigate NVR?
Frigate NVR is a software surveillance solution created with open-source code. It has a focus on real time AI object detection, which is super useful to optimize disk space and browse through events.
Frigate+ is the premium version of Frigate, offering support for open-source Frigate and custom models. These models improve accuracy and allow you to detect objects not available in the free version.
Some of Frigate's main features:
- Well done Frigate Home Assistant integration
- Uses motion detection to optimize object recognition
- MQTT capabilities allow for easy integration into other systems
- Password protected RTSP stream
- Birdseye, a dynamic view of cameras that can be configured based on detected events
Frigate Installation
Frigate can run as a docker container, meaning it can be installed on a variety of different setups as long as they support docker. This includes the Raspberry Pi 3 and 4, although you should consider performance can be an issue with that type of hardware.
Frigate can also be installed as a HassOS Addon. The performance of Frigate Proxmox virtual environment is better when run as an LXC container.
However, the most efficient way is probably to run the Frigate container in a bare metal setup with a lightweight Linux distro.
Creating a Frigate Docker container is easy if you use simple configuration files. Once you get accustomed to how these files work you can make necessary changes to improve the setup however you need.
In this guide, I will give you simple examples of how to run a Frigate container that you can use and customize according to your needs. I will provide examples to run your container using docker run anddocker compose.
Related Posts
- MotionEye Docker Guide for Beginners: Simplest NVR
- ZoneMinder Docker Guide for Beginners: Best Free Video Surveillance
Installing Frigate Docker Container
Requirements
You can use this guide to create a working Frigate container in most desktop operating systems, but you need a couple of things first. First, you must have your camera's Real Time Streaming Protocol (RTSP) address handy. RTSP allows Frigate and other software to get a live stream from your cameras.
If you have Docker installed and you know your camera's RTSP URL you can go ahead and start with Step 1.
Find Your Camera's RTSP Stream
Before starting, you may want to find your camera's RTSP stream and resolution. You will need to use them in the configuration file. If you already have an NVR like ZoneMinder you may be able to copy the camera's URL from the configuration in the 'Source' section.
Different camera models have different URLs, you may find yours in the device's manual or the manufacturer's website. For most widely used cameras you can find this information through a quick Google search.
Install Docker and Docker Compose
To follow along, you need to have Docker installed on your system. If you don't, you can check out these basic guides:
- What is Docker: Docker vs VirtualBox, Home Server with Docker
- How to Install Docker on Ubuntu: A Step-by-Step Guide
I also suggest you go over Anand's Ultimate Docker Media Server guide. It is a comprehensive Docker guide that includes the hows and the whys regarding Home Assistant in Docker.
Home Assistant can be integrated with Frigate for extended functionality.
Step 1 - Create Directories for Frigate's Files
Create a frigate directory and a config directory. Frigate will create a storage folder where videos and events will be saved.
mkdir frigate
mkdir frigate/config
Step 2 - Set Up Your Frigate Configuration File
You have to create a config.yaml file inside frigate/config/ folder, which will contain information about your MQTT broker and camera settings.
The Frigate container on Docker is configured mostly through this file. There are not many things to do through the web interface. Feel free to use the example below, but you will need to change at least the following settings:
mqtt:
  enabled: false
cameras:
  Camera:
    ffmpeg:
      inputs:
        - path: rtsp://user:password@cameraIPadress:554/stream1
          roles:
            - detect
            - record
    objects:
      track:
        - person
        - dog
        - bicycle
        - car
        - motorcycle
    detect:
      width: 2304
      height: 1296
    record:
      enabled: True
      retain:
        days: 7
        mode: all
detectors:
    cpu1:
      type: cpu
      num_threads: 3
If this is your first run, I would advise you to start with a single camera. Once you are ready, you can add extra cameras within the cameras section.
Some comments about Frigate config.yaml:
- path - This is the path to the RTSP stream you want to pass through Frigate. In my case, it's rtsp://admin:[email protected]:554/stream1, but your camera may have a different one.
- width and height - These set the resolution of the frames that Frigate will process. I'm using the full resolution of my cameras, but it can be reduced to improve performance.
- objects - Frigate has models for nearly a hundred different objects. You can change the objects to be detected according to this list.
- roles - Through this option, we are telling our Frigate docker container that this stream has to be processed in search for movement and objects, and to enable recording. The section below with the retain keyword tells Frigate that you want videos saved for 7 days and to keep recordings even when objects are not detected
- detectors - This example will try to use your CPU to run detection, but Frigate supports GPU and accelerators such as Google Coral. My recommendation is to test your setup using CPU and then head over to the official documentation if you have better hardware options available.
Step 3 - Set Up Your Frigate Docker Container
There are some options you should know about before creating your Frigate Docker container:
- privileged - This means the container has full access to all of the host's devices, including the filesystem. Setting it to True may be needed to use your host's hardware for object recognition, but for improved security, it would be best to set it to False
- shm_size - This option sets the shared memory available for your Frigate container. The default should be enough for two 720p cameras running detection. You can calculate the recommended size by looking at the recommendations in the official Frigate documentation.
- volumes (-v option in docker run) - In this section you can map paths in your system to those used by Frigate, so things like storage and configuration files can be accessed in the host itself.
- ports (-p option in docker run) - These ports are mapped to access the container through the network. You can change them if you already have services occupying them.
- FRIGATE_RTSP_PASSWORD - You have to set this password if you want to access Frigate's rtsp stream. This may come in handy if you want to reduce the number of connections to your cameras.
In case you want to take the Frigate Docker Compose approach, go ahead and follow step 3a. If you'd rather use the docker run command, jump forward to step 3b.
Step 3a - Install Frigate Using Docker Compose File
Using docker compose for Frigate installation makes a lot of sense, as it's easier to troubleshoot and make modifications to your setup. You can use our example as a blueprint for building your Frigate container. If you have a docker-compose file with other services you can add this Frigate Docker Compose example to it.
Otherwise, create a file named docker-compose.yml, add the contents below. Just make sure you set the paths to your config.yaml file and frigate directory. Frigate Docker container will create the storage folder as needed.
version: "3.9"
services:
  frigate:
    container_name: frigate
    privileged: true
    restart: unless-stopped
    image: ghcr.io/blakeblackshear/frigate:stable
    shm_size: "64mb"
    volumes:
      - /etc/localtime:/etc/localtime:ro
      - /home/user/frigate/config/config.yml:/config/config.yml
      - /home/user/frigate/storage:/media/frigate
      - type: tmpfs # 1GB of memory
        target: /tmp/cache
        tmpfs:
          size: 1000000000
    ports:
      - "5000:5000" # Port used by the Web UI
      - "8554:8554" # RTSP feeds
      - "8555:8555/tcp" # WebRTC over tcp
      - "8555:8555/udp" # WebRTC over udp
    environment:
      FRIGATE_RTSP_PASSWORD: "useyourownpassword!"
Now everything should be ready to spin up your Frigate container. Run the following command from with the folder the compose file is located.
sudo docker compose -f docker-compose.yml up -d
Step 3b - Install Frigate Using Docker Run
If you prefer to use docker run instead of docker compose, you can use this command, but remember to set the paths to the directories in your system:
docker run -d --name frigate --privileged --restart unless-stopped --shm-size="64mb" -v /etc/localtime:/etc/localtime:ro -v /pathToYourFrigate_config.yaml:/config/config.yaml -v /pathToYourFrigateFolder/storage:/media/frigate -v /tmp/cache -p 5000:5000 -p 8554:8554 -p 8555:8555/tcp -p 8555:8555/udp -e FRIGATE_RTSP_PASSWORD="useyourownpassword!" ghcr.io/blakeblackshear/frigate: stable
Step 4 - Access Your Frigate Docker Setup
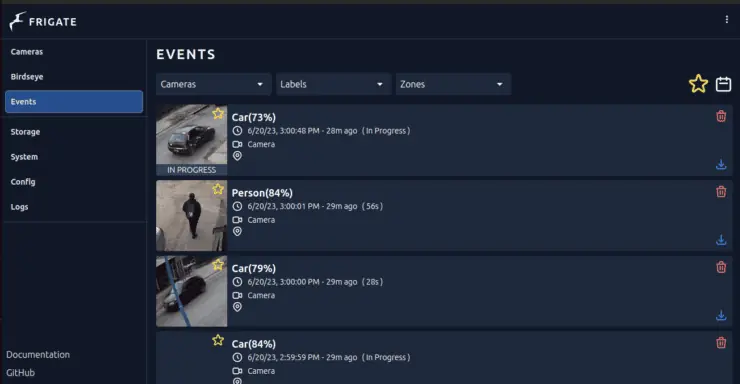
Once the container starts, you can access Frigate web interface at http://yourIP:5000. In the "Cameras" section, you will see your camera, and the "Events" section will show detected objects. This page does not refresh automatically, so you may need to reload the page to see the latest events.
Step 5 (optional) - Accessing your Frigate Docker container Over the Internet
Accessing Frigate from within your home network should work fine (described above). But what if you want access to Frigate NVR on the go from outside your home network?
Well, there are many ways to do this.
The easiest and slightly insecure way to do this is to forward port 5000 on your router/gateway to point to your Frigate server.
Accessing Frigate with VPN
A secure way to access Frigate on Docker is to connect to your home network using a VPN service. Home routers and network-attached storage devices sometimes come with a built-in VPN server. Once connected, you can use the same home network IP address of your Frigate Docker server.
You may also use a third-party VPN mesh network such as Tailscale or Zerotier-One.
Another alternative is to set up your own Wireguard network. But this is a more advanced topic.
Other Posts in the Wireguard Series:
- Wireguard VPN Intro in 15 min: Amazing new VPN Protocol
- Complete Wireguard Setup in 20 min – Better Linux VPN Server
- Wireguard Windows Setup: Powerful VPN for Windows
- Wireguard Mac OS Client Setup – The sleek new VPN
- Wireguard Android Client Setup – Simple and Secure VPN
- Ultimate WireGuard Docker Compose: with CF and Traefik Support
Exposing Frigate with Reverse Proxy
Another secure way to access Frigate NVR is to put it behind a reverse proxy. But this requires a domain name or a DDNS.
Nginx Proxy Manager is very simple to setup but not very flexible.
We use and recommend Traefik. You can read all about setting it up in Anand's Docker Traefik guide or refer to his GitHub repo.
With a reverse proxy, you can access Frigate using a nicer URL (e.g., https://frigate.example.com).
FAQ
Here are some of the most frequently asked questions involving Frigate and Docker.
What is the best OS for Frigate?
The best way to install Frigate is by running Docker on a bare-metal Debian-based distribution. I installed Frigate on Ubuntu 22.04 LTS and 23.04 by following the steps in this article without issues.
Running on Windows or a Linux VM may work, but that could bring about some issues, especially with performance. Some people run Frigate on Raspbian, but in that situation, you have to be mindful of hardware requirements.
Where is the config file in Frigate?
When running Frigate in a container, the recommended path of the config file is in a /config directory inside the directory where you store your Frigate /storage directory or docker-compose.yml file. However, Frigate will try to use any config file provided you set the appropriate path.
How do you use Frigate with Home Assistant?
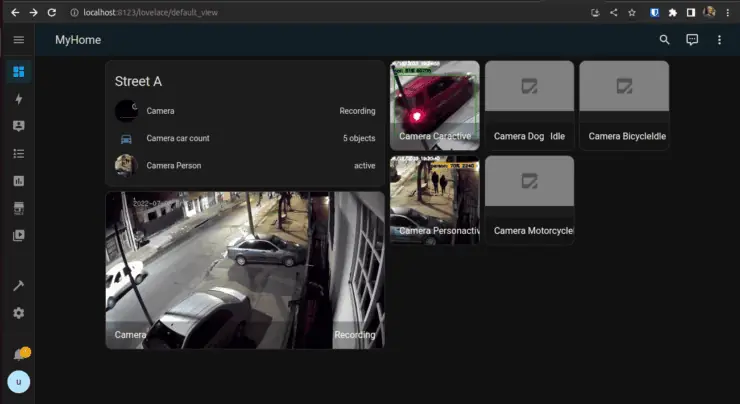
Frigate can be used with Home Assistant in different ways, but you have to go through an integration process. Once you integrate Frigate and Home Assistant, you can set up your view in Home Assistant with live video or captures of recently detected objects. You can also set up push notifications to your phone activated by object detection in Frigate.
By combining Home Assistant with a Frigate docker container, there are endless possibilities as to what you can build and automate. If you want to take full advantage of your setup in that way, I would advise you to become familiar with Home Assistant first.
Concluding Remarks on Docker Frigate Setup
If everything goes right, your Frigate Docker container should be up and running. However, there is probably some tweaking you may want to do. For instance, you may want to add extra cameras or focus on performance by using a different detector.
Depending on the number of cameras you want to set up, getting a device such as a Coral USB accelerator may be worth your money. These devices can process nearly a hundred frames per second, achieving amazing performance when compared to CPU processing.
To learn more about Docker Compose and how to integrate your Frigate NVR Docker container, you may want to see Anand's work on Docker and Compose usage. Alternatively, check our list of best Docker containers to expand your setup.
Let us know how your setup goes! Also, leave a comment if you have suggestions or would like us to expand on any related topics.

