Virtualization and Containerization apps such as VirtualBox and Docker require you to enable hardware virtualization. This refers to VT-x on Intel and AMD-V on AMD motherboards. On AMD motherboards AMD-V is enabled by default. However, on Intel motherboards, you will to manually enable VT-x from BIOS / UEFI. In addition there are some motherboards that are locked down and won't allow you to enable VT-x/AMD-V, in which case you are out of luck. Without further ado, let's look at how to enable Intel VT-x hardware virtualization in BIOS or UEFI firmware so you can run Virtual Machines or Docker containers.
Table of Contents
- Enable Hardware Virtualization
- Step 1a. Boot into BIOS settings on non-UEFI computer
- Step 1b. Boot into BIOS settings on UEFI computer
- Step 2. Enable Hardware Virtualization Intel VT-x in BIOS / UEFI Firmware
- Step 3a. Verify if Hardware Virtualization is Enabled on Windows
- Step 3b. Verify if Hardware Virtualization is Enabled on Ubuntu
- What after Enabling Intel VT-x/AMD-V?
Enable Hardware Virtualization
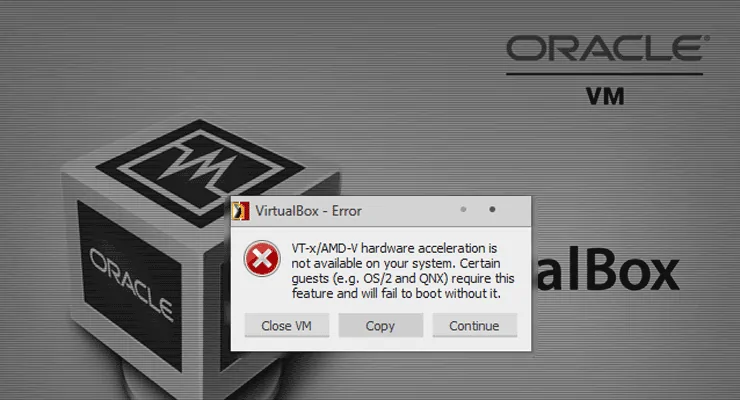
If hardware virtualization is not enabled on your UEFI or BIOS, you might see one or more of the following errors:
- This computer doesn't have VT-x/AMD-V enabled
- VT-x/AMD-V hardware acceleration is not available on your system
If you run into this problem, read on to enable hardware acceleration on BIOS or UEFI.
Step 1a. Boot into BIOS settings on non-UEFI computer
First, if you have a BIOS firmware, you will see options to boot into BIOS displayed during boot. Typically this is displayed within the first few seconds of boot. Esc, Del, F2, F11, etc. are some of typical keys that will take you into BIOS settings. The actually key depends on your motherboard make. If this applies to you, then you can reach BIOS settings much easier than if you had UEFI firmware. Boot into BIOS settings and move to Step 2 to enable Intel VT-x for virtualization. If this does not apply to you (you have a UEFI computer), try Step 1b instead.
Step 1b. Boot into BIOS settings on UEFI computer
Most modern Windows computers (Windows 8 and 10) come with UEFI, which has several advanced features. But it boots your computer so fast and there are no options to intervene and make your computer boot to BIOS. But fear not, the process is still easy.
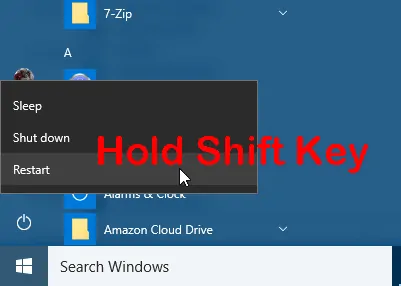
First, hold the Shift Key and press restart from the menu, as shown in the picture below.
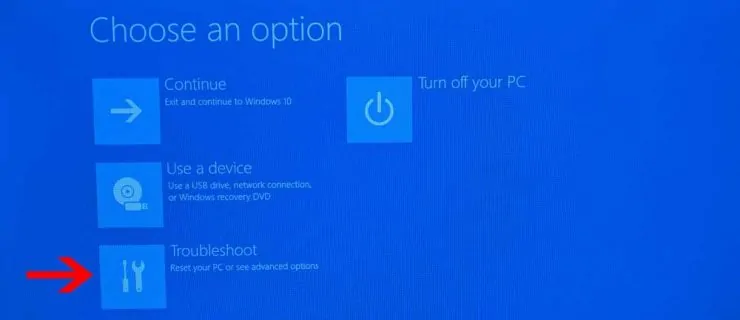
During restart, you will see a few boot options as shown in the screenshot below. Choose "Troubleshoot".
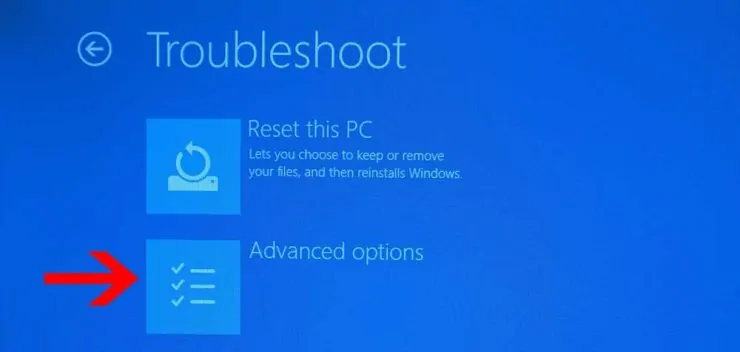
In the next screen, choose "Advanced options" as shown below.
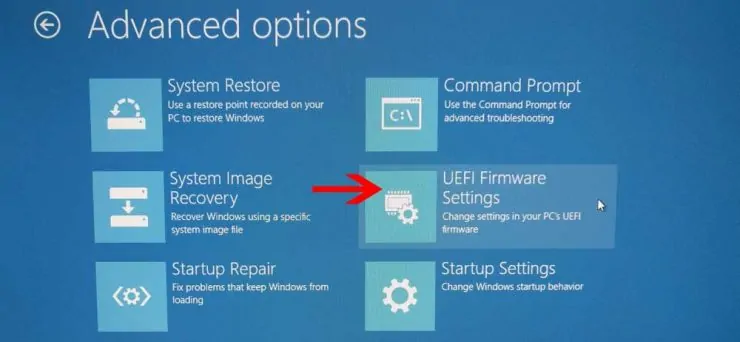
In the list of "Advanced options", find and choose "UEFI Firmware settings" as shown in the picture below.
When prompted, press restart to reach UEFI firmware settings.

Now, you should see options to boot into BIOS setup as shown below. In this guide, pressing F10 will take me to BIOS setup.

Step 2. Enable Hardware Virtualization Intel VT-x in BIOS / UEFI Firmware
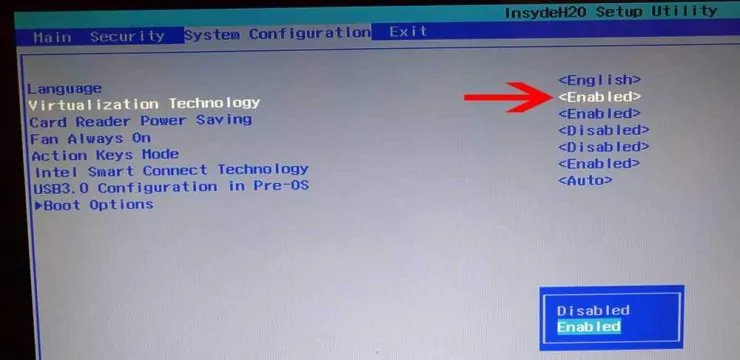
The location where options to enable VT-x/AMD-v is present will depend on the motherboard make. Browse around to find Virtualization options. In my case, it was under "System Configuration". Once found, select, and enable hardware virtualization as shown below.
Finally, save and exit BIOS / UEFI settings as shown below.

Step 3a. Verify if Hardware Virtualization is Enabled on Windows
If all goes well, your VirtualBox or Docker Engine should start without any errors. You can also manually verify if hardware acceleration is enabled on Windows PCs as described below. Press "Ctrl + Alt + Del" and select "Task Manager". Once in task manager, find and select "Performance" tab to find virtualization status.
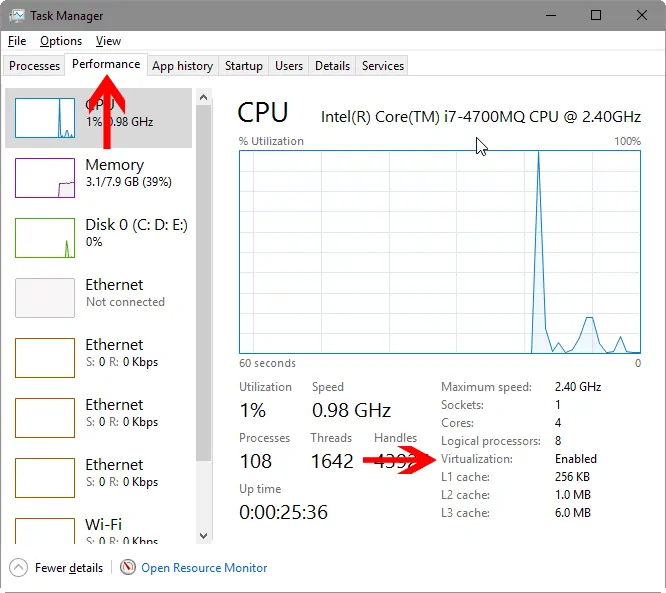
Notice that in my case, virtualization is set to Enabled in the above picture.
Step 3b. Verify if Hardware Virtualization is Enabled on Ubuntu
On Ubuntu, you can verify if Intel VT-x is enabled using the cpu-checker package. First, install it using the following commands:
sudo apt-get update
sudo apt-get install cpu-checker
Then, check hardware acceleration status on Ubuntu using the following command:
kvm-ok
If hardware virtualization is enabled, you should see an output like this:
INFO: /dev/kvm exists
KVM acceleration can be used
What after Enabling Intel VT-x/AMD-V?
That is all, you are now ready to roll with VirtualBox, VMware, or Docker. Read our VirtualBox home server guide or our Docker introduction guide to find out which is a better option for you. If you know what you want, then go ahead enable hardware Virtualization VT-x/AMD-V extensions and open up a new world of possibilities.

![5 Best Mini PC for Proxmox Home Server [2024] Best Mini PC for Proxmox](https://www.smarthomebeginner.com/images/2024/04/Best-Mini-PC-for-Proxmox.png)


![5 Best NAS with SSD Cache for Home and Office [2023] A feature image that shows all 5 of the best NAS that supports SSD caching for home and office](https://www.smarthomebeginner.com/images/2023/10/best-nas-with-ssd-cache-feature-image.png)