In my previous article, I wrote on the benefits of using Podman as a replacement for Docker.
This guide is intended to be a follow up to that article by giving the reader a working example of how one might migrate from using Docker to Podman.
I will use a few examples taken from Anand's fantastic Docker Media Server article. [Read: 60+ Best Docker Containers for Home Server Beginners 2023]
Table of Contents
- About This Podman Migration Guide
- Intro to the World of Rootless Containers
- Membership Required
- Install Podman
- Podman and Podman-compose
- Setup Host system for Rootless Containers
- Setup our Podman Environment
- Building our Podman Stack
- Restart Containers and Start on Boot
- Things to Know
- Concluding Remarks
About This Podman Migration Guide
Recall, Podman is simply a container runtime. What this means for you is that all of the introductory content written by Anand on containerization applies here as well. Therefore, I will jump straight into the details of getting your Docker containers running in a Podman environment. There are some new concepts to learn along the way; please take your time, take notes, and read through each section.
I have done my best to write this guide at a novice level. But some of what I am going to cover I consider to be intermediate-level topics. If this is your first time diving into containers or the Linux command line, I recommend starting with Anand's Docker guides.
That being said, I do not intend for this to be a "just copy and paste what you see here" guide. Instead, I hope to give the reader some tools to build their own server in a way they see fit. After all, it is YOU who is responsible for what you decide to run. Knowing HOW it was put together will only aid you in the long run.
Prerequisites for Replacing Docker with Podman
Podman is the native container runtime in all Red Hat based systems. This means it's very well integrated as the default for users of RHEL, CentOS, Fedora, AlmaLinux, Rocky Linux, and other derivatives. Personally, I prefer this ecosystem as it comes with other features I find useful.
However, I know many readers of this site tend to use Ubuntu and other Debian based distributions. Thus, this guide will be written using Ubuntu 22.04 LTS Jammy Jellyfish as a base. As such I must warn you: Podman support on Ubuntu isn't great; the repositories are stuck many versions behind. That means there is some functionality that does not work as expected, and it might take a bit of finessing. Consider yourself warned.
To follow along, you will need:
- Ubuntu server 22.04 LTS
- Basic understanding of CLI Linux
- Basic understanding of containerization
- Basic understanding of YAML file format
- And most importantly: Patience
Coming from Docker to Podman
This article is written from a standalone perspective, meaning a bare server with nothing installed is preferred. However, since many of you will be transitioning from Docker on the same installation, I will give some tips along the way to help ease the transition. The tips will be in blue boxes like the following statement below. For those of you following along from a standalone perspective, you can ignore these boxes.
I will begin by shutting down Docker (but not uninstalling it immediately).
sudo docker-compose -f docker-compose.yml down
Verify you don't have any stray containers still running:
sudo docker ps -a

You should see no other containers running. If you have others listed, be sure to stop and remove them as well. Leaving containers running could interfere with Podman if they are bound to ports we want to use via Podman.
Intro to the World of Rootless Containers
I know, the last thing you want is some theory to get started. But I promise to keep it short, concise, and most importantly, relevant to the guide: Namespaces vs Rootless Namespaces.
In my previous article, I discussed one of the biggest benefits of using Podman is its rootless design. I gave some examples, but now it's time to put the theory into practice. The below sections might be a bit dense, but do your best to follow along. If it's too much, move forward to the next section and return here when I refer to it later in the article.
Install Podman
Podman can easily be installed with the standard Ubuntu repositories. As of writing this, Podman in the official Ubuntu repositories is at version 3.4.4.
In February 2022, a large update to Podman (version 4.0+), was made which rewrote their entire networking stack. The only limitation I have found with Podman version 3.4.4 is that networking between containers can be difficult at times, even within the same pod. Regardless, everything still works and this article will stick with Podman version 3.4.4.
sudo apt install podman
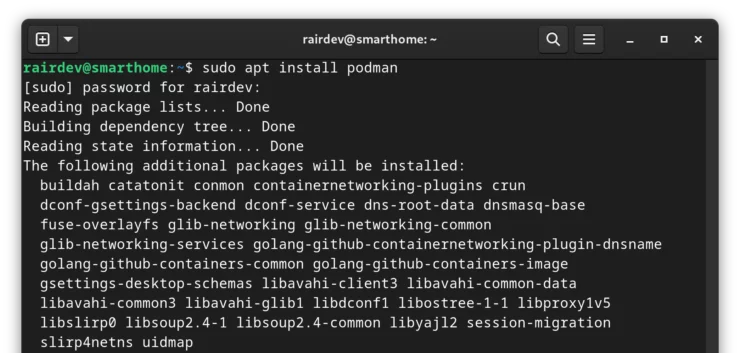
By installing Podman, we will be getting a load of other supporting software along with the program itself. As stated in my previous article, Podman is actually a set of different tools that perform different functions in the container ecosystem. I'll spare you the details of what each software does, but if it interests you, there are numerous articles on each software.
Podman-compose
Just like Docker, Podman is able to work with compose files - greatly speeding up deploying, redeploying containers, and even transition from Docker to Podman. Podman-compose is a program written in the Python programming language. Thus, the easiest way to install it is via Python's module installer called pip3, short for Package Installer for Python.
At the time of writing this, the pip repositories have the latest version of podman-compose at version 1.0.3. That was released 10 months ago, and there have been numerous fixes put into the as-of-yet unreleased version 1.0.4. For now we will stick on 1.0.3, but if there are breaking changes in 1.0.4, I will update this article.
pip3 install --user podman-compose==1.0.3
- The install command above is used with the
--userswitch to only install it for the current user. - After the name of the package (podman-compose), we can specify which version we require. In this case, we are asking for the exact version with
==: 1.0.3. - If you are receiving the error:
Command 'pip3' not found,pip3can be installed by issuing the command:
sudo apt install python3-pip
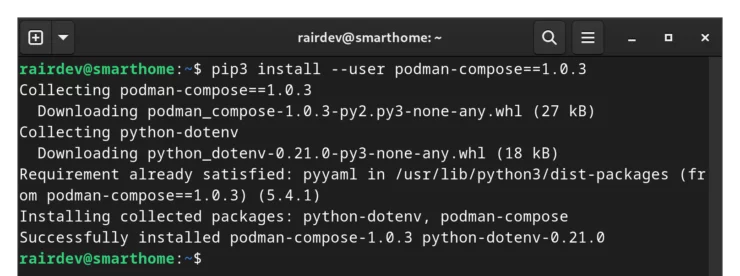
Hopefully everything installed fine and we are good to go! Move on to the next section.
Podman and Podman-compose
Fortunately for us, Podman is described as a "drop-in replacement" for Docker. And it's true.
All of the commands you are familiar with work the same with Podman as they did for Docker. Refer to Anand's Docker Beginners Guide for reference. In most cases, simply substitute the word "docker" for "podman" and you're in business.
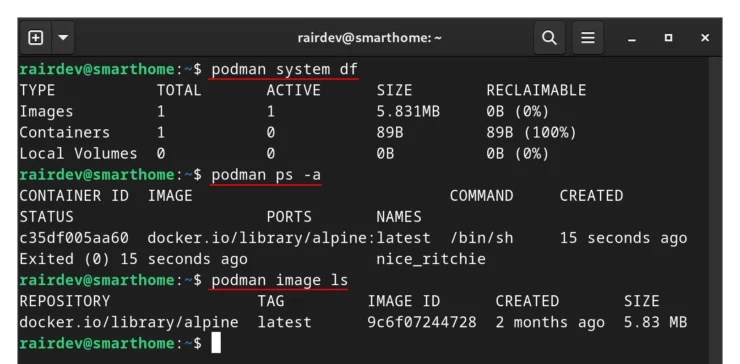
One huge difference, however, is that we are running in a rootless environment. That means that we don't need to add our user to a Podman group, or use sudo when running Podman commands.
This does however come with a few caveats which I will discuss below.
Basic Podman Commands
Podman commands generally follow the exact same syntax as what you're familiar with for Docker and docker-compose. For example:
To show all containers (running and stopped):
podman ps -a
To start your compose file:
podman-compose -f docker-compose.yml up -d
The rest follow along exactly the same as Anand's article.
Pods
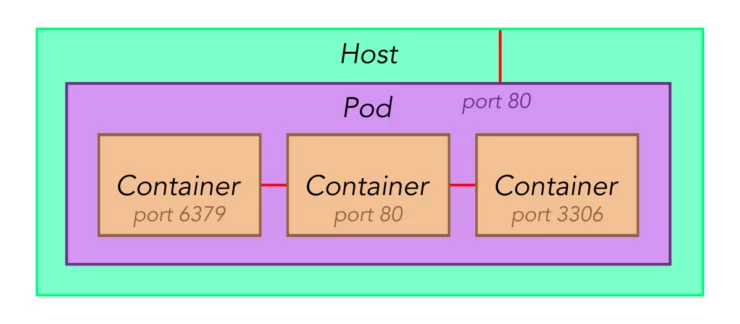
One main difference from Docker to Podman is the use of Pods. Pods are a type of container holding a collections of containers. The primary use for pods is when you want to setup a single application that uses multiple containers.
Let's say, for example, you decide to setup Nextcloud which can use 3 different containers for even a basic installation. By putting them in the same pod, you can start and stop them together, and even interconnect them using "localhost" as if they were already in the same container.
When running containers alone, Podman will not create a pod to put them in by default. The containers can run standalone just like Docker. For example, you could put all the CrowdSec related containers in a pod.
How-To Series: Crowd Security Intrusion Prevention System
As this post is following Anand's, there are no clear use cases for pods. Thus, I will not be covering them in this guide.
Setup Host system for Rootless Containers
Before diving straight into replacing Docker with Podman, we must take a few steps to setup our rootless environment.
When you run containers using Docker, ultimately, the root user is behind the actions. The consequence is that there are a few system restrictions that do not apply to the root user but will apply to our user. Let's take a look at them before we start using Podman.
Docker as an Image Source Registry
With Docker, pulling images occurs automatically using their own docker.io repository.
Podman however, was originally designed to run in the Red Hat environment and thus use Red Hat derived image repositories. Podman on Ubuntu, for some odd reason, has no default registries included at all! An annoyance, but an easy fix.

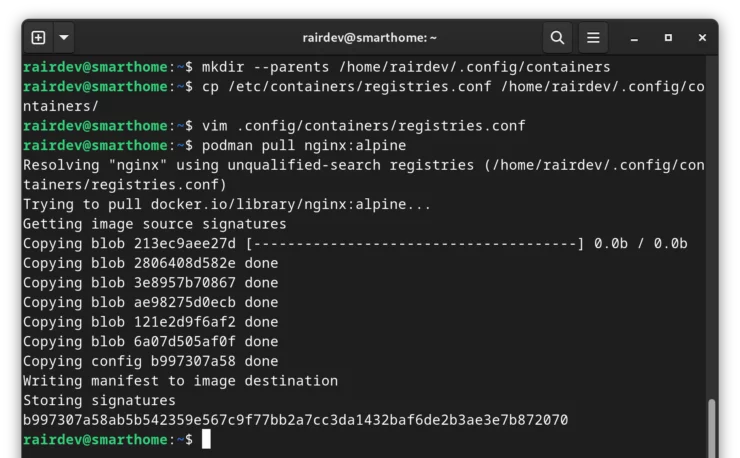
Podman allows us add any, and as many, repositories as we'd like, including docker.io. By default, Podman will read the global settings from the /etc/containers/registries.conf file. To override it and add the Docker repository permanently, we will create a local settings file.
Copy the Registries Config File
Copy the above mentioned file, and place it in your user's ~/.config directory:
mkdir --parents /home/rairdev/.config/containers
cp /etc/containers/registries.conf /home/rairdev/.config/containers/
The first command creates the
containers directory. If we don't have the .config directory already, the --parents flag will create it as well.Add Docker as a Registry
Using your preferred text editor, open the file we just copied.
I found the comments within the file to be rather obtuse. So I compared its contents to the same file on my Fedora machine and quickly found that we just need to add docker.io as an "unqualified-search-registry". Head to the bottom of the config file and add:
unqualified-search-registries = ["docker.io"]
If you would like to add other registries to pull images from in the future, all you need to do is add them to the array (list):
unqualified-search-registries = ["docker.io", "registry.fedoraproject.org"]
Save and exit. Done! Every time you run Podman as your user, Podman will see this file and use your defined registries to find container images.
Enable Containers to Run After Logout
By default, when using Docker containers, logging-out of your server does not stop the containers. Why? Because the Docker process is running as the root user. The root user is allowed to continue running processes in the background even when not logged-in. As we will be running in a rootless environment, we don't have the same privilege by default.
Since we will be running containers as a regular user, we need to enable their processes to "linger", or remain active, even if not logged in.
sudo loginctl enable-linger rairdev
This simple one-liner will allow my user (rairdev) to run containers, logout, and keep the containers running in the background.
Allow Containers Use of HTTP/HTTPS Ports
A default security measure is to deny non-root users binding ports below 1024. Ports below 1024 are known as "privileged ports". We can test this by trying to run a container on port 80:
podman run --rm -p 80:80 nginx:alpine

This is problematic as we want to access our services through the default HTTP/HTTPS (80 and 443 respectively) ports.
Take note: The error message tells us exactly what we need to do to - add a line to the /etc/sysctl.conf file.
Create a New Configuration File
We can follow the directions above exactly, but there's a risk that the /etc/sysctl.conf file gets overwritten during a system update. To ensure this setting doesn't get removed, we can create a separate sub-configuration file under /etc/sysctl.d/ with the corrected setting:

This line at the top of the
/etc/sysctl.conf file tells us that the system will read variables from files in the /etc/sysctl.d/ directory.Let's create a file in that directory, named something we will recognize later:
sudo -e /etc/sysctl.d/podman-privileged-ports.conf
- Using
sudowith the -e switch is a quick way to tell the system we want to "edit" the file listed. - We are creating a new file called
podman-privileged-ports.confwithin the/etc/sysctl.d/directory, where other config files of the same nature are stored by default.
We are greeted with a blank file. Let's add a comment at the top so when our future-selves find this file, we will know where it came from!
# Lowering privileged ports to 80 to allow us to run rootless Podman containers on lower ports
# From: www.smarthomebeginner.com
# default: 1024
Below my comments, we just need to copy and paste the exact line from the error message shown above:
net.ipv4.ip_unprivileged_port_start=80
Save the file and exit.
Make the Setting Permanent
Finally, to load the setting we just created:
sudo sysctl --load /etc/sysctl.d/podman-privileged-ports.conf
You should see the setting printed in your console.
For those interested, we can run the quick test again to ensure it worked:
podman run --rm -p 80:80 nginx:alpine
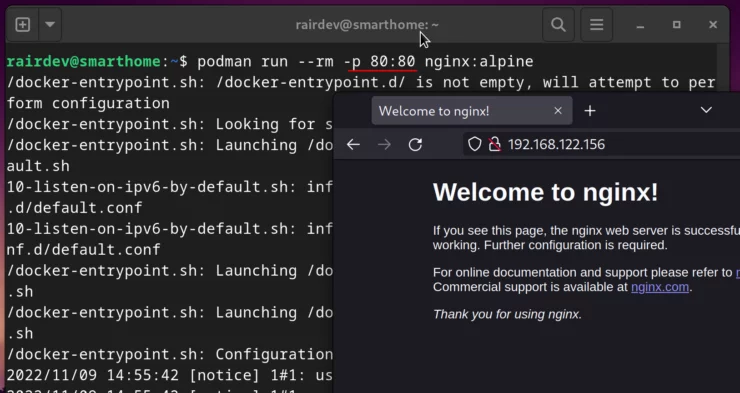
OK, great! Our system is setup and ready to use.
Setup our Podman Environment
Following along with Anand's previous article, he sets you up with a file and directory structure. For the purpose of simplicity, I will follow his way of doing things and keep the naming scheme identical.
Directories and Files
According to his article, we don't need much to get started. Follow along there for descriptions of what we're doing if needed. Let's begin by creating the docker directory, and inside it the appdata directory.
We can easily re-use the same files and directories from your Docker setup, so no need to change anything here.

However, as we will be running rootless, make sure to change ownership of the files to your current user:
sudo chown -R rairdev:rairdev ~/docker
This will change any files you had owned as root to your user. This is critical or Podman won't be able to access those files!
mkdir -p ~/docker/appdata
cd docker
We are creating both directories in a single command just like we did above. This time I used the abbreviated
-p flag which is the same as using --parent.Next, we need both the .env environmental variables file, as well as the docker-compose.yml file iteself.
touch .env docker-compose.yml
And lastly, let's set some stricter permissions for the .env file since it could contain some sensitive information.
chmod 600 .env
In Anand's article, he sets the ownership of the
.env file to the root user. For our rootless Podman environment, you can probably deduce that nothing can be owned by root for our user to use it. Thus we will keep it owned by our user.What we lost in minimal security benefit we can make up for with Podman secrets.
Default Directory Permissions
Differing from Anand's article, we don't need to set a default group owner for our files. Having them owned by our user is perfectly sufficient. If you would like a tiny bit of added security, we can restrict access to other users in one of two ways:
- Using
umask: Theumaskcommand can be used to set a default permission for newly created files and directories. It is used in a deductive fashion. Therefore, if we wanted to create new files withoutotherusers permissions added, we would useumask 007to remove all (7 = rwx) permissions. Remember, you must run theumaskcommand before creating any files or directories. However, the big caveat is that this is reset each time you logout and login. - Using Access Control Lists (ACL's): Similar to Anand's article, we can use ACL's to set default permissions for the entire filesystem within our
dockerdirectory. This is a bit overkill, but can be done with:sudo setfacl -Rdm o::--- /home/rairdev/dockerHere we modify (-m) the default (-d) ACL's for the
dockerdirectory recursively (-R) to remove all permissions (---) from other users (o::).
I will let you decide which method you prefer. Generally speaking, it is more critical to ensure you have followed some basic good-security practices for securing the host system from outside users.
Environmenal Variables in the .env File
The environmental variables help us to set recurring configuration settings in multiple containers. For the time being, you can use the exact same as what's in Anand's guide.
You can also safely leave the PUID and PGID variables at 1000, but you may notice that your apps won't be able to access your previous data. If that's the case, you would need to change ownership of the files.
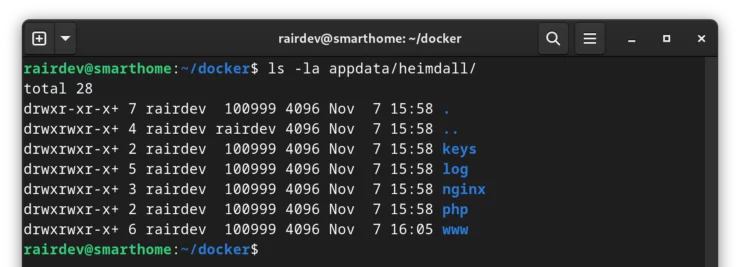
That's done with the chown command. However, things get a little tricky when using Podman within a user namespace. If you followed my explanation above, you would see that anything owned by user 1000 within the container, is actually user 100999 outside of the container.
So we can just use the following right?
chown -R rairdev:100999 /home/rairdev/docker/appdata/heimdall
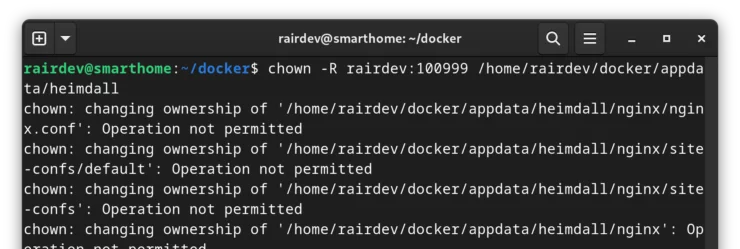
Oops! Not permitted! That's because we don't have permission to change ownership outside of our user in this namespace. That is a critical point. But what if we were the root user?
To become the "root" user within our Podman namespace, we use a command known as podman unshare. This drops us into our user namespace, so the following command is run as the "root" user from rootless Podman's perspective. So instead, it should look like:
podman unshare chown -R root:1000 /home/rairdev/docker/appdata/heimdall
NB: I changed the group to 1000 in the second command. Remember now I'm running this command within the user namespace. Have a look at the file ownership now:
You may have noticed that I have left the PUID and PGID variables the same as Anand's Docker article. While I tried to find an easier work around, the LSIO images are quite particular and have some attributes that cause them to not play nice with Podman.
Building our Podman Stack
As mentioned in the introduction, this article is not intended to be a full replacement for the Docker guide, but simply a starting point for Podman. With that in mind, I'll get you started with a few apps, and some tips to keep in mind when using Podman instead of Docker.
I recommend creating a new file to play with, while leaving the old
docker-compose.yml file untouched. Call the new file anything you like - podman.yml for example. When we run our podman-compose up command, simply substitute the docker-compose.yml filename with the correct name you set.Note that you do not need the "version" declaration at the top of your compose file as it has no effect in Podman. Leave it, delete it, there's no difference here.
Networks
Since we are using podman-compose version 1.0.3, we can declare networks in our compose file, but not control the subnet they will use.
If you absolutely need to use a specific subnet, check out the optional section just below.
Open your compose file and add the following:
########################### NETWORKS ###########################
# You may only customize the network subnet (192.168.89.0/24) below if you are using
# Podman-Compose version 1.0.4 or higher.

networks:
  npm_proxy:
    name: npm_proxy
    # ipam:
    #   config:
    #     - subnet: 192.168.89.0/24
(Optional) Create your NPM Proxy Network Separately
If you would like to use a spefic subnet with your npm_proxy network (or any other networks for that matter), you will have to manually create the network before starting your podman-compose file. This issue has been fixed in the unreleased version 1.0.4 of Podman-Compose.
Creating a network with a specific subnet in Podman is simple.
podman network create --subnet 192.168.89.0/24 npm_proxy
To verify the network, we can inspect it:
podman network inspect npm_proxy
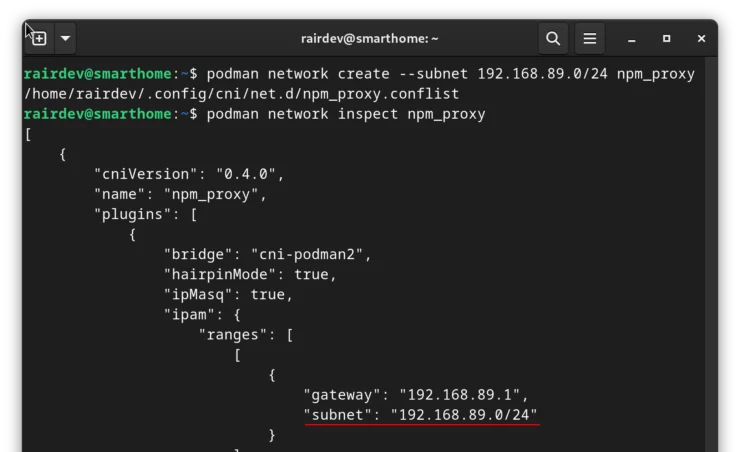
Extension Fields
If we are re-using certain declarations again and again, we can simplify our compose file by simply calling these extension field "groups". Below your networks declaration from above, we can add the extension fields similar (but not identical) to Anand's Docker article.
########################### EXTENSION FIELDS
# Helps eliminate repetition of sections
# More Info on how to use this: https://github.com/htpcBeginner/docker-traefik/pull/228

# Common environment values
x-environment: &default-tz-puid-pgid
  TZ: $TZ
  PUID: $PUID
  PGID: $PGID

# Keys common to some of the core services that we always to automatically restart on failure
x-common-keys-core: &common-keys-core
  networks:
    - npm_proxy
  security_opt:
    - no-new-privileges
  restart: always

# Keys common to some of the dependent services/apps
x-common-keys-apps: &common-keys-apps
  networks:
    - npm_proxy
  security_opt:
    - no-new-privileges
  restart: unless-stopped

# Keys common to some of the services in media-services.txt
x-common-keys-media: &common-keys-media
  networks:
    - npm_proxy
  security_opt:
    - no-new-privileges
  restart: "no"
Great! With that out of the way we will move onto the services themselves.
Services Declaration
Before adding containers, we simply need to identify where our container declarations will start. Give yourself a couple of lines below the extensions heading and add the following:
#################### SERVICES ##################
services:
Note that there are no spaces before the services: declaration. Any containers we declare after this, will begin with 2 spaces to denote that they will exist within this services: declaration.
Frontends
While not my favorite name for these pieces of software, they are designed to sit "in front" of your other containers/applications. Thus, they act as a "doorway" of sorts to our other containers. Both of these pieces of software are Graphical User Interfaces (GUI) that are not entirely necessary, but can be helpful if you are still learning and the command line is intimidating.
Be the 1 in 200,000. Help us sustain what we do.You will gain benefits such as Deployarr access, discord roles, exclusive content, ad-free browsing, and more.🔥 Holiday Sale! 25% Off Platinum Membership$399.99$299.99 (ends December 31).Join the Geek Army (starting from just $1.67/month)
Nginx Proxy Manager
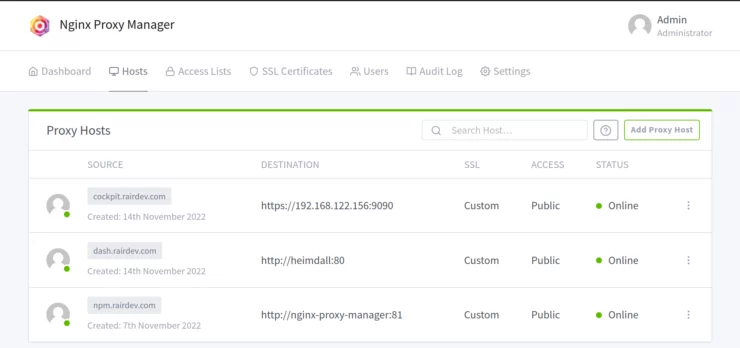
In this section, we will be adding Nginx Proxy Manager as a reverse proxy. This piece of software adds a nice user interface to the popular NGINX webserver common throughout the internet. Acting as a reverse proxy, NPM allows us to access all of our containers via a domain name (like https://service.example.com) instead of having to remember IP addresses and port numbers.
The setup is fairly straight forward and similar to Anand's. Open your compose file, and add the following:
  # Nginx Proxy Manager - Reverse Proxy with LetsEncrypt
  npm:
    <<: *common-keys-core # See EXTENSION FIELDS at the top
    container_name: nginx-proxy-manager
    # Use the fully qualified name to pull including the docker.io portion
    image: 'docker.io/jc21/nginx-proxy-manager:latest'
    # We will let Podman assign a Dynamic IP
    networks:
      - npm_proxy
    # If you REALLY need a static IP (normally not necessary) and are using podman-compose version <= 1.0.3,
    # you will need to create the npm_proxy network manually with podman, using the --subnet flag. If you've done that you can use the following:
    #  networks:
    #    npm_proxy:
    #      ipv4_address: 192.168.89.254
    ports:
      - '80:80' # Public HTTP Port. Port Forwarding on Router is ON.
      - '443:443' # Public HTTPS Port. Port Forwarding on Router is ON.
      - '81:81' # Admin Web Port. Port Forwarding on Router is OFF. Internal Home Network Access only.
    volumes:
      - $DOCKERDIR/appdata/npm/config:/config
      - $DOCKERDIR/appdata/npm/letsencrypt:/etc/letsencrypt
      - $DOCKERDIR/appdata/npm/data:/data
    environment:
      DB_SQLITE_FILE: "/config/database.sqlite"
      DISABLE_IPV6: 'true'
Note that the main difference between the above and Anand's compose file is that I'm not setting a static IP. My personal preference is to not set static IP's at all, and instead refer to containers by their names. This allows any IP changes to be insignificant to us, as Podman's internal DNS will always point us to the correct address regardless.
After adding the above, save and close.
Before starting our container, recall that Podman does not alter our firewall rules like Docker does (another security enhancement).
Thus, you will need to open ports 80, 443, and 81 in ufw:
sudo ufw allow 80,443,81/tcp comment Nginx-Proxy-Manager
Now we can start the container using:
podman-compose -f docker-compose.yml up -d
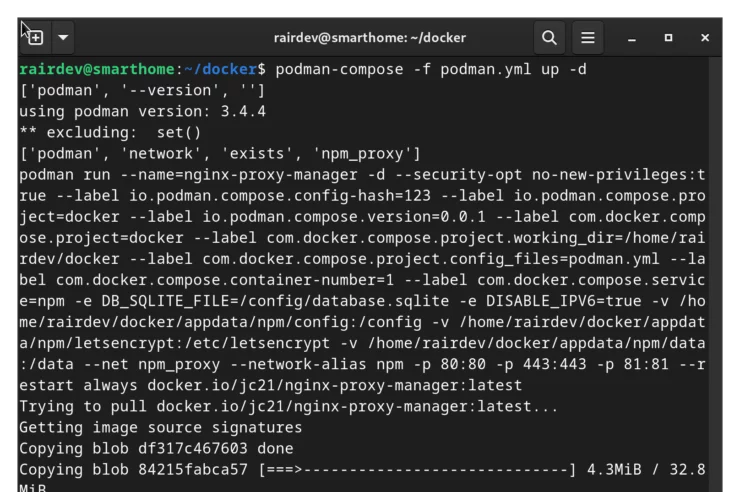
Now let's have a look at the app itself: Open a browser on your desktop and type in http://your-server-ip:81
If you don't know your server's IP, you can find it with:
ip -4 address
I highly recommend setting your server as a static DHCP lease in your router!
This should bring you to the login page for Nginx-Proxy-Manager.
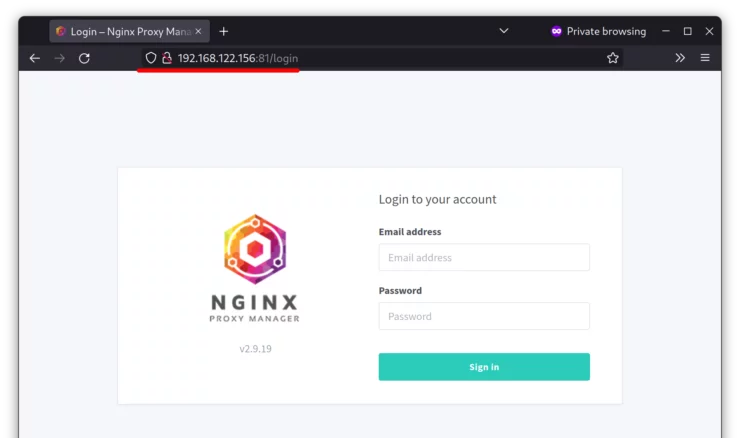
At this point you are at the same point in Anand's article titled: "Setting Up Reverse Proxy for Nginx Proxy Manager's Web Interface". Follow along to finish setting up your Nginx Proxy Manager with Podman.
Cockpit
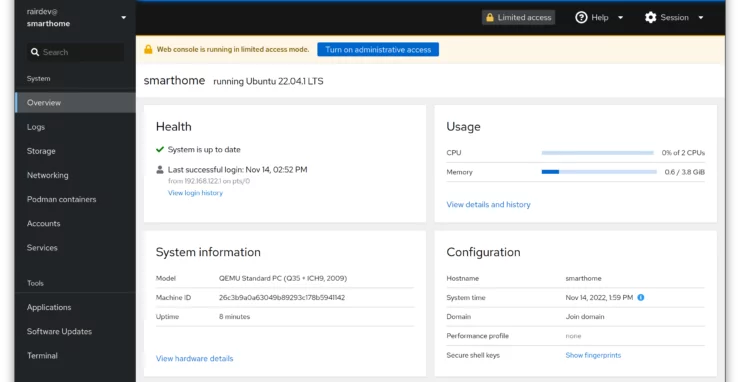
Cockpit is a web-based GUI for your server, and has a nice plugin for us to manage Podman containers. It is admittedly limited in some respects, but uses Podman's REST API instead of the socket. I find this approach more modern and secure.
Cockpit Installation
Cockpit is not intended to be run as a container, but instead directly on the host. It can manage more than just Podman containers, but those are our focus today. Install directly on the host with:
sudo apt install cockpit cockpit-podman
Once installed, we can start it and enable it at boot time with systemd:
sudo systemctl enable --now cockpit.socket
If you decide to access it only via host IP address on your local network, open port 9090 in your ufw firewall like we did above. Connect to Cockpit with https://your-server-ip:9090.
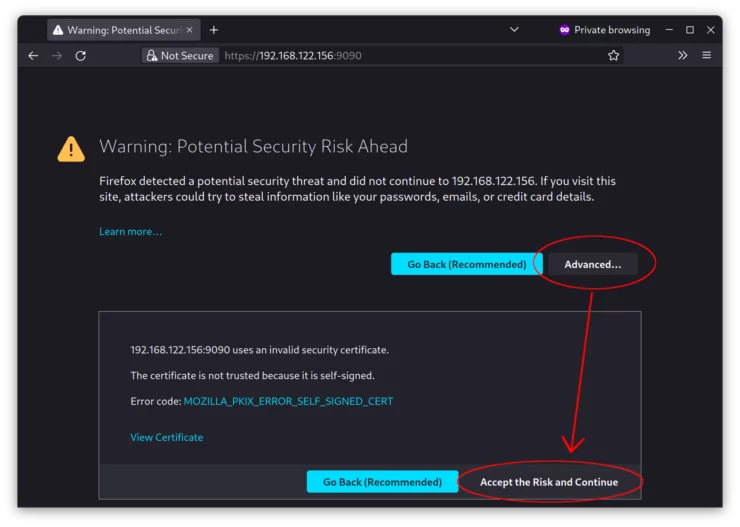
It's safe to ignore, you can continue to use Cockpit.
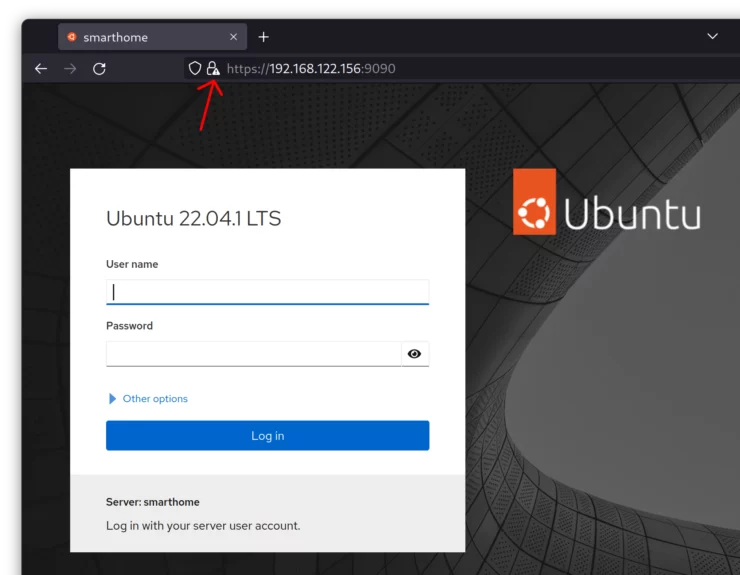
Access Cockpit Through Domain Name
If you'd like to access it through a domain name, either externally and/or internally, we have to make one change to the system. As a protective measure, Cockpit doesn't normally allow anything (like reverse proxies) in front of it. But we can change that behavior by creating Cockpit configuration file on the system just like we have before.
The configuration file is located at /etc/cockpit/cockpit.conf. Chances are this file does not exist yet, so we will create it and add the following:
Hint: Remember the sudo -e command from before?
[WebService]
# The domain name you'll be using goes here
Origins = https://some.domain.com
# Settings to ensure Cockpit works behind a reverse-proxy
ProtocolHeader = X-Forwarded-Proto
ForwardedForHeader = X-Forwarded-For
Save and close.
Restart Cockpit to enable the changes:
sudo systemctl restart cockpit.service
Now we head back to Nginx Proxy Manager. Create a new Proxy Host. After entering your desired domain name, there are a few critical settings to pay attention to:
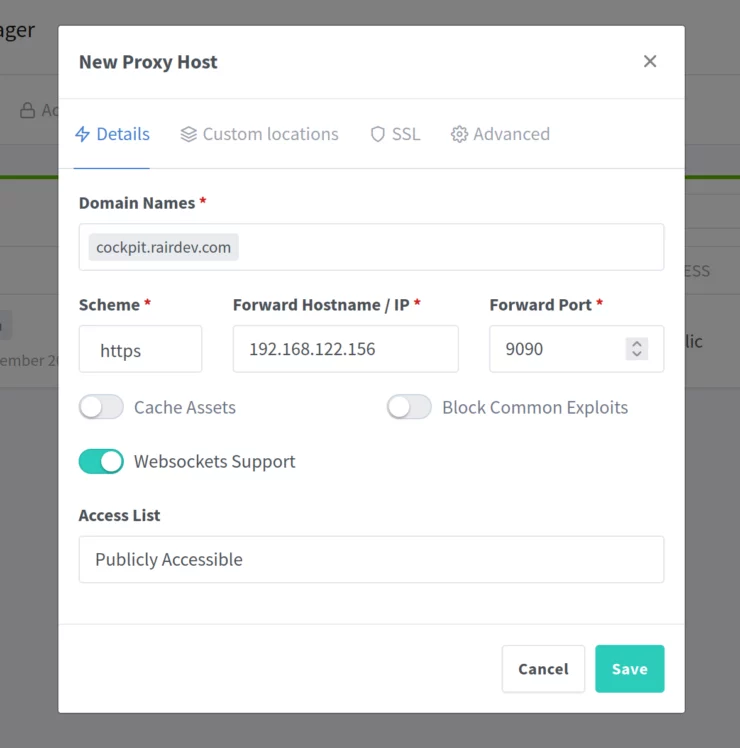
- Scheme: The scheme must be set to https. This is due to Cockpit using self-signed certificates by default. If you are having trouble or would just like to use http, you will need to add
AllowUnencrypted = trueto the config file above. - Forward Hostname / IP: We use the IP of the host. If we use localhost, or 127.0.0.1, Nginx Proxy Manager will not be able to find Cockpit. This is due to the way Podman creates and handles containers.
- Websockets Support: We must check this box for Cockpit to be accessible.
Choose your SSL settings as Anand has described and save.
You should now be able to reach Cockpit at the domain name you just set.
Using Cockpit
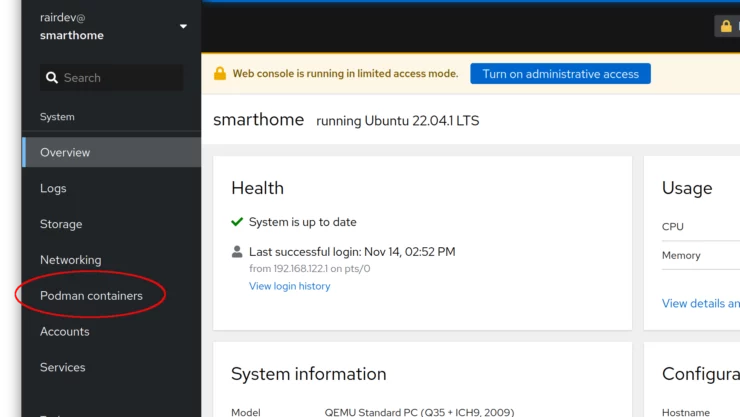
Login with your system credentials. On the left you will see lots of different sections with information about your system. You will also see a section called "Podman containers".
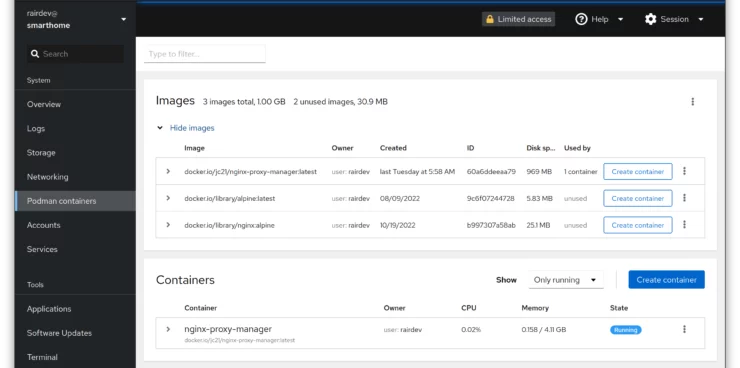
Here we can see images we've downloaded and both running and stopped containers. Clicking the arrow to the left of the container name allows us to see more details, logs, and instantly start a console in the container (if the container image supports it).
I will let you discover the rest of Cockpit's features. Check the documentation for more.
Other monitoring tools
Since I have left out Portainer, I wanted to mention some options you have if you're looking for more Podman dashboard information.
Uptime-Kuma
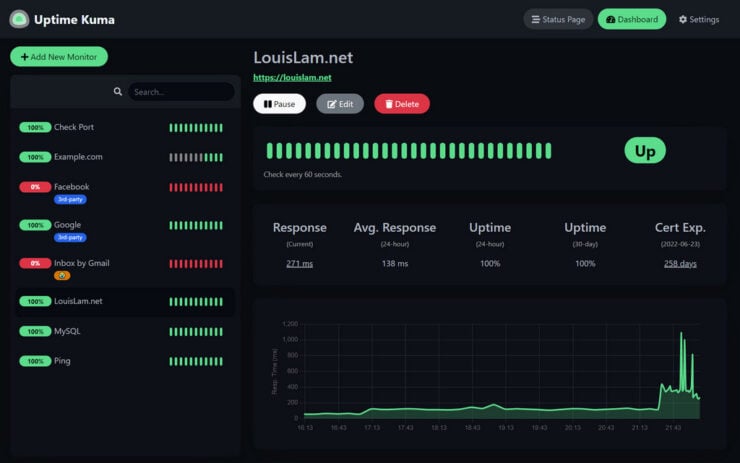
A nice dashboard for monitoring container status.
Grafana
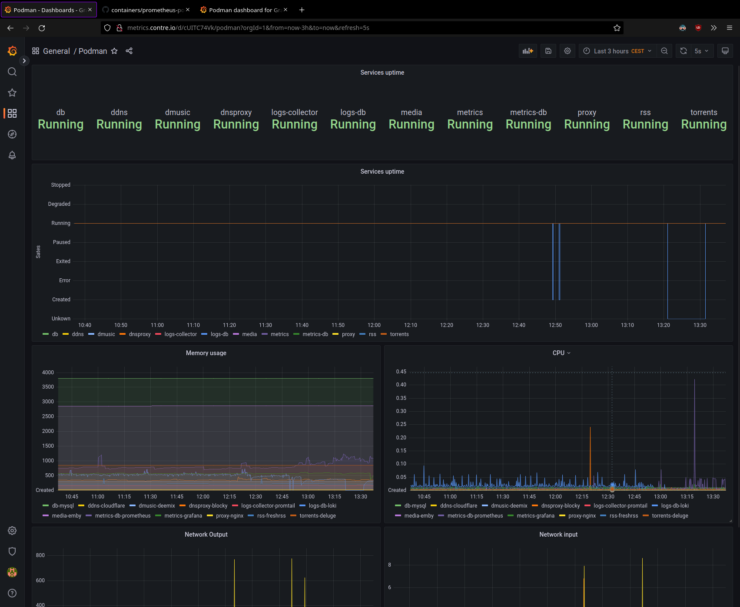
An infinitely customizable dashboard application that can take data from nearly any source and create a dashboard from it. Since we are talking Podman, here's an example of container stats.
You will also need Promethus Podman Exporter to export stats from Podman to Prometheus database.
Backends
I decided to keep this section short and give just a single example for now. Perhaps later I will expand this section with other apps. Per usual, more can be found in the SmartHomeBeginner GitHub Repository.
In your compose file, you might want to create a separator for each category of service; add a divider below your Nginx Proxy Manager if you'd like.
######################## DASHBOARDS ###################
I called mine Dashboards since this the next app on the list falls into the category. But you can name it anything you like, or follow Anand's naming scheme in the sister article.
Heimdall
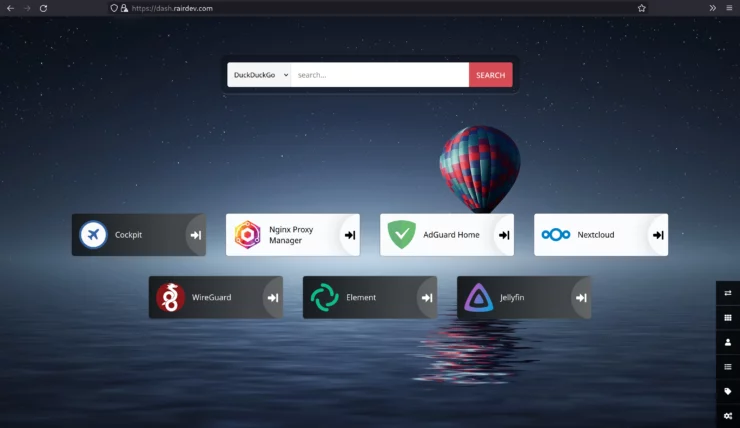
As you'll probably add a ton of apps to your container stack, you might want a way to organize links to them in a visual dashboard. I find this especially useful for users who have a hard time remembering all of the URL's for different apps.
Heimdall Podman Compose
In your compose file, add the following to add the Heimdall dashboard to your stack:
  heimdall:
    <<: *common-keys-core # See EXTENSION FIELDS at the top
    image: lscr.io/linuxserver/heimdall
    container_name: heimdall
    # We don't need to assign ports if we are accessing the apps through nginx proxy manager. If you want to access it via the server's IP, assign a port
    # ports:
      # - "83:80" # 80 to 82 already taken by other services
      # - "444:443" # 443 used by Nginx Proxy Manager. Disabled because we will put Heimdall behind proxy.
    volumes:
      - $DOCKERDIR/appdata/heimdall:/config
    environment:
      <<: *default-tz-puid-pgid
Save and close the file.
Start the container with the usual command:
podman-compose -f docker-compose.yml up -d
Add Heimdall to Nginx Proxy Manager
Feel free to add Heimdall to Nginx Proxy Manager. Since the Heimdall container resides in the same npm_proxy network as Nginx Proxy Manager, it can be found by using http://heimdall:80.
If your server is open to the internet, anyone fishing around could find your Heimdall dashboard! By default, there is no login or password. While not a huge security issue, by not setting any type of authentication, a bad actor can see whatever else you have running. I recommend limiting access to your local network, putting authorization and authentication in front of it, or using a Virtual Private Network (VPN) like Wireguard.
At the bare minimum, set a password for your dashboard.
Restart Containers and Start on Boot
Container restarts can be handled by Podman in much the same way Docker does. However the containers cannot be set to start on boot or after a reboot through Podman directly.
Fortunately, as stated in my previous article, Systemd to the rescue! If you are unfamiliar with Systemd and how your server relates to it, I recommend reading up on it. There are numerous articles explaining how it works.
The syntax and inner workings of a Systemd service can be complex.
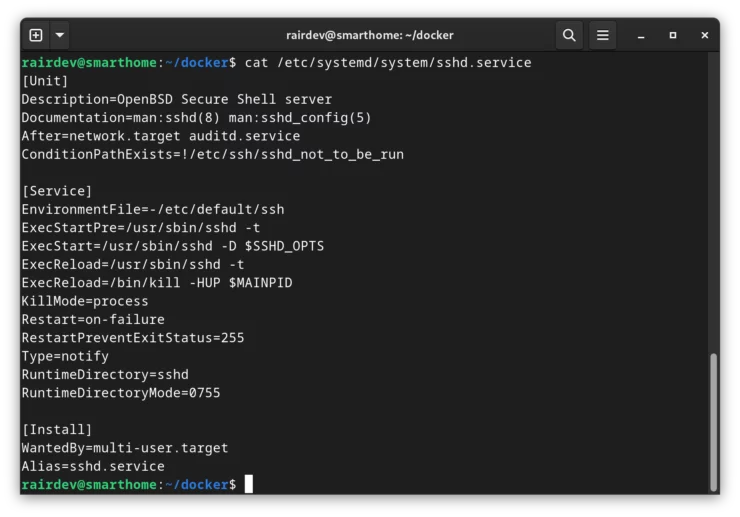
Fortunately, Podman comes with a tool to generate these files for us using the commands and variables we used to create the container previously. So let's generate some Systemd unit files to have the system manage the containers at boot and restart as needed.
Systemd Unit files
The first thing we must consider is that we are running in a rootless environment. This means that we don't want to create Systemd files that require sudo to run. Fortunately, we can create Systemd unit files that can be run in our user space! No sudo required!
Create our Systemd Userspace Directory
By using Systemd as a user, the default location for Systemd service files is within our user's home directory.
Normally this directory does not exist by default, so we need to create the directory where systemd will look for the configuration files.
mkdir -p ~/.config/systemd/user
cd $_
The command
cd is used to change directory. The $_ after is used to reference the last directory we interacted with. In this case, $_ will represent /home/rairdev/.config/systemd/user.Generate the Systemd Files
Now that we have created the directory, and are in the directory, let's have Podman generate the Systemd unit files for us:
podman generate systemd --new --name --files nginx-proxy-manager
podman generate systemduses a default template to create basic Systemd files for us.- The
--newflag creates unit files that do not expect the container to already exist. Instead it will 'run' a new container each time. - The
--nameflag means the unit file will refer to the container name, and not its ID. Otherwise you will have files called something likecontainer-9c878a22406711922fdb480ed66af1056cf162a20d6d92ab248e83b94c9351b4.service. - The
--filesflag means that the output will create a file instead of just outputting the result to your console. - And finally we use the name of the container we want to create the Systemd unit file for.
We can see that Podman has generated the Systemd files. Since I referenced a container, the Systemd unit file will be prefixed with "container-".

Repeat this step for any further containers you wish to have start at boot.
Restart Policy
You may have noticed I did not mention anything about a restart policy! By default, when using the podman generate systemd command, Podman defaults to "on-failure". This is generally good for most circumstances. The other policy options are listed in the link above, although there's not a lot of info on exactly how each acts.
If you'd like to set a different policy than the default, you can pass it as a command line option when generating the Systemd unit files:
podman generate systemd --restart-policy=always --new --name --files nginx-proxy-manager
By setting the restart policy to "always", the container will always try to restart. If you stop the container with
podman stop, the container will restart itself via Systemd. If it is failing to start due to a bad configuration, it will be stuck in a continuous restart loop!Enable to Start on Boot
Now that we have created the Systemd unit files, we simply need to enable them like we would any other service on our system.
systemctl --user enable --now container-nginx-proxy-manager
- The critical piece here is the use of the
--userflag. This allows even non-root users to create Systemd units. - By using
enable --now, we enable the container service at boot time, and start the Systemd unit now to use the restart policy you've set.
And that's it! You're set.
Checking Status, Updates, and Other Notes
To check the status of your container's Systemd unit, the command is similar to nearly any other Systemd service:
systemctl --user status container-nginx-proxy-manager
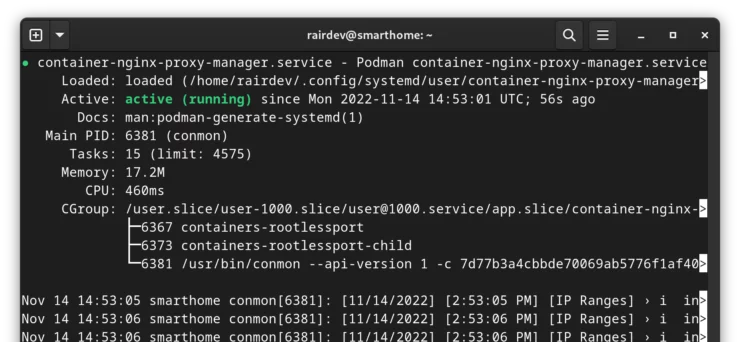
Besides the usual podman ps -a command, we can also see which Systemd unit files have loaded correctly or failed:
systemctl --user list-units container\*
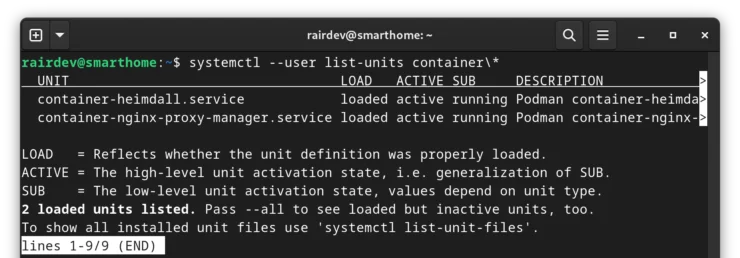
By using
container\*, we are asking Systemd to show us any units that start with (match) the name "container". An asterisk is used to match "anything", but must be "escaped" by putting the backslash "\" in front of it.Images With Version Tags
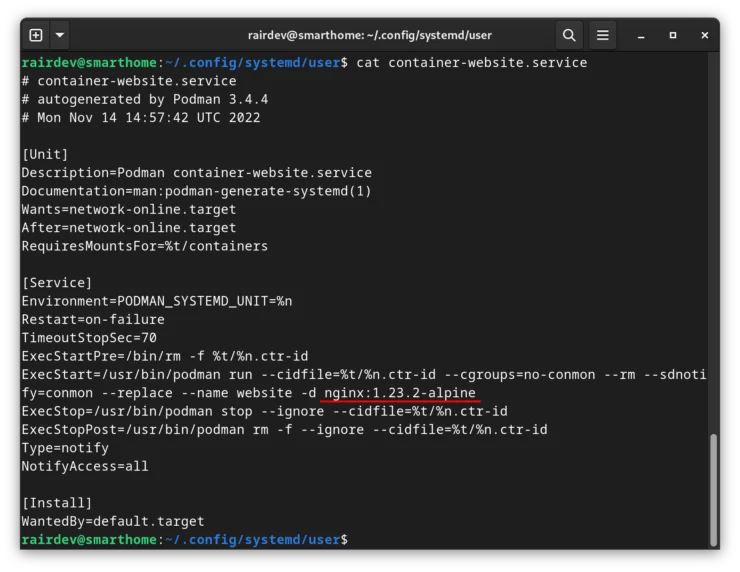
The last thing I wanted to mention is that if you are using version tags when running images, that version will be included in the Systemd unit file as shown above. Thus, if you update an app version in your compose file, you will need to re-generate the Systemd unit file. By running the same generate command as above, the new unit files will overwrite the old ones.
Afterwards, you will need to tell Systemd to look for an updated service file:
systemctl --user daemon-reload
There are more options available via Systemd (for example: container startup order) that you can read about in the Podman documentation.
Things to Know
Linuxserver.io Images
Linuxserver.io (LSIO) has spent a huge amount of time and resources building some amazing containers that prioritize simplicity and security. While these are much appreciated and necessary features in the Docker space, they have some characteristics that can be difficult to overcome using Podman.
For example: In rootless Podman, the "root" user (UID and GID 0) are actually just our user on the host, not the host system root user. However, many of the LSIO images do not allow running them as the "root" user within the container. I tried multiple ways trying to setup Podman (v. 3.4.4) to play nice with LSIO images, but some just would not allow me to override the error caused by this security feature.
It should be noted that some images do allow you to set the PUID and PGID environment variables to 0 without any issues. I have not tested many apps, but some work while others do not. YMMV.
That being said, LSIO images can easily be used in Podman, but there is no official support for Podman. The main thing to be aware of is the files and directories you bind to the container will be owned by a user other than your own on the host. Depending on how you (or other containers) access these files, it may or may not be an issue for your setup.
Create a System Group (Optional)
If, for example, you want to share a directory across containers, and also access it as your user, we can create a system group and add our user to it.
Assuming your user has an ID of 1000, and we have our PUID and PGID environmental variables set to 1000, files created by these images will be owned by user 100999 (see above for a more in-depth explanation).
sudo addgroup --gid 100999 media
sudo usermod -aG media rairdev
- The first command is adding a group to our system called "media" with the group ID of 100999.
- The second command is to add the group named "media" to our user's (rairdev) list of groups.
And now when I look at the files used by LSIO containers, I can open and modify them as long as they have permissions set for the group.

If a file or directory is giving "Permission Denied" errors, you can still access and edit them using the
podman unshare command discussed above.Portainer for Podman
I know many of you rely heavily on Portainer to manage your containers and view their status. I did not include it as one of the apps above for two reasons.
1. We Must Create and Expose a Podman Socket
This isn't ultimately that big of a deal as the socket has good permissions and only allows our user access to it. I just have a hard time exposing such a powerful feature to a piece of software under heavy development. Maybe I just have trust issues.
2. Only Partial Podman Support
After nearly 2 years of people requesting Podman support, users finally got their wish - well sort of. Portainer does work with Podman, but many features are missing and I personally found the experience to be less than stellar. It does appear, however, that the Portainer team is slowly building support for Podman. Keep an eye on this GitHub issue which is tracking the current support for Podman.
How do I Use Portainer with Podman?
I don't care about your trust issues; how do I use Portainer with Podman anyways!
For those of you insisting on continuing to use Portainer, the instructions for using it with Podman can be found in this post on their GitHub. Make sure to pay attention to use the "Rootless" section.
How do I Use an Updated Version of Podman?
As of writing, Podman in Ubuntu repositories is at version 3.4.4. I find this odd as there have been 3 security releases since then and it should be at least at 3.4.7.
The official Podman documentation does a good job of explaining how to install updated versions of Podman. It involves adding some repositories from Kubic. Unfortuantely, the "testing" repo is very far behind at version 3.4.2. However, if you're willing to live on the bleeding edge, "unstable" has just released the most updated version of Podman - 4.3.0.
Can Podman Auto-update My Containers?
Yes! A popular container to run with Docker called Watchtower can automatically update containers for you when new versions are pushed to a repository. Podman can also do this via Systemd. The documentation does a good job of covering the auto-update process, but I will give you an example using podman-compose.
Open your compose file. Under any service we want auto-updated, we need to add a label. For example I will add one to my Heimdall container:
  heimdall:
    ...
    environment:
      <<: *default-tz-puid-pgid
    labels:
      - "io.containers.autoupdate=registry"
You could also add this to an extensions field if you'd like to enable auto-updates to multiple services quickly.
After adding this to your compose file, you will have to: Destroy the old container, recreate it, regenerate the Systemd unit file, and re-enable the Systemd unit file as described above.
Testing Podman Container Auto Update
Once you've accomplished that, try out a "dry-run"
podman auto-update --dry-run

If everything works as expected, you should see the above. Note the "UPDATED" column. If it reads "pending", there is an update available but it hasn't been applied yet. Removing the --dry-run flag will update the container for you and restart it. When completed, the final column should now read "true".
If the container fails to start for some reason, the default behavior is for podman to rollback the container to the previously working version.
Auto Updating Podman Containers on Schedule
If you'd like your containers to auto-update themselves on a schedule, you have 2 options: the built-in systemd unit, or you can add this command to a cron job. I'll let you discover the latter. To use the built-in systemd unit, we simply need to enable it. This unit, by default, relies on a systemd timer to run everyday at midnight and update your containers.
Enable it with:
systemctl --user enable --now podman-auto-update.service
To modify the time the unit runs or how frequently, you can edit the systemd timer files located in /usr/lib/systemd/user/podman-auto-update.timer. Better yet, before editing the files, make a copy of them into your user's .config directory we created earlier to ensure they aren't affected by updates!
Concluding Remarks
While Podman is billed as a "direct drop-in replacement" for Docker, there are still some steps involved on getting Podman to behave as expected on non-Red Hat based operating systems. I know it's taken some work to get there, but hopefully this Podman How-to has taken some of the mystery out of switching from Docker to Podman.
Podman is also updated regularly (although not in Ubuntu's repos) to become more and more in parity with Docker.
Podman-compose has also come a long way and is constantly under development to act in a predictable manner while providing compatibility with docker-compose.
These two tools took some getting used to since they are somewhat different than Docker. But as the development continues, I see Podman continuing to improve and proving easier and easier for users to migrate to. After using Podman exclusively for well over a year, I can say that it is challenging at times, but rewarding overall.
If you feel energized and want to challenge yourself, you can take our Docker Traefik guide and adapt it for Podman.
Thank you, reader, for taking the time to follow along this guide on replacing Docker with Podman. Let me know if you have any comments, suggestions, or wishes for additional posts in the comment section below! Happy hosting!



![Ultimate Docker Server: Getting Started with OS Preparation [Part 1] Docker Server Tutorials 1 OS Preparation](https://www.smarthomebeginner.com/images/2024/01/Docker-Series-01-Intro-and-OS-Prep.png)