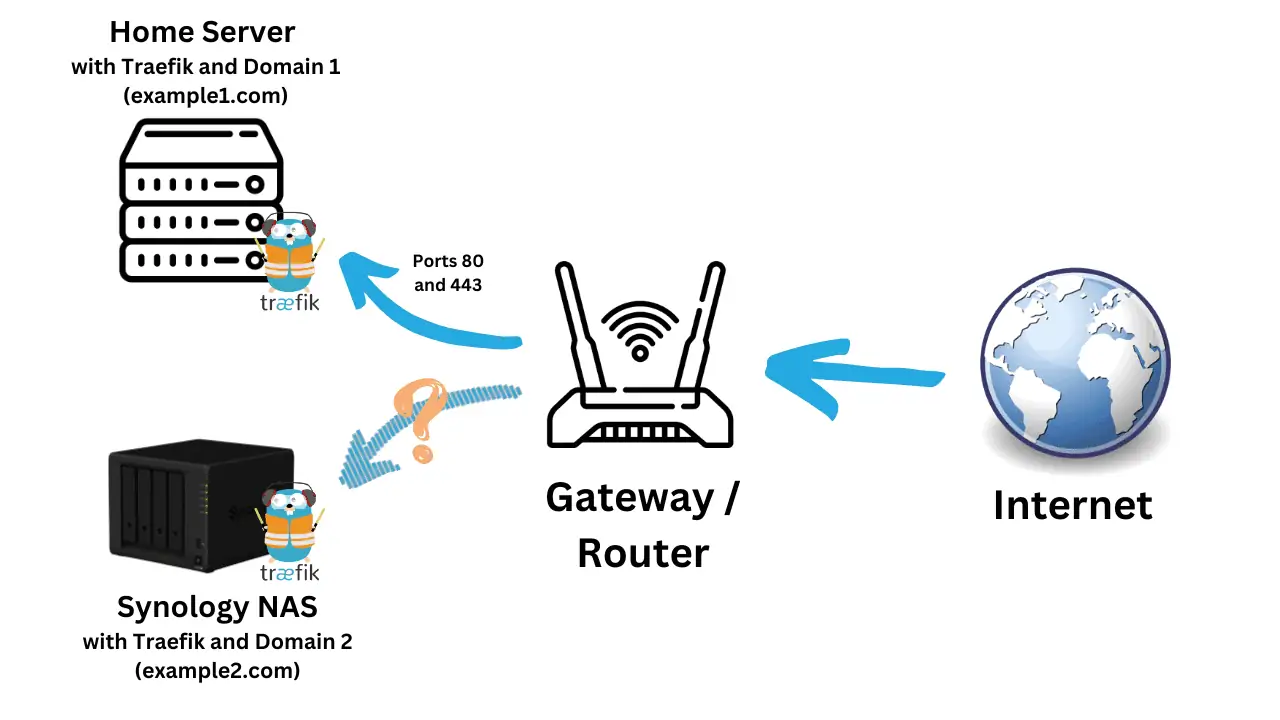
Docker can help you build a Home Media Server in just minutes without complex setups. In this post, I will show you how to build a perfect Docker media server using Docker and Ubuntu.
When I say, Media Server, I do not just mean Plex or Emby or Jellyfin. This all-in-one media server built with Docker will automate media download, organization, streaming, and sharing with family/friends. This setup is an integral part of my smart home setup. [Read: 60+ Best Docker Containers for Home Server Beginners 2023]
Note that this a "basic" level post on how to setup a perfect home media server using Docker only. We will also add a simple reverse proxy solution with Nginx reverse proxy, for easy access to your services, SSL, and security. For most homelab users this is sufficient.
Traefik Reverse Proxy is covered in detail in my advanced guide. In addition, a similar setup is also possible with Podman instead of Docker.
This post is written with a lot of details to help newbies get started on this journey. It may look long but the process itself should take less than an hour. So let's get started with building the perfect Docker media server stack with Ubuntu 22.04 LTS Jammy Jellyfish.
Table of Contents
- About This Docker Media Server Guide
- What is a Home Media Server?
- Objectives of this Media Server with Docker
- What is Docker?
- Requirements for Media Server Docker Stack
- Setting Up the Docker Environment
- Building Docker Media Server
- Membership Required
- Closing Thoughts
- Membership Required
About This Docker Media Server Guide
Previously, this post was written for Ubuntu 18.04 LTS Bionic. I should have updated it for 20.04 but I didn't. Plus the differences between my original guide and GitHub Repo became more and more glaring, resulting in confusion for readers.
So this this post is highly overdue.
At the time of publishing this (May 2022), the guide should strictly follow my GitHub repo.
So, let us start with some basics.
What is a Home Media Server?
A Home Media Server is a server located in your home network that acts as a central data storage and serving device. It is a key part of most "homelabs".
Typically, a home server is always on, has tons of storage capacity and ready to serve files (including media) when the need arises. We have covered several home server topics in great detail in the past. If you do not yet have a home server or are considering building one, then read this summary on the most common NAS or Home Server uses.
In my case, I use:
- Dedicated cloud server on Proxmox: It hosts many guest machines, including my main Docker media server. [Read: Proxmox vs ESXi: 9 Compelling reasons why my choice was clear]
- Synology DS918+: I run many docker service at home, including media servers such as Plex. [Read: 8 Best NAS with Plex Server Support [2022] – 4k, Transcoding, etc.]
- Ubuntu Virtual Machine on Proxmox: This runs a docker web stack with WordPress, Nginx, PHP, and more. [Read: WordPress on Docker with Nginx, Traefik, LE SSL, Security, and Speed]
My Proxmox dedicated server (#1 above) runs a Ubuntu 22.04 LXC container with Jellyfin, Radarr, Sonarr, most of the services described in this post. This Docker media server guide is based on a virtual machine I setup from scratch to walk you through the process. [Read: 10 Best Media Server for Plex + one SURPRISING bonus [2022]]
Operating System for Docker Media Server
Once you have hardware figured out, next big question is the operating system. In my opinion, Linux is the best operating system to build your home media server on. But then, there are several Linux home server distros available, which offer stability and performance. So which one to use?
I always recommend Ubuntu Server, more specifically the LTS (Long Term Support Releases), which are supported for 5 years. Once you build your server you can let it run for 5 years with all security updates from the Ubuntu team.
I have tested this guide on both Ubuntu Server 20.04 Focal Fossa and 22.04 Jammy Jellyfish.
Having said that, the docker compose examples in this guide will also work on Network Attached Storage devices such as Synology or QNAP:
- Ultimate Synology NAS Docker Compose Media Server [2022]
- Ultimate QNAP Docker Compose and Container Station Guide [2023]
Objectives of this Media Server with Docker
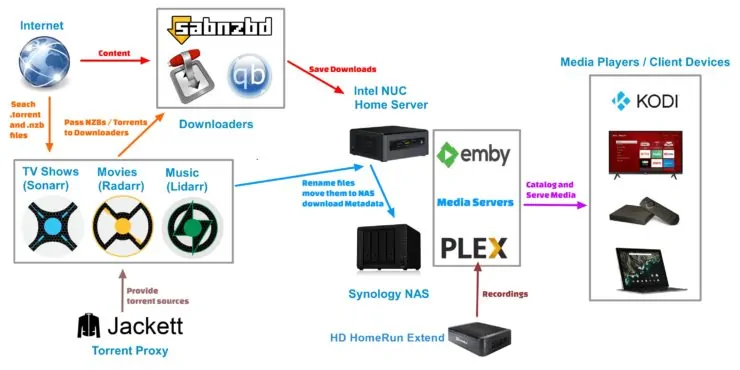
One of the big tasks of a completely automated media server is media aggregation. For example, when a TV show episode becomes available, automatically download it, collect its poster, fanart, subtitle, etc., put them all in a folder of your choice (eg. inside your TV Shows folder), update your media library (eg. on Jellyfin, Emby, or Plex) and then send a notification to you (eg. Email, Mobile notification, etc.) saying your episode is ready to watch.
Sounds awesome right?
How does everything fit together - the big picture
Here is a list of functions I want on my basic level perfect Docker Media Server to do:
- Automated TV Show download and organization
- Automated Movie download and organization
- On-demand or automated torrent download
- On-demand or automated NZB (Usenet) download
- Serve and Stream Media to Devices in the house and outside through internet
- On demand torrent and NZB search interface
- Act as a personal cloud server with secure file access anywhere
- Provide a unified interface to access all the apps
- Update all the apps automatically
Apps for Docker Media Server
There are several apps that can do such tasks and we have compiled them in our list of 60+ best Docker containers for home server beginners.

Here is a summary of some of the apps I want to build into this Docker media server stack:
- Frontends: Heimdall, Nginx Proxy Manager
- Downloaders: Nzbget, qBittorent with Gluetun VPN
- Indexer Proxy: Prowlarr
- PVRs: Lidarr, Radarr, Sonarr, Readarr
- Media Servers: Airsonic Advanced, Plex, Jellyfin
- Communication: Ombi, Tautulli
- Media File Management: Bazarr, Picard, Handbrake
- System Utilities: Dozzle
- Maintenance: Watchtower and Docker-GC
It may seem like a complex setup, but trust me, docker (along with Docker Compose) can make installation, migration, and maintenance of these home server apps easier.
While I will touch very briefly on what these apps do, explaining the functionality of these is not the purpose of this post. In addition, I will not go into detailed configuration of these apps. This post is only to get you started on the journey.
Look out for more specific posts in future that will guide you through some of the specific configurations in detail.
What is Docker?
Before we get started with building a docker media server, it only makes sense to touch on Docker. We have already covered What is Docker and how it compares to a Virtual Machine such as VirtualBox. Therefore, we won't go into much detail here.
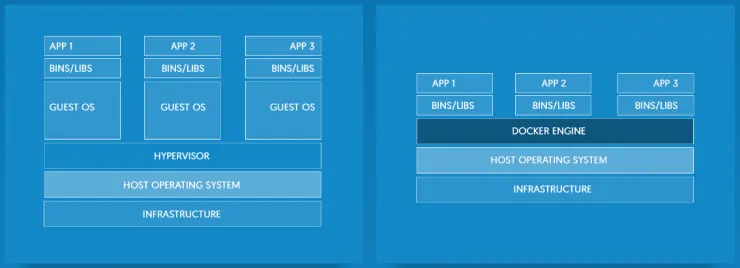
Briefly, Docker allows for operating-system-level virtualization. What this means is that applications can be installed inside virtual "containers", completed isolated from the host operating system.
Unlike a virtual machine, which needs guest OS for each of the virtual machines, a Docker container does not need a separate Operating system. So docker containers can be created and destroyed in seconds. The containers also boot in seconds and so your app is ready to roll very quickly.
Docker works natively on Linux, but is also available for Mac and Windows.
Recommended Guides on Docker:
OK Great, but why build a Media Server on Docker?
Again, this has been explained in detail in my original docker guide.
The traditional way of building a Home Media Server involves setting up the operating system, adding repositories, downloading the apps, installing the pre-requisites/dependencies, installing the app, and configuring the app.
This is cumbersome on Linux and requires extensive commandline work.
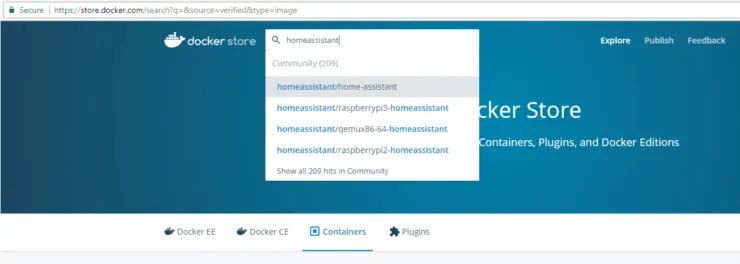
In Docker, home server apps such as Radarr, Sonarr, Plex, etc. can be installed with ease without worrying about pre-requisites or incompatibilities. All requirements are already pre-packaged with each container.
Most well-known apps are already containerized by the Docker community and available through the Docker Store. Many of them even have example Docker compose files. [Read: Podman vs Docker: 6 Reasons why I am HAPPY I switched]
What is Docker Compose?
Docker already makes installation of applications easier. But it gets even better. With Docker Compose, you can edit the compose file to set some configuration parameters (eg. download directory, seed ratio, etc.) and run the file and all your containerized apps can be configured and started with just one command.
But wait, there is more. Once you create your docker compose files, it becomes so much easier to migrate your apps, rebuild your servers, etc. I have moved my setup to many servers. All I have to do is install Ubuntu Server, copy over my Docker data folder (or Docker Root Folder as we will call it in this guide), edit my environmental variables, and start the stack from compose file.
All the 50 or so apps I have defined in my compose files are up in minutes and continue from where I left off in my previous server.
A Docker Compose file is like a template of all the apps in your docker stack with their basic configuration. You can even share your template with others, just like I am doing in this guide.
The scope of this post is to build a Docker-Compose media server. However, there are other methods to simplify installation of Docker containers (e.g. Portainer, Ansible, etc.). Explaining those methods is outside the scope of this post.
Requirements for Media Server Docker Stack
There are several requirements that must be satisfied before you can start building your docker media server. Let's take it one at a time.
1. Setting up Host Operating Systems
Having a Ubuntu or Debian system ready is a basic requirement of this guide. Windows and Mac users check out Docker Desktop.
At this point, the assumption is that you already have Ubuntu running. If not, check out previous docker guide.
Recommended Guides for Ubuntu:
For this guide, I am using Ubuntu Server 22.04 as Virtual Machine on Proxmox with SSH enabled. [Read: How to simplify SSH access by using SSH config file on remote server]
But you could install any flavor of Ubuntu or Debian. Previously, I have used Pop OS and Linux Mint with this setup, with no issues.
2. Install Docker on Ubuntu Server
Now we are all set to start building our Docker media server. First, we need to install Docker. This has been covered in detail in the posts below:
- Install Docker and Docker Compose on Ubuntu 22.04 Jammy Jellyfish
- Install Docker and Docker Compose on Ubuntu 20.04 Focal Fossa
In addition, there is the official Docker documentation.
But briefly the process involves adding the Docker official repo and installing docker-ce. Here are the 6 commands to run in sequence on Ubuntu 22.04 LTS and 20.04 LTS:
sudo apt update
sudo apt install apt-transport-https ca-certificates curl software-properties-common gnupg lsb-release
curl -fsSL https://download.docker.com/linux/ubuntu/gpg | sudo gpg --dearmor -o /usr/share/keyrings/docker-archive-keyring.gpg
echo "deb [arch=$(dpkg --print-architecture) signed-by=/usr/share/keyrings/docker-archive-keyring.gpg] https://download.docker.com/linux/ubuntu $(lsb_release -cs) stable" | sudo tee /etc/apt/sources.list.d/docker.list > /dev/null
sudo apt update
sudo apt install docker-ce
Once installed, verify that Docker is running before proceeding further with the Docker media server setup. In addition, follow the post-installation tips provided in the guides linked above.
3. Install Docker Compose on Ubuntu
Next, let us install Docker compose. This again has been covered in detail below:
- Install Docker and Docker Compose on Ubuntu 22.04 Jammy Jellyfish
- Install Docker and Docker Compose on Ubuntu 20.04 Focal Fossa
Briefly, the steps involve downloading the latest release of docker-compose to /usr/local/bin/ and making it executable. The commands to follow in sequence are listed below:
sudo curl -L https://github.com/docker/compose/releases/download/v2.5.0/docker-compose-`uname -s`-`uname -m` -o /usr/local/bin/docker-compose
sudo chmod +x /usr/local/bin/docker-compose
At the time of writing this guide, v2.5.0 was the latest release of Docker Compose.
If correctly installed you should see the version number as output for this command: docker-compose --version.
4. Domain Name or Not?
For this basic home media server guide, you do not need a domain name if you plan to use within your home or private network. You could just use local DNS feature in PiHole or AdGuard Home. Alternatively, you can just use the internal IP addresses and port (e.g. 192.168.1.100:6789 for Nzbget web interface).
No port forwarding is necessary in this case but the downside is you will be able to access everything from only inside your home network.
When needed you could VPN into your home network using Wireguard and access all your resources. [Read: Complete Wireguard Setup in 20 min – Better Linux VPN Server]
To Reverse Proxy or Not?
But if you plan to expose your apps to the internet, then without a domain name, you will have to remember your public IP (which may change if your ISP issues dynamic IPs). In addition, you will also have to expose ports and do port forwarding on your router, which is a security loop hole.
A domain name makes it looks nicer (e.g. mydomain.com:6789 for Nzbget). But the security problem of exposing ports still remains.
This is where a reverse proxy like Nginx Proxy manager (or Traefik, HAProxy, etc.) comes in handy (e.g. nzbget.mydomain.com). No ports exposed except 80 (HTTP) or 443 (HTTPS). For this, you will need a domain name.
Automated Homelab Setup with Docker Compose
Deployarr can install 100+ Docker Apps in minutes, including Traefik, Authelia, Starr Apps, and more. Everything discussed in this post is done automatically by Deployarr.
With free Dynamic DNS services (DuckDNS, Afraid.org, etc.) you will have to go with the subdirectory URL structure (e.g. mydomain.com/nzbget). Although this was explained in my previous Docker server guides, I do not use or recommend this.
If you are going to through the whole journey with me, then I strongly recommend a domain name. A private domain name only costs about $7.XX a year with Cloudflare and I strongly recommend that. In this guide, I will use my burner domain name: simpletechie.com.
5. Proper DNS Records
If you choose to setup Nginx Proxy Manager, then in addition to having a private domain name, you will have to have correct DNS records with your domain registrar.
My DNS provider is Cloudflare. I recommend moving your DNS to Cloudflare, which is amazingly fast, and free (and I get no money to say this). [Must Read: Cloudflare Settings for Traefik Docker: DDNS, CNAMEs, & Tweaks]
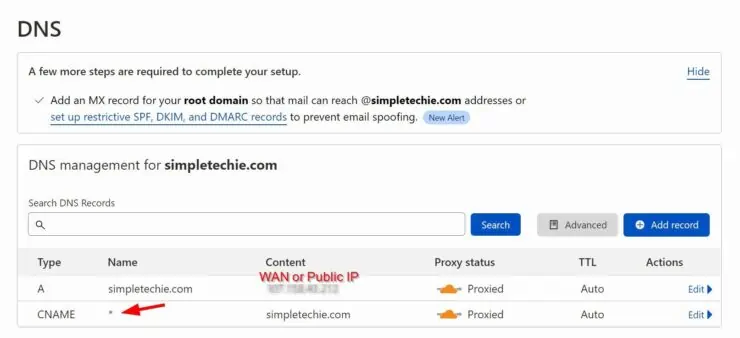
On Cloudflare, you have to point your root domain (e.g. simpletechie.com) to your WAN IP (external IP provided by your ISP) using an A record, as shown above. Then, add either a wildcard CNAME (*) or individual subdomains (portainer, nzbget, etc.), all pointing to your root domain (@ for the host), as shown above (this does not require a paid account).
6. Cloudflare SSL Settings
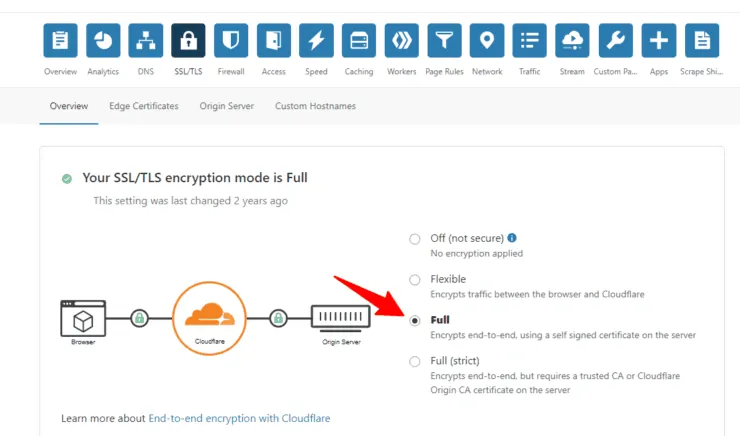
If you have Cloudflare, you will also have to adjust Cloudflare's SSL settings to avoid indefinite redirects. Go to SSL/TLS settings for the domain and change SSL to Full as shown below.
7. Port Forwarding for Reverse Proxy
Lastly, you need to enable port forwarding on your router or gateway.
Nginx Proxy Manager (and Traefik, if you decide to go with it instead) uses ports 80 and 443. The traffic received on these ports from the internet must be forwarded to the internal/local IP address of the docker host running Nginx Proxy Manager. In this guide, we going to use 192.168.1.100, which is the IP of my Docker host (don't forget to use yours instead).
Since everything else is going to be behind Nginx reverse proxy, no other ports need to be (and should be) forwarded.
Setting Up the Docker Environment
The groundwork is done. We have the server, operating system, DNS records, and Docker in place. Let us start laying the foundation for us to start building our perfect media server Docker stack.
1. Folders and Files
I have a specific folder structure I use for my setup, with everything I need to manage the server in one place. This is the base of all of my Docker guides and the GitHub repo.
So here it goes:
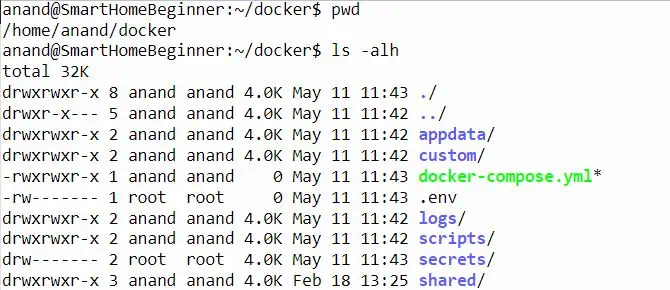
As you can see above, I have a docker folder in my home directory. This is the root Docker data folder. Let us call this DOCKER ROOT FOLDER. This will house all our docker related folders and files:
- appdata - this folder will store the data for all our apps and services.
- custom - this folder will store our custom docker builds (Dockerfile). The only place I use this is to customize the PHP7 container for my WordPress site. For this guide, you can safetly ignore it.
- logs - to centralize all relevant logs. I use this to store my script logs, traefik logs, etc. Although you can customize your apps (e.g. Nginx Proxy Manager) to store logs in this folder, we won't cover that in this guide. So you can safely ignore this folder.
- scripts - to store all scripts. I use this folder to store my scripts for rClone, systemd, backup, etc. You can safely ignore this folder.
- secrets - to store credentials used by apps securely. See Docker secrets. Notice that the folder is owned by root and permissions are set to 600. We won't be using secrets in this basic docker server guide. So you can ignore it.
- shared - to store shared information. I save a lot of things in this folder that I share between 3 docker hosts (e.g. SSH config, .bash_aliases, etc.). For this guide, you can ignore this folder.
- docker-compose.yml - this is our template or configuration file for all our services. We will create this later in the guide.
- .env - to store credentials used by apps securely as variable names. This way I wont have to use real values in docker-compose.yml (for security). And, I can use the variable names in many places. Notice that the file is owned by root and permissions are set to 600.
As in the description of each folder (and in bold font), you will need only a few from the above list for this basic docker media server guide.
But, if you start here and continue to follow my other guides, you will have to create the rest later on.
2. Docker Root Folder Permissions
Assuming that you have created the files and folders listed above, let us set the right permissions for them. We will need acl for this. If it is not installed, install it using:
sudo apt install acl
Next, set the permission for /home/anand/docker folder (anand being the username of the user) as follows:
sudo chmod 775 /home/anand/docker
sudo setfacl -Rdm g:docker:rwx /home/anand/docker
sudo setfacl -Rm g:docker:rwx /home/anand/docker
The above commands provides access to the contents of the docker root folder (both existing and new stuff) to the docker group. Some may disagree with the liberal permissions above but again this is for home use and it is restrictive enough.
In my experience, this has addressed many permissions issues I have faced in the past due to containers not being able to access the contents of docker root folder.
3. Environmental Variables (.env) + Permissions
We are going to put some frequently used information in a common location and call them up as needed using variable names. This is what setting up environmental variables means in simple terms.
So if you haven't already created, create and set restrictive permissions for .env file. The dot in front is not a typo, it hides the file in directory listings. From inside docker root folder:
touch .env
sudo chown root:root .env
sudo chmod 600 .env
From now on, to edit the .env file you will have to be either logged in as root or elevate your privileges by using sudo. Let us now open the file for editing:
sudo nano ~/docker/.env
Add the following environmental variables to it:
PUID=1000
PGID=1000
TZ="Europe/Zurich"
USERDIR="/home/anand"
DOCKERDIR="/home/anand/docker"
DATADIR="/media/storage"
Replace/Configure:
- PUID and PGID - the user ID and group ID of the linux user (anand), who we want to run the home server apps as. Both of these can be obtained using the id command as shown below.
As in the above picture, we are going to use 1000 for both PUID and PGID.
- TZ - the timezone that you want to set for your containers. Get your TZ from this timezone database.
- USERDIR - the path to the home folder of the current user (typically /home/USER).
- DOCKERDIR - the docker root folder that will house all persitent data folders for docker apps. We created this in the steps above.
- DATADIR - the data folder that store your media and other stuff. This could be an external drive or a network folder. [Read: Install and configure NFS server on Ubuntu for serving files]
Save and exit nano (Ctrl X followed by Y and Enter).
These environmental variables will be referred to using $VARIABLE_NAME throughout the docker-compose file. Their values will be automatically pulled from the environment file that we created/edited above.
As we go through this guide, we will continue to add more environmental variables to the .env file. You will find an example .env in my GitHub repo.
At any time, you can save and exit by pressing Ctrl + X -> y -> Enter and reopen for editing with the above nano command.
That's it, the basic prep work to build our docker home server is done.
4. Docker and Docker Compose Usage
In the past, we have listed a few good docker and docker compose commands to know. But I will expand on them here anyway.
Starting Containers using Docker Compose
This section is an intro to some of the commands you will use later in this guide. Running them at this point in the guide will throw errors. After adding compose options for each container (note that we have not added these yet), I recommend saving, exiting, and running the compose file using the following command to check if the container app starts correctly.
sudo docker-compose -f ~/docker/docker-compose.yml up -d
Replace docker-compose.yml with the actual name of the compose file (mine varies depending on the host).
The -d option daemonizes it in the background. Without it, you will see real-time logs, which is another way of making sure no errors are thrown. Press Ctrl + C to exit out of the real-time logs.
Also notice we are using sudo in front because we chose not to add the user (anand) to docker group.
See Docker Containers
At any time, you can check all the docker containers you have on your system (both running and stopped) using the following command:
sudo docker ps -a
As an example here is a list of my containers for now. "STATUS" column shows whether a container is running (for how long) or exited. The last column shows the friendly name of the container.
Check Docker Container Logs
If you want to check the logs while the container starts you can use the following command:
sudo docker-compose -f ~/docker/docker-compose.yml logs
Or,
sudo docker logs
In addition, you can also specify the name of the specific container at the end of the previous command if you want to see logs of a specific container. Here is a screenshot of the docker logs for my transmission-vpn container that was generated using the following command:
sudo docker-compose -f ~/docker/docker-compose.yml logs transmission-vpn
Finally, if you want to follow the logs in real-time (tailing), then use:
sudo docker-compose -f ~/docker/docker-compose.yml logs transmission-vpn logs -tf --tail="50"
This will show you the last 50 lines of the log, while following it in real-time.

At any time, you can exit from the real-time logs screen by pressing Ctrl + C.
Stopping / Restarting Containers using Docker Compose
To stop any running docker container, use the following command:
sudo docker-compose -f ~/docker/docker-compose.yml stop CONTAINER-NAME
Replace CONTAINER-NAME with the friendly name of the container. You can also replace stop with restart. To completely stop and remove containers, images, volumes, and networks (go back to how it was before running docker compose file), use the following command:
sudo docker-compose -f ~/docker/docker-compose.yml down
Docker Cleanup
Remember, one of the biggest benefits of Docker is that it is extremely hard to mess up your host operating system. So you can create and destroy containers at will. But over time leftover Docker images, containers, and volumes can take several GBs of space. So at any time you can run the following clean up scripts and re-run your docker-compose as described above.
sudo docker system prune
sudo docker image prune
sudo docker volume prune
These commands will remove any stray containers, volumes, and images that are not running or are not associated with any containers. Remember, even if you remove something that was needed you can always recreate them by just running the docker compose file.
Building Docker Media Server
Finally, we are now ready to start building our media server with Docker. Let us look at docker-compose examples for a comprehensive autonomous media server setup.
Start the Docker Compose File
1. Define Docker Compose File Basics
Open the docker-compose.yml file:
nano /home/anand/docker/docker-compose.yml
Add the following line at the top:
version: "3.9"
It basically says we are going to use Docker Compose file format 3.9.
2. Define Default Network
########################### NETWORKS
# You may customize the network subnet (192.168.89.0/24) below as you please.
# Docker Compose version 3.5 or higher required to define networks this way.

networks:
  default:
    driver: bridge
  npm_proxy:
    name: npm_proxy
    driver: bridge
    ipam:
      config:
        - subnet: 192.168.89.0/24
We are defining two networks (default and npm_proxy). All services behind Nginx Proxy Manager network will use IP addresses between 192.168.89.1 and 192.168.89.254.
In this basic guide, we will not be using Socket Proxy to protect the Docker socket. It is probably not needed for Docker homelab environment. But if you decide to expand and use Docker Socket Proxy later on, you will to add a socket_proxy network as well.
3. Define Extension Fields
One of the main issues with docker compose is that we will be reusing code bits multiple times. This makes the compose file long. My compose files are over 1300 lines long. To eliminate repetitions, I recently implemented Docker extension fields.
The downside of extension fields is that it reduces readability of the compose file (can be confusing for beginners). So you will have to pay extra attention on the syntax.
Copy-paste the code block below after the network block.
########################### EXTENSION FIELDS
# Helps eliminate repetition of sections
# More Info on how to use this: https://github.com/htpcBeginner/docker-traefik/pull/228

# Common environment values
x-environment: &default-tz-puid-pgid
  TZ: $TZ
  PUID: $PUID
  PGID: $PGID

# Keys common to some of the core services that we always to automatically restart on failure
x-common-keys-core: &common-keys-core
  networks:
    - npm_proxy
  security_opt:
    - no-new-privileges:true
  restart: always

# Keys common to some of the dependent services/apps
x-common-keys-apps: &common-keys-apps
  networks:
    - npm_proxy
  security_opt:
    - no-new-privileges:true
  restart: unless-stopped

# Keys common to some of the services in media-services.txt
x-common-keys-media: &common-keys-media
  networks:
    - npm_proxy
  security_opt:
    - no-new-privileges:true
  restart: "no"
First, we are defining the variables $TZ, $PUID, and $PGID. So any service that requires these three variables as environmental variables (most LinuxServer.io images do) all we need to do is include <<: *default-tz-puid-pgid under environment section of the service's compose (you will see this in action later).
Likewise, next we are defining the network (with a default network of npm_proxy) and security options to be used with docker containers.
Then we are adding restart policy. Some services (e.g. Nginx Proxy Manager, Portainer) are core services and we want those to be restarted always, in case of failure or reboot. Some of them we do not restart when manually stopped by the user. And, then some others no automatic restart at all upon failure or reboot.
So for any service that requires always restart with standard network and security policies, all we need to do is to just include <<: *common-keys-core.
So as I said before, loss of readability but fewer lines of code.
Start Adding Docker Media Server Containers
Right below the extensions block, let us start adding our services/containers. First, begin by adding the following lines:
########################### SERVICES
services:
Within services: we are going start adding the compose for our docker media server containers.
Frontend Services
I call these frontend services because, they are in front of many of the apps in our docker media server. Let us begin by adding the line below (don't ignore the 2 blank spaces in the front) under the services block.
############################# FRONTENDS
1. Nginx Proxy Manager - Reverse Proxy with LetsEncrypt
As said before, a reverse proxy allows you to expose only ports 80 and 443 and still be able to access your self-hosted apps through a fully qualified domain name. Some even fetch LetsEncrypt SSL certificates. Nginx Proxy Manager is one of them.
We have already covered reverse proxy and its benefits in detail in our Traefik guide.
Traefik vs Nginx Proxy Manager
Compared to Traefik, Nginx proxy manager is very simple, has a very nice web interface, docker-only, LetsEncrypt capable, and offers multi-user support. For this reason, I have added Nginx Proxy Manager to this iteration of basic Docker server tutorial, even though a reverse proxy was not a part of my original docker basic guide.
First, let us add our proxy manager, which allows us to only expose ports 80 and 443 to the internet.
Nginx Proxy Manager Docker Compose
Here is the Nginx Proxy Manager docker-compose example to copy-paste into your compose file (pay attention to blank spaces at the beginning of each line):
  # Nginx Proxy Manager - Reverse Proxy with LetsEncrypt
  npm:
    <<: *common-keys-core # See EXTENSION FIELDS at the top
    container_name: nginx-proxy-manager
    image: 'jc21/nginx-proxy-manager:latest'
    # For Static IP
    networks:
    # For Static IP
      npm_proxy:
        ipv4_address: 192.168.89.254 # You can specify a static IP
    # For Dynamic IP
    # networks:
    #  - npm_proxy
    ports:
      - '80:80' # Public HTTP Port. Port Forwarding on Router is ON.
      - '443:443' # Public HTTPS Port. Port Forwarding on Router is ON.
      - '81:81' # Admin Web Port. Port Forwarding on Router is OFF. Internal Home Network Access only - 192.168.89.254:81.
    volumes:
      - $DOCKERDIR/appdata/npm/config:/config
      - $DOCKERDIR/appdata/npm/letsencrypt:/etc/letsencrypt
      - $DOCKERDIR/appdata/npm/data:/data
    environment:
      DB_SQLITE_FILE: "/config/database.sqlite"
      DISABLE_IPV6: 'true'
Here are some notes about the Nginx Proxy Manager Docker Compose:
- We are using the common-keys-core docker extension, which should automatically set the network to npm_proxy and the restart policy to always.
- We are choosing to setup a static IP for the container. While I have also included network block for dynamic IP (docker will randomly assign an IP address in the npm_proxy range), those lines are commented out. As mentioned before in Docker extensions, by providing a networks block here, we are overwriting the keys set by common-keys-core.
- We are exposing ports, 80, 443, and 81 outside the container. So you should be able to access Nginx Proxy Manager web interfaces in 2 ways:
- Using Docker Host IP: In this tutorial, it is http://192.168.1.100:81, since we are connecting containers port 81 to the host's port 81.
- Using Container IP: We use the static IP we set above http://192.168.89.254:81.
Access is available only from your home network and without secure HTTPS. This is OK for now. The whole point of installing Nginx Proxy Manager is to get around this and we will soon see how to do that.
- The environmental variable $DOCKERDIR is already defined in our .env file.
You can customize the paths but it should be OK to leave everything as-is.
Starting and Testing Containers
After saving the docker-compose.yml file, run the following command to start the container and check if the app is accessible:
sudo docker-compose -f ~/docker/docker-compose.yml up -d
Usually, I also like to check the logs to ensure there are no errors:
sudo docker-compose -f ~/docker/docker-compose.yml logs -tf --tail="50" npm

If everything looks OK in the logs, press Ctrl+C to exit. Verify that you are able to access Nginx Proxy Manager's web interface as described above.
docker-compose.yml file.Setting Up Reverse Proxy for Nginx Proxy Manager's Web Interface
As I mentioned at the beginning of this guide, convering app configurations is not the purpose of this guide. However, reverse proxy is so important to this setup. So I will touch on the basic steps to put the apps in this guide behind Nginx reverse proxy:
- Change the default Nginx Proxy Manager login (Username: [email protected] and Password: changeme).
- Ensure that you have DNS records setup on Cloudflare or your DNS provider, as described earlier: root domain A record pointing to WAN IP and wildcard CNAME (or a specific subdomain) pointing to the root domain.
- From the Domain Page on Cloudflare, click on API Tokens, create an API token with Edit Zone DNS template. Scope it to your specific domain name for improved security.
- Open Nginx Proxy Manager, go to SSL Certificates and add a new certificate. Fill in domain.com and *.domain.com and your email. Use a DNS Challenge with the scoped API key you created previously. After a few minutes your LetsEncrypt certificates should be ready.
- On Nginx Proxy Manager, go to Hosts and add new Proxy host. Provide a domain name for the app (e.g. npm.simpletechie.com), choose http for scheme, npm for Hostname/IP (npm is the service name in docker-compose.yml for Nginx Proxy Manager), 81 for port (Web UI port of Nginx Proxy Manager. Enable Block Common Exploits.
Next, under SSL tab, pick the certificate you just created for the domain. Enable all other options (Force SSL, HTTP/2, HSTS, and HSTS Subdomains) and save. The app, in this case Nginx Proxy Manager Web UI, should now be accessible through https://npm.domain.com.
Here are a few example Proxy hosts created on Nginx Proxy Manager.

2. Portainer - WebUI for Containers
We have covered Portainer installation docker run command and docker-compose in detail. Portainer provides a WebUI to manage all your docker containers. I strongly recommend this for newbies.

It even allows several advanced admin tasks, including setting up stacks, managing containers, volumes, networks, etc.
Below is the Portainer docker-compose example to copy-paste into your compose file (pay attention to blank spaces at the beginning of each line). Alternatively, check our Portainer Docker-Compose for Beginners.
  # Portainer - WebUI for Containers
  portainer:
    <<: *common-keys-core # See EXTENSION FIELDS at the top
    container_name: portainer
    image: portainer/portainer-ce:latest
    command: -H unix:///var/run/docker.sock # Use Docker Socket Proxy and comment this line out, for improved security.
    # command: -H tcp://socket-proxy:2375 # Use this instead, if you have Socket Proxy enabled.
    networks:
      - npm_proxy
    ports: # Comment out if using Nginx Proxy Manager to access portainer WebUI.
      - "9000:9000"
    volumes:
      - /var/run/docker.sock:/var/run/docker.sock:ro # Use Docker Socket Proxy and comment this line out, for improved security.
      - $DOCKERDIR/appdata/portainer/data:/data # Change to local directory if you want to save/transfer config locally.
    environment:
      - TZ=$TZ
Here are some notes about the Portainer Docker Compose (I am leaving out some of the explanations already covered under Nginx Proxy Manager):
Once again, start the container and check the logs to make sure Portainer docker container is working fine before proceeding.
Downloaders
With the frontend apps in place, let us add some downloaders. There are many downloaders available. But I am only recommending one for torrents and one for usenet. Check out my Github Repo for a few more docker-compose examples.
Add the following header to docker-compose.yml file to begin.
############################# DOWNLOADERS
3. Nzbget - Binary newsgrabber (NZB downloader)
NZBGet is a binary downloader, which downloads files from Usenet based on information given in nzb-files. [Read: Complete Usenet Guide: Is Usenet better than torrents?]
It can run on almost any device - classic PC, NAS, media player, SAT-receiver, WLAN-router, etc.
The past versions of my docker-compose files had SABnzbd. But after several years the general feeling was that it felt a bit heavy. It served me well for many years and I just needed a change. So I switched to Nzbget and it has been working great also.
Here is the Nzbget docker-compose example to copy-paste into your compose file (pay attention to blank spaces at the beginning of each line):
  # nzbget - Binary newsgrabber (NZB downloader)
  nzbget:
    <<: *common-keys-apps # See EXTENSION FIELDS at the top
    image: lscr.io/linuxserver/nzbget
    container_name: nzbget
    networks:
      npm_proxy:
        ipv4_address: 192.168.89.216
    ports:
      - "6789:6789"
    volumes:
      - $DOCKERDIR/appdata/nzbget:/config
      - $DATADIR/downloads:/data/downloads
    environment:
      <<: *default-tz-puid-pgid
Here again we are setting a static IP in the npm_proxy network for Nzbget. So if you want to add Nzbget to Sonarr or Radarr as a downloader, you could use to the static IP or the hostname (nzbget), as long as they are all in the same network (npm_proxy).
We are mount the appdata/nzbget folder for storing Nzbget configs and a folder for Nzbget to download stuff into.
Start the container and check the logs to make sure Nzbget docker container is working fine before proceeding. Nzbget should be available at 192.168.89.216:6789 (container IP) or 192.168.1.100:6789 (docker host IP) or https://nzbget.domain.com (if you setup nzbget Proxy host on Nginx Proxy Manager).
4. TransmissionBT - Torrent Downloader with VPN
Transmission is a fast, easy, and free Bittorrent client. It is available for various platforms.
But the real reason I am recommending this is due to the availability of a docker image with built-in OpenVPN kill switch.
YOUR IP ADDRESS IS 95.90.235.108
We strongly recommend using a VPN such as Surfshark VPN (exclusive 82% off - $2.49/month) to hide on your online activity.So if there is no active VPN connection, Transmission stops working.
We have discussed installing Transmission as a native app on Ubuntu. But docker makes it so much easier.
Here is the Transmission docker-compose example to copy-paste into your compose file (pay attention to blank spaces at the beginning of each line):
  # TransmissionBT - Torrent Downloader
  # For Proxmox LXC Containers - https://pve.proxmox.com/wiki/OpenVPN_in_LXC
  transmission-vpn:
    image: haugene/transmission-openvpn:latest
    container_name: transmission-vpn
    restart: unless-stopped
    networks:
      npm_proxy:
        ipv4_address: 192.168.89.169
    ports:
      - "9091:9091"
    cap_add:
      - NET_ADMIN
    devices:
      - /dev/net/tun
    volumes:
      - /etc/localtime:/etc/localtime:ro
      - $DOCKERDIR/appdata/transmission-vpn/data:/data
      - $DOCKERDIR/appdata/transmission-vpn/config:/config
      - $DATADIR/downloads:/data/downloads
    environment:
      <<: *default-tz-puid-pgid
      OPENVPN_PROVIDER: FASTESTVPN
      OPENVPN_USERNAME: $FASTEST_USERNAME
      OPENVPN_PASSWORD: $FASTEST_PASSWORD
      LOCAL_NETWORK: "$LOCAL_NETWORK"
      UMASK_SET: 2
      TRANSMISSION_RPC_AUTHENTICATION_REQUIRED: "true"
      TRANSMISSION_RPC_HOST_WHITELIST: "127.0.0.1,$SERVER_IP"
      TRANSMISSION_RPC_PASSWORD: $TRANSMISSION_RPC_PASSWORD
      TRANSMISSION_RPC_USERNAME: $TRANSMISSION_RPC_USERNAME
      TRANSMISSION_UMASK: 002
      TRANSMISSION_RATIO_LIMIT: 1.00
      TRANSMISSION_RATIO_LIMIT_ENABLED: "true"
      TRANSMISSION_ALT_SPEED_DOWN: 40000
      TRANSMISSION_ALT_SPEED_ENABLED: "false"
      TRANSMISSION_ALT_SPEED_UP: 250
      TRANSMISSION_SPEED_LIMIT_DOWN: 80000
      TRANSMISSION_SPEED_LIMIT_DOWN_ENABLED: "true"
      TRANSMISSION_SPEED_LIMIT_UP: 500
      TRANSMISSION_SPEED_LIMIT_UP_ENABLED: "true"
      TRANSMISSION_INCOMPLETE_DIR: /data/downloads/torrents/incomplete
      TRANSMISSION_INCOMPLETE_DIR_ENABLED: "true"
      TRANSMISSION_WATCH_DIR: /data/downloads/torrents
      TRANSMISSION_WATCH_DIR_ENABLED: "true"
      TRANSMISSION_DOWNLOAD_DIR: /data/downloads/torrents
      LOG_TO_STDOUT: "true"
OK, Transmsision OpenVPN has a lot more configuration options and there are a few more things to note here:
- We are setting a static IP for the same reason we did it for Nzbget - so we can add it Radarr or Sonarr using IP address.
- We need to provide some admin privileges (NET_ADMIN) and access to the network device from host (/dev/net/tun) for establishing VPN connection.
- We also need to provide VPN provider's access details. In the above example, we are using Fastest VPN, which I do not recommend because it is slow and outdated. But I have a lifetime account and I use it for testing. This docker image supports several VPN providers.
- You will need to define the variable LOCAL_NETWORK in your .env file. In my case, I am using 192.168.0.0/16, which counts all 192.168.X.X IPs as belonging to the same network. The reason why this is important is, you will only be able to access the Transmission Web UI only from the local network. Nginx Proxy Manager will be seen as a local network IP. So we can put the Web UI behind proxy to expose it to the internet if needed.
- As with Nzbget, we are mounting folders for Transmission to store the settings and the downloads folder.
The rest of the environmental variables can be customized as you please as they are standard Transmission settings.
Start the container and check the logs to make sure Transmission Docker is working fine before proceeding. Transmission should be available at 192.168.89.169:9091 (container IP) or 192.168.1.100:9091 (docker host IP) or https://transmission.domain.com (if you setup transmission Proxy host on Nginx Proxy Manager).
For some reason, if you do not want VPN, take the look at the qBittorrent docker-compose example I have included in the docker-compose.yml file in my GitHub repo. The qBittorrent docker-compose has an interesting option, so check it out.
Personal Video Recorders (PVRs)
The next section is one of the coolest ones. Personal Video Recorder apps help with aggregating content from various sources and organizing them for you.
Let us add the section header for PVR apps:
############################# PVRS
There are several home server apps for media aggregation: such as Radarr, Sonarr, Lidarr, Readarr, etc. (basically at "arr"-apps). [Read: 9 Best Home Server Apps to Automate Media Management]
We will look at Radarr and Sonarr in detail in this guide. But Lidarr and Sonarr are very easy to add to your media server docker stack. Just copy-paste the docker-compose examples from my GitHub repo and you should be good to go.
5. Radarr - Movie management
Radarr is a Movie PVR. You add the movies you want to see to Radarr and it will search various bittorrent and Usenet providers for the movie. If it is available, Radarr will grab the index file and send it to your bittorrent client or NZB client for downloading.
Once the download is complete it can rename your movie to a specified format and move it to a folder of your choice (movie library). It can even update your Plex library or notify you when a new movie is ready for you to watch. [Read: CouchPotato vs SickBeard, SickRage, or Sonarr for beginners]
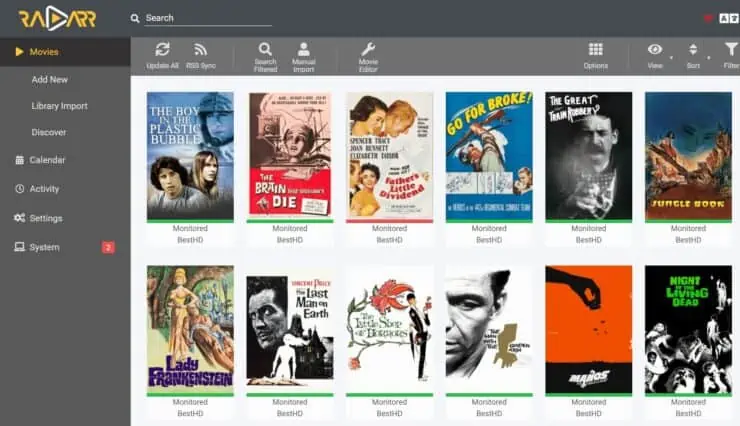
We have already covered Radarr installation on Ubuntu, as well as, using docker. Docker-compose makes it easier to install.
Here is the Radarr docker-compose example to copy-paste into your compose file (pay attention to blank spaces at the beginning of each line):
  # Radarr - Movie management
  radarr:
    <<: *common-keys-media # See EXTENSION FIELDS at the top
    image: lscr.io/linuxserver/radarr:nightly # latest tag was causing "Error parsing column 45"
    container_name: radarr
    networks:
      npm_proxy:
        ipv4_address: 192.168.89.164
    ports:
      - "7878:7878"
    volumes:
      - $DOCKERDIR/appdata/radarr:/config
      - $DATADIR/downloads:/data/downloads
      - $DATADIR/media:/data/media
      - "/etc/localtime:/etc/localtime:ro"
    environment:
      <<: *default-tz-puid-pgid
Nothing fancy to configure here. Just the config folder for radarr settings, the downloads folder, and the media folder that stores all your media.
Start the container and check the logs to make sure Radarr docker container is working fine before proceeding. Radarr should be available at 192.168.89.164:7878 (container IP) or 192.168.1.100:7878 (docker host IP) or https://radarr.domain.com (if you setup radarr Proxy host on Nginx Proxy Manager).
6. Sonarr - TV Show Management
Sonarr is a PVR for TV Shows. You add the shows you want to see to Sonarr and it will search various bittorrent and Usenet providers for the show episodes. If it is available, Sonarr will grab the index file and send it to your bitorrent client or NZB client for downloading.
Once the download is complete it can rename your episode to a specified format and move it to a folder of your choice (TV Show library). It can even update your Plex library or notify you when a new episode is ready for you to watch.

We have previously covered Sonarr installation on Ubuntu, Windows and Docker. Docker compose makes it easier to install.
Here is the Sonarr docker-compose example to copy-paste into your compose file (pay attention to blank spaces at the beginning of each line):
  # Sonarr - TV Shows management
  sonarr:
    <<: *common-keys-media # See EXTENSION FIELDS at the top
    image: lscr.io/linuxserver/sonarr
    container_name: sonarr
    networks:
      npm_proxy:
        ipv4_address: 192.168.89.167
    ports:
      - "8989:8989"
    volumes:
      - $DOCKERDIR/appdata/sonarr:/config
      - $DATADIR/downloads:/data/downloads
      - $DATADIR/media:/data/media
      - "/etc/localtime:/etc/localtime:ro"
    environment:
      <<: *default-tz-puid-pgid
Customize the config folder for sonarr settings, the downloads folder, and the media folder that stores all your media.
Start the container and check the logs to make sure Sonarr docker container is working fine before proceeding. Sonarr should be available at 192.168.89.167:8989 (container IP) or 192.168.1.100:8989 (docker host IP) or https://sonarr.domain.com (if you setup sonarr Proxy host on Nginx Proxy Manager).
Media Server Apps
This section is why you are probably here. There are several music server apps. For videos, there is Plex, Jellyfin, Emby, and Kodi.
We are going to cover only the three I recommend. Airsonic-Advanced (successor to Airsonic) for music serving. Plex and Jellyfin for media serving. [Read: Jellyfin Docker Compose: Powerful FREE Media Server in 5 min]
Cloudflare Cache and Media Servers
If you access your media servers through a proxy-enabled (orange-cloud) CNAME (e.g. https://plex.domain.com), then, turn off Cloudflare caching using page rules. It is against Cloudflare ToS to pass media through their caching system. Your account will be disabled.
There is a limit of 3 page rules on free accounts. For this reason, I prefix my media server CNAMEs with a common string (e.g. proxair.domain.com, proxplex.domain.com, and proxjf.domain.com). Now I can use wildard page rule (https://prox*.domain.com/*) and disable caching for all these subdomains.
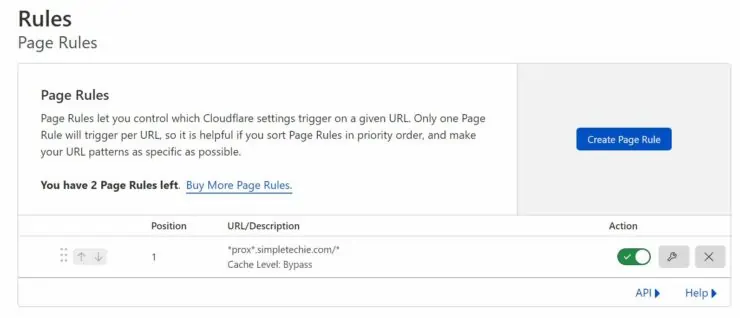
You could use whatever prefix (e.g. docker, my, etc.) you prefer as long as the prefix is not part of any other CNAMEs. This applies all media servers discussed in this guide: Plex, Jellyfin, and Airsonic.
Add the following header to your docker-compose.yml to begin.
############################# MEDIA
7. Airsonic Advanced - Music Server
We have discussed many music server apps previously. I tried several of them: Ampache, Navidrome, Funkwhale, Subsonic, and more. After Airsonic development halted, I was lost. None of them was simple yet featureful (e.g. being able to control music folder access by user).
Fortunately, Airsonic reappeared as Airsonic-Advanced.
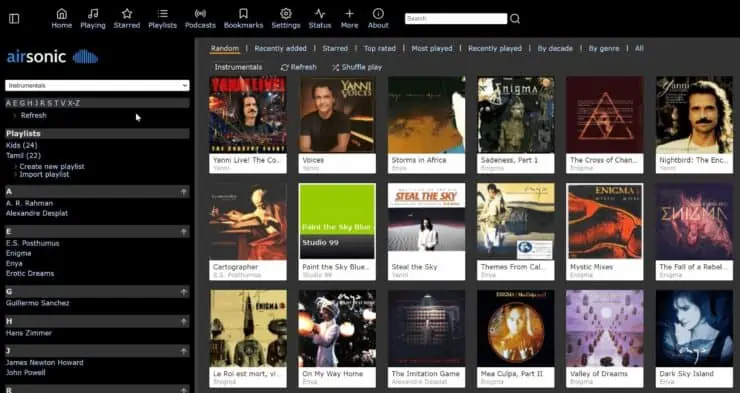
Airsonic-Advanced is a more modern implementation of the Airsonic fork with several key performance and feature enhancements. It adds and supersedes several features in Airsonic.
It offers a web-based media streamer that you can use and share with family and friends. It is designed to handle very large music collection. [Read: 5 Best Apps for Music Tagging – Organize your songs better]
Airsonic-Advanced can play several different audio formats, including MP3, WMA, FLAC, APE, and is compatible with several mobile apps using the Subsonic API.
Here is the Airsonic docker-compose example to copy-paste into your compose file (pay attention to blank spaces at the beginning of each line):
  # Airsonic Advanced - Music Server
  airsonic:
    <<: *common-keys-media # See EXTENSION FIELDS at the top
    image: lscr.io/linuxserver/airsonic-advanced
    container_name: airsonic-advanced
    ports:
      - "4040:4040"
      # - "4041:4041" #UPnp
    volumes:
      - $DOCKERDIR/appdata/airsonic/podcasts:/data/podcasts
      - $DOCKERDIR/appdata/airsonic/playlists:/data/playlists
      - $DOCKERDIR/appdata/airsonic/config:/config
      - $DATADIR/local/music:/data/music
    environment:
      <<: *default-tz-puid-pgid
      JAVA_OPTS: '-Dserver.forward-headers-strategy=native' # Optional - if you use a reverse-proxy
Note that Airsonic-Advanced requires the podcasts and playlists folders, even if you do not use or care about them. We are also enabling the JAVA_OPTS since we are going to put Airsonic behind Nginx Proxy Manager. You can enable UPNP (port 4041) if you want to advertise Airsonic as a media player in your network.
In addition, we add the config folder for Airsonic settings and the music folder that stores all your music.
Start the container and check the logs to make sure Airsonic-Advanced docker container is working fine before proceeding. Airsonic should be available at 192.168.1.100:4040 (docker host IP) or https://myairsonic.domain.com (if you setup myairsonic Proxy host on Nginx Proxy Manager). You could also set a static IP for the container like other services described above.
8. Plex - Media Server
Plex media server is a free media server that can stream local and internet content to you several of your devices. It has a server component that catalogs your media (movies, tv shows, photos, videos, music, etc.). [Read: 10 Best Media Server for Plex + one SURPRISING bonus [2022]]
To stream, you need the client app installed on compatible Plex client devices. This can cost some money.
With free movies, TV, curated content, and Plexamp music, lifetime Plex Pass is a great value.
Best Plex Client Devices:
- NVIDIA SHIELD TV Pro Home Media Server - $199.99
- Amazon Fire TV Streaming Media Player - $89.99
- Roku Premiere+ 4K UHD - $83.99
- CanaKit Raspberry Pi 3 Complete Starter Kit - $69.99
- Xbox One 500 GB Console - $264.99
We have covered plex in detail, including comparing Plex, Jellyfin, Emby, and Kodi and installation of Plex on various platforms: XBox One, PS4, Windows Server, and Ubuntu Server.
We have even described Plex docker setup with Docker Compose (check this one out if you need a more detailed guide than what is below).
With Docker compose you can set up Plex much more easily. Here is the Plex docker-compose example to copy-paste into your compose file (pay attention to blank spaces at the beginning of each line):
  # Plex - Media Server
  plex:
    <<: *common-keys-media # See EXTENSION FIELDS at the top
    image: plexinc/pms-docker:public
    container_name: plex
    ports:
      - "32400:32400/tcp"
      - "3005:3005/tcp"
      - "8324:8324/tcp"
      - "32469:32469/tcp"
      - "1900:1900/udp" # Conflicts with xTeVe and Synology default ports
      - "32410:32410/udp"
      - "32412:32412/udp"
      - "32413:32413/udp"
      - "32414:32414/udp"
      # - "33400:33400" # If you use Plex Web Tools
    #devices:
    #  - /dev/dri:/dev/dri # for harware transcoding
    volumes:
      - $DOCKERDIR/appdata/plex:/config
      - $DATADIR/media:/media
      - /dev/shm:/transcode
    environment:
      TZ: $TZ
      HOSTNAME: "dockerPlex"
      PLEX_CLAIM_FILE: $PLEX_CLAIM
      PLEX_UID: $PUID
      PLEX_GID: $PGID
      ADVERTISE_IP: http://$SERVER_IP:32400/
As with other apps, we are setting a folder for Plex configuration and the media folder. /dev/shm is the RAM memory, which we are passing for transcoding purposes. If you are short on memory, you could comment this out.
If your docker host has a graphics card (you will see /dev/dri) that you can use for hardware accelerated transcoding then you can pass this on. This is especially useful for NASes that support Plex (e.g. Synology).
In addition to the environmental variables already defined, you will also have to define PLEX_CLAIM, which is your Plex claim token.
Start the container and check the logs to make sure Plex media server docker is working fine before proceeding. Plex should be available at 192.168.1.100:32400/web (docker host IP) or https://myplex.domain.com (if you setup myplex Proxy host on Nginx Proxy Manager). You could also set a static IP for the container like other services described above.
Media File Management
In this next section, we are going to add some complementary apps to enchance our media server experience. This is beginner level docker media server guide, I am only going to showcase one example.
But at the end of this guide, you will find docker-compose examples to a few more cool ones. And there is my GitHub repo too, which as many more.
First, let's add the header.
############################# MEDIA FILE MANAGEMENT
19. Bazarr - Subtitle Management
Bazarr is a companion application to Sonarr and Radarr that manages and downloads subtitles based on your requirements.
It supports automatic searches based on the criteria you set, manual searches, and even subtitle upgrades.
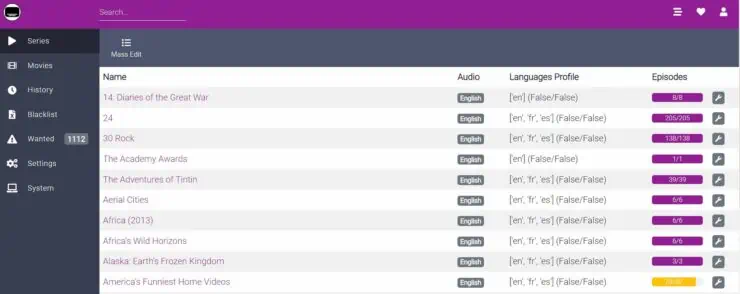
Here is the Bazarr docker-compose example to copy-paste into your compose file (pay attention to blank spaces at the beginning of each line):
  # Bazarr - Subtitle Management
  bazarr:
    <<: *common-keys-media # See EXTENSION FIELDS at the top
    image: lscr.io/linuxserver/bazarr
    container_name: bazarr
    ports:
      - "6767:6767"
    volumes:
      - $DOCKERDIR/appdata/bazarr:/config
      - $DATADIR/media:/data/media
    environment:
      <<: *default-tz-puid-pgid
Like most Linuxserver.io images, there is not much to configure here except the folders.
Start the container and check the logs to make sure Bazarr docker container is working fine before proceeding. Bazarr should be available at 192.168.1.100:6767/web (docker host IP) or https://bazarr.domain.com (if you setup bazarr Proxy host on Nginx Proxy Manager). You could also set a static IP for the container like other services described above.
Utility Apps
The next section is utilities - apps that enhance the functionality of stack or simplifies certain tasks. Let us begin by adding the utilities header to our docker-compose.yml.
############################# UTILITIES
10. Dozzle - Real-time Docker Log Viewer
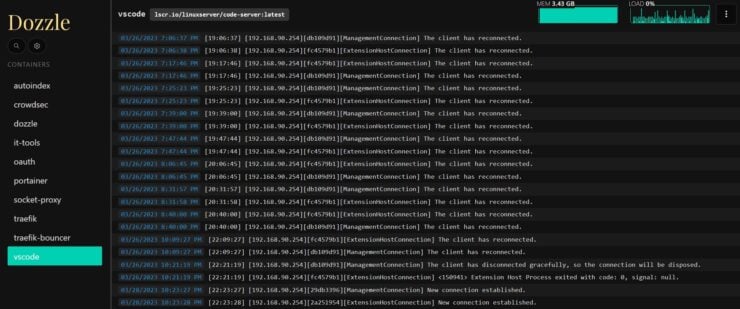
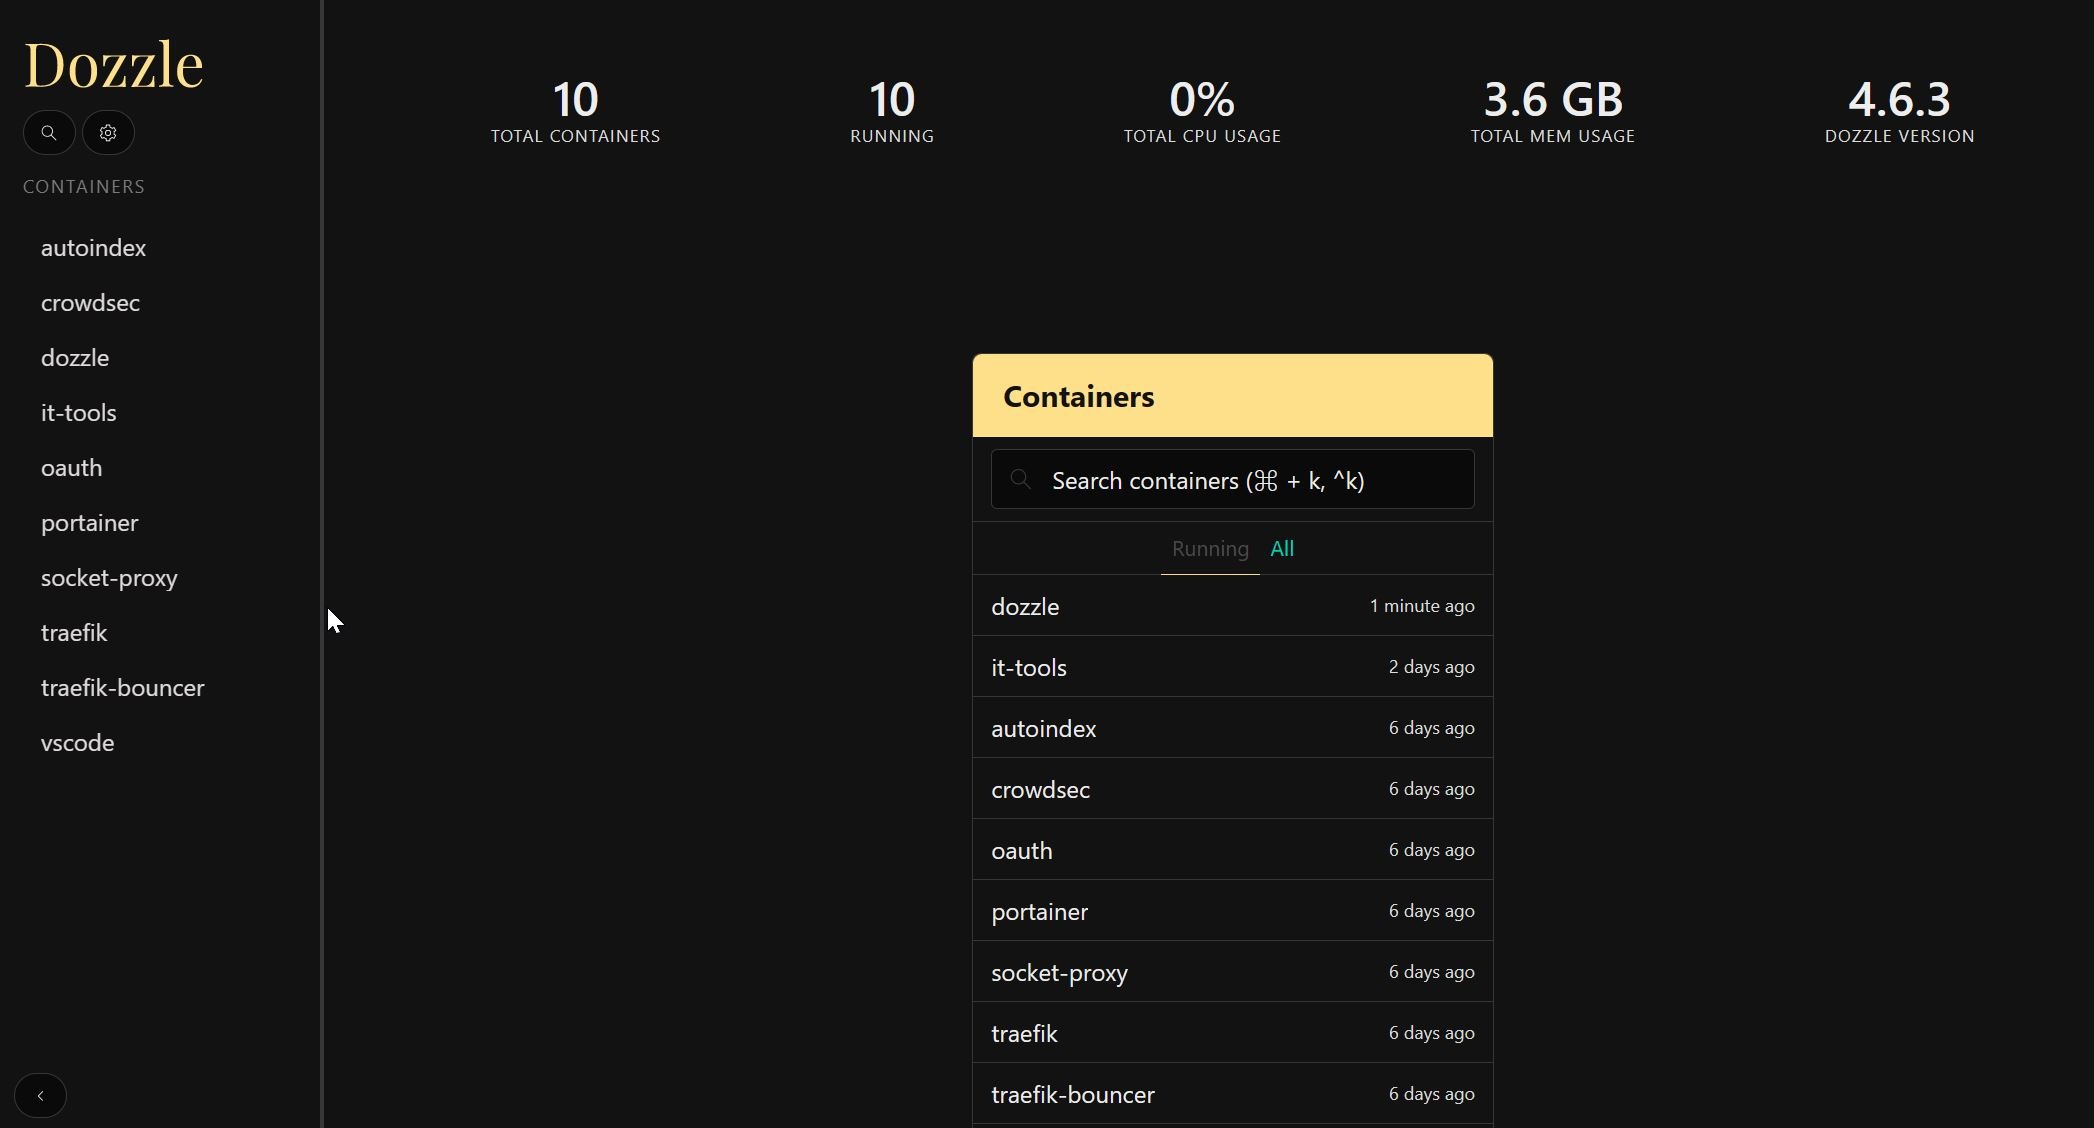
Dozzle is a simple and responsive application that provides you with a web based interface to monitor your Docker container logs live. It doesn’t store log information, it is for live monitoring of your container logs only.
I quickly became a big fan of it. Dozzle allows you to monitor logs of all your docker containers in real-time. This helps to troubleshoot and fix issues.
I have covered Dozzle logs viewer for real-time logs viewing.">Dozzle Docker Compose installation in a separate guide for beginners, if you are interested. Here is a bit more advanced Dozzle docker-compose example to copy-paste into your compose file (pay attention to blank spaces at the beginning of each line):
  # Dozzle - Real-time Docker Log Viewer
  dozzle:
    <<: *common-keys-apps # See EXTENSION FIELDS at the top
    image: amir20/dozzle:latest
    container_name: dozzle
    networks:
      - npm_proxy
    ports:
      - "8081:8080" # qBittorrent is using port 8080.
    environment:
      DOZZLE_LEVEL: info
      DOZZLE_TAILSIZE: 300
      DOZZLE_FILTER: "status=running"
      # DOZZLE_FILTER: "label=log_me" # limits logs displayed to containers with this label.
      # DOCKER_HOST: tcp://socket-proxy:2375 # Use this instead if you have Socket Proxy enabled.
    volumes:
      - /var/run/docker.sock:/var/run/docker.sock # Use Docker Socket Proxy and comment this line for improved security.
As you can see from the variables, you can customize what you see a little bit.
May be I should have put this up high on this list, because you can have dozzle up and running in one window and monitor the logs of the containers as you keep building your stack.
Start the container and check the logs to make sure Dozzle docker container is working fine before proceeding. Dozzle should be available at 192.168.1.100:8081 (docker host IP) or https://dozzle.domain.com (if you setup dozzle Proxy host on Nginx Proxy Manager). You could also set a static IP for the container like other services described above.
11. File Browser - Explorer
FileBrowser is a create-your-own-cloud-kind of software where you can install it on a server, direct it to a path and then access your files through a nice web interface.
Apart from browsing, uploading, and downloading, it has a beautiful text editor with syntax-highlighting. So you can edit your docker yml files right from File Browser.
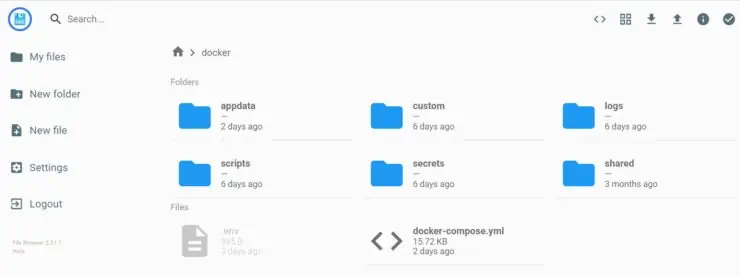
Here is the FileBrowser docker-compose example to copy-paste into your compose file (pay attention to blank spaces at the beginning of each line):
  # File Browser - Explorer
  filebrowser:
    <<: *common-keys-core # See EXTENSION FIELDS at the top
    image: filebrowser/filebrowser:s6
    container_name: filebrowser
    ports:
      - "82:80" # 80 and 81 are used by Nginx Proxy Manager
    volumes:
      - $DOCKERDIR/appdata/filebrowser:/config
      - $USERDIR:/srv
    environment:
      <<: *default-tz-puid-pgid
Files and folders that you want to make available is mounted on /srv inside the container. In the above example, we are mounting the user's home folder.
Start the container and check the logs to make sure FileBrowser docker container is working fine before proceeding. FileBrowser should be available at 192.168.1.100:82 (docker host IP) or https://filebrowser.domain.com (if you setup filebrowser Proxy host on Nginx Proxy Manager). You could also set a static IP for the container like other services described above.
Maintenance Apps
Finally, we are going to add few maintenance apps to docker-compose media server stack. These apps will help us keep our stack up-to-date and lean. So, let us begin by adding the following secion:
############################# MAINTENANCE
12. Docker-GC - Automatic Docker Garbage Collection
Over time, /var/lib/docker folder will fill up with left over images, volumes, etc. This can easily get up to several tens of Gigabytes. Because I do so much testing, mine has gone up to 150 GB.
The docker-gc-cron container will periodically run to automatically clean up unused containers and images. It is useful if you build or pull several containers and your space is limited (like in my case virtual machine on a Cloud server).
By default, the process will run each night at midnight, but the timing and other behaviors can be precisely specified using standard cron syntax.
Here is the Docker Garbage Collection docker-compose example to copy-paste into your compose file (pay attention to blank spaces at the beginning of each line):
  # Docker-GC - Automatic Docker Garbage Collection
  # Create docker-gc-exclude file
  dockergc:
    <<: *common-keys-apps # See EXTENSION FIELDS at the top
    image: clockworksoul/docker-gc-cron:latest
    container_name: docker-gc
    volumes:
      - /var/run/docker.sock:/var/run/docker.sock # Use Docker Socket Proxy and comment this line for improved security.
      - $DOCKERDIR/appdata/docker-gc/docker-gc-exclude:/etc/docker-gc-exclude # Create empty file
    environment:
      CRON: 0 0 0 * * ? # Everyday at midnight. Previously 0 0 * * *
      FORCE_IMAGE_REMOVAL: 1
      FORCE_CONTAINER_REMOVAL: 0
      GRACE_PERIOD_SECONDS: 604800
      DRY_RUN: 0
      CLEAN_UP_VOLUMES: 1
      TZ: $TZ
      # DOCKER_HOST: tcp://socket-proxy:2375 # Use this if you have Socket Proxy enabled.
The only thing you need to remember is to create an empty docker-gc-exclude file, as docker cannot create files (only directories).
Start the container and check the logs to make sure Garbage Collection Docker container is working fine before proceeding.
13. WatchTower - Automatic Docker Container Updates
So we have built a kickass docker media server but it would be a pain if we have to monitor each container and update it manually. This is where Watchtower comes in.
Watchtower monitors your Docker containers. If their images in the Docker Hub change, then watchtower will pull the new image, shutdown the running container and restart with the new image and the options you originally set for the container while deploying. You can specify the frequency of update check as time interval or as cron time.
Here is the Watchtower docker-compose example to copy-paste into your compose file (pay attention to blank spaces at the beginning of each line):
  # WatchTower - Automatic Docker Container Updates
  watchtower:
    <<: *common-keys-core # See EXTENSION FIELDS at the top
    image: containrrr/watchtower
    container_name: watchtower
    volumes:
      - /var/run/docker.sock:/var/run/docker.sock # Use Docker Socket Proxy and comment this line for improved security.
    environment:
      TZ: $TZ
      WATCHTOWER_CLEANUP: "true"
      WATCHTOWER_REMOVE_VOLUMES: "true"
      WATCHTOWER_INCLUDE_STOPPED: "true"
      WATCHTOWER_NO_STARTUP_MESSAGE: "false"
      WATCHTOWER_SCHEDULE: "0 30 12 * * *" # Everyday at 12:30
      # DOCKER_HOST: tcp://socket-proxy:2375 # Use this if you have Socket Proxy enabled.
      DOCKER_API_VERSION: "1.40"
Nothing much to configure here except the schedule. I have it going every day at 12:30 pm. It just runs in the background and does its job.
Start the container and check the logs to make sure Watchtower docker container is working fine before proceeding.
14-23. More Media Server Apps
The media server apps listed above are what I consider as key to a kickass media server based on Docker. However, there are a few more apps that are nice to have.
This guide is already several thousand words long. So I have included the docker compose examples for the following apps in my Github Repo (docker-compose.yml).
By now, you should be quite familiar with copy-pasting it from my GitHub repo and customizing any needed environmental variables. So it should be a breeze to add the following apps to your setup if you choose to.
- qBittorrent - Torrent downloader without VPN: In case you want an alternative to Transmission-VPN. This one is without VPN.
- Lidarr - Music Management: Like Radarr and Sonarr but for Music. Setup is very similar to Radarr/Sonarr described above.
- Readarr - Books management: Like Radarr and Sonarr but for Books. Setup is very similar to Radarr/Sonarr described above.
- Prowlarr - Indexer Proxy: A proxy service for torrents and usenet. Plus it allows you to manually search for stuff. Don't think twice about adding it to your stack. I used to use Jackett and NzbHydra. Prowlarr combines the functionalities of both and better integrates with arr-apps.
- Jellyfin - Media Server: An open-source and free alterantive to Plex that is getting more popular by the day.
- Tautulli - Plex Stats and Monitoring: For monitoring Plex usage.
- Ombi - Media Requests: Share your library with friends, collect content requests, and pass them on to Radarr/Sonarr.
- Picard - Music Library Tagging and Management: Great for tagging and organizing music (like beets but with a GUI).
- Handbrake - Video Conversion (Transcoding and compression): Great to convert/transcode video files when needed.
- Heimdall - Application Dashboard: Once your stack grows, you may probably want a dashboard to easily access all your apps. In my original Docker guide, I had Organizr. Overtime Organizr became too clunky and so I replaced it with Heimdall.
Be the 1 in 200,000. Help us sustain what we do.You will gain benefits such as Deployarr access, discord roles, exclusive content, ad-free browsing, and more.🔥 Holiday Sale! 25% Off Platinum Membership$399.99$299.99 (ends December 31).Join the Geek Army (starting from just $1.67/month)
Closing Thoughts
There you have it. A ten-thousand word post on how to setup a media server from scratch using Docker and Ubuntu. If this helped I would greatly appreciate you showing your support of my work in one or more ways listed above.
To take full advantage of Cloudflare free plan, including the proxy feature (orange-cloud) that enhances security and performance, be sure to follow my Cloudflare tweaks for Traefik.
In addition, add a strong intrusion prevention system with CrowdSec.
Troubleshooting
If you follow the guide word-to-word, you should be fine. However, something may go wrong. Feel free to join our disord community to ask around or just chat with like-minded people. But before you do, here are some common mistakes and fixes for those.
Page does not load due to too many redirects.
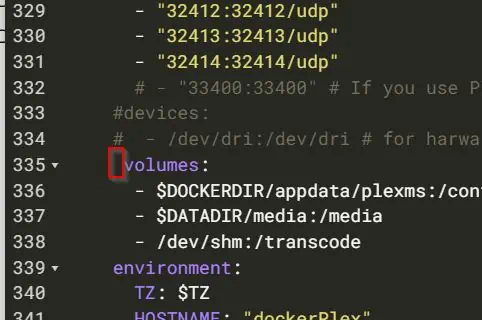
Did not Find Expected Key

Check the indentation in docker-compose.yml. In the above case, line 335 had one extra space in the front that threw off the indentation as shown below.
Environmental Variable Not Set
If you forget to add any of the environmental variables to the .env file, you will see the following error.

Notice that the container still starts. But, you won't be able to access the web app. This is why I suggest starting and testing each app, before you go on to add more.
Nginx Proxy Manager Does not Retrieve Certificates
There could be many reasons for this. Sometimes I saw the following error during DNS Challenge:
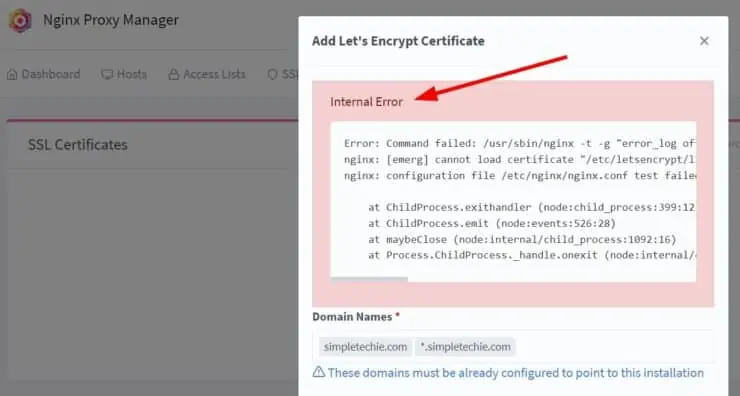
One time I had mistake in my API key. The other time, I had no clue what happened. Ensure that you have proper DNS records in place and that the API key has proper Zone Edit permissions. In addition, different DNS providers have different propagation speeds. Give it at least a few minutes before trying. In my case, I fixed the API key and recreated the container (after deleting all files it created in appdata/npm).
Conclusions
Congratulations! If you thought that your are done. You are wrong. Your journey is just getting started. Here are on out the possibilities are endless.
You could improve security by implementing docker security practices and implement cloudflare tweaks.
You could even replace Nginx Proxy Manager with Traefik Reverse Proxy for additional features. This would also enable you to add Google OAuth, or even your own Multi-factor authentication system with Authelia.
You could add a Docker WordPress stack, like I do, and host your own blog.
And if you want to extend the functionality of your Plex, you could consider adding IPTV support with Docker's help (now that Channels dont work anymore).
There are literally hundreds of self-hosted apps for your homelab: like ad-blocking with PiHole, or AdGuard Home. Add NextCloud for your own Cloud storage, Guacamole for VNC, SSH, SFTP, and RDP, or run UniFi Controller if you are into UniFi ecosystem. Checkout the many YML files in my GitHub Repo.
Whatever you decide to do, my hope was to share my knowledge and experience through this Docker media server guide and help you get started with your setup. If you have any comments or thoughts, feel free to comment below.

