Fail2ban is quite well known for intrusion prevention. It scans logs and bans IPs that show malicious signs such as too many password failures, seeking for exploits, etc. It automatically updates your firewall rules based on the decision it takes.
Now imagine similar intrusion prevention, but only this time, the malicious IPs are shared with other users, and you receive similar information from them. This, in simple terms, is what CrowdSec does and a key difference between Fail2ban and CrowdSec. Hence, the appropriate name CrowdSec.
In addition, CrowdSec offers "Bouncers" for Traefik, Linux Firewall, Cloudflare, and more. This allows a multi-level/redundant threat mitigation and not at just the Linux Firewall level.
I (and many of our followers) use the above services and hence this CrowdSec Docker Compose setup is a great addition to my GitHub Repo, Docker Guide, and Traefik guide.
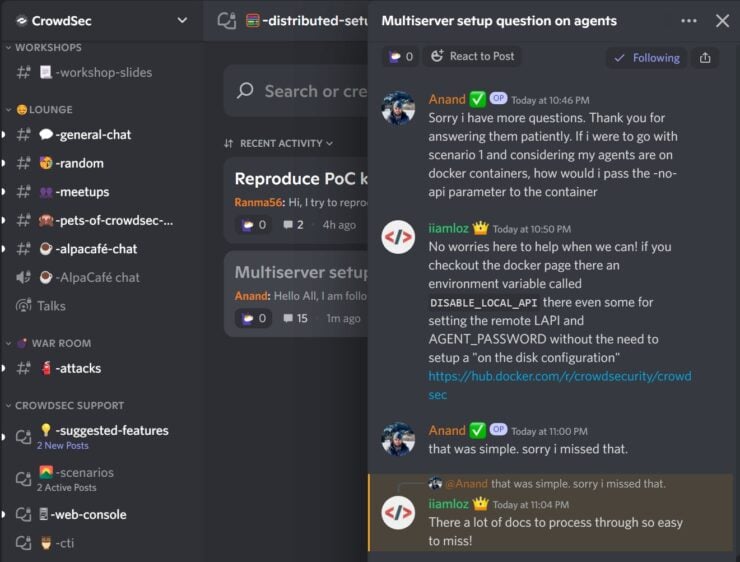
I received a few requests for this guide on our Discord server. So here it goes.
Table of Contents
- My Experience with CrowdSec
- CrowdSec Introduction
- CrowdSec Docker Compose Setup
- CrowdSec Docker Dashboard
- CrowdSec Tweaks
- Closing Thoughts on CrowdSec Docker
My Experience with CrowdSec
I am not being compensated to do this and others may have different opinions. But in my first few days of using CrowdSec, I could see the impact of CrowdSec that led me to buying-in. In addition, the community was awesome in helping me through the setup process.
Here is what I saw on my public-facing Digital Ocean VPS that runs this website:
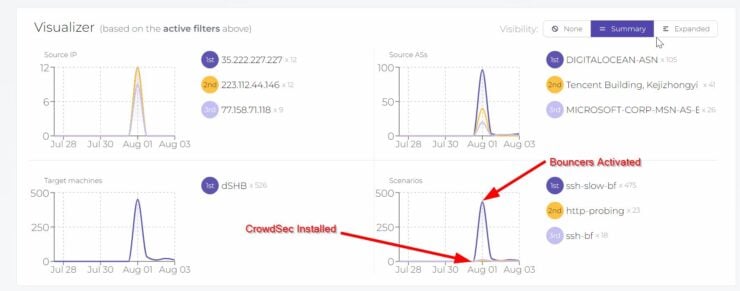
I added CrowdSec Docker Compose to my stack on July 31, 2022. In less than 12 hours, CrowdSec alerted me of nearly 500 malicious attempts. Mind you, at this point, I wasn't blocking any attempts as I wanted to better understand my current situation.
The biggest attack was SSH slow brute force attack to gain shell access on my server.
Once I activated the bouncers the blocking began and within a couple of hours, the attacks dropped from about 60 an hour to 1-2 per hour.
CrowdSec Introduction
With the stage set, let us dig a bit deeper into what CrowdSec is.
CrowdSec already put together great documentation. So, I will try not to regurgitate everything.
As said before, CrowdSec is a crowd-based cyber-security suite. CrowdSec's objective is to outnumber cyber criminals together.
How does CrowdSec work?
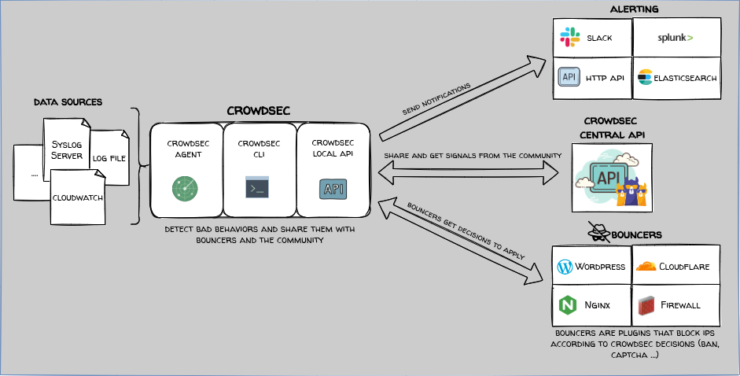
This again is already explained very well in CrowdSec documentation. In short, the CrowdSec intrusion detection system consists of a few elements:
- CrowdSec Agent: Analyzes logs and works with the Local API for further processing.
- CrowdSec Local API: Also known as LAPI, it allows CrowdSec machines to push alerts and decisions to a database, bouncers to look up alerts and decisions from the database, and allow CrowdSec CLI (cscli) to view, add, or delete decisions.
- CrowdSec CLI: View, add, or delete decisions.
- CrowdSec Bouncers: Bouncers are standalone software pieces in charge of acting upon actors that triggered alerts. To do so, the bouncers query the Local API to know if there is an existing decision against a given IP, range, username, etc.
- CrowdSec Central API: Also known as CAPI, Central API is to share with and get signals from the Community.
In terms of how all the elements fit together, here is a schematic that explains it quite well.
As explained later, I also get nice alert notifications on my discord. Of course, at the beginning with over 60 alerts an hour, this was quite annoying.
CrowdSec Privacy
During my research I found a few people raising concerns over sharing your data with a 3rd-party company in the form of "blocklists". Some even expressed that he/she wasn't comfortable letting another company "pimp" their data to make money.
My response to this is, Facebook, Google, Instagram, and even your Smart Devices are collecting a lot more data about you for marketing purposes. At least here, I am helping make the internet safer while also being protected. If you are curious, here is a list of data that is pushed to the Central API.
This is how I see it. So, make your own decision.
Be the 1 in 200,000. Help us sustain what we do.You will gain benefits such as Deployarr access, discord roles, exclusive content, ad-free browsing, and more.🔥 Holiday Sale! 25% Off Platinum Membership$399.99$299.99 (ends December 31).Join the Geek Army (starting from just $1.67/month)
CrowdSec Docker Compose Setup
I have a multi-server setup. But I will limit this guide to a single server CrowdSec setup using Docker. In a separate post, I have covered how to extend the CrowdSec Docker Compose stack to include additional servers.
Here is a schematic of what we are going to set up (copied with Pride from CrowdSec):
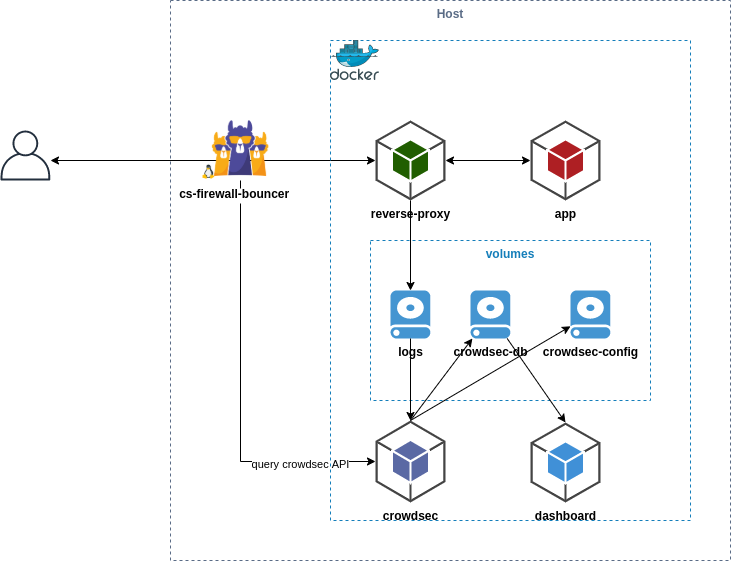
Our setup will look like this:
- CrowdSec Agent, CLI, and API: Running on Docker and will liaise with other CrowdSec elements.
- CrowdSec Firewall Bouncer: Installed natively on the docker host to block SSH attacks, port scans, etc. This becomes the first line of defense if the attacks come directly to the origin server.
In future posts, I will improve this setup by adding:
- CrowdSec Cloudflare Bouncer: Installed on Docker. It will send blocked IPs to Cloudflare so requests can be blocked before they reach the origin server. This will become the first level of defense if the service is accessed using the domain name. The drawback is that the blocklist is limited to 10,000 IPs (Cloudflare's limit). [Read: CrowdSec Docker Part 2: Improved IPS with Cloudflare Bouncer]
- CrowdSec Traefik Bouncer: Installed on Docker. Access to services behind Traefik is regulated using a specific middleware. [Read: CrowdSec Docker Part 3: Traefik Bouncer for Additional Security]
When published, links to future posts on this topic will be added above.
If you have reserve proxies other than Traefik (e.g. Nginx), it is possible to add a Nginx bouncer. Maybe I will do a separate guide for Nginx Proxy Manager.
Let's move on and set up CrowdSec to protect our server.
Pre-requisites for CrowdSec on Docker
This guide is written to be a plug-and-play for folks that followed my Docker guide and Traefik guide.
At the very least, you should have a Docker stack running, as in my Docker guide:
But, if your setup differs from my way of doing things, fear not. I will try to point to relevant links for you to follow along as well.
Install CrowdSec using Docker compose
Below is a copy-paste of my working CrowdSec docker-compose from docker-compose-t2-web.yml my GitHub Repo. The CrowdSec API on my VPS is my primary server (let's call it mothership).
  # CrowdSec - Open-source & collaborative security IPS
  crowdsec:
    <<: *common-keys-core # See EXTENSION FIELDS at the top
    image: crowdsecurity/crowdsec
    container_name: crowdsec
    ports:
      - "$CROWDSEC_API_PORT:8080"
      # - "$CROWDSEC_PROMETHEUS_EXPORT:6060" # For metrics export to Prometheus database.
      # - "$ZEROTIER_IP_WEBSERVER:$CROWDSEC_PROMETHEUS_EXPORT:6060" # If you don't use ZeroTier remove use just $CROWDSEC_PROMETHEUS_EXPORT:6060
    environment:
      COLLECTIONS: "crowdsecurity/traefik crowdsecurity/http-cve crowdsecurity/whitelist-good-actors crowdsecurity/iptables crowdsecurity/linux crowdsecurity/nginx crowdsecurity/sshd"
      GID: "${GID-1000}"
      CUSTOM_HOSTNAME: dSHB
    volumes:
      - $DOCKERDIR/logs/web:/logs/web:ro
      - /var/log:/var/log:ro
      - $DOCKERDIR/appdata/crowdsec/data:/var/lib/crowdsec/data
      - $DOCKERDIR/appdata/crowdsec/config:/etc/crowdsec
Customizing CrowdSec Docker-Compose
- *common-keys-core - Extension field as described in Docker guide linked above. Extension fields minimize the repetition of compose statements. common-keys-core sets the restart policy to always and makes the container a part of the t2_proxy network.
- $CROWDSEC_API_PORT - Define the environmental variable in .env file or replace with actual port number. If you are starting, I recommended using the default CrowdSec port number, 8080. So the line would look simple: - 8080:8080.
- $ZEROTIER_IP_WEBSERVER:$CROWDSEC_PROMETHEUS_EXPORT:6060 - I am exposing port 6060 from inside the CrowdSec docker container to the port $CROWDSEC_PROMETHEUS_EXPORT on my host's ZeroTier interface ($ZEROTIER_IP_WEBSERVER). You could just expose it to any interface on the host by using just - $CROWDSEC_PROMETHEUS_EXPORT:6060. Of course, both environmental variables must be defined in the .env file.
- COLLECTIONS: Collections are bundles of parsers, scenarios, postoverflows that form a coherent package. You can add more or remove some depending on your situation. They give CrowdSec the ability to analyze and detect anomalies. Having more collections won't hurt you but may add bloat. Check CrowdSec Hub for what is available.
- CUSTOM_HOSTNAME - You can define your own custom hostname. This is the name that will appear on the CrowdSec Console (web app) and machines list to identify the CrowdSec instance.
- $DOCKERDIR/logs/web - This is where my web server-related logs are stored (Traefik, Nginx, etc.). So, I am passing this folder as read-only for CrowdSec to analyze/parse.
- /var/log - I am also passing the logs folder from my Ubuntu host for CrowdSec to analyze auth.log, kern.log, etc.
- The last two lines define the data folder and config folder for CrowdSec to use.
At the beginning of this guide, I mentioned I won't describe Nginx bouncer. But here I am enabling the Nginx collection. Why?
Because, enabling the Nginx collection would allow me to pass Nginx logs from my webserver to CrowdSec, analyze them to look for malicious IPs, and if some are found they would be added to the blacklists on Firewall, Cloudflare, and Traefik. I won't be using an Nginx bouncer but the bad IPs from Nginx access logs can still be banned by other bouncers. If you are not running an Nginx web server, you may remove the Nginx collection.
Starting CrowdSec Docker Container
With the Compose defined, let's fire up the CrowdSec Docker container and check what the logs tell us. Most likely, you will see some errors and warnings during first start. Do not be alarmed.
Here we see an error message asking us to perform hub update.

Because of this error, not all collections were loaded successfully. Let's check using the command:
sudo docker compose -f /home/USERNAME/docker/docker-compose-t2-web.yml exec -t crowdsec cscli collections list
- Be sure to replace /home/USERNAME/docker/docker-compose-t2-web.yml with the path to your docker compose file - throughout this guide.
- I am using the new Docker Compose V2 that is bundled with Docker. If you are still on V1, then use docker-compose instead of docker compose.
As expected, only 2 collections were properly loaded.
CrowdSec Hub Update
As recommended by CrowdSec, let's update the hub using the following command:
sudo docker compose -f /home/USERNAME/docker/docker-compose-t2-web.yml exec -t crowdsec cscli hub update
Then, let's recreate CrowdSec docker container. This time, following the docker container logs, shows a successful start.

Now let's recheck the collections.

Voila! Now all collections were loaded successfully.
Other CrowdSec Commands
I showed you the usage of cscli collections list and cscli hub update above. Note that these commands have to be run from within the CrowdSec docker container, which is where the CrowdSec CLI is installed. You cannot run them on your Docker host.
To run it from the docker host, we use sudo docker compose -f /home/USERNAME/docker/docker-compose-t2-web.yml exec -t crowdsec in the front.
Likewise, there are a few other commands I use frequently with CrowdSec. If you are running the command on the Docker host, then all the commands have to be prefixed with the above-bolded line:
- cscli decisions list: See a list of decisions made by CrowdSec.
- cscli alerts list: See a list of alerts.
- cscli alerts inspect -d: See details of a specific alert, using its ID from the alerts list.
- cscli hub list: See a list of hubs (collections, parsers, scenarios, etc.).
- cscli parsers list: See a list of parsers. You could also use the hub list command above, instead.
- cscli metrics: See cool nerdy CrowdSec stats.
- cscli machines list: See a list of all CrowdSec machines. At this point, there should be only one.
- cscli bouncers list: See a list of enabled bouncers. At this point, we have enabled none.
- cscli bouncers delete BOUNCER-NAME: Delete a bouncer.
At this point, our CrowdSec Agent on Docker is successfully up and running. But it does nothing until we configure it and add the rest of the modules.
Connect CrowdSec Instance to CrowdSec Account
First, let's connect your CrowdSec instance to your CrowdSec account to enable sharing and metrics viewing.
If you do not do this, you will not be sharing your detections with the community and likewise, you won't receive the community blocklist updates. In addition, you won't be able to visualize the metrics on CrowdSec App.
First, create a CrowdSec Account. Log in and click on Add Instance. Use the displayed command and execute it inside your CrowdSec container or on the Docker host with the proper prefix as explained above.
So, the command on the docker host should be:
sudo docker compose -f /home/USERNAME/docker/docker-compose-t2-web.yml exec -t crowdsec cscli console enroll xxxxxxxxxxxyyyyyyyyyyyyzzzzzzzzzzzzz
Upon successful enrollment, you should see the following output:
You may have to manually approve/accept the enrollment from CrowdSec Console, as shown below:

Once approved, you should be able to see your instance and all relevant stats on your CrowdSec account.
CrowdSec Agent Configuration
CrowdSec comes with default configurations. If you look at the docker logs for the CrowdSec container, you will find warnings for missing logs (Nginx, Apache, etc.).

This is because these defaults do not apply to my/our situation. So, let's do some configuration.
Acquisition - acquis.yaml
To be able to detect things, CrowdSec needs to access logs. These data sources are specified in acquis.yaml in the CrowdSec config folder.
There are many ways to aggregate the logs, as described in CrowdSec docs. But we are going to focus on just log files from various sources.
Edit acquis.yaml (if you followed the same structure as in my guides, this should be under /home/USER/docker/appdata/crowdsec/config/). Let's replace the defaults with this:
filenames:
  - /var/log/auth.log
  - /var/log/syslog
  - /var/log/kern.log
  - /var/log/ufw.log
  - /var/log/mail.log
labels:
  type: syslog
---
filenames:
  - /logs/web/traefik/*.log
labels:
  type: traefik
---
filenames:
  - /logs/web/nginx/*.log
labels:
  type: nginx
If you want to start slow and get everything working before you add more logs, then I recommend adding only the syslog section with the log files that apply to your situation. You can add the scenarios for traefik and nginx once you get rolling.
Double-check the log file paths and ensure that they are present/valid.
I am sending my traefik logs (error and access), several of the logs from my docker host (remember we mapped /var/log from the host as a read-only volume onto CrowdSec container?), and finally my Nginx web server logs.
Now, let's restart the CrowdSec docker container and ensure that the log files are being parsed. After restarting CrowdSec, use the following command (or just csmetrics if you have bash_aliases configured):
sudo docker compose -f /home/USERNAME/docker/docker-compose-t2-web.yml exec -t crowdsec cscli metrics
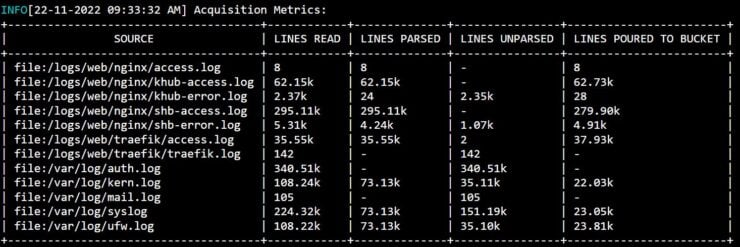
Under the "Acquisition Metrics" section you should see stats from CrowdSec analyzing your log files, as shown below.
You may not see as many files or as high numbers as I do. So don't fret. But notice that I am passing access and error logs from Traefik and Nginx, which can be quite high for a busy server/website.
At this point, this is a good start. You can leave the rest of the configurations to the defaults. I will share a few additional tweaks later in this guide.
Custom Whitelists
Before we start blocking malicious traffic, it is important to whitelist known/good IPs (like your IPs) to not be locked out in case of false positives.
Create a new file called custom-whitelists.yaml in CrowdSec's config/parsers/s02-enrich/ folder. Add the following content to it:
name: crowdsecurity/whitelists
description: "Whitelist events from my ip addresses"
whitelist:
  reason: "my ip ranges"
  ip:
    - "xxx.xxx.xxx.xxx" # Home. Jellyfin was throwing 403 forbidden errors on some clients.
    - "127.0.0.1" # Local Host
  cidr:
    - "192.168.0.0/16" # Local IPs + ZeroTier Network
    - "10.0.0.0/8" # Local IPs
    - "172.16.0.0/12" # Local/Docker IPs
You can list the IPs as individual IPs or in CIDR groups. I listed the known local IP networks, which should work for most situations.
Save, exit, and restart CrowdSec container. This whitelists file should be picked up automatically.
Be the 1 in 200,000. Help us sustain what we do.You will gain benefits such as Deployarr access, discord roles, exclusive content, ad-free browsing, and more.🔥 Holiday Sale! 25% Off Platinum Membership$399.99$299.99 (ends December 31).Join the Geek Army (starting from just $1.67/month)
CrowdSec Bouncers
OK, now we have CrowdSec analyzing our logs. At this point, you should already start seeing alerts on your CrowdSec Console - if indeed you are being attacked.
How do you find out if you are being attacked?
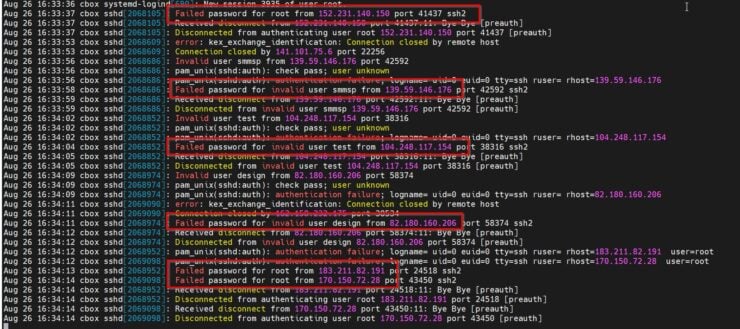
You can check /var/log/auth.log. I was being bombarded with attacks and so I tried to follow it in real-time using:
tail -f /var/log/auth.log
In 45 second span, I noticed 6 SSH brute-force attacks. This was my internet-facing Cloud Server. If you are behind a router at home, you may not see as many.
So, at the very least you need the firewall bouncer enabled to mitigate these attacks.
CrowdSec Firewall Bouncer
CrowdSec Firewall Bouncer is an absolute must-have. It fetches the blocklists and adds them to supported firewalls (iptables, nftables, ipset only, and pf).
CrowdSec Firewall Bouncer is available to install through the CrowdSec repository. First, install the repository using the following command (Ubuntu/Debian):
curl -s https://install.crowdsec.net | sudo sh
For other Linux distros and operating systems, check the link above.
Once the repo is added, install CrowdSec Firewall Bouncer on Ubuntu/Debian using the following commands:
sudo apt update
sudo apt install crowdsec-firewall-bouncer-iptables
Upon successful installation, a systemd service (/etc/systemd/system/crowdsec-firewall-bouncer.service) will be created to autostart the Firewall Bouncer during boot. In addition, a default configuration file will be created (/etc/crowdsec/bouncers/crowdsec-firewall-bouncer.yaml), which we will need to customize.
Create a CrowdSec API Key for Firewall Bouncer
Before we start configuring the Firewall Bouncer, let's generate an API key to allow it to connect to CrowdSec API (aka LAPI). Use the following command to generate the key for host-firewall-bouncer-dshb (name it whatever you want):
sudo docker compose -f /home/USERNAME/docker/docker-compose-t2-web.yml exec -t crowdsec cscli bouncers add host-firewall-bouncer-dshb
Your API key should be generated and displayed as shown below.
Note it down, you will need it to configure the Firewall Bouncer in the next step.
Firewall Bouncer Configuration
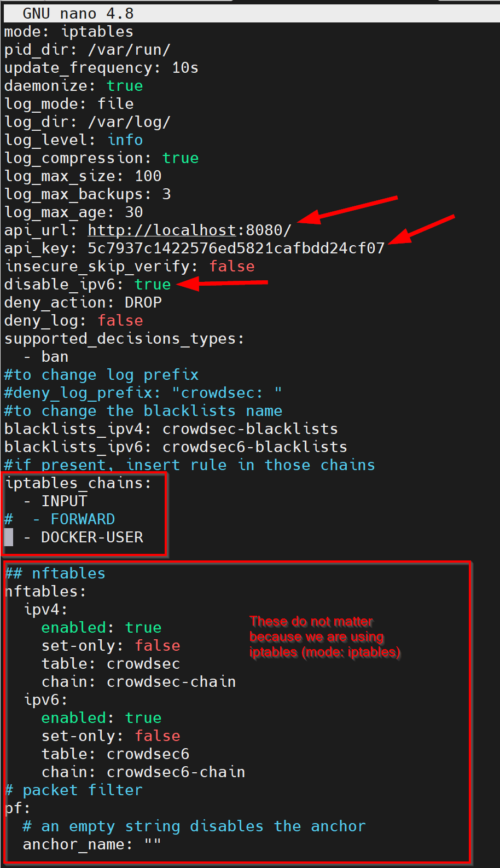
The default Firewall Bouncer configuration file should be located at /etc/crowdsec/bouncers/crowdsec-firewall-bouncer.yaml. Edit it and change the following values:
- api_url: There may be several options for API URL. You could use the CrowdSec Docker container's IP with port 8080. But in our CrowdSec Docker-Compose, we exposed port 8080 to the host machine. So, we could just use http://localhost:8080/, which is what I do.
- api_key: Enter the API key generated in the previous step.
- iptables_chains: Normally, INPUT is the most important one, which specifies that if the source IP is in the blocklist then drop the connection. In addition, since we are using docker we will enable DOCKER-USER.
- disable_ipv6: Set it to true if you are not using ipv6.
The nftables and the pf sections at the end do not matter because we are using iptables mode. Here is a screenshot of how the configuration should look like.
Save the configuration. Restart Firewall Bouncer using the following command:
sudo systemctl restart crowdsec-firewall-bouncer.service
Verifying Firewall Bouncer
Finally, let's check to ensure Firewall Bouncer is connected to the CrowdSec API. This can be checked in two ways. First, by looking at the firewall bouncer logs:
cat /var/log/crowdsec-firewall-bouncer.log
You should see something similar to the screenshot below, which shows decisions were successfully added/deleted.

Second, you could check the list of bouncers connected to CrowdSec API, using the CLI:
sudo docker compose -f /home/USERNAME/docker/docker-compose-t2-web.yml exec -t crowdsec cscli bouncers list
This should show a list of all bouncers connected to the API, along with their IP as shown below.
At this point, you should be all set and CrowdSec and Firewall Bouncer should be working together to drop malicious IPs. To verify this, let's tail the kernel log using the following command:
sudo tail -f /var/log/kern.log
Connections dropped by CrowdSec should appear as shown below:

If you reached this point successfully, CONGRATULATIONS! You are set and protected.
CrowdSec Docker Dashboard
When I was new to CrowdSec, I was so fascinated by what it does that I wanted to follow the metrics. This led me to look for a CrowdSec dashboard. Of course, I can use the metrics CLI command (mentioned previously), which spits out a ton of information.
But who doesn't dig a fancy graphical interface? There are a few options to accomplish this.
CrowdSec Metabase Dashboard
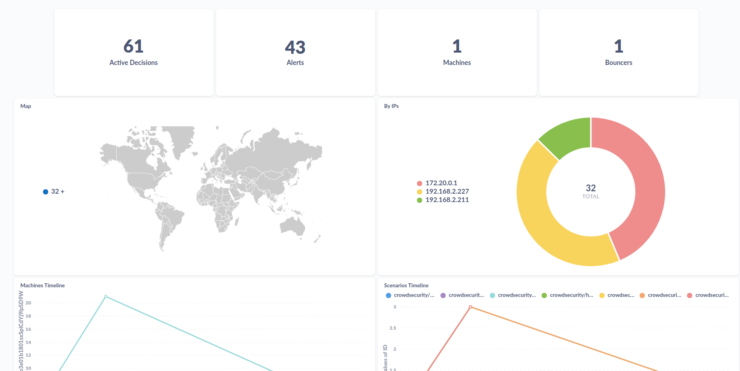
CrowdSec comes with a Metabase dashboard, which can be run as a separate docker container.
If you are interested in trying this out, check the docker-compose file marked "obsolete" in my GitHub Repo. The reason I stopped using it is that it was using a lot of system resources.
Don't worry though, there are a couple of more options.
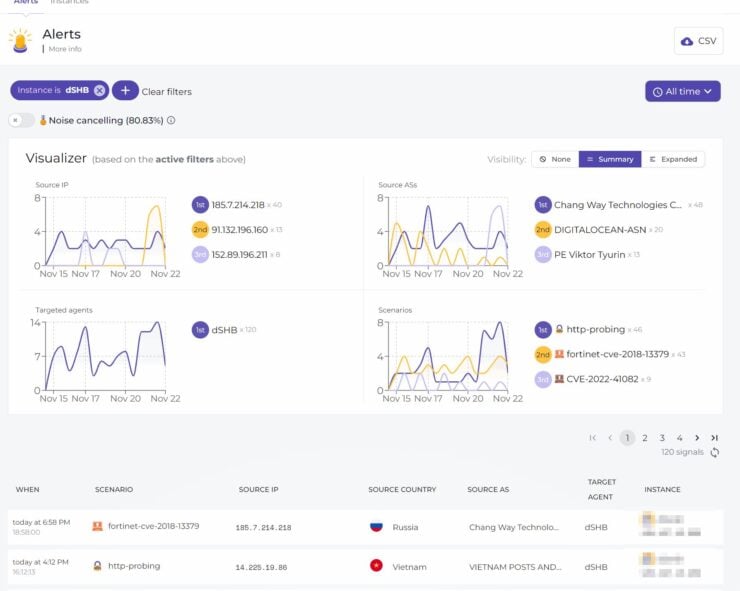
CrowdSec Console
We created a CrowdSec account previously and logged into the console. Whatever data CrowdSec collects from us is available in a nice UI for us to analyze.
And this is available to you without having to spend any system resources.
CrowdSec Grafana Dashboard
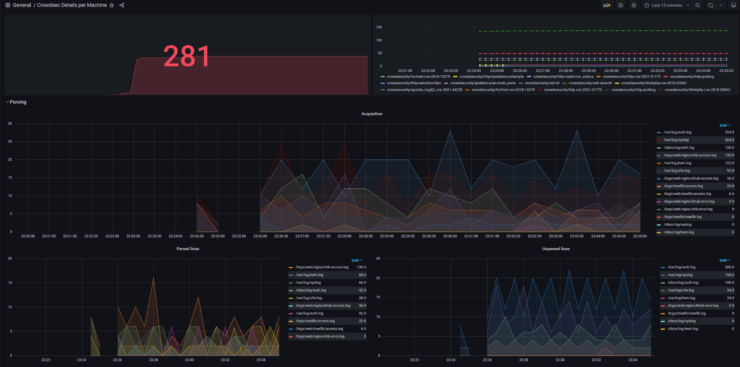
In our CrowdSec docker-compose snippet above, there is a line for exporting metrics to the Prometheus database, which can then be fed to Grafana for dashboarding. CrowdSec even provides a pre-built dashboard, so you won't have to design one from scratch. Here is the one I built:
In a future guide, I will detail how to accomplish this.
CrowdSec Tweaks
Earlier in this guide, I said I will share a couple of tweaks to further improve CrowdSec. So here they go.
Use MariaDB for Database
CrowdSec uses SQLite database by default. This is fine for most home users. But if you have a busy server, then using MariaDB may offer better performance. Edit CrowdSec config.yaml file and modify the highlighted section with MariaDB connection details:
db_config:
  log_level: info
  type: mysql
  #db_path: /var/lib/crowdsec/data/crowdsec.db
  user: USERNAME
  password: PASSWORD
  db_name: crowdsec
  host: mariadb
  port: 3306
  flush:
    max_items: 5000
    max_age: 7d
Restart the CrowdSec Docker container to start using MariaDB.
Customize Ban Duration
The default ban duration is 4h. My cloud server was being bombarded with over 60 brute-force attacks every hour. With the default 4 hours, I could not bring this number down.
What helped me was to increase the ban hours in profiles.yaml. I believe the maximum ban hours is 596, which is what I chose. This seems to be working fine for me.
Notifications
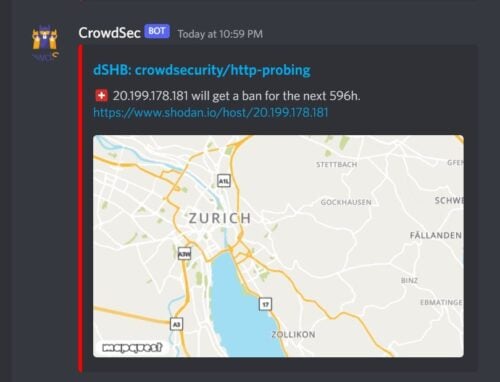
As mentioned at the beginning of this CrowdSec Docker guide, we can configure notifications on various platforms when an alert it triggered. Edit your profiles.yaml file in the config folder for your notification service.
I chose Discord for notifications.
As shown above, using the free mapquest API, you could even make it include a fancy map, identifying the geographical location of the attacker based on the IP.
Join CrowdSec Discord Community
Honestly, I thought they helped a lot while I was trying to wrap my mind around CrowdSec. They also organize frequent workshops for beginners.
So, check it out.
Closing Thoughts on CrowdSec Docker
I was considering Fail2ban for a long time but never got to it. Recently, I started hearing about CrowdSec and decided to do a bit of digging on CrowdSec vs Fail2ban. In the end, I decided to go with CrowdSec for the collaborative platform.
It took a while to figure out but once I did, I could see the impact it was having. First, with the alerts, I became aware of the sheer volume of attacks I was receiving. I had no idea I was being attacked so frequently.
Second, with the bouncers, I could quickly block offending IPs. And add to that, I could visualize the metrics and of course, brag about it.
CrowdSec Firewall Bouncer is the bare minimum. I strongly recommend adding additional bouncers for multiple layers of defense. I have Cloudflare Bouncer and Traefik Bouncer enabled. I will cover these in separate guides in the next few parts.
So, what are you waiting for? Begin blocking malicious connections with CrowdSec. And I hope this CrowdSec docker compose guide comes in handy for that.





![Ultimate Docker Server: Getting Started with OS Preparation [Part 1] Docker Server Tutorials 1 OS Preparation](https://www.smarthomebeginner.com/images/2024/01/Docker-Series-01-Intro-and-OS-Prep.png)
![Ultimate Traefik Docker Compose Guide [2022] with LetsEncrypt Traefik Docker Compose Guide](https://www.smarthomebeginner.com/images/2020/11/traefik-docker-compose-ft.jpg)
