In Part 1 of this series, I explained how to set up CrowdSec using Docker Compose and then block malicious traffic using the Firewall Bouncer installed natively on the Docker host.
This is great. But at this point, the attacker is already reaching your origin server. What if we add a layer on top that would top the attackers/bots before they reach your server?
This is exactly where CrowdSec Cloudflare Bouncer fits in. It works great with the Cloudflare free plan and so there is no cost to running it. In addition, you save your server resources for important tasks instead of fending off attackers (which is also important but not value-added).
Having Cloudflare bouncer is also great if for some reason you do not have access to your host system and can't install the Firewall Bouncer.
So let's see how to install Cloudflare Bouncer for CrowdSec.
Table of Contents
CrowdSec Cloudflare Bouncer
In my previous post on CrowdSec, I mentioned I was blocking close to 60 attacks per hour on my server. So what value does Cloudflare bouncer bring on top of that? Take a look:

Cloudflare bouncer blocked/challenged 743 potentially bad attempts in the last 24 hours. This is on top of what the Firewall Bouncer was already blocking.
How does the Cloudflare bouncer work?
CrowdSec already provides excellent documentation on the Cloudflare Bouncer. So I will keep repetitions to the minimum and focus more on adding Cloudflare to my Docker-Traefik stack.
Bouncers are responsible for dropping traffic from IPs that are in the blocklists. They work with the CrowdSec API to access the decisions and take action.
The Cloudflare Bouncer works in the same way. It accesses recent decisions using the CrowdSec API and adds the newly banned IPs to the blocklist on Cloudflare. For this, it accesses the Cloudflare account using a scoped API token.
Setup Cloudflare Bouncer
We are going to add Cloudflare bouncer as a docker container to our existing stack. It is also possible to install Cloudflare Bouncer natively on the host operating system, but, we are not going to discuss that here.
1. Create Cloudflare Scoped Token
First, let's create a scoped API token in our Cloudflare account. This will be needed by the Cloudflare bouncer to make changes to your Cloudflare account (i.e. managing the blocklist, creating firewall rules, etc.).
Head over to the API tokens section of your Cloudflare profile and create a new "custom" token (last option on the page):

Customize the token as shown below:
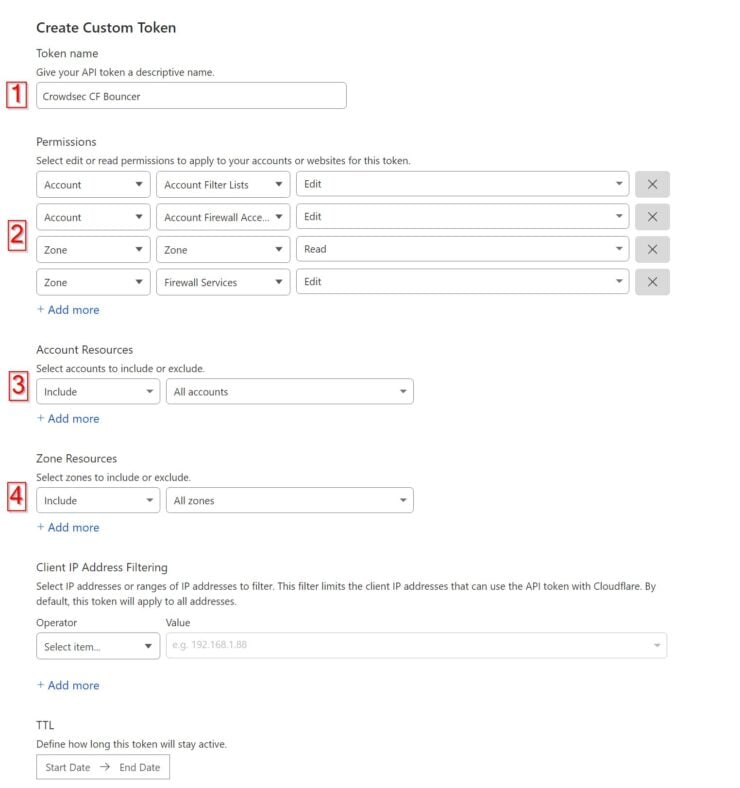
Name the API token with a recognizable name.
You will need to provide 4 permissions to the token:
- Edit Account Filter List
- Edit Account Firewall Access Rules
- Read Zone List
- Edit Zone Firewall Services
All the remaining items on the page are optional. But I am choosing to include all my accounts and all my zones. The reason is, I want the bad IP identified on one zone to also be banned from all the other accounts and zones.
Save and record the API token safely.
Be the 1 in 200,000. Help us sustain what we do.You will gain benefits such as Deployarr access, discord roles, exclusive content, ad-free browsing, and more.🔥 Holiday Sale! 25% Off Platinum Membership$399.99$299.99 (ends December 31).Join the Geek Army (starting from just $1.67/month)
2. Create a CrowdSec API Key for Cloudflare Bouncer
Before we start configuring the Cloudflare Bouncer, let's generate an API key to allow it to connect to CrowdSec API (aka LAPI). Use the following command to generate the key for cloudflare-bouncer-dshb (name it whatever you want). Remember to specify the correct path of your docker-compose file.
sudo docker compose -f /home/USERNAME/docker/docker-compose-t2-web.yml exec -t crowdsec cscli bouncers add cloudflare-bouncer-dshb
Your API key should be generated and displayed as shown below.

Note it down.
3. Initial Cloudflare Bouncer Configuration File
Next, we will need to generate an initial configuration file for Cloudflare Bouncer to use. If you have been following my folder structure for Docker, then inside your docker root folder (i.e. /home/USERNAME/docker) create the following empty file: appdata/cloudflare-bouncer/cfg.yaml.
Move into appdata/cloudflare-bouncer folder and run the following command (replace CLOUDFLARE_TOKEN with what we created in the previous step):
sudo docker run crowdsecurity/cloudflare-bouncer -g CLOUDFLARE_TOKEN > cfg.yaml
Within a few seconds, this file should be populated with basic configuration.
4. Edit Cloudflare Bouncer Configuration
We will have to make some changes to the basic configuration file generated above. Change the values identified below:
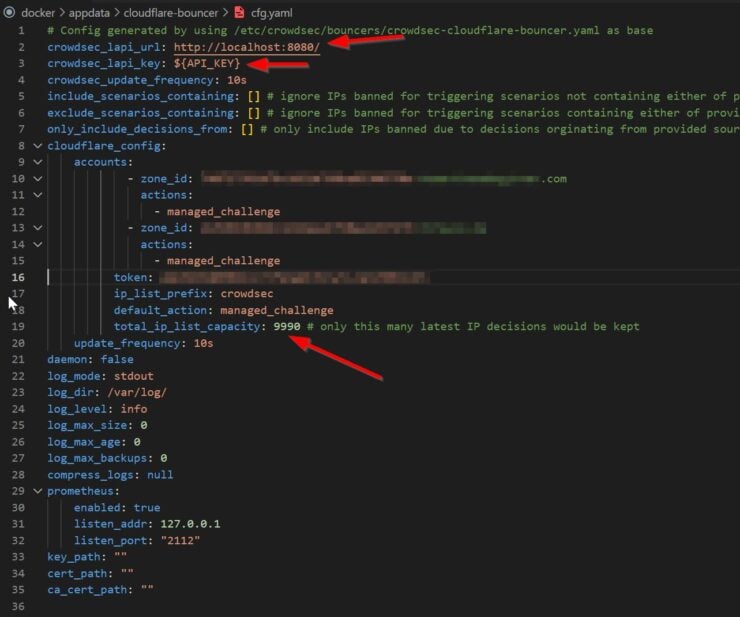
In the above example, I have two zones that Cloudflare Bouncer will protect.
Customize the following:
- crowdsec_lapi_url - Provide the URL for CrowdSec API. Since Cloudflare Bouncer and CrowdSec are on the same network (t2_proxy), we can refer to CrowdSec host using the hostname. So change it to http://crowdsec:8080/. In Part 1, we exposed CrowdSec container's port 8080 to the host machine. Therefore you can use HOST-IP:PORT as well.
- crowdsec_lapi_key - The CrowdSec API key we generated for cloudflare-bouncer-dshb, which was 564d4f3bb66ad4b142f1fd1f1b3e0028.
- total_ip_list_capacity - Cloudflare restricts your account to 10,000 IPs (combined from all lists). So the default is set to 10,000. Unfortunately, in my case, I have few IPs from other sources. I changed it to 9990 so I do not exceed the total. Obviously, this may not apply to you.
Be sure to check the docs to further customize your settings (e.g. I set my log_level to error). Save and exit.
5. Cloudflare Bouncer Docker Compose
Next, let's add the Cloudflare Bouncer docker-compose to our stack:
  # CrowdSec Bouncer - Cloudflare
  # Set max ip number right the first time (max 10000). Recreating the container deletes all ips and readds them causing cloudflare 429 rate limiting.
  cloudflare-bouncer:
    <<: *common-keys-core # See EXTENSION FIELDS at the top
    image: crowdsecurity/cloudflare-bouncer
    container_name: cloudflare-bouncer
    volumes:
      - $DOCKERDIR/appdata/cloudflare-bouncer/cfg.yaml:/etc/crowdsec/bouncers/crowdsec-cloudflare-bouncer.yaml
If you have been following my guides, understanding the above code should be easy. But here is a brief explanation with relevant links:
- *common-keys-core - Extension field as described my Docker guide. Extension fields minimize the repetition of compose statements. common-keys-core sets the restart policy to always and makes the container a part of the t2_proxy network.
- $DOCKERDIR - Environmental variable that needs to be created as described in my Docker guide.
- Volumes - We are just using the cfg.yaml we created previously.
Save, exit, start the container, and follow the Docker logs for it.

Everything went smooth and 9990 IPs were added to the Cloudflare Web Application Firewall rule.
6. Verify Cloudflare Bouncer Connection to CrowdSec API
Let us also verify that Cloudflare Bouncer is talking to the CrowdSec API. At this point, it should already be talking, otherwise, 9990 IPs would not have been added in the previous step. But let's check it anyways.
sudo docker compose -f /home/USERNAME/docker/docker-compose-t2-web.yml exec -t crowdsec cscli bouncers list
You should see the Cloudflare Bouncer connected to the API as shown below.

That's it. Cloudflare Bouncer should start doing its job and protecting you from attacks before they reach your server.
Limitations and Things to Know
CrowdSec Cloudflare Bouncer works great. However, there are a few limitations.
10,000 IP limit
Cloudflare IPs lists are limited to 10,000 total IPs among all lists that you have in your account. There are close to 19,000 IPs in the CrowdSec community blocklist at this time. Therefore, you won't be protected from about half of them.
When CrowdSec adds new IPs, some of the old ones will be removed from the list. So, you will still be protected from the most recent attackers.
Nevertheless, I recommend adding Traefik bouncer as a way to catch all attackers missed by the Cloudflare bouncer.
Cloudflare Bouncer Only Works with FQDN
Cloudflare Bouncer only works when your server is accessed through a fully qualified domain name. If the attacker has your IP address and reaches your server using IP then CrowdSec Cloudflare Bouncer will not protect you.
That responsibility will fall on your Host's Firewall Bouncer.
Cloudflare Free Plan Limits
Cloudflare free plan will work with CrowdSec Firewall Bouncer. However, in the free plan you are limited to:
- 1 list
- 5 WAF rules
You will have to ensure you are within these limits.
Recovering from Errors is NOT Easy
Today, there is no easy way to scratch and restart the Cloudflare Bouncer setup if you messed or went over the 10,000 IPs limit. I messed up once when I was testing things.
Based on the docs you are supposed to run the following command:
sudo crowdsec-cloudflare-bouncer -d
This command removes all the lists and firewall rules the boucner creates on your Cloudflare account, taking it back to the pre-CrowdSec condition.
But, this is when the bouncer is installed natively on the operating system. On the docker version, the container does not start because of going over the limit. But the container has to be up to be able to run the above command (should be run inside the container). So it is a catch-22 situation. Fortunately I recovered by trial and error (don't know what worked).
Reddit user modem7junior was kind enough to share what worked for him and create issues on the bouncer's GitHub page to get this resolved.
You can undo everything done by the Cloudflare bouncer using the following command:
docker run --rm -it -v /home/USER/docker/appdata/cloudflare-bouncer/cfg.yaml:/etc/crowdsec/bouncers/crowdsec-cloudflare-bouncer.yaml --name BouncerRecovery 'crowdsecurity/cloudflare-bouncer' -d
Of course, ensure proper path to cfg.yml. Once done, start over and you should be good.
Concluding Remarks
There you have it. Now we have Cloudflare Bouncer on top to take some of the load off of the Firewall Bouncer. As said above, in my case the additional benefit is that ban originating from one server is automatically applied to all my servers and domains.
Setting up CrowdSec Cloudflare Bouncer was not as easy as I thought it would be. Theoretically, it should have been simple. But I hope this guide steers you in the right direction.


![Ultimate Docker Server: Getting Started with OS Preparation [Part 1] Docker Server Tutorials 1 OS Preparation](https://www.smarthomebeginner.com/images/2024/01/Docker-Series-01-Intro-and-OS-Prep.png)
