In this post, I will explain how to easily create cron job on Ubuntu and other Linux system with Webmin. Cron allows you to setup time-based job schedule in Unix-like operating systems. Typically they are used to schedule jobs (commands or shell scripts) to run periodically at fixed times, dates, or intervals. As a Linux user or home server user you can use Cron to your advantage in several ways. In fact, we have already shown you how to automatically backup XBMC settings, update your MiniDLNA library, and record your social network stats using Cron. Several Linux users do not have a clear understanding of how to setup Cron jobs using the commandline. This is where a web-based system administration tool such as Webmin can come in handy. If you have not yet installed Webmin, follow this guide to install it. If you already have Webmin installed, it is time to see how easy it is to create cron job with Webmin.
Recommended Guides:
Create Cron Job with Webmin
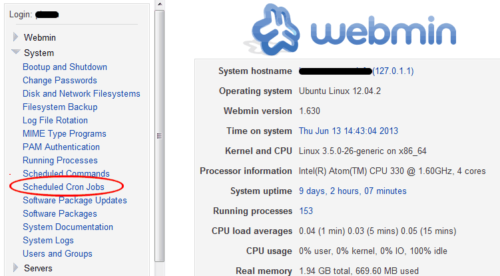
Webmin makes it very it very easy to setup Cron job. To create cron job, first login into your Webmin interface. You will find the link to create Cron job on the left under "System".
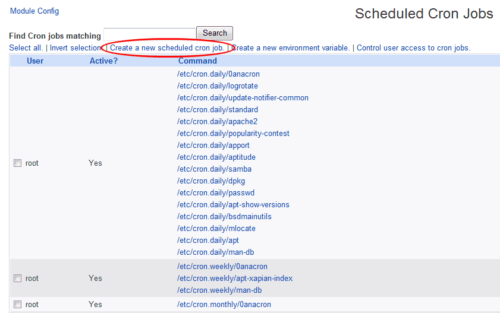
Once you click on "Scheduled Cron jobs" you will see a list of cron jobs that are currently on your system. Many of them are automatically created by the system when you install your operating system. You can select any of the Cron jobs from the list use on of the buttons on the bottom of the page to "Delete", "Disable", or "Enable" cron jobs. If disabled, the cron job would stay on your system but won't run. To create a new cron job click on "Create a new scheduled cron job" link on the top.
Cron Job Details
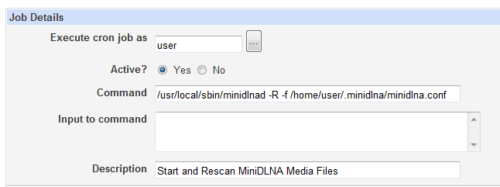
There are basically two sections in the create cron job page on Webmin. The first one contains details of the cron job. For "Execute cron job as" enter the username of the user you want to run the cron job as. Typically, for commands that require sudo you would enter root as the user. For those that do not require root permissions you can enter any user's username. Check "Active" and enter the command you want to run on a schedule. I have listed some example commands below. In most cases, you can leave "Input to command" field blank. Finally, you may choose to provide a description for the command. Although this is optional it can be a good reminder of the what the command does. So I recommend providing a good description.
Some examples of commands you could run on a scheduled basis:
reboot- Run asroot. Reboots your system periodically.shutdown -h now- Run asroot. Shuts down your system at the scheduled time.apt-get update ; apt-get upgrade- Run asroot. Updates your packages and upgrades all existing packages at the scheduled time.rsync -v /home/user/files/ /home/user/backup/- Run asuser. Syncs the contents of/home/user/filesfolder to/home/user/backupfolder./usr/local/sbin/minidlnad -R -f /home/user/.minidlna/minidlna.conf- Run asuser. This command is shown in the picture above. It starts MiniDLNA and rescans your media files../home/user/scripts/./runbackups.sh- Run asuser. Runs therunbackups.shscript at the scheduled times.
Recommended Guides:
Setup Cron Job Schedule
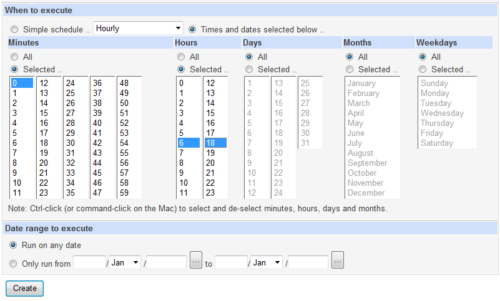
The second section of the create Cron job page, is for the scheduling the times to run the command. You can schedule the command in two ways: "Simple Schedule" or "Times an Dates Selected Below". Simple schedule runs the command at set times: hourly, daily, monthly, yearly, or every time when the system boots. For a more custom schedule, choose "Times and Dates Selected Below". In the example shown below, the command would be run every month, all days, at 6:00 and 18:00 hours, which twice a day. Choose the time that works for you. Finally, specify whether you want to run this command on any date or during the specified date periods and then click "Create".
Doesn't Webmin make it easy to create Cron job? The created cron job should now appear on the list of scheduled Cron job. Every time a Cron job runs, an output or error is emailed to the system administrator. Over time this can get annoying. If you want to stop receiving these notifications, check this post.
Go ahead setup cron job and make administering Linux systems easier.



![Watchtower Docker Compose with Cool Notifications [2024] Watchtower Docker Compose with Cool Telegram Notifications](https://www.smarthomebeginner.com/images/2024/01/title.png)
