Using a VPN on your media center helps keeping your media browsing secure and private. There are lots of options if you want to use a VPN and Kodi. For example, you can install a VPN client such as IPVanish on Android or any other OS you use. Of course, OSMC was not going to be the exception. Its a bit tricky but OSMC also has the ability to let you use a VPN connection and make your media center safe. In this tutorial we show you how to install VPN on OSMC with OpenVPN for Raspberry Pi. [Read: OpenELEC vs OSMC for Raspberry Pi 2 Media Center]
Table of Contents
Setup VPN on OSMC
To install VPN on OSMC for Raspberry Pi you will need:
- A Raspberry Pi. For this tutorial I will use the Raspberry Pi 3 b.
- Debian based OS. I am using OSMC on Raspberry Pi.
SSHneeds to be enabled on the Pi.- a Windows computer with Putty installed (or other SSH Clients) or
SSHfor Mac/Linux. - a
VPNprovider (eg. IPVanish)
Surfshark VPN Exclusive Offer - 82% off ($2.39/month):
♦ Hide your browsing (no logs), Anonymize Streaming and Downloads
♦ Wireguard Protocol support for VPN.
♦ Circumvent Geo/Country Restrictions and access worldwide content
♦ Works on Windows, Mac, Linux, Android, iOS, Router, and more
♦ 1 TB Encrypted Storage
♦ Money back guarantee - Sign Up Now
Determine OSMC IP Address
Local method
First we need to know the IP address of the Raspberry Pi. We can do this in several ways. If you want to do it locally from the Raspberry Pi itself, run the terminal command ifconfig.
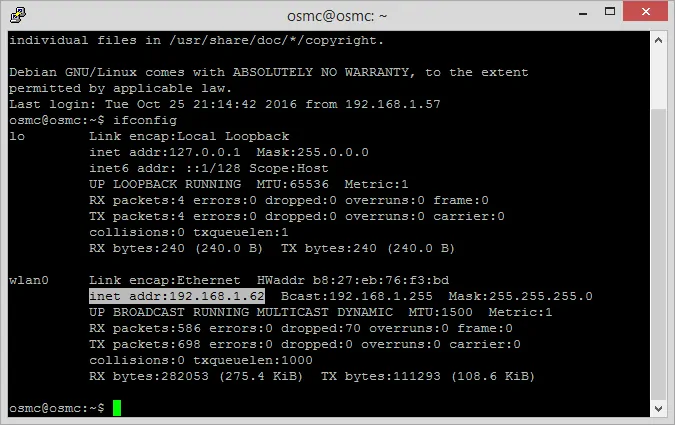
Look for the inet addr and save the IP address that's shown. In the example displayed above, the Pi is connected to the wlan0 WiFi interface. In case you are using an Ethernet cable look at lo instead of wlan0.
Router method
Alternatively, you can use your router to see the Raspberry Pi address. In your browser type the URL 192.168.1.1. After this, enter your login information and connect to your router.
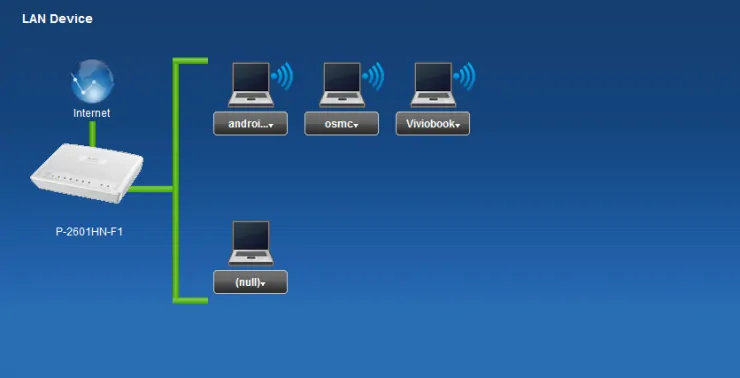
Depending on your model and brand of router you might see an interface similar to the one above. In this case, you can easily find your Raspberry Pi and click on it. For the image above, the device is labelled OSMC, since our Pi has that OS installed. [Read: Install OSMC on Raspberry Pi 2 and 1 on a Windows System]
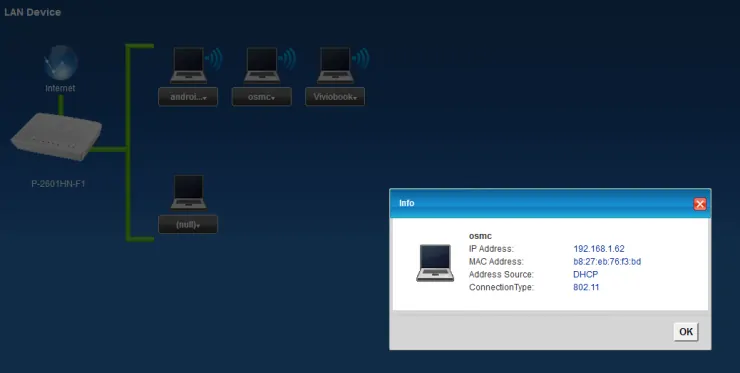
If the interface is not as graphical as the one shown above, you can still find the IP address, albeit with some more patience and deductive power. Nevertheless, once you have the IP address of your OSMC Raspberry Pi device, then you can save it for the next steps. [Read: Quick Vero 2 review: unlock all the power of OSMC]
Installing VPN on OSMC
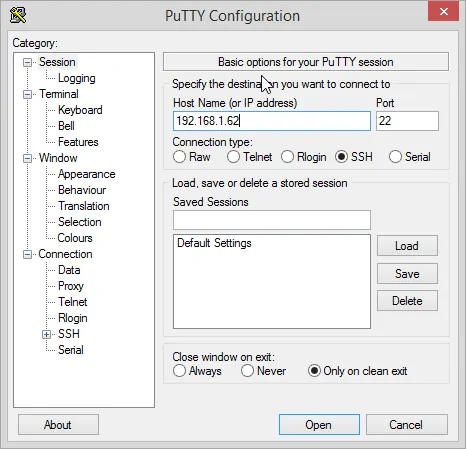
Open Putty or your favorite SSH client and then paste the IP address in the Host Name field. After you have properly configured your connection, press the Open button.

Type the login name and press Enter. After that, write your password and press Enter again. Default credentials are username and password osmc. [Read: Guide: Easy Kodi VPN Ubuntu setup with IPVanish]
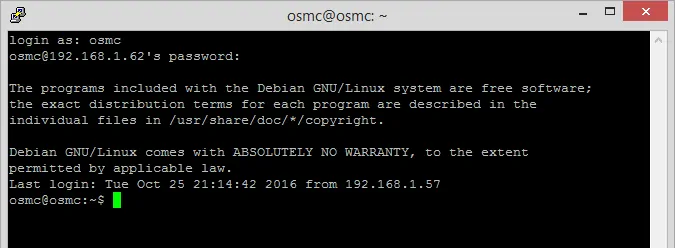
Type the following commands in the terminal. This will update your package manager and then install VPN on OSMC for your Raspberry Pi device.
sudo apt-get update
apt-get install openvpn
cd /etc/openvpn
The next command helps you download the .ovpn configuration files from the NordVPN provider (remember to get the .ovpn files from your provider).
sudo wget https://nordvpn.com/api/files/zip
For IPVanish, use the following instead:
sudo wget https://www.ipvanish.com/software/configs/configs.zip
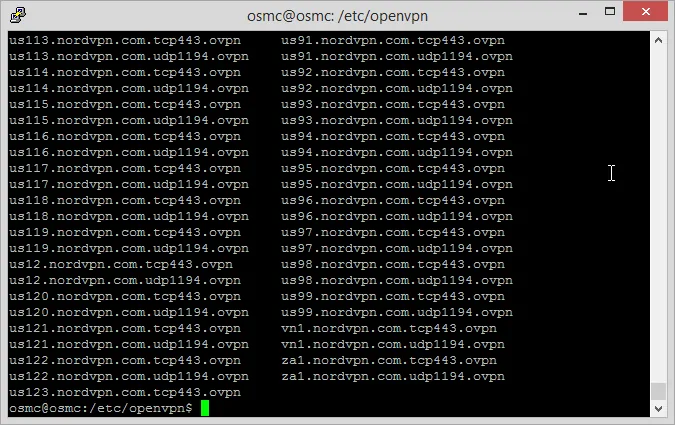
Then, unzip the package you just downloaded (use configs.zip instead for IPVanish) and the last command gives you a list of all the available servers.
sudo unzip config.zip
ls
| Build a Low-Cost Raspberry Pi Media Center | Price |
|---|---|
| Raspberry Pi 4B Starter Kit with case, power adapter, and heat sinks | ~$82.00 |
| Sandisk Ultra 32GB Micro SDHC UHS-I Card 98 MB/s | ~$8.00 |
| SANOXY Wireless USB PC Remote Control Mouse for PC | ~$8.00 |
Connecting to VPN servers
To connect to the server, you can use an instruction similar to this one:
sudo openvpn de105.nordvpn.com.udp1194.ovpn
Of course, the actual command will vary depending on what server you want to connect to. You can also select between UDP or TCP protocol based in some filenames (depending on your provider)
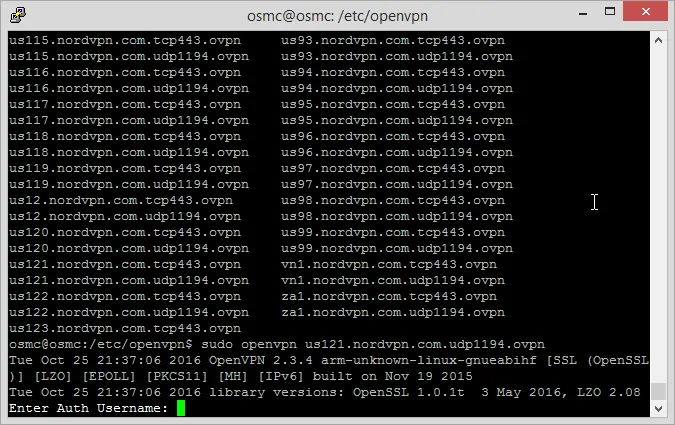
OpenVPN will need your credentials, so enter your VPN provider name/email and password. Once you do that, you will be successfully connected to the VPN. To disconnect from the VPN simply press Ctrl+C.
Fixing DNS VPN Problems
You might not be able to connect to the internet due to DNS problems. If that happens, we can fix that issue. To do so, first disconnect from the VPN as described above (Ctrl + C). In the terminal, type
sudo apt-get install nano
sudo nano /etc/resolv.conf
This will let you edit the config file with the nano text editor.

In nano use # to comment out the first 4 lines so that OSMC does not use the DNS provided by your router. Instead, make a new line and type:
#new mode
nameserver 162.242.211.137
nameserver 78.46.223.24
The DNS number will differ if you're using another provider than NordVPN. In that case check your providers website for information. Try to exit nano by pressing Ctrl+X, and answer y to save the config file. After that, go to the terminal and type:
sudo chattr +i /etc/resolv.conf
This command will set your DNS configuration to immutable, which means it will not be changed unless you change it.
Congratulations! You now enjoy the perks of using a fully-functional VPN on your OSMC device! Not on OSMC? How about trying to use OpenVPN on Windows? You can also speed up the process by using the paid service from IPVanish on Windows and forgetting about setups and configurations. There are lots of options to keep your browsing and media viewing secure!

![8 Amazing Raspberry Pi Ideas [2022]: Beginners and Enthusiasts Raspberry Pi ideas](https://www.smarthomebeginner.com/images/2021/09/raspberry-pi-4-dev-board.jpg)

![15 Best Plex Alternatives [2022] - FREE and BETTER Options Best Plex Alternatives feature image](https://www.smarthomebeginner.com/images/2022/08/best-plex-alternatives-feature-image.gif)
![10 Best Plex Client Devices [2022] - STUTTER-free Streaming Best Plex Client Devices](https://www.smarthomebeginner.com/images/2022/02/best-nas-for-plex-server-featured-images-from-pexels-photography-maghradze-ph-3764958-e1648542743772.jpg)

