Home Assistant is by far the best home automation software I have used. One thing that would make it even better is if I could control home assistant with Google Home. The biggest advantage of Smart Home hubs such as SmartThings, Wink, etc., over home assistant, was the integration with Google Assistant, which adds the ability to voice control devices attached to the hub. Not anymore. Release 0.56 added Home Assistant Google Assistant integration. This was even more simplified with the introduction of Home Assistant cloud in release 0.60. [Read: Samsung SmartThings vs Wink Hub – Which one is better for whom?]
In this post, I will show you how to configure Google Assistant for Home Assistant with and without using Home Assistant Cloud, which costs $5 per month. The free method has some requirements and can be cumbersome to setup, but it is not that difficult and is FREE.
Changelog:
- April 10, 2019 - Updated instructions to reflect current process. Tested on Home Assistant Version 0.91.2.
- October 17, 2018 - Home Assistant version 0.80 had a breaking change that affected Google Assistant. Updated the guide with new instructions.
Table of Contents
Benefits of Home Assistant - Google Assistant Integration
The obvious benefit is the ability to control devices such as lights, switches, etc. that are connected to your home assistant, using your voice, either on your Google Assistant enabled portable devices or Google Home. If you take into account that Home Assistant has integration for over 1000 components, you will be able to do a lot more things with your voice compared to SmartThings, Wink, or any other similar hub. [Read: How to add an animated Weather Radar on Home Assistant?]
Here are some uncommon but exciting examples:
- I can turn on vacation mode using my voice. All home assistant automations that include vacation mode will automatically become active.
- If you are a Docker fan, you can manage your docker containers using your Google Home (a separate guide on this will follow). I can use voice commands to start, stop, or restart Home Assistant, UniFi Controller, Plex, Emby, Radarr, Sonarr, etc. that I run using Docker as described in my Docker Media Server pPost.
- I can start, stop, or restart downloads (Transmission, SABnzbd, etc.). I can even turn on Alternate Download speeds in Transmission using my voice.
- I turn off and on an input boolean, which triggers an automation to send an "OK" command to my TV. I use this to skip ads with voice, when my kids are watching YouTube.
So let's see how to setup Google Assistant for Home Assistant.
Configure Google Assistant for Home Assistant
As explained previously, there are now two ways to integrate Google Assistant so you can use Google Home with Home Assistant. The easier but not free ($5 per month) method is using the Home Assistant cloud service, which also offers integration with Amazon Alexa. The cumbersome (it is not that tough and I will walk through it) requires a little bit of configuring but is free. I will cover both in this guide.
1. Setup Google Assistant for Home Assistant without Cloud Service - Free
Setting up Google Assistant for Home Assistant is based on the Google Assistant component. This method has some key requirements:
1.1. Requirements
- Home Assistant should be externally accessible from the internet. This may require port forwarding on your router and can be a security risk if not done right. You will have to forward port 443 to point to your home assistant host.
- A domain name (example.com) or a dynamic DNS pointing (eg. DuckDNS or Afraid) to your home IP.
- A certified SSL Certificate (not a self-signed one) for your domain name or Dynamid DNS.
If you followed my Docker Media Server and Traefik Reverse Proxy guides, it is quite easy to setup a home assistant instance using Docker, behind Traefik reverse proxy and automatic Let's Encrypt SSL certificate. You only have to expose port 443 (for HTTPS) to the internet rather than the home assistant port, which adds some security.
Once you have satisfied the requirements let us move forward with configuring Google Assistant for Home Assistant.
| Build an Ultimate Raspberry Pi Smart Home Hub ~$105 | Price |
|---|---|
| Raspberry Pi 3 B+ Starter Kit with case, power adapter, and heat sinks | ~$55.00 |
| Sandisk Ultra 16GB Micro SDHC UHS-I Card 98 MB/s | ~$7.50 |
| Aeotec Z-Stick Gen5, Z-Wave Plus USB to create gateway | ~$45.00 |
1.2. Create Actions on Google Project
This process involves creating a Smart Home Google Action and obtaining credentials to access it. Before you can control Home Assistant with Google Home, you will need the following details:
- project_id - Project ID from Google Developer Console
client_id - A long random string used for Implicit OAuth- Not needed since Home Assistant v0.80.access_token - Another long random string. Not really used anywhere but needed- Not needed since Home Assistant v0.80.
Head over to Actions on Google / Developer Console and create a new Actions project and provide a name, as shown below. The name could be anything you can recognize.
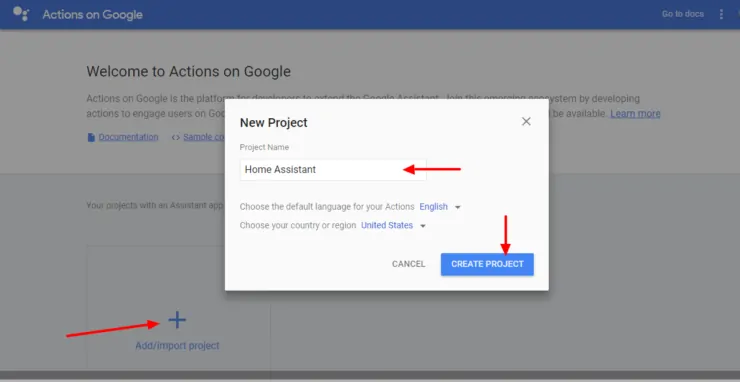
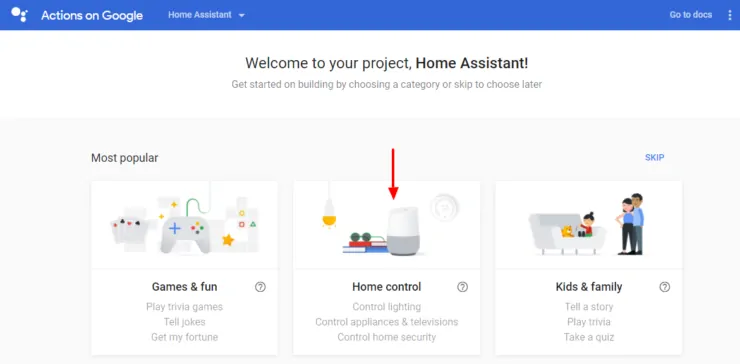
In the following screen, choose Home Control for category, followed by Smart Home for type.
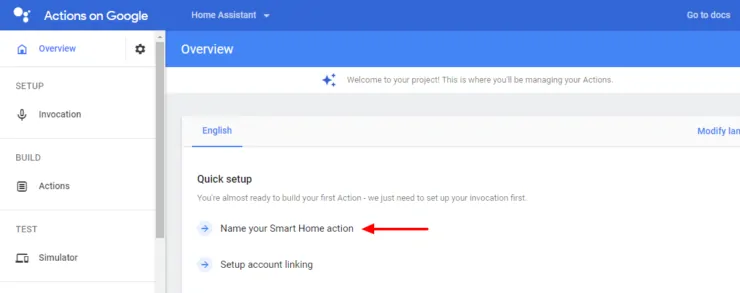
Next, under Overview, select Name your Smart Home action, as shown below.
Provide a name that you will use to call your home assistant on Google Home or Google Assistant. Unfortunately, you cannot call your home assistant instance Home Assistant because it contains the word "Assistant", which is prohibited. You will have to come up with something creative and don't mind using. Don't use "Mr. Hass", I could not get my google home to recognize this properly.

Go back to Overview and then click Setup account linking.
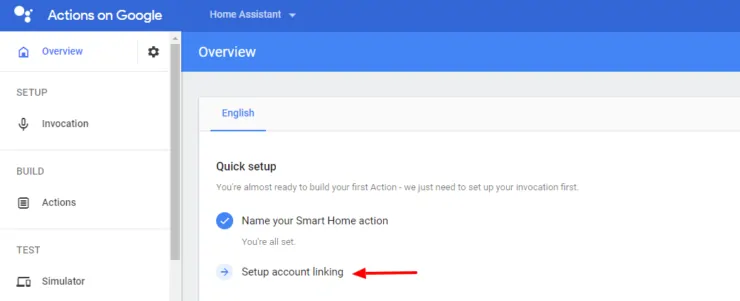
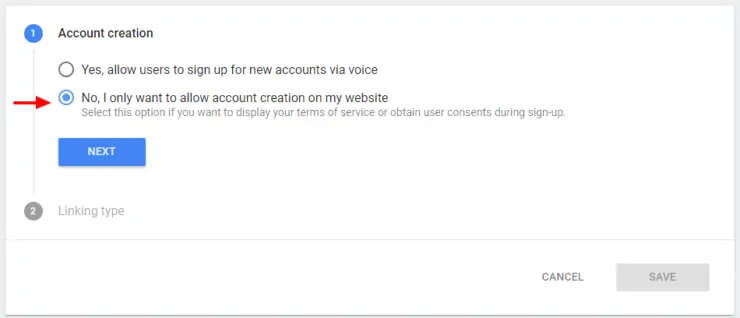
Leave the default selection here - No, I only want to allow account creation on my website, as shown below.
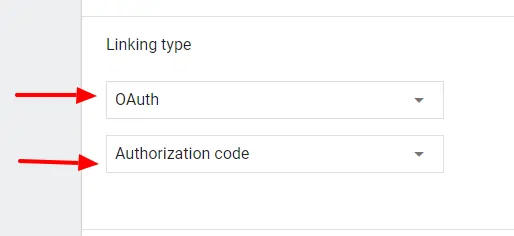
Next, for Linking type choose OAuth and Authorization Code, as shown below.
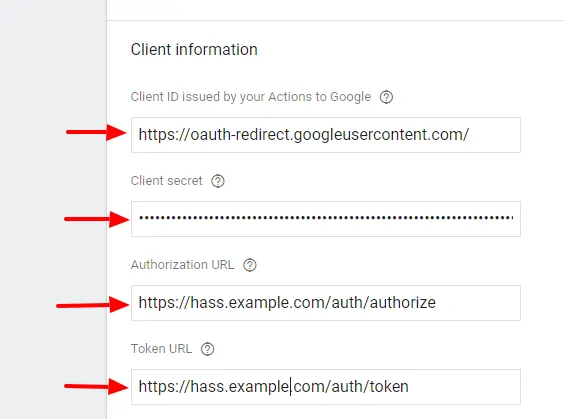
Then you will have to provide Client Information as shown below:
Customize the following:
- Client ID: Must be https://oauth-redirect.googleusercontent.com/ (including the trailing forward slash).
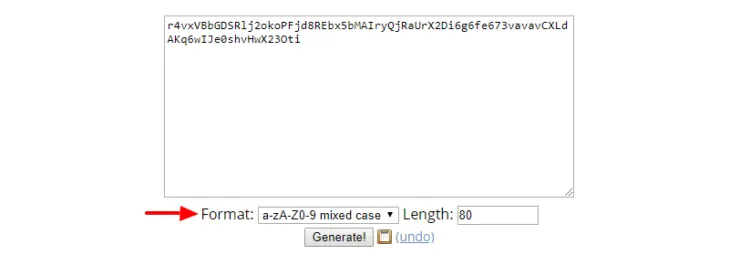
- Client Secret: Required by Google Actions but not used by Home Assistant. So it can be any random string. Although an overkill, you may use this online tool to generate a random string, as shown below.
For Authorization URL use the following:
https://hass.example.com/auth/authorize
For Token URL use the following:
https://hass.example.com/auth/token
Customize the following for Authorization URL and Token URL:
- hass.example.com: Use your dynamic DNS or domain name. In my case, HASS is under its own subdomain behind Traefik reverse Proxy. If yours is exposed through a port, then you can use example.com:8123, where 8123 is your Home Assistant port.
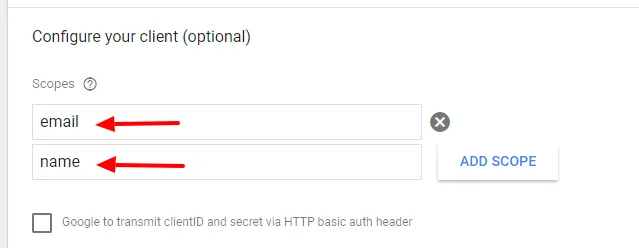
Next, under Configure your client, define the following two scopes: name and email, as shown below:
Google to transmit clientID and secret via HTTP basic auth must be left unchecked.
Next, under Testing instructions, provide a test account, as shown below. It can be anything since we won't actually be testing anything. So test is fine.
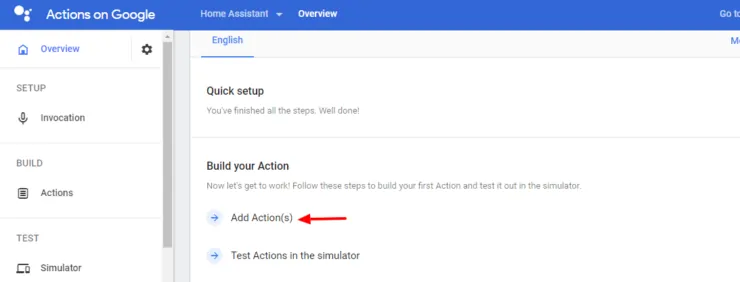
Once you hit save, the Quick Setup is complete. Go back to Overview and complete Build your action. Click on Add Actions, as shown below.
Fulfillment URL should be similar to the following:
https://hass.example.com/api/google_assistant
Once again, customize hass.example.com as described previously. Then click Done to complete building your action. Next, you will have to provide some deployment information.
Go back to Overview screen choose Enter information required for listing your action in the actions directory.
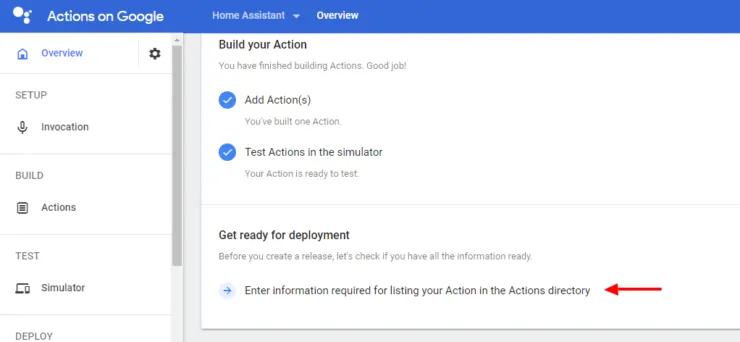
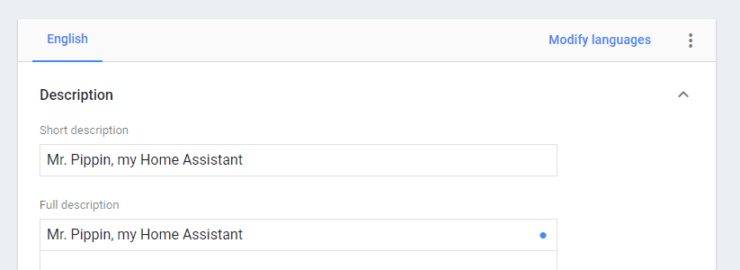
We won't actually be listing our action in the directory. We will leave it in "draft" mode. Do not fuss over the details you provide. First, provide a description as shown below. It can be anything.
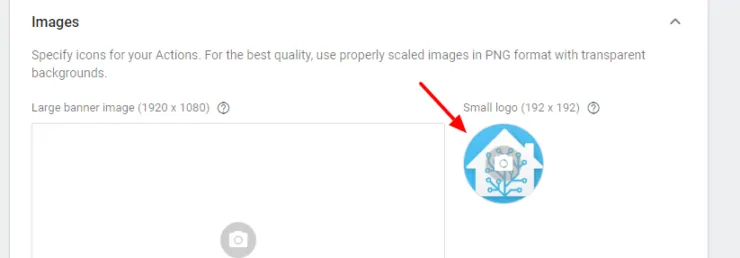
Next, provide a background image and icon for your action. Only the icon is required. As you can see below, I just used the home assistant icon here.
Then, for contact details, provide your email ID. This won't be displayed publicly. So do not worry.

Finally, for a link to Privacy Policy, just provide any link. I just used Home Assistant's website URL here.
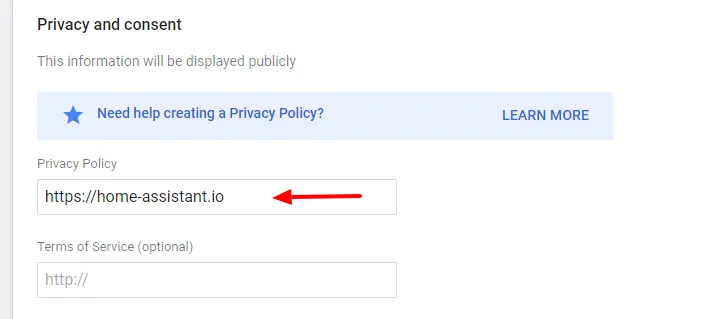
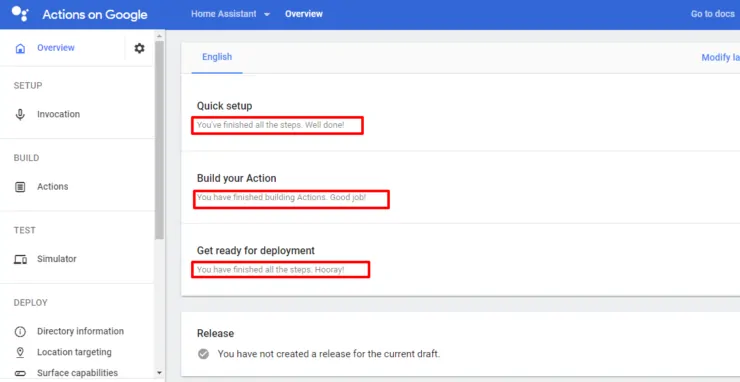
Ignore Additional Information section and click Save. After completing all the above steps, you should now have satisfied all requirements on Overview page to release the action.
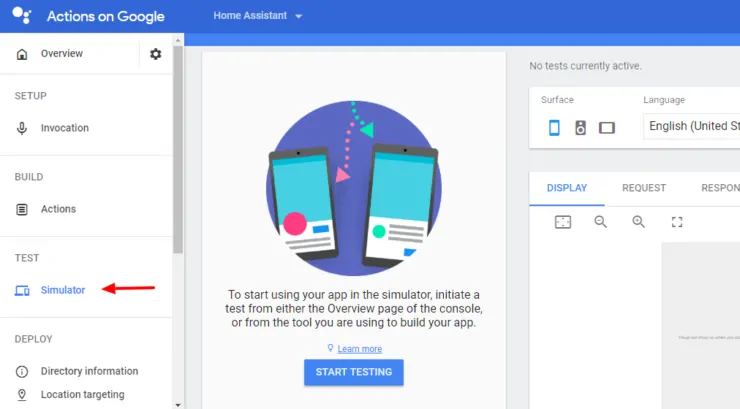
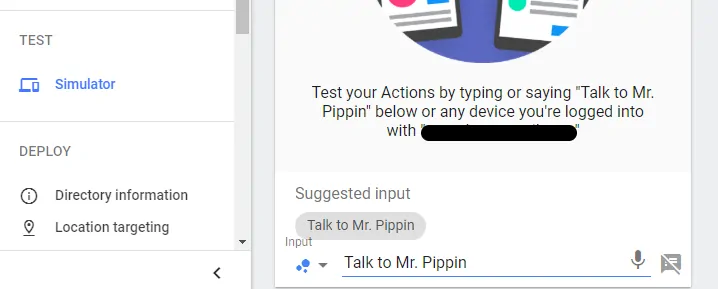
Click on Simulator as shown below and Start Testing. Do not worry, this won't really test anything at this point.
You will be presented with a screen that looks like the one below. You do not need to do anything here.
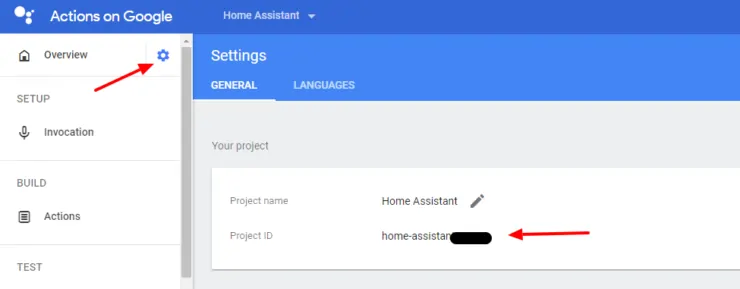
Finally, click on the gear icon as shown below, go to Project Settings, and record the project ID. This is required for you to setup Google Assistant for Home Assistant.
1.3. Create Google Console API Key for the Project
API Key is optional. But, without this, you will not be able to say “Ok Google, sync my devices” to update the devices from home assistant listed in your Google Home app. Therefore, if you add new devices to your home assistant after configuring Google Assistant, you will have to unlink and re-link your account for them to show up on your Google Home App. In doing so, you will lose customizations such as Nicknames and room assignments. Therefore, providing an api_key is highly recommended.
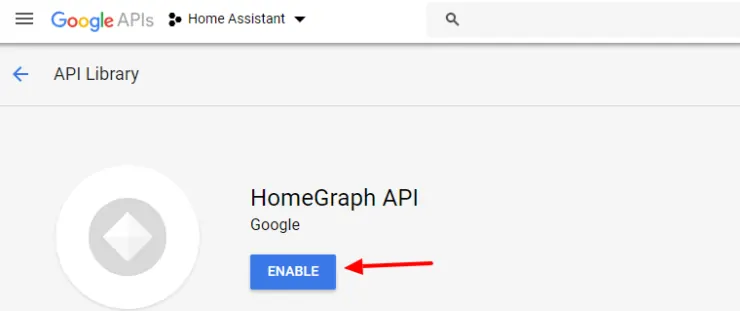
Head over the Google Cloud Console and choose the project you created in previous step, as shown below. Next, click Enable APIs and Services button.
Search, find, and enable the "Homegraph API".
Next, click on Credentials and create a new API Key.
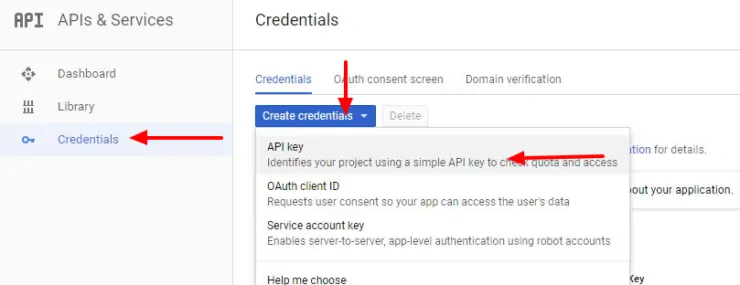
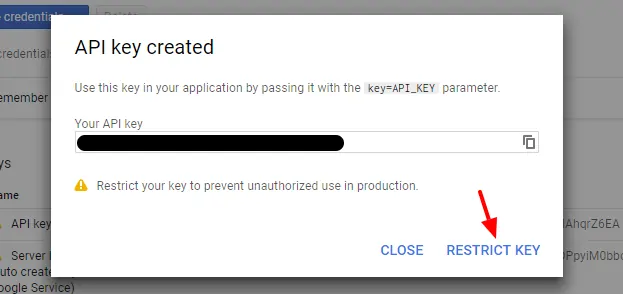
Note down the API Key shown. You may end here but, I suggest you to click on Restrict Key.
At the very least, provide a name for the API Key so you can recognize what it was generated for. If you know what you are doing, you may restrict the API to your home assistant WAN IP or provide other restrictions for key usage. But this is not required.
Phew! That is all on configure things on the Google side. Now it is time to add the Google Assistant component to Home Assistant.
1.4. Add Google Assistant to Home Assistant
With the client ID, project ID, access token, and API key generated in the previous steps, we can now add the Google Assistant component to Home Assistant. Open your configuration.yaml file and add the following code block:
google_assistant:
  project_id: PROJECTID
  api_key: APIKEY
  exposed_domains:
    - light
Replace PROJECTID, CLIENTID, ACCESSTOKEN, and APIKEY with what you noted down in the previous steps. You can make several domains (types of devices) available to Google Assistant. The whole list can be found here. This page also includes several more ways to customize what devices are available to Home Assistant and how they are available. I am only exposing my smart light in this guide for simplicity. It is better to start with one or a few domains and keep adding other domains/entities in steps so you are not bombarded with hundreds of new devices cluttering your Google Home app. Alternatively, you also have the option to explicitly specify which entities can appear on Google Home app.
Save your configuration file and restart home assistant.
2. Home Assistant Cloud Google Assistant Setup - $5 per month
The introduction of the cloud service in 2018 simplified integration of Amazon Alexa and Google Assistant on Home Assistant, significantly. You do not have to create projects, IDs, API Keys, etc. and makes it so much easier to control home assistant with google home. The downside is, the cloud service costs $5 per month.
The cloud service creates a secure link between your home instance and the home assistant cloud. Your voice commands are sent to Home Assistant cloud, processed, and a response is sent back to your HASS instance.
2.1. Sign up or Sign into Home Assistant Cloud Account
Home Assistant cloud is administered by Nabu Casa. To sign up or sign in, go to Configuration->Home Assistant Cloud from your home assistant UI.
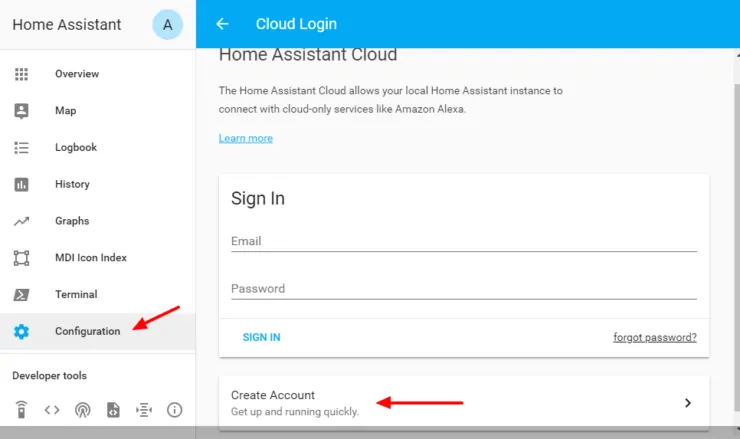
If you already have an account, sign in now. If you do not, you may create an account. Creating an account here will create a 31-day trial account on Nabucasa.com. Beyond the 31-day trial period, the cloud service will cost you $5 per month.
| Build an Ultimate Raspberry Pi Smart Home Hub ~$105 | Price |
|---|---|
| Raspberry Pi 3 B+ Starter Kit with case, power adapter, and heat sinks | ~$55.00 |
| Sandisk Ultra 16GB Micro SDHC UHS-I Card 98 MB/s | ~$7.50 |
| Aeotec Z-Stick Gen5, Z-Wave Plus USB to create gateway | ~$45.00 |
2.2. Add Google Assistant to Home Assistant
After signing up for Cloud service, you may open up your Google Home App and link the account. However, I do not recommend doing this as the cloud service, by default, makes all home assistant domains / entities available on Google Home. This can be several hundred devices if you have a comprehensive HASS setup. I recommend adding devices in steps. In this guide, I am only including the smart lights.
Open your configuration.yaml file and add the following code block:
cloud:
  google_actions:
    filter:
      include_domains:
        - light
Details on ways to customize what devices are available to Home Assistant and how they are available is available on this page.
Save your configuration file and restart home assistant. There is all there is to configuring google assistant through home assistant cloud.
3. Setup Google Home App
On your Android device, open your Google Home app using the same google account as the one used for creating the projects above, and go to Home control from the menu. Under Add new you should see the Smart Home action you created above. In this guide, it is Mr. Pippin. Notice that the [test] in front indicates that it is draft and is not publicly available to anyone else, which is good. If you went with the Home Assistant Cloud, then you will have to search for hass.io (ignore the hass.io name, it will work for any home assistant instance) and add it.
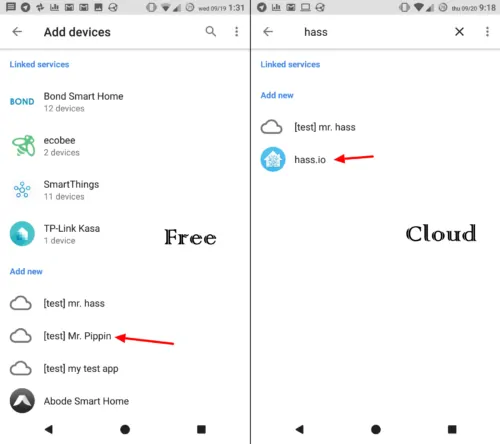
Once you select your Smart Home action, Google Home App will authenticate and should provide you with a list of devices that were found. If you selected the cloud option, you will have to login into your Nabucasa account (Home Assistant Cloud Account). For the free option, you will be asked to login to home assistant.
In this example, only one device is being added (you may have several more depending on your situation). Once customized with Nickname and room information, these devices should appear under your list of devices as shown below.
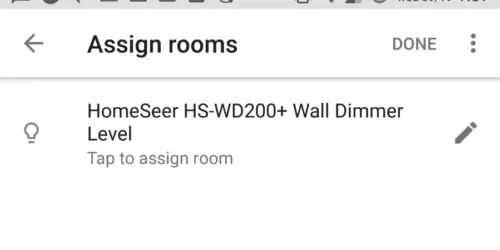
HomeSeer switch is one the best Z-wave light switches. It controls my garage lights and now I can say "OK Google, turn on garage lights" and it should work.
Control Home Assistant with Google Home
Setting up Google Assistant for HASS used to be quite difficult. Cloud service has made home assistance google home integration so easy for even non-tech savvy users. Even the free method has gotten significantly easier over the months. Both methods work the same and which one you use is a matter of personal preference. If you like Home Assistant, which is free, going with the Cloud option will not only reduce work on your side but it is one way to support Home Assistant development activities.
Not being able to voice control my HASS was one of the biggest drawbacks I had. This is one reason I had both Samsung SmartThings and Home Assistant running for home automation activities. I have slowly started transitioning all my devices to Home Assistant.
Google Assistant component page on Home Assistant's website has instructions to configure Google Assistant for Home Assistant. However, I found that the details don't exactly reflect how things are done today (although you can still figure out). In addition, I tried to make it easier for newbies by adding pictures at various steps. I hope others find this guide useful. So go ahead, configure Google Assistant for Home Assistant and take your setup to the next level.






![8 Amazing Raspberry Pi Ideas [2022]: Beginners and Enthusiasts Raspberry Pi ideas](https://www.smarthomebeginner.com/images/2021/09/raspberry-pi-4-dev-board.jpg)
