GoDaddy is one of the most widely used domain and hosting provider. The offer hosting plans as low as $1 per month. In this post, I will provide a detailed explanation of how to create automatic MySQL database backup on GoDaddy's Linux shared hosting. Please note that this method works only on Linux hosting. Each hosting account comes with one or more MySQL databases. And if you are a webmaster you know how critical it is to backup your database. Setting up automatic MySQL database backup is one way to backup your database without any effort from the webmaster. Enough said, let us now look at how to automatically backup MySQL database daily, weekly, and monthly using a bash script. Don't worry you do not have to write any codes. This tutorial will provide with beginner-level instructions to achieve this.
Table of Contents
What this script will do?
The script I will be providing in this guide will do automatic MySQL database backup by:
- Creating a automatic MySQL database backup daily
- At the end of the week, creating a weekly backup
- At the end of the month, creating a monthly backup
- Storing backups as compressed files to save space (upto 90% space-saving)
- Deleting old daily, weekly, and monthly MySQL database backups - lets you define what is old
It is completely customizable without the need for any coding knowledge. In addition I have provided pictures at each step to guide you through the process. If you do not have a GoDaddy hosting account yet, this might be time to make use of the exclusive offer above.
Download Automatic MySQL Database Backup Script
The first step is to download the bash script I have written for you by clicking the button below:
After downloading, open the script with Notepad++ or other code editors. Opening the code in Windows Notepad, WordPad or Word does not process symbols well and will cause the following error when the script runs:
^M:bad interpreter:No such file or directory
If you see the above error, your first attempt should be to fix the symbols such as ` and ' in the code using Noteplad++.
Edit the Bash Script
This script is written with comments (lines that start with a #) for everything that requires your input. It is divided into two sections. One you will have to edit before the script works and other that you should not edit if you do not know what you are doing. For the script to work all you to do is find the section below and provide some basic details. Open the script in Notepadd++ and edit it as shown below:
#############BEGIN EDIT AREA######################
# BELOW ARE SOME REQUIRED SETTINGS. CONFIGURE THEM PROPERLY BEFORE USING
# THE SCRIPT

DBHOSTNAME=xxxxx.db.xxxxxxx.hostedresource.com
DBUSERNAME=databaseusername
DBPASSWORD=databasepassword
DBNAME=databasename
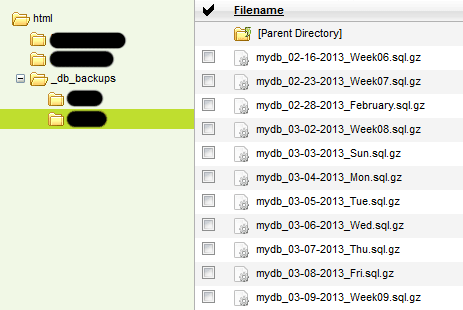
BACKUPFOLDER=$HOME/html/_db_backups/backupfolder
DELETEFILES=Y
DAILYBACKUP=Y
NUMDAILYBACKUPS=6
WEEKLYBACKUP=Y
NUMWEEKLYBACKUPS=4
MONTHLYBACKUP=Y
NUMMONTHLYBACKUPS=2

#############END EDIT AREA######################
Here are the explanations for all the parameters in the code:
DBHOSTNAMEis the host name of the host that hosts yours MySQL database. You can get this from GoDaddy. Just replace the entire contents after = with your database host name.DBUSERNAMEis the username to access the MySQL database. Just replace the worddatabaseusernamewith your username. No quotes needed.DBPASSWORDis the password to access the MySQL database. Just replace the worddatabasepasswordwith your password database. No quotes needed.DBNAMEis the MySQL database that needs to be backed up. Typically, in GoDaddy Linux Hosting this is the same as theDBUSERNAME.
BACKUPFOLDERis the path to the folder where backups will be stored.$HOME/htmlwill automatically put you in the hosting accounts root folder. GoDaddy MySQL databases are normally stored in the_db_backupsfolder within your base hosting folder. If the folder does not exist create it before running the script. You can also create a subfolder within_db_backupsfolder if you would like to backup the database to a separate folder. Alternatively, you can backup to an entirely different folder of your choice. Whatever you choose to do, ensure that the path is correctly specified.DELETEFILES- Should the script delete older files based on the conditions you set (Y or N - uppercase letters only). Choosing Y will maintain only recent backups based on your settings here. Choosing N will keep all the backups from the past.DAILYBACKUP- Do daily backups Y or N? (one uppercase letter only)NUMDAILYBACKUPS- Number of recent daily backups to keep. The default is 6 (Sun-Fri) with Weekly backup on Sat. All previous backups will be deleted. This is meaningless unlessDAILYBACKUPis set to Y.WEEKLYBACKUP- Do weekly backups Y or N? (one uppercase letter only). Weekly backups are done on Saturdays.NUMWEEKLYBACKUPS- Number of recent weekly backups to keep. The default is 4. All previous weekly backups will be deleted. This is meaningless unlessWEEKLYBACKUPis set to Y.MONTHLYBACKUP- Do monthly backups Y or N? (one uppercase letter only). Monthly backups are done on the last day of the month.NUMMONTHLYBACKUPS- Number of recent monthly backups to keep. The default is 2. All previous monthly backups will be deleted. This is meaningless unlessMONTHLYBACKUPis set to Y.
As I said before, do not edit anything else other than the above unless you can understand the script and know what you are doing.
Upload the Script
The next step is to upload the edited script to your hosting account. You may upload it to any folder. If you like to have things organized, you could create a scripts folder within /html folder and save all your scripts in it. Give the script "Execute" permission and disable "Web Visible". To do this, open File Manager (from your hosting control panel) and navigate to the folder where the script is saved. Select the file and click on "Permissions" button. Check "Executable" and uncheck "Web Visible" and click OK. Once done you should see the symbol shown in the lower-right corner of the following picture.
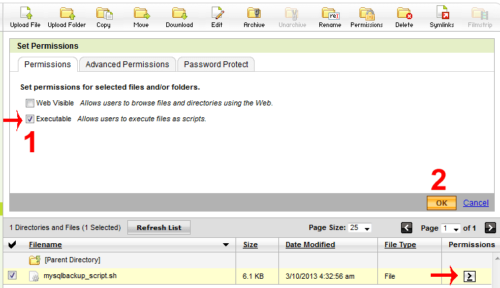
It is critical that you uncheck/disable "Web visible" in the above step. If not anybody who knows the path to the script can download the script and get credentials to connect/hack your MySQL database. For the scripts folder you may want to disable both "Executable" and "Web Visible" under "Permissions". Then under "Advanced Permissions" tab, enable only "Execute" for web user and everything for the owner (which is you). This further improves your security.
Automatic MySql Database Backup
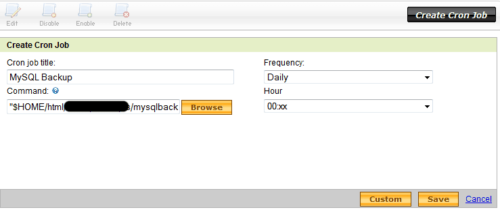
You can setup automatic MySQL database backup by setting up a Cron job. A cron job executes an operation at the set time. An operation could be a single command or a bash script file containing several commands. The backup script is essentially a set of commands that automatically backup MySQL databases. Typically, upon completion the output or error is emailed to the administrator. In fact, providing one of the first things I recommend you do while in "Cron Job Manager" is provide an administrator email. You should see option the left side of the screen to provide one. To setup a cron job, open "Cron Job Manager" from the hosting control panel.
Then, click on "Create Cron Job". Provide a descriptive title for the job that will you recognize what the job does. Choose the "Daily" for frequency and an "Hour" of your choice.
For "Command", click on "Browse", navigate to the folder where you saved the backup script and click "Select". After you are back to the "Create Cron Job" screen, click "Save" to create the job. You should now see the scheduled Cron job in the jobs list.
Your automatic MySQL database backup is almost done.
MySQL Database Backups
The script should automatically run everyday at the time you chose. After a few days have passed you see the most recent daily, weekly, and monthly backups based on how you set the backup parameters. An example is shown below.
That is it, you have now successfully setup automatic MySQL database backup on your GoDaddy Linux hosting. Note that, storing files (as in online storage) in your hosting space is against GoDaddy's terms and conditions even if you have an unlimited hosting account. So it is essential that you periodically delete old backups or configure the script to do it for you automatically.
Backing Up Multiple Databases
What if you have multiple databases? Well there are two ways to backup multiple databases. You can save multiple copies of the script and provide unique database details in the EDIT AREA in each script. Then schedule a separate cron job for each database to be backed up. But remember that GoDaddy only allows up to 10 cron jobs.
To overcome this limitation you can backup multiple databases with a single script file and a cron job. To do it this way, open the script file, copy the contents from the line #############BEGIN EDIT AREA###################### to the last line (ending with fi), and paste the contents after the last line in the same file. Continue pasting until number of copies equal the number of databases you want to backup. The example below shows a script file for 3 databases.
#!/bin/bash
...

#############BEGIN EDIT AREA######################
...
# EDIT AREA for Database 1
...
fi

#############BEGIN EDIT AREA######################
...
# EDIT AREA for Database 2
...
fi

#############BEGIN EDIT AREA######################
...
# EDIT AREA for Database 3
...
fi
Remember to set DBHOSTNAME, DBUSERNAME, DBPASSWORD, DBNAME, BACKUPFOLDER, DELETEFILES, DAILYBACKUP, NUMDAILYBACKUPS, WEEKLYBACKUP, NUMWEEKLYBACKUPS, MONTHLYBACKUP, and NUMMONTHLYBACKUPS in all the EDIT AREAs. The script will run sequentially through the lines and backup one database after another in their respective folders. Because each database is backed up with its own name you could, if you want, provide the same BACKUPFOLDER for every database.
Restore a Backup
As mentioned above backup files are stored as compressed .gz files. This saves a lot of space. For example, the database used in the in the examples above if stored uncompressed is 13 MB. Upon compression it is reduced to about 1.8 MB. If you have a huge database, this can make a great difference. You may directly restore from a compressed backup.
First download the compressed backup to your local computer. Open the phpMyAdmin interface and navigate to the database where you want to restore the backup. If you are not on GoDaddy or any other hosting provider and self-host your website and do not have phpMyAdmin installed, check this post to install it and this post to improve its performance. If you are on GoDaddy or other hosting providers, you should have the link to access phpMyAdmin interface. If the selected database already has entries it is essential that you delete existing content before importing the database or else the imported entries may mess up your database. I normally create a fresh database and then import the backup file into it.
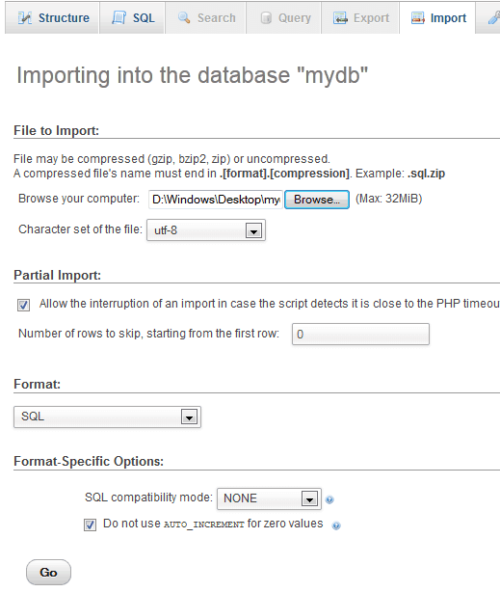
As shown above, from phpMyAdmin, with selected database active, choose "Import" and select the download backup database. Ensure that "SQL is selected for Format. Typically you do not have to change anything else. Click "Go" to import the database. When done, you should see the confirmation message on the screen and the tables of the imported database listed on the left. It's that easy.
Recommended Guides for MySQL and phpMyAdmin:
Remember that, it is extremely important to configure the script correctly. While all care has been taken to avoid accidental deletion of other files, there may be scenarios that may not have been accounted for. However, if configured properly there should not be any issues. Other than that, your automatic MySQL database backup is now set for your GoDaddy shared Linux hosting. Enjoy!






![Ultimate Docker Server: Getting Started with OS Preparation [Part 1] Docker Server Tutorials 1 OS Preparation](https://www.smarthomebeginner.com/images/2024/01/Docker-Series-01-Intro-and-OS-Prep.png)